

Owner's Manual
Page 4
Essential Parts of Your Pfaff 84 17 2 1 Face cover 2 Take-up lever 3 Thread guide 4 Top cover 5 Thread retainer stud 6 Spool pins 7 Bobbin winder 8 Balance wheel 9 Stop motion knob 10 Motor disengaging mechanism 11 Stitch length control 12 Reverse feed control 13 Bed cover 14 Transverse rotary hook 15 Needle plate 16 Sewing foot thumb screw 17 Light switch 18 Stitch width control 19 Needle position lever 20 Needle thread tension 21 Presser bar lifter (on back of machine arm) 22 Needle set screw 23 Sewing foot I
Essential Parts of Your Pfaff 84 17 2 1 Face cover 2 Take-up lever 3 Thread guide 4 Top cover 5 Thread retainer stud 6 Spool pins 7 Bobbin winder 8 Balance wheel 9 Stop motion knob 10 Motor disengaging mechanism 11 Stitch length control 12 Reverse feed control 13 Bed cover 14 Transverse rotary hook 15 Needle plate 16 Sewing foot thumb screw 17 Light switch 18 Stitch width control 19 Needle position lever 20 Needle thread tension 21 Presser bar lifter (on back of machine arm) 22 Needle set screw 23 Sewing foot I

Owner's Manual
Page 5
Essential Parts of Your Pfaff 85 12 3 4 5 -G- 7 II I fI 8 9 15- 14 1 Face cover 2 Take-up lever 3 Thread guide 4 Top cover 5 Thread retainer stud 6 Spool pins 7 Bobbin winder 8 Balance wheel 9 Stop motion knob 10 Motor disengaging mechanism 11 Stitch length control 12 Reverse feed control 13 Free arm 14 Free arm cover (enclosing transverse rotary hook) 15 Needle plate 16 Sewing foot thumb screw 17 Light switch 18 Stitch width control 19 Needle position lever 20 Needle thread tension 21 Presser bar lifter (On back of machine arm) 22 Needle set screw 23 Sewing foot
Essential Parts of Your Pfaff 85 12 3 4 5 -G- 7 II I fI 8 9 15- 14 1 Face cover 2 Take-up lever 3 Thread guide 4 Top cover 5 Thread retainer stud 6 Spool pins 7 Bobbin winder 8 Balance wheel 9 Stop motion knob 10 Motor disengaging mechanism 11 Stitch length control 12 Reverse feed control 13 Free arm 14 Free arm cover (enclosing transverse rotary hook) 15 Needle plate 16 Sewing foot thumb screw 17 Light switch 18 Stitch width control 19 Needle position lever 20 Needle thread tension 21 Presser bar lifter (On back of machine arm) 22 Needle set screw 23 Sewing foot
Owner's Manual
Page 7
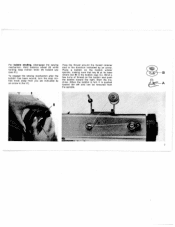
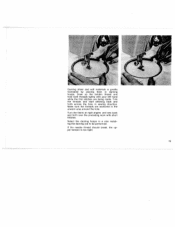
.... For bobbin winding, disengage the sewing mechanism. Place a bobbin on the bobbin and push the bobbin toward the left and can be removed from you (see ill.). To engage the sewing mechanism after the bobbin has been wound, turn the stop motion knob (9) toward you (as indicated by an arrow. Pass the thread around the thread retainer stud in the direction indicated by...
.... For bobbin winding, disengage the sewing mechanism. Place a bobbin on the bobbin and push the bobbin toward the left and can be removed from you (see ill.). To engage the sewing mechanism after the bobbin has been wound, turn the stop motion knob (9) toward you (as indicated by an arrow. Pass the thread around the thread retainer stud in the direction indicated by...
Owner's Manual
Page 14
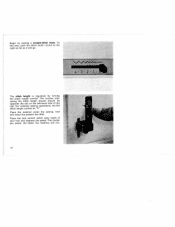
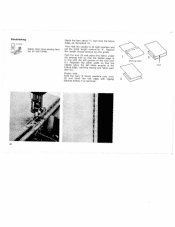
The stitch length is regulated by sewing a straight-stitch seam. For ordinary sewing operations, set the stitch length control on the left-hand side of your foot and depress the pedal. Begin by turning the stitch length control. The harder you press, the faster the machine will go. Place the foot control within easy reach of the slot. Place the material under the sewing foot and lower the presser bar lifter. To this end, push the stitch width control to the right as far as it will run. 14 The number indi cating the stitch length chosen should be opposite the dot on "2".
The stitch length is regulated by sewing a straight-stitch seam. For ordinary sewing operations, set the stitch length control on the left-hand side of your foot and depress the pedal. Begin by turning the stitch length control. The harder you press, the faster the machine will go. Place the foot control within easy reach of the slot. Place the material under the sewing foot and lower the presser bar lifter. To this end, push the stitch width control to the right as far as it will run. 14 The number indi cating the stitch length chosen should be opposite the dot on "2".
Owner's Manual
Page 16
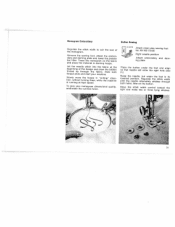
... knurled screw on the upper tension dial. Turn this screw right for a tighter tension, or left for sewing. The higher the number, the tighter the tension. For ordinary sewing operations, the upper tension should be overcome when pulling the thread. bottom top Upper tension too loose or lower tension too tight. Numbers 0 to 10 indicate different degrees of the material. This tension is set correctly if a slight resistance has to adjust the bobbin thread tension. bottom...
... knurled screw on the upper tension dial. Turn this screw right for a tighter tension, or left for sewing. The higher the number, the tighter the tension. For ordinary sewing operations, the upper tension should be overcome when pulling the thread. bottom top Upper tension too loose or lower tension too tight. Numbers 0 to 10 indicate different degrees of the material. This tension is set correctly if a slight resistance has to adjust the bobbin thread tension. bottom...
Owner's Manual
Page 17
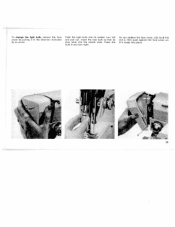
... (see ill.). Tighten screw 22 securely. For elastic fabrics, use ordinary sewing foot No. 93-838 954-00 instead of the needle clamp. To change the sewing foot, bring the needle bar to your machine contains several sewing feet for special sewing operations. The accessory box which belongs to its shank faces toward the back. The new foot is at tached in the reverse order. To change the needle, bring the needle to its highest point...
... (see ill.). Tighten screw 22 securely. For elastic fabrics, use ordinary sewing foot No. 93-838 954-00 instead of the needle clamp. To change the sewing foot, bring the needle bar to your machine contains several sewing feet for special sewing operations. The accessory box which belongs to its shank faces toward the back. The new foot is at tached in the reverse order. To change the needle, bring the needle to its highest point...
Owner's Manual
Page 19
... Trim the threads and start stitching back and forth across the hole in a size match ing the darning job to be performed. If the needle thread should break, the up the bobbin thread and hold both threads lightly with short stitches. Make sure the threads are being made. Select the darning hoops in sewing direction. Turn the fabric at right angles and sew back and forth over the preceding work with your left...
... Trim the threads and start stitching back and forth across the hole in a size match ing the darning job to be performed. If the needle thread should break, the up the bobbin thread and hold both threads lightly with short stitches. Make sure the threads are being made. Select the darning hoops in sewing direction. Turn the fabric at right angles and sew back and forth over the preceding work with your left...

Owner's Manual
Page 22
... an elastic hem on p. 25. 22 Hemming 847 551 Attach hemmer foot No. 93-847 551-00 (which can be obtained from your right hand (see ill.), making a hem about 1/8 inch wide and seve ral inches long. Make 3 to 4 straight stitches to 2 Fold the beginning of the foot. Feed the fabric edge into the hemmer by pulling both threads backwards, as instructed on soft fabrics, use zigzag stitches. Set the stitch...
... an elastic hem on p. 25. 22 Hemming 847 551 Attach hemmer foot No. 93-847 551-00 (which can be obtained from your right hand (see ill.), making a hem about 1/8 inch wide and seve ral inches long. Make 3 to 4 straight stitches to 2 Fold the beginning of the foot. Feed the fabric edge into the hemmer by pulling both threads backwards, as instructed on soft fabrics, use zigzag stitches. Set the stitch...

Owner's Manual
Page 23
... aft 85 Twin needles for needle distances of material used for heavy materials, 3 cording foot No. 93-847 675-00 with two needle threads. Stitch length: 1.5 to draw up the The smallest distance between a make different size cording, the follow ing twin needles and supplied at extra cost. with the ordinary sewing foot is abt. 1/4 inch. When threading the needles, lead each thread between cording seams made with grooves for medium-heavy fabrics, and 5 cording foot...
... aft 85 Twin needles for needle distances of material used for heavy materials, 3 cording foot No. 93-847 675-00 with two needle threads. Stitch length: 1.5 to draw up the The smallest distance between a make different size cording, the follow ing twin needles and supplied at extra cost. with the ordinary sewing foot is abt. 1/4 inch. When threading the needles, lead each thread between cording seams made with grooves for medium-heavy fabrics, and 5 cording foot...

Owner's Manual
Page 25
... fabrics are best overcast with Zigzag Stitches 838 954 Attach ordinary sewing foot. This will cover the fabric edge securely. 25 Overcasting Edges with a zigzag stitch of light and mediumweight fabrics, set the machine for its edge. Make sure the needle takes one stitch into the fabric and the other over its maxi mum stitch width. The stitch length is outside the fabric. Stitch length: 2 To overcast the edges of medium width. The Zigzag Seam The stitch...
... fabrics are best overcast with Zigzag Stitches 838 954 Attach ordinary sewing foot. This will cover the fabric edge securely. 25 Overcasting Edges with a zigzag stitch of light and mediumweight fabrics, set the machine for its edge. Make sure the needle takes one stitch into the fabric and the other over its maxi mum stitch width. The stitch length is outside the fabric. Stitch length: 2 To overcast the edges of medium width. The Zigzag Seam The stitch...

Owner's Manual
Page 26
... are patched in the same manner. 26 At the corners, stop the machines with the needle down in the middle of the patch. Elastic materials are stitched twice (see ill.). Cut a patch about 1/3 inch larger than the hole and place it under the hole, matching its slot and stitch along the fabric yarns. uInserting Patches 838 954 Attach ordinary sewing foot.
... are patched in the same manner. 26 At the corners, stop the machines with the needle down in the middle of the patch. Elastic materials are stitched twice (see ill.). Cut a patch about 1/3 inch larger than the hole and place it under the hole, matching its slot and stitch along the fabric yarns. uInserting Patches 838 954 Attach ordinary sewing foot.

Owner's Manual
Page 29
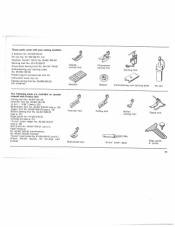
For sewing buttonholes, you can obtain buttonhole sewing foot No. 94-847 616-00 from your dealer. 3 4 For heavier threads, slightly increase the stitch length. Sewing Buttonholes 4 Attach all-purpose sewing foot No. 93-100 179-00 Flick the needle to its left groove of the sewing foot. To obtain more prominent buttonholes, place a filler cord of medium size in the left position and put the stitch width control in notch R 1 (see Figs. 2 and 3), When using No. 50 embroidery thread, set the stitch length control so that the white dot is opposite the groove (see Fig. 4).
For sewing buttonholes, you can obtain buttonhole sewing foot No. 94-847 616-00 from your dealer. 3 4 For heavier threads, slightly increase the stitch length. Sewing Buttonholes 4 Attach all-purpose sewing foot No. 93-100 179-00 Flick the needle to its left groove of the sewing foot. To obtain more prominent buttonholes, place a filler cord of medium size in the left position and put the stitch width control in notch R 1 (see Figs. 2 and 3), When using No. 50 embroidery thread, set the stitch length control so that the white dot is opposite the groove (see Fig. 4).
Owner's Manual
Page 31
... the needle stitch into the fabric at high speed. Sew on the fabric and place the material in darning hoops. Raise the needle, but retain the foot in writing" direc tion, without turning them, while the machine is running at the beginning of the monogram. Monogram Embroidery Button Sewing Regulate the stitch width to suit the size of the design and draw the bobbin thread up through both thread ends and start your monogram...
... the needle stitch into the fabric at high speed. Sew on the fabric and place the material in darning hoops. Raise the needle, but retain the foot in writing" direc tion, without turning them, while the machine is running at the beginning of the monogram. Monogram Embroidery Button Sewing Regulate the stitch width to suit the size of the design and draw the bobbin thread up through both thread ends and start your monogram...
Owner's Manual
Page 32
... merely one grade. Baste the hem about I16 inch from the fabric edge, as illustrated (1). Then flick the needle to its right position and set the stitch length control at "4". Blindstitching I..93-IOO79 Apply clear-view sewing foot No. 91-100 179-00. Reduce the needle thread tension by one fabric yarn (see Basting seam ill.). Fold the hem (2) and place the fabric under the sewing toot so that the...
... merely one grade. Baste the hem about I16 inch from the fabric edge, as illustrated (1). Then flick the needle to its right position and set the stitch length control at "4". Blindstitching I..93-IOO79 Apply clear-view sewing foot No. 91-100 179-00. Reduce the needle thread tension by one fabric yarn (see Basting seam ill.). Fold the hem (2) and place the fabric under the sewing toot so that the...

Owner's Manual
Page 33
Sewing Curtains - 938 954 Stitch length: 2.5 to 3 Stitch width: medium Use a thin needle (see Needle and Thread Chart). Ease the needle thread tension somewhat. Additional ornamental effects are illustrated on this page. Ornamental Sewing You can make exciting fashion-stitch designs by sewing over a filler cord. Hold synthetic materials a little taut while sewing. 33 Some of the designs you can make are obtained by varying stitch length, stitch width and needle position.
Sewing Curtains - 938 954 Stitch length: 2.5 to 3 Stitch width: medium Use a thin needle (see Needle and Thread Chart). Ease the needle thread tension somewhat. Additional ornamental effects are illustrated on this page. Ornamental Sewing You can make exciting fashion-stitch designs by sewing over a filler cord. Hold synthetic materials a little taut while sewing. 33 Some of the designs you can make are obtained by varying stitch length, stitch width and needle position.
Owner's Manual
Page 35
As you replace the face cover, slip tip d into slot c, then push against the face cover un til it in and turn left and pull out. Press the bulb in the direction indicated by pulling it snaps into the socket slots. Push the light bulb into its pins slide into place. 35 To change the light bulb, remove the face cover by an arrow. Insert the new bulb so that its socket, turn right.
As you replace the face cover, slip tip d into slot c, then push against the face cover un til it in and turn left and pull out. Press the bulb in the direction indicated by pulling it snaps into the socket slots. Push the light bulb into its pins slide into place. 35 To change the light bulb, remove the face cover by an arrow. Insert the new bulb so that its socket, turn right.

Owner's Manual
Page 36
To this end, re move the needle, the sewing foot and the bobbin case with a soft brush. Pfaff 84 machines are tilted back. On port able machines, loosen the screw on the bottom of the arm (1 & 2). I 1 On Piaft 85 machines, loosen the set screw, lift the front of the free arm cover and pull the cover out lengthwise of the machine base and tilt the machine back cautiously (3). 36 - 2 Machine Care From time to time, clean the parts in the machine arm and in the vicinity of the sew ing hook with the bobbin.
To this end, re move the needle, the sewing foot and the bobbin case with a soft brush. Pfaff 84 machines are tilted back. On port able machines, loosen the screw on the bottom of the arm (1 & 2). I 1 On Piaft 85 machines, loosen the set screw, lift the front of the free arm cover and pull the cover out lengthwise of the machine base and tilt the machine back cautiously (3). 36 - 2 Machine Care From time to time, clean the parts in the machine arm and in the vicinity of the sew ing hook with the bobbin.

Owner's Manual
Page 38
... pieces of oil into the raceway, jerk the balance wheel back and then rock it is sufficient to its central position, and setting the stitch length control on 2. Trouble Shooting When operated properly, your sewing job (buttonhole sewing or darning, for instance) by switching the machine back to straight stitching, flicking the needle position lever to put a drop of thread wedged between the tension discs. • The Pfafl rotary hook will hardly...
... pieces of oil into the raceway, jerk the balance wheel back and then rock it is sufficient to its central position, and setting the stitch length control on 2. Trouble Shooting When operated properly, your sewing job (buttonhole sewing or darning, for instance) by switching the machine back to straight stitching, flicking the needle position lever to put a drop of thread wedged between the tension discs. • The Pfafl rotary hook will hardly...
Owner's Manual
Page 39
...parts come with your sewing machine: 3 bobbins No. 93-009 033-21 Oil can No. 91-129 449-91, full Needles, System 130 R, No. 93-847 990-00 Darning foot No. 93-102 826-91 All-purpose sewing foot No. 93-1 00 179-00 Embroidering and darning plate No. 93-030 125-45 Plastic bag for accessories (not ill.) Instruction book (not ill.) Zigzag sewing foot... specify the ten-digit part number Hemmer foot 4 Buttonhole foot 4J All-purpose sewing foot Darning foot Bobbin Embroidering and darning plate Oil can I Felling foot Button sewing foot Zipper foot "Arrow" seam ripper Edge guide, w screw 39
...parts come with your sewing machine: 3 bobbins No. 93-009 033-21 Oil can No. 91-129 449-91, full Needles, System 130 R, No. 93-847 990-00 Darning foot No. 93-102 826-91 All-purpose sewing foot No. 93-1 00 179-00 Embroidering and darning plate No. 93-030 125-45 Plastic bag for accessories (not ill.) Instruction book (not ill.) Zigzag sewing foot... specify the ten-digit part number Hemmer foot 4 Buttonhole foot 4J All-purpose sewing foot Darning foot Bobbin Embroidering and darning plate Oil can I Felling foot Button sewing foot Zipper foot "Arrow" seam ripper Edge guide, w screw 39
Owner's Manual
Page 40
... the Face Cover Reverse Sewing Sewing Buttonholes Sewing Curtains Straight Stitching Trouble Shooting Upper Threading Winding the Bobbin Workplate of Pfaff 85 . . Workplate of Pfaff 84 . . Contents Page Accessories . Cording Darning Darning Foot Drawing Up the Bobbin Thread Dropping Electrical the Machine Equipment Feed . Zigzag Stitching Zipper Insertion 21 Foot 12 14 16 .6 35 15 29/30 33 14 38 11 .7 10 10 25 20 Blindstitching Button Sewing Changing the Light Bulb Changing the Needle Changing the Needle Position Changing the Sewing Foot Cleaning . Foot Control 39 34...
... the Face Cover Reverse Sewing Sewing Buttonholes Sewing Curtains Straight Stitching Trouble Shooting Upper Threading Winding the Bobbin Workplate of Pfaff 85 . . Workplate of Pfaff 84 . . Contents Page Accessories . Cording Darning Darning Foot Drawing Up the Bobbin Thread Dropping Electrical the Machine Equipment Feed . Zigzag Stitching Zipper Insertion 21 Foot 12 14 16 .6 35 15 29/30 33 14 38 11 .7 10 10 25 20 Blindstitching Button Sewing Changing the Light Bulb Changing the Needle Changing the Needle Position Changing the Sewing Foot Cleaning . Foot Control 39 34...


