
Owner's Manual
Page 15
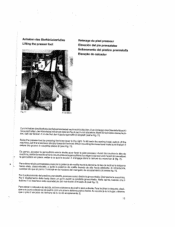
....ecAniatnotae2dse(dlvaeèniatnesce.liAfnilga.rin1Iat1r)om. gEenindsecshiOebbeerntedilasrMauafsacchhi Raise the presser foot by pressing the knee machine, pull the knee lever sharply towards enters the groove in coupling sleeve 2 (see lever to the right. To tilt back the sewing the front. dauqcuirilnaa, PbPueelrrlioliinsreoibl1laelvstiaammineesnnetrtooiscddaeelllnapeilteleadsistnacoatnpiraraelrametuisurtnaofdpfaeo,l'ipnmreaamnviaecnroteittvoIaedrps'roienddneeetsstttaorag2Iian(vogecindciohfciiecgl.hlai1e.1)lN.laelDlaissipnisnetrai...
....ecAniatnotae2dse(dlvaeèniatnesce.liAfnilga.rin1Iat1r)om. gEenindsecshiOebbeerntedilasrMauafsacchhi Raise the presser foot by pressing the knee machine, pull the knee lever sharply towards enters the groove in coupling sleeve 2 (see lever to the right. To tilt back the sewing the front. dauqcuirilnaa, PbPueelrrlioliinsreoibl1laelvstiaammineesnnetrtooiscddaeelllnapeilteleadsistnacoatnpiraraelrametuisurtnaofdpfaeo,l'ipnmreaamnviaecnroteittvoIaedrps'roienddneeetsstttaorag2Iian(vogecindciohfciiecgl.hlai1e.1)lN.laelDlaissipnisnetrai...
Owner's Manual
Page 21
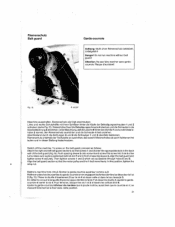
... off the machine. Align the belt guard section so that screws 1 and 2 enterthe appropriate slots in front of the belt guard (Fig. 15). Mettre Ia machine hors circuit....2 schieben (siehe Fig. 15). Push spacing sleeve 3 onto screw 4 and screw this position, tighten the wing nut. Then tighten screws 1 and 2 which are accessible through holes 8 and 9. Abschliel3end durch die Bohrungen 8 und 9 die ...Gewindebohrung 5 eindrehen. To screw on the belt guard, proceed as follows: Attach the right and left belt guard sections so that the motor pulley and the V-belt move freely...
... off the machine. Align the belt guard section so that screws 1 and 2 enterthe appropriate slots in front of the belt guard (Fig. 15). Mettre Ia machine hors circuit....2 schieben (siehe Fig. 15). Push spacing sleeve 3 onto screw 4 and screw this position, tighten the wing nut. Then tighten screws 1 and 2 which are accessible through holes 8 and 9. Abschliel3end durch die Bohrungen 8 und 9 die ...Gewindebohrung 5 eindrehen. To screw on the belt guard, proceed as follows: Attach the right and left belt guard sections so that the motor pulley and the V-belt move freely...


