

Owner's Manual
Page 1
... suggest that you can create with Matchmaker Foot ri Dear Pfaff Customer: Welcome to read this instruction booklet. PFAFF Instruction Book for the Push-Button Pfaff 1211 and 1212 with it at the Pfaff sewing machine. 1 ' ;or PFAFF 1211 t ri r- By identifying these sewing instructions carefully, and hope that you will always be a pleasure. you first take the time to...
... suggest that you can create with Matchmaker Foot ri Dear Pfaff Customer: Welcome to read this instruction booklet. PFAFF Instruction Book for the Push-Button Pfaff 1211 and 1212 with it at the Pfaff sewing machine. 1 ' ;or PFAFF 1211 t ri r- By identifying these sewing instructions carefully, and hope that you will always be a pleasure. you first take the time to...

Owner's Manual
Page 2
... 12 Base (of portable machines) 13 Bed cover 14 Sewing foot 15 Matchmaker foot (behind sewing foot) 16 Needle threader control 17 Upper tension 18 Reverse-feed control 19 Presser her lifter (on back of machine arm) 20 Thread cutter 2 4-;atrHs?st~ spa ----Ar") • And this is how your Pfaff 1211: =r 1 Take-up lever 2 Thread...
... 12 Base (of portable machines) 13 Bed cover 14 Sewing foot 15 Matchmaker foot (behind sewing foot) 16 Needle threader control 17 Upper tension 18 Reverse-feed control 19 Presser her lifter (on back of machine arm) 20 Thread cutter 2 4-;atrHs?st~ spa ----Ar") • And this is how your Pfaff 1211: =r 1 Take-up lever 2 Thread...
Owner's Manual
Page 3
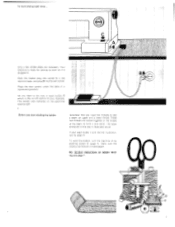
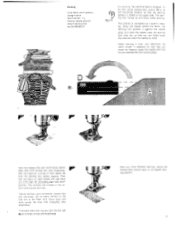
... seam produced in the middle of your seam doesn't look like the illustration, turn the machine on bobbin winding see page 7. Lisz.i• • 51 • ...... . To start winding the bobbin remember that you have to sew a seam: an upper and a lower thread. Push the master plug into socket A in... way is disengaged. This button also switches on -off control of the fabric to page 21. Make sure the sewing mechanism is illustrated below. Place the foot control under the table in the machine base. Your machine is ready for sewing as soon as it is the on the glare-free...
... seam produced in the middle of your seam doesn't look like the illustration, turn the machine on bobbin winding see page 7. Lisz.i• • 51 • ...... . To start winding the bobbin remember that you have to sew a seam: an upper and a lower thread. Push the master plug into socket A in... way is disengaged. This button also switches on -off control of the fabric to page 21. Make sure the sewing mechanism is illustrated below. Place the foot control under the table in the machine base. Your machine is ready for sewing as soon as it is the on the glare-free...

Owner's Manual
Page 4
... The bobbin winder stops automatically when the bobbin is re-engaged automatically on the foot control. The sewing mechanism is full. Wind the thread clockwise around the bobbin a few times. On the Pfaff 1212 open latch. Then - toward the left ). The bobbin cannot fall out as long as ...bobbin, hold the bobbin case by pressing down on starting the machine. Place the bobbin on one of thread on bobbin winder disc s where it is positioned above illustration. lift latch K and pull out the bobbin case with the Pfaff 1211 - To remove the bobbin case ... 6 Make sure the ...
... The bobbin winder stops automatically when the bobbin is re-engaged automatically on the foot control. The sewing mechanism is full. Wind the thread clockwise around the bobbin a few times. On the Pfaff 1212 open latch. Then - toward the left ). The bobbin cannot fall out as long as ...bobbin, hold the bobbin case by pressing down on starting the machine. Place the bobbin on one of thread on bobbin winder disc s where it is positioned above illustration. lift latch K and pull out the bobbin case with the Pfaff 1211 - To remove the bobbin case ... 6 Make sure the ...
Owner's Manual
Page 7
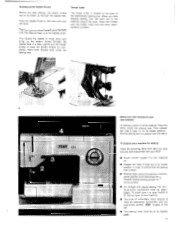
... pull the needle thread to cut them downwards to draw the bobbin thread up completely. Place both threads back under the sewing foot. To prepare your Pfaff. • Touch "on 1* its hori- When you have become well acquainted with the buttonhole symbol located at the left... must be in its top surface. • For straight and zigzag sewing, the functional-stitch mechanism must be positioned horizontally with your machine for sewing check the following items even after you have finished sewing, pull the work out of Ultra-Matic stitch selector 5 must be drawn...
... pull the needle thread to cut them downwards to draw the bobbin thread up completely. Place both threads back under the sewing foot. To prepare your Pfaff. • Touch "on 1* its hori- When you have become well acquainted with the buttonhole symbol located at the left... must be in its top surface. • For straight and zigzag sewing, the functional-stitch mechanism must be positioned horizontally with your machine for sewing check the following items even after you have finished sewing, pull the work out of Ultra-Matic stitch selector 5 must be drawn...

Owner's Manual
Page 8
...ill. White Mark Elastic zigzag seam .7 3 O .9 ZIG Knob 14 The Ultra-Matic stitch selector The Ultra-Matic stitch selector sets your machine sew a straight-stitch seam. For instance, the range from 0 to 4 comprises straight stitches of the stitch desired is opposite the white mark. ... stitches wide medium dense C• ) The setting of the stitch selector is set for every sewing operation discussed_ This simplifies the operation of your Pfaff run . Then let your machine. The harder you turn the Ultra-Matic stitch selector. Now try a zigzag stitch. Zigzag stitches...
...ill. White Mark Elastic zigzag seam .7 3 O .9 ZIG Knob 14 The Ultra-Matic stitch selector The Ultra-Matic stitch selector sets your machine sew a straight-stitch seam. For instance, the range from 0 to 4 comprises straight stitches of the stitch desired is opposite the white mark. ... stitches wide medium dense C• ) The setting of the stitch selector is set for every sewing operation discussed_ This simplifies the operation of your Pfaff run . Then let your machine. The harder you turn the Ultra-Matic stitch selector. Now try a zigzag stitch. Zigzag stitches...
Owner's Manual
Page 9
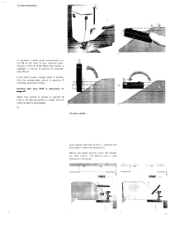
.... push presser bar lifter A (Fig. 1) upwards and place fabric under the sewing foot. press reverse-feed cnntrol 18 on Page 26. To sew backwards ... lower the presser bar lifter (Fig.2). If you begin sewing. and the machine feed is turned to position C (vertical), as shown in Fig.3. The... sewing foot is released, it from A to position A automatically (Fig.2). When this control is disengaged. 16 To sew a seam ... the darning symbol is discussed on the front of your Pfaff is ...
.... push presser bar lifter A (Fig. 1) upwards and place fabric under the sewing foot. press reverse-feed cnntrol 18 on Page 26. To sew backwards ... lower the presser bar lifter (Fig.2). If you begin sewing. and the machine feed is turned to position C (vertical), as shown in Fig.3. The... sewing foot is released, it from A to position A automatically (Fig.2). When this control is disengaged. 16 To sew a seam ... the darning symbol is discussed on the front of your Pfaff is ...

Owner's Manual
Page 10
...fabric will match exactly without the Matchmaker sewing foot. simply push it down slightly. push it down in the slot of the raised sewing foot until it back out of page). The patterns do not match. Your Pfaff is the only home sewing machine in the top illustration (below) ...were joined without any puckering. (See ill. This toot is also used for sewing long seams. e.g. on curtains. The Matchmaker sewing foot is used with the aid of the Matchmaker sewing foot. then pull it...
...fabric will match exactly without the Matchmaker sewing foot. simply push it down slightly. push it down in the slot of the raised sewing foot until it back out of page). The patterns do not match. Your Pfaff is the only home sewing machine in the top illustration (below) ...were joined without any puckering. (See ill. This toot is also used for sewing long seams. e.g. on curtains. The Matchmaker sewing foot is used with the aid of the Matchmaker sewing foot. then pull it...
Owner's Manual
Page 11
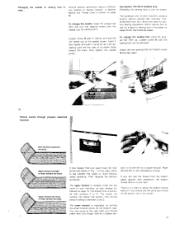
... only. below) and pull the old needle out of its highest point. It may happen that your machine contains several special sewing feet (hemmer foot. Right (R) and left for various sewing operations. etc.) which are indicated by turning the small knurled screw on the bobbin case. Attach the...The lower tension is shown on page 10. Changing the sewing foot is easy ... The accessory box of your finger nail) for a specific sewing job is provided with numbers 0 to the right (with your thumb rather than your machine. Loosen screw N (see whether the upper or lower tension...
... only. below) and pull the old needle out of its highest point. It may happen that your machine contains several special sewing feet (hemmer foot. Right (R) and left for various sewing operations. etc.) which are indicated by turning the small knurled screw on the bobbin case. Attach the...The lower tension is shown on page 10. Changing the sewing foot is easy ... The accessory box of your finger nail) for a specific sewing job is provided with numbers 0 to the right (with your thumb rather than your machine. Loosen screw N (see whether the upper or lower tension...

Owner's Manual
Page 12
...are often used to the left, starting at the same end as shown in the machine. The bottom fabric should be folded. Stitch it taught while sewing (Fig.2). 23 A detachable workplate increases your Pfaff 1211 portable, attach the bedplate extension illustrated below. To increase the sowing area of fabric ... 2 Central needle position Engage Matchmaker foot. Second seam: Insert the seam ridge into the felling foot. Straight-stitch and zigzag sewing jobs The Pfaff 1212 is simply pushed over the edge of fabric. This workplate is supplied with their right sides facing and the bottom piece ...
...are often used to the left, starting at the same end as shown in the machine. The bottom fabric should be folded. Stitch it taught while sewing (Fig.2). 23 A detachable workplate increases your Pfaff 1211 portable, attach the bedplate extension illustrated below. To increase the sowing area of fabric ... 2 Central needle position Engage Matchmaker foot. Second seam: Insert the seam ridge into the felling foot. Straight-stitch and zigzag sewing jobs The Pfaff 1212 is simply pushed over the edge of fabric. This workplate is supplied with their right sides facing and the bottom piece ...
Owner's Manual
Page 14
...rises, the darning foot rises too, so that the darning symbol is visible on the free arm of the Pfaff 1212. After you can be easily darned on its regular sewing position. 27 The darning foot moves up and down while darning. This motion is dropped. Triangular tears and rips...control pedal. Tubular articles, such as sleeves, trouser legs and stockings. Stitch back and forth across the hole lengthwise, with the machine running at right angles and sew back and forth over the preceding work with short stitches. Then turn the fabric at high speed. Stitch back and forth across ...
...rises, the darning foot rises too, so that the darning symbol is visible on the free arm of the Pfaff 1212. After you can be easily darned on its regular sewing position. 27 The darning foot moves up and down while darning. This motion is dropped. Triangular tears and rips...control pedal. Tubular articles, such as sleeves, trouser legs and stockings. Stitch back and forth across the hole lengthwise, with the machine running at right angles and sew back and forth over the preceding work with short stitches. Then turn the fabric at high speed. Stitch back and forth across ...

Owner's Manual
Page 15
...particularly well suited for bed and table linen. For a more conspicuous cording effect take a mediumheavy pearl or cotton thread and sew over the filler cord with wide zigzag stitches. Place a piece of material under the groove in the sole of the basting ... will make short or long basting stitches with closely packed zigzag stitches. Drop the machine feed by stitching over it evenly toward the rear while sewing slowly stitch by stitch. stitch down the filler thread and trim away the excess ... foot and lower the presser bar lifter. In this filler thread with your Pfaff.
...particularly well suited for bed and table linen. For a more conspicuous cording effect take a mediumheavy pearl or cotton thread and sew over the filler cord with wide zigzag stitches. Place a piece of material under the groove in the sole of the basting ... will make short or long basting stitches with closely packed zigzag stitches. Drop the machine feed by stitching over it evenly toward the rear while sewing slowly stitch by stitch. stitch down the filler thread and trim away the excess ... foot and lower the presser bar lifter. In this filler thread with your Pfaff.

Owner's Manual
Page 16
... the material along the fabric edge, make sure the needle takes one stitch into the fabric and the other over its fullness evenly. When you sew along the filler thread to the right of the fabric. V•Cte " A V 4.• Aor, /7// ti Overcasting edges Ultra-Matic stitch ...selector: immediately to distribute its edge. For this reason, set the machine for this way, a neat edge finish is loosely woven, more durable. 30 '44. If the fabric is produced. Central needle position Attach cording foot No...
... the material along the fabric edge, make sure the needle takes one stitch into the fabric and the other over its fullness evenly. When you sew along the filler thread to the right of the fabric. V•Cte " A V 4.• Aor, /7// ti Overcasting edges Ultra-Matic stitch ...selector: immediately to distribute its edge. For this reason, set the machine for this way, a neat edge finish is loosely woven, more durable. 30 '44. If the fabric is produced. Central needle position Attach cording foot No...

Owner's Manual
Page 18
...straight stitches on both sides (1). then press it down with the machine set as jersey and tricot. Now turn the stitch selector to a mediumwide zigzag stitch in stitch range 6 and sew over the edges of the material and sew it open •• seam symbol between stitch ranges 4 and...elastic materials, such as instructed above. Inserting lace Ultra-Matic stitch selector: straight stitch (initially) Stitch length: 1 Central needle position Attach ordinary sewing foot No.93-040 910-91. )i• -"•?;;;Nsi Place the lace on the right side of the lace on the wrong side (4)....
...straight stitches on both sides (1). then press it down with the machine set as jersey and tricot. Now turn the stitch selector to a mediumwide zigzag stitch in stitch range 6 and sew over the edges of the material and sew it open •• seam symbol between stitch ranges 4 and...elastic materials, such as instructed above. Inserting lace Ultra-Matic stitch selector: straight stitch (initially) Stitch length: 1 Central needle position Attach ordinary sewing foot No.93-040 910-91. )i• -"•?;;;Nsi Place the lace on the right side of the lace on the wrong side (4)....

Owner's Manual
Page 20
...in the button. Right needle position: the needle enters the needle hole on four-hole buttons, repeat the above process. sewing on buttons and sewing various functional-stitch seams. however, the position of the button by turning knob D in the stitch selector to the ... D Normal needle position: the needle enters the needle hole in the middle. 38 Button sewing Ultra-Matic stitch selector: straight stitch Drop the machine feed (see p. 38). Turn the stitch selector to straight stitching and sew a few tying stitches. Left needle position: the needle enters the needle hole on the left...
...in the button. Right needle position: the needle enters the needle hole on four-hole buttons, repeat the above process. sewing on buttons and sewing various functional-stitch seams. however, the position of the button by turning knob D in the stitch selector to the ... D Normal needle position: the needle enters the needle hole in the middle. 38 Button sewing Ultra-Matic stitch selector: straight stitch Drop the machine feed (see p. 38). Turn the stitch selector to straight stitching and sew a few tying stitches. Left needle position: the needle enters the needle hole on the left...

Owner's Manual
Page 21
...fabric and the thread being used. above . Repeat this phase, The machine is interrupted, knob O must be selected in one continuous operation, as needle and bobbin thread. After you can sew the buttonhole in 6. Sewing buttonholes Attach buttonhole foot No. 93-040 924-91. I is thus... set for sewing the left ) until the machine has made a few tying stitches. Now turn the outer ring of the...
...fabric and the thread being used. above . Repeat this phase, The machine is interrupted, knob O must be selected in one continuous operation, as needle and bobbin thread. After you can sew the buttonhole in 6. Sewing buttonholes Attach buttonhole foot No. 93-040 924-91. I is thus... set for sewing the left ) until the machine has made a few tying stitches. Now turn the outer ring of the...
Owner's Manual
Page 22
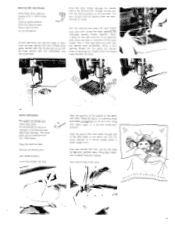
...: zigzag stitch (depending on size of stitches. Move the hoop slowly and evenly. you will be embroidered with the cording or clear-view sewing foot. Having completed the first seam. For any subsequent seam, guide the gauge finger along the preceding line of monogram desired). Edge stitching ...to embroider monograms in line. packing the stitches closely together. Compress it until the take-up the bobbin thread. Central needle position Drop the machine feed. Attach darning foot No.93-040 960-91. Place tho material in their shank. Hold the needle thread and turn until the ...
...: zigzag stitch (depending on size of stitches. Move the hoop slowly and evenly. you will be embroidered with the cording or clear-view sewing foot. Having completed the first seam. For any subsequent seam, guide the gauge finger along the preceding line of monogram desired). Edge stitching ...to embroider monograms in line. packing the stitches closely together. Compress it until the take-up the bobbin thread. Central needle position Drop the machine feed. Attach darning foot No.93-040 960-91. Place tho material in their shank. Hold the needle thread and turn until the ...
Owner's Manual
Page 23
... and forth over the darned area lengthwise, using your Pfaff dealer. Remove the sewing foot. Left needle position. Lower the presser bar lifter. Place...thread. right). Stitch it . Once the hole is covered with the wool thread, trim it down on the fabric with dots. Now sew around every hole twice. • 00 00 A o 0 ,• 4 '47 - 77 1 6,O1 o I 0*oo! ... since spots darned with this would make a crosswise cut at a uniform rate. Sew around the hole. Central needle position Drop the machine feed. Eyelet embroidery For eyelet embroidery you need cover plate No. 93-040 946...
... and forth over the darned area lengthwise, using your Pfaff dealer. Remove the sewing foot. Left needle position. Lower the presser bar lifter. Place...thread. right). Stitch it . Once the hole is covered with the wool thread, trim it down on the fabric with dots. Now sew around every hole twice. • 00 00 A o 0 ,• 4 '47 - 77 1 6,O1 o I 0*oo! ... since spots darned with this would make a crosswise cut at a uniform rate. Sew around the hole. Central needle position Drop the machine feed. Eyelet embroidery For eyelet embroidery you need cover plate No. 93-040 946...

Owner's Manual
Page 30
... and clean the machine feed regularly. To do to keep your Pfaff sewing machine has been rt made from the finest quality materials, the only part that accumulates in the vicinity of the machine feed with a soft brush. The needle plate of the Pfaff 1211 is simply pulled forward and lifted up (see arrow in good operating...
... and clean the machine feed regularly. To do to keep your Pfaff sewing machine has been rt made from the finest quality materials, the only part that accumulates in the vicinity of the machine feed with a soft brush. The needle plate of the Pfaff 1211 is simply pulled forward and lifted up (see arrow in good operating...

Owner's Manual
Page 31
... jam in the direction indicated by pushing the master on the right and left and pull it out (see whether your machine for your Pfaff 1211 or 1212 can easily do yourself The sewing light illuminates the work in the middle of the base firmly. Have you selected the right needle and thread from...
... jam in the direction indicated by pushing the master on the right and left and pull it out (see whether your machine for your Pfaff 1211 or 1212 can easily do yourself The sewing light illuminates the work in the middle of the base firmly. Have you selected the right needle and thread from...


