
Owner's Manual
Page 2
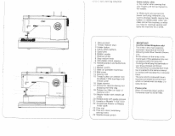
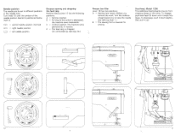
... 1 6 Upper tension 1 7 Control for United Kingdom only! Please note: When 13 amperes plug is used a 3 amperes fuse has to interrupt sewing and leave the machine for a while. 1 Take-up lever 2 Thread retainer stud 3 Eraser button 4 Utility-stitch buttons 5 Spool pins 6 Bobbin winder 7 Balance wheel... 8 Stop motion knob 9 Ultra-Matic stitch selector 1 0 Needle position and buttonhole control 11 Master switch 1 2 Base (of portable machines) 1 3 Bed cover 14 Sewing foot 1 5 Thread cutter (on presser bar) On Model 1 209 dual feed with the letter L or coloured red. b) Make sure ...
... 1 6 Upper tension 1 7 Control for United Kingdom only! Please note: When 13 amperes plug is used a 3 amperes fuse has to interrupt sewing and leave the machine for a while. 1 Take-up lever 2 Thread retainer stud 3 Eraser button 4 Utility-stitch buttons 5 Spool pins 6 Bobbin winder 7 Balance wheel... 8 Stop motion knob 9 Ultra-Matic stitch selector 1 0 Needle position and buttonhole control 11 Master switch 1 2 Base (of portable machines) 1 3 Bed cover 14 Sewing foot 1 5 Thread cutter (on presser bar) On Model 1 209 dual feed with the letter L or coloured red. b) Make sure ...
Owner's Manual
Page 3
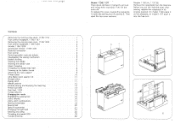
... cover sections. Contents Removing the carrying case cover, 1 196/1197 Foot control receptacle, 1196/11 97 Removing the carrying case cover, 1199/1209 Foot control receptacle, 11 99/1209 Handle, 1199/1209. Before you put the machine away after sewing, replace the receptacle in its original position. On model 11 96 place it...
... cover sections. Contents Removing the carrying case cover, 1 196/1197 Foot control receptacle, 1196/11 97 Removing the carrying case cover, 1199/1209 Foot control receptacle, 11 99/1209 Handle, 1199/1209. Before you put the machine away after sewing, replace the receptacle in its original position. On model 11 96 place it...
Owner's Manual
Page 4
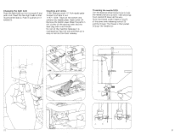
...Compact models the accessories are to be easily lifted off. Foot control receptacle Models 11 99/1209 Remove the receptacle from the machine. Before you put the machine away after sewing, replace the receptacle in a drawer. Push the catch upwards a little (A> and at the same time pull drawer 22 ...out of the machine (B>. B. Removing the carrying case cover, Model 1199/1209 On the Compact models the carrying case cover is not locked ...
...Compact models the accessories are to be easily lifted off. Foot control receptacle Models 11 99/1209 Remove the receptacle from the machine. Before you put the machine away after sewing, replace the receptacle in a drawer. Push the catch upwards a little (A> and at the same time pull drawer 22 ...out of the machine (B>. B. Removing the carrying case cover, Model 1199/1209 On the Compact models the carrying case cover is not locked ...
Owner's Manual
Page 5
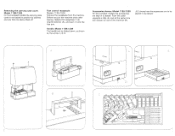
... knob toward you start winding the bobbin, disengage the sewing mechanism. Electrical connection Push plug A into the machine socket and plug B into the wall socket. Foot control Place the foot control under the table. The machine starts sewing. Removing bobbin case and bobbin Raise the needle. Remove... bed cover 1 3 or open free arm cap 24. Disengaging the sewing mechanism Before you . The more the pedal is now switched on...
... knob toward you start winding the bobbin, disengage the sewing mechanism. Electrical connection Push plug A into the machine socket and plug B into the wall socket. Foot control Place the foot control under the table. The machine starts sewing. Removing bobbin case and bobbin Raise the needle. Remove... bed cover 1 3 or open free arm cap 24. Disengaging the sewing mechanism Before you . The more the pedal is now switched on...

Owner's Manual
Page 8
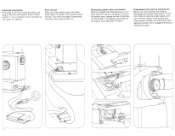
Thread cutter, Models 1196/1199 There is made. Place the threads in the thread cutter slot and pull them downwards to 8, the stitches are located in the ranges marked 5, 6, 7, 8 and 9. Pull the work back out of the machine. Straight stitch Straight stitches are close together; At the ... selector (9) Turn the outer ring until the symbol of the straight or zigzag stitch desired is located at the back of the machine, Place the threads over thread cutter 22 and pull them downwards to 4. Raise the sewing foot. toward the left, the zigzag stitches become increasingly longer.
Thread cutter, Models 1196/1199 There is made. Place the threads in the thread cutter slot and pull them downwards to 8, the stitches are located in the ranges marked 5, 6, 7, 8 and 9. Pull the work back out of the machine. Straight stitch Straight stitches are close together; At the ... selector (9) Turn the outer ring until the symbol of the straight or zigzag stitch desired is located at the back of the machine, Place the threads over thread cutter 22 and pull them downwards to 4. Raise the sewing foot. toward the left, the zigzag stitches become increasingly longer.
Owner's Manual
Page 9
... set to raise the needle and take-up lever 1.) B = The sewing foot is dropped (for sewing. C = Vertical position. D = The feed dog is lowered for embroidering, darning, etc.). The machine sews permanently in the needle hole. Dual feed, Model 1209 This additional feed prevents... position (normal) = right needle position = left needle position Reverse sewing and dropping the feed dog Reverse-feed control 1 7 has the following positions: A = Normal position B As long as the control is depressed, the machine sews backwards. Turn knob 1 0 until it snaps into place, To disengage...
... set to raise the needle and take-up lever 1.) B = The sewing foot is dropped (for sewing. C = Vertical position. D = The feed dog is lowered for embroidering, darning, etc.). The machine sews permanently in the needle hole. Dual feed, Model 1209 This additional feed prevents... position (normal) = right needle position = left needle position Reverse sewing and dropping the feed dog Reverse-feed control 1 7 has the following positions: A = Normal position B As long as the control is depressed, the machine sews backwards. Turn knob 1 0 until it snaps into place, To disengage...
Owner's Manual
Page 14
... thread under fingers A and B, at the same time releasing control 25 and the thread. Push control 25 down all the way. Do not oil the machine because it is then pulled through the needle eye. 22 2 Remove the bobbin case. Changing the light bulb Push the light bulb up, turn it... out. Insert the new light bulb so that its pins enter slots C. The thread is maintenance-free, but now and then put a drop of the sewing hook and the feed dog with a soft brush.
... thread under fingers A and B, at the same time releasing control 25 and the thread. Push control 25 down all the way. Do not oil the machine because it is then pulled through the needle eye. 22 2 Remove the bobbin case. Changing the light bulb Push the light bulb up, turn it... out. Insert the new light bulb so that its pins enter slots C. The thread is maintenance-free, but now and then put a drop of the sewing hook and the feed dog with a soft brush.


