
ZX-7 Manual
Page 2
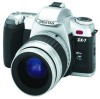
Incorporating a broad range of advanced technologies and highly accurate automation, this camera will perform superbly for difficulties resulting from the use . • Illustrations in this manual Operation direction -41..••...your purchase of this operating manual are not made by other manufacturers. This compact and light weight camera is an autofocus SLR camera that offers higher levels of Pentax autofocus photography! Congratulations on your Pentax camera. Icon indicators used in this camera and welcome to the exciting world of sophistication and performance.
Incorporating a broad range of advanced technologies and highly accurate automation, this camera will perform superbly for difficulties resulting from the use . • Illustrations in this manual Operation direction -41..••...your purchase of this operating manual are not made by other manufacturers. This compact and light weight camera is an autofocus SLR camera that offers higher levels of Pentax autofocus photography! Congratulations on your Pentax camera. Icon indicators used in this camera and welcome to the exciting world of sophistication and performance.
ZX-7 Manual
Page 3
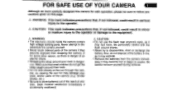
... to store batteries out of the reach of children. Never attempt to the equipment. , , WARNING • The electronic circuits inside the camera contain high voltage working parts. Be particularly careful with the flash around your eyes, and/or parts of the battery in serious injury to the... operator. ,L CAUTION This mark indicates precautions that small children do not dispose of the camera (e.g: shutter blades, etc.) • Be sure to disassemble, short or recharge the battery. Make sure that , if not followed, could ...
... to store batteries out of the reach of children. Never attempt to the equipment. , , WARNING • The electronic circuits inside the camera contain high voltage working parts. Be particularly careful with the flash around your eyes, and/or parts of the battery in serious injury to the... operator. ,L CAUTION This mark indicates precautions that small children do not dispose of the camera (e.g: shutter blades, etc.) • Be sure to disassemble, short or recharge the battery. Make sure that , if not followed, could ...

ZX-7 Manual
Page 4
...or any other object. • Use a blower and lens brush to prevent the growth of safety at a Pentax service center. mulated on the interior or exterior of the camera may often be caused by water, dirt or dust at points of the warranty and charges may be extremely harmful...Never touch the shutter curtain or mirror with your picture with moth balls or in a place with great care. 1111131 PRECAUTIONS FOR YOUR CAMERA Your Pentax camera is minimized. Repairs of icelets may cause rust. Handle it in an area where chemicals are not covered under the terms of electrical ...
...or any other object. • Use a blower and lens brush to prevent the growth of safety at a Pentax service center. mulated on the interior or exterior of the camera may often be caused by water, dirt or dust at points of the warranty and charges may be extremely harmful...Never touch the shutter curtain or mirror with your picture with moth balls or in a place with great care. 1111131 PRECAUTIONS FOR YOUR CAMERA Your Pentax camera is minimized. Repairs of icelets may cause rust. Handle it in an area where chemicals are not covered under the terms of electrical ...

ZX-7 Manual
Page 5
... the terms of the battery can cause hazards such as outlined in the "Precautions for Your Camera" section or any kind cannot be repaired at no charge under the terms of the Pentax warranty. • The PENTAX warranty provides only for the repair of the battery's characteristics. • Replace the batteries at the...
... the terms of the battery can cause hazards such as outlined in the "Precautions for Your Camera" section or any kind cannot be repaired at no charge under the terms of the Pentax warranty. • The PENTAX warranty provides only for the repair of the battery's characteristics. • Replace the batteries at the...

ZX-7 Manual
Page 6
...4 Names of working parts 6 LCD panel indication 8 Viewfinder indication 9 • Multi (6) - BASIC OPERATION (PREPARATION) ....11-23 Attaching the camera strap 11 Loading the batteries 12 • When the battery is exhausted 13 Attaching the lens 14 Turning on the power 16 Operating the shutter...zoom lenses 27 Setting the Single-Frame Drive Mode 28 Selecting the Autofocus Mode 28 Holding the Camera 29 Taking a picture 30 Selecting the various flash Modes 32 • AF illuminator 33 • About Red-eye Reduction Flash Function ..33 Activate the built-in flash...
...4 Names of working parts 6 LCD panel indication 8 Viewfinder indication 9 • Multi (6) - BASIC OPERATION (PREPARATION) ....11-23 Attaching the camera strap 11 Loading the batteries 12 • When the battery is exhausted 13 Attaching the lens 14 Turning on the power 16 Operating the shutter...zoom lenses 27 Setting the Single-Frame Drive Mode 28 Selecting the Autofocus Mode 28 Holding the Camera 29 Taking a picture 30 Selecting the various flash Modes 32 • AF illuminator 33 • About Red-eye Reduction Flash Function ..33 Activate the built-in flash...
ZX-7 Manual
Page 7
... • Using the snap-in focus function 65 • Hard-To-Autofocus Subjects 66 Advanced operation for the Built-in the Data Back 73 Using a Pentax Dedicated External Flash 74 • Contrast-Control-Sync Flash Photography 75 • Overview of flash function 76 Daylight-sync shooting 77 Slow-shutter-sync shooting...
... • Using the snap-in focus function 65 • Hard-To-Autofocus Subjects 66 Advanced operation for the Built-in the Data Back 73 Using a Pentax Dedicated External Flash 74 • Contrast-Control-Sync Flash Photography 75 • Overview of flash function 76 Daylight-sync shooting 77 Slow-shutter-sync shooting...

ZX-7 Manual
Page 11
...44. The multi (6)-segment metering system also calculates exposure values for a scene to the horizontal panorama format frame. VIEWFINDER INDICATION 9 [c 3]: 3-point AF frame (p.30) : Shutter speed : Aperture value : Green Operation Mode (p.47) : Portrait Operation Mode (p.48) : Landscape Program Mode (p.49...65) : Memory lock (p.63) : Bar graph (p.58, 61) MULTI (6)-SEGMENT METERING This camera incorporates six-segment TTL metering system. With multi(6)-segment metering, the camera records the brightness in six segments within the image field and will properly expose the subject.
...44. The multi (6)-segment metering system also calculates exposure values for a scene to the horizontal panorama format frame. VIEWFINDER INDICATION 9 [c 3]: 3-point AF frame (p.30) : Shutter speed : Aperture value : Green Operation Mode (p.47) : Portrait Operation Mode (p.48) : Landscape Program Mode (p.49...65) : Memory lock (p.63) : Bar graph (p.58, 61) MULTI (6)-SEGMENT METERING This camera incorporates six-segment TTL metering system. With multi(6)-segment metering, the camera records the brightness in six segments within the image field and will properly expose the subject.

ZX-7 Manual
Page 12
... • [Mount type] --A-utofocus (Lens only) (Lens with AF Adapter 1.7X) 3-point autofocus Manual focus (with FI) (with the Autofocus SLR camera. Lenses with a maximum aperture of f/2.8 or larger. (See AF Adapter operating manual.) '2. Exception of f/5.6 or larger. *4. f-stop under. '8. Lenses with a maximum aperture of Pentax-F or FA Soft 85mm/f2.8. *5. When the 50mm f/1.2 lens...
... • [Mount type] --A-utofocus (Lens only) (Lens with AF Adapter 1.7X) 3-point autofocus Manual focus (with FI) (with the Autofocus SLR camera. Lenses with a maximum aperture of f/2.8 or larger. (See AF Adapter operating manual.) '2. Exception of f/5.6 or larger. *4. f-stop under. '8. Lenses with a maximum aperture of Pentax-F or FA Soft 85mm/f2.8. *5. When the 50mm f/1.2 lens...

ZX-7 Manual
Page 13
BASIC OPERATION (PREPARATION) ATTACHING THE CAMERA STRAP IBM 0 Co C) 0 z rn 33 Nc 0 z Fit the strap on the camera as illustrated. 33 m • There is a pocket on the strap so you can store the remote control transmitter, finder cap, 33 release socket cover, hot shoe cover or any other small accessory as illustrated. 0 z I.
BASIC OPERATION (PREPARATION) ATTACHING THE CAMERA STRAP IBM 0 Co C) 0 z rn 33 Nc 0 z Fit the strap on the camera as illustrated. 33 m • There is a pocket on the strap so you can store the remote control transmitter, finder cap, 33 release socket cover, hot shoe cover or any other small accessory as illustrated. 0 z I.

ZX-7 Manual
Page 14
...overheating. Turn the battery chamber cover screw in the direction of the arrow to lock it securely. • When the batteries are replaced, the camera settings such as the audible PCV signal switching, exposure compensation value, red-eye reduction flash function, self-timer, remote control and auto-popup flash ...function of the built-in flash will be re-set. • The optional "AA-Battery Pack FG" is also available for this camera instead of using a coin, etc. Open the battery chamber cover by using the lithium batteries. • Replace two batteries at the same time....
...overheating. Turn the battery chamber cover screw in the direction of the arrow to lock it securely. • When the batteries are replaced, the camera settings such as the audible PCV signal switching, exposure compensation value, red-eye reduction flash function, self-timer, remote control and auto-popup flash ...function of the built-in flash will be re-set. • The optional "AA-Battery Pack FG" is also available for this camera instead of using a coin, etc. Open the battery chamber cover by using the lithium batteries. • Replace two batteries at the same time....
ZX-7 Manual
Page 16
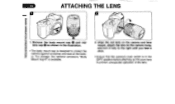
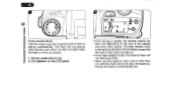
..., and turn it fully to the right until you hear a click. • Ensure that the camera's main switch is in the illustration. • The body mount cap is available. 2. Remove the body mount cap 0 and rear lens cap 0 as shown in ...the [OFF] position before attaching an FA zoom lens to protect the camera against scratches and dust at the factory. ATTACHING THE LENS BASIC OPERATION (PREPARATION) 00 0 , 4f. 1. For storage, the optional accessory "Body Mount Cap K" is designed...
..., and turn it fully to the right until you hear a click. • Ensure that the camera's main switch is in the illustration. • The body mount cap is available. 2. Remove the body mount cap 0 and rear lens cap 0 as shown in ...the [OFF] position before attaching an FA zoom lens to protect the camera against scratches and dust at the factory. ATTACHING THE LENS BASIC OPERATION (PREPARATION) 00 0 , 4f. 1. For storage, the optional accessory "Body Mount Cap K" is designed...

ZX-7 Manual
Page 17
... mount side facing upward. • 8 3. CO 0 0 m /I( I z * How to remove I • To protect the contacts and AF coupler of lenses made by other manufacturers. • The camera body and lens mount incorporate lens information contacts and an AF coupler. I To remove the lens, turn it to the electrical system. To remove the front lens...
... mount side facing upward. • 8 3. CO 0 0 m /I( I z * How to remove I • To protect the contacts and AF coupler of lenses made by other manufacturers. • The camera body and lens mount incorporate lens information contacts and an AF coupler. I To remove the lens, turn it to the electrical system. To remove the front lens...

ZX-7 Manual
Page 18
...:13d0 3ISVEI 16 TURNING ON THE POWER OFF ON 0 II OFF ON 1. When taking a picture, depress the shutter release button gently to prevent camera shake. • To prevent camera shake, depress the shutter release button gently. • Before loading a roll of film, slowly depress the shutter release button to [no)] and reinstall...
...:13d0 3ISVEI 16 TURNING ON THE POWER OFF ON 0 II OFF ON 1. When taking a picture, depress the shutter release button gently to prevent camera shake. • To prevent camera shake, depress the shutter release button gently. • Before loading a roll of film, slowly depress the shutter release button to [no)] and reinstall...
ZX-7 Manual
Page 19
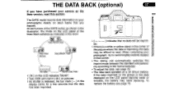
...Hour Minute a9 '99, Day Month Year No data I 0 z indicates that no data will imprint [ 00 ] on each press of the DATE button as shown in the illustration, the mode on the LCD indicates "Month". • Year 2000 will be difficult to avoid brightly-colored subject ... the data imprinted on the picture or the data displayed on a 3V lithium battery. When composing your camera as .indicated in the display blinks for a few seconds that corner. • The dating unit automatically switches the imprint mode between the standard and panora- m I may need replacing. At each...
...Hour Minute a9 '99, Day Month Year No data I 0 z indicates that no data will imprint [ 00 ] on each press of the DATE button as shown in the illustration, the mode on the LCD indicates "Month". • Year 2000 will be difficult to avoid brightly-colored subject ... the data imprinted on the picture or the data displayed on a 3V lithium battery. When composing your camera as .indicated in the display blinks for a few seconds that corner. • The dating unit automatically switches the imprint mode between the standard and panora- m I may need replacing. At each...

ZX-7 Manual
Page 20
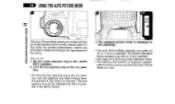
... the illustration. • Always load and unload film in the direction of the arrow. 2. Automatic film speed setting This camera is designed to use a non-DX coded film, you first operate the camera with no film loaded to become familiar with ISO ratings from 25 to 5000. • When DX-coded film... first time after purchase, open the back cover, slide the back cover release lever in the shade or by using your body to shade the camera. • P. 'tibi a II 8 II II 8 WOO -I•mur - 1■■■ See page 70. • Before loading film for the...
... the illustration. • Always load and unload film in the direction of the arrow. 2. Automatic film speed setting This camera is designed to use a non-DX coded film, you first operate the camera with no film loaded to become familiar with ISO ratings from 25 to 5000. • When DX-coded film... first time after purchase, open the back cover, slide the back cover release lever in the shade or by using your body to shade the camera. • P. 'tibi a II 8 II II 8 WOO -I•mur - 1■■■ See page 70. • Before loading film for the...

ZX-7 Manual
Page 23
UNLOADING FILM is completely rewound. • When removing the film from the camera, protect it from exposure to direct sun light. 2. The film automatically rewinds at the end of the roll. • During rewinding, [-] blinks on the LCD panel. When the film is fully rewound, only [0] blinks on the LCD panel, indicating that the film is being rewound, the exposure counter counts frame numbers in reverse. • Never open the back cover until the whole film roll is OFF ON (NOLIMEIVdal NOIIVEI3dO 0ISVS -""" V 1.
UNLOADING FILM is completely rewound. • When removing the film from the camera, protect it from exposure to direct sun light. 2. The film automatically rewinds at the end of the roll. • During rewinding, [-] blinks on the LCD panel. When the film is fully rewound, only [0] blinks on the LCD panel, indicating that the film is being rewound, the exposure counter counts frame numbers in reverse. • Never open the back cover until the whole film roll is OFF ON (NOLIMEIVdal NOIIVEI3dO 0ISVS -""" V 1.

ZX-7 Manual
Page 25
ADJUSTING THE VIEWFINDER DIOPTER Mill (0) 0 Alm the camera at a bright subject.While looking through the viewfinder,move the diopter adjustment lever to 10. 0 m-O303 II. O O z O BASIC OPERATION r• (SHOOTING) O z ixn. to the left or right until the autofocus frame [C 3] appears in the sharpest focus.
ADJUSTING THE VIEWFINDER DIOPTER Mill (0) 0 Alm the camera at a bright subject.While looking through the viewfinder,move the diopter adjustment lever to 10. 0 m-O303 II. O O z O BASIC OPERATION r• (SHOOTING) O z ixn. to the left or right until the autofocus frame [C 3] appears in the sharpest focus.
ZX-7 Manual
Page 26
.... • See page 54 to the [ A J position, turn the aperture ring while holding down the aperture-A lock button on the lens. In this mode, the camera automatically selects one of 5 picture modes according to the requirement of the scene. The lens aperture ring can be released from the [ A ] position in use...
.... • See page 54 to the [ A J position, turn the aperture ring while holding down the aperture-A lock button on the lens. In this mode, the camera automatically selects one of 5 picture modes according to the requirement of the scene. The lens aperture ring can be released from the [ A ] position in use...
ZX-7 Manual
Page 28
...'t want the built-in the up position. 1. The flash disable mode is automatically set. OFF ON Tv ;25" min Av2 2 • From among 5 modes, the camera selects the best one depending on the LCD panel. Set the mode dial to other factors. The flash will not discharge either. • When the...
...'t want the built-in the up position. 1. The flash disable mode is automatically set. OFF ON Tv ;25" min Av2 2 • From among 5 modes, the camera selects the best one depending on the LCD panel. Set the mode dial to other factors. The flash will not discharge either. • When the...
ZX-7 Manual
Page 29
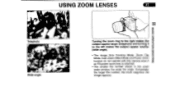
Conversely, the larger the number, the more magnified the image appears. USING ZOOM LENSES (DNIIOOHS) NOLLVEI3dO 3ISVEI Telephoto t Wide angle Turning the zoom ring to the right makes the subject appear larger (telephoto) and turning it to the left makes the subject appear smaller (wide angle). • The Image Size Tracking Mode, Zoom Clip Mode, Auto Zoom Effect Mode and Power Zoom function do not operate with this camera even if an FA power zoom lens is attached. • The smaller the number shown in the zoom scale window, the wider the angle.
Conversely, the larger the number, the more magnified the image appears. USING ZOOM LENSES (DNIIOOHS) NOLLVEI3dO 3ISVEI Telephoto t Wide angle Turning the zoom ring to the right makes the subject appear larger (telephoto) and turning it to the left makes the subject appear smaller (wide angle). • The Image Size Tracking Mode, Zoom Clip Mode, Auto Zoom Effect Mode and Power Zoom function do not operate with this camera even if an FA power zoom lens is attached. • The smaller the number shown in the zoom scale window, the wider the angle.

