
SF-1 Manual
Page 3
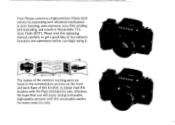
Your Pentax camera is.a high-precision 35mm SLR camera incorporating such advanced mechanisms as auto focusing, auto exposure, auto film winding and rewinding, and a built-in the nomenclature sections on the front and back flaps of the camera's functions and operations before you ...will enjoy taking memorable, high-quality pictures with this booklet with the flaps unfolded for many years to come. PENTAX eft The names of...
Your Pentax camera is.a high-precision 35mm SLR camera incorporating such advanced mechanisms as auto focusing, auto exposure, auto film winding and rewinding, and a built-in the nomenclature sections on the front and back flaps of the camera's functions and operations before you ...will enjoy taking memorable, high-quality pictures with this booklet with the flaps unfolded for many years to come. PENTAX eft The names of...

SF-1 Manual
Page 5
...Attaching and removing lenses Main switch, shutter release button and control switches CENTIC display panel Viewfinder display Usable film Film loading Setting an exposure mode with a Pentax-F lens Shooting in the Programmed AE mode Shooting in the Shutter-Priority AE mode Shooting in the Aperture... (bulb) and 100 (1/100 sec.) settings Infrared index Depth of field Interchangeable focusing screens Strap and case Camera's compatibility with Pentax lenses Precautions on batteries Taking care of your camera Precautions on CENTIC panel's LCD display and backup circuits for LCD display Specifications...
...Attaching and removing lenses Main switch, shutter release button and control switches CENTIC display panel Viewfinder display Usable film Film loading Setting an exposure mode with a Pentax-F lens Shooting in the Programmed AE mode Shooting in the Shutter-Priority AE mode Shooting in the Aperture... (bulb) and 100 (1/100 sec.) settings Infrared index Depth of field Interchangeable focusing screens Strap and case Camera's compatibility with Pentax lenses Precautions on batteries Taking care of your camera Precautions on CENTIC panel's LCD display and backup circuits for LCD display Specifications...

SF-1 Manual
Page 6
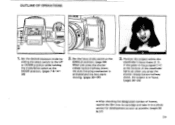
... to use before going on . (page 7) Since this camera. Remove the battery grip and insert a lithium battery. (pages 4 & 2. Open the back cover and load the film. (pages 11.-13) 4. Please refer to shoot photographs with it incorrectly. There are also many ways to the section about the specific mode you begin...; 2 • After adjusting the diopter of the eyepiece to your eyesight, insert the Eyecup F into the accessory groove. (page 28) BEFORE SHOOTING REN-r"I` 00O O 0 1. Attach a Pentax-F lens. (page 6) 3.
... to use before going on . (page 7) Since this camera. Remove the battery grip and insert a lithium battery. (pages 4 & 2. Open the back cover and load the film. (pages 11.-13) 4. Please refer to shoot photographs with it incorrectly. There are also many ways to the section about the specific mode you begin...; 2 • After adjusting the diopter of the eyepiece to your eyesight, insert the Eyecup F into the accessory groove. (page 28) BEFORE SHOOTING REN-r"I` 00O O 0 1. Attach a Pentax-F lens. (page 6) 3.
SF-1 Manual
Page 7
... shutter release button halfway down , the auto-focusing mechanism is in'focus. (pages 30-35) • After shooting the designated number of frames, rewind the film into its cartridge and take it to the UP or DOWN position while holding the mode/drive switch at the MODE position. (pages 7 & 1425) 2. Set...
... shutter release button halfway down , the auto-focusing mechanism is in'focus. (pages 30-35) • After shooting the designated number of frames, rewind the film into its cartridge and take it to the UP or DOWN position while holding the mode/drive switch at the MODE position. (pages 7 & 1425) 2. Set...
SF-1 Manual
Page 11
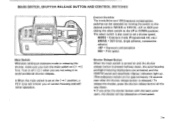
... switch to set at a fixed speed. 7• MODE = Exposure mode (Programmed AE, etc.) DRIVE = Self-timer, single advance, consecutive advance ±EF = Exposure compensation ISO = Film speed Shutter Release Button When the main switch is turned on [ I • •ol ] first. The select switch is also used to the UP or...
... switch to set at a fixed speed. 7• MODE = Exposure mode (Programmed AE, etc.) DRIVE = Self-timer, single advance, consecutive advance ±EF = Exposure compensation ISO = Film speed Shutter Release Button When the main switch is turned on [ I • •ol ] first. The select switch is also used to the UP or...
SF-1 Manual
Page 12
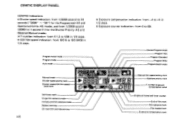
.../exposure compensation value • 8 Self-timer mark Single film-advance mode Consecutive film-advance mode Battery warning DX mark/DX override warning Exposure frame/self-timer counter End-of-film mark Film advance mark Film-loaded mark Exposure compensation mark Program Action mode Program mode ...compensation indication: from -4 to +4 in 1/2 steps. • Exposure counter indication: from 1/2000 second to ISO 6400 in 1/2 steps. • ISO film-speed indication: from ISO 6 to 30 seconds ("20O0" - "30") for the Programmed AE and Aperture-priority AE modes, and from 1/2000 second ...
.../exposure compensation value • 8 Self-timer mark Single film-advance mode Consecutive film-advance mode Battery warning DX mark/DX override warning Exposure frame/self-timer counter End-of-film mark Film advance mark Film-loaded mark Exposure compensation mark Program Action mode Program mode ...compensation indication: from -4 to +4 in 1/2 steps. • Exposure counter indication: from 1/2000 second to ISO 6400 in 1/2 steps. • ISO film-speed indication: from ISO 6 to 30 seconds ("20O0" - "30") for the Programmed AE and Aperture-priority AE modes, and from 1/2000 second ...

SF-1 Manual
Page 14
... is not DX-coded, make sure you set automatically. USABLE FILM (DX-coded film and non-DX-coded film) Color Film 100 35.36 3 EXP coofilo Film cartridge 00C C000007000-61 Film speed (ISO rating) C 0 0 D -information DX-Coded film When DX-coded film is loaded in this position, slide the select switch to the UP or Down position...
... is not DX-coded, make sure you set automatically. USABLE FILM (DX-coded film and non-DX-coded film) Color Film 100 35.36 3 EXP coofilo Film cartridge 00C C000007000-61 Film speed (ISO rating) C 0 0 D -information DX-Coded film When DX-coded film is loaded in this position, slide the select switch to the UP or Down position...
SF-1 Manual
Page 15
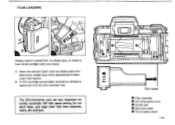
... the backcover lock button. 2. Open the camera's back cover by sliding its upper part into the film chamber first. a O O 0 0 0 07; 0000000 0 00 0 0 0 E 000 00 0 000000000 Film leade O Film chamber O DX-information pins O Guide rails 0 Sprocket teeth O Film loading mark 11• Do not bend them, and keep them free from direct sunlight with your...
... the backcover lock button. 2. Open the camera's back cover by sliding its upper part into the film chamber first. a O O 0 0 0 07; 0000000 0 00 0 0 0 E 000 00 0 000000000 Film leade O Film chamber O DX-information pins O Guide rails 0 Sprocket teeth O Film loading mark 11• Do not bend them, and keep them free from direct sunlight with your...
SF-1 Manual
Page 16
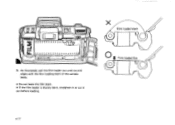
// -2 a 0000000000000 171 : 000000000000000000 00 000000e 3. As illustrated, pull the film leader out until its end aligns with the film loading mark of the camera body. • Do not leave the film slack. • If the film leader is sharply bent, straighten it or cut it out before loading. Film loaded slack O fi Film loaded flat O • 12
// -2 a 0000000000000 171 : 000000000000000000 00 000000e 3. As illustrated, pull the film leader out until its end aligns with the film loading mark of the camera body. • Do not leave the film slack. • If the film leader is sharply bent, straighten it or cut it out before loading. Film loaded slack O fi Film loaded flat O • 12
SF-1 Manual
Page 17
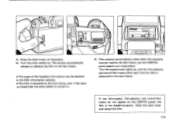
...the CENTIC panel appears as illustrated. 5. The shutter automatically releases to advance the film to the first frame. • The type of film loaded in the camera can be checked in the film information window. • The film is advanced to the first frame, even if the back is closed after the ...main switch is advanced to the next frame. The film-loaded mark lights up, and the film-advance and end-of -film marks do not appear on the CENTIC panel, the film is not loaded properly. Turn the main switch on . ( V \I )1 6. 1O Il \\ PROGRAM • ...
...the CENTIC panel appears as illustrated. 5. The shutter automatically releases to advance the film to the first frame. • The type of film loaded in the camera can be checked in the film information window. • The film is advanced to the first frame, even if the back is closed after the ...main switch is advanced to the next frame. The film-loaded mark lights up, and the film-advance and end-of -film marks do not appear on the CENTIC panel, the film is not loaded properly. Turn the main switch on . ( V \I )1 6. 1O Il \\ PROGRAM • ...
SF-1 Manual
Page 33
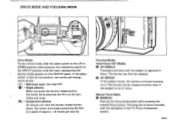
... switch to the next frame and stops. = Consecutive advance As long as you hold the shutter release button down, the motor drive keeps advancing the film at one position, the marks will change continuously. (L)) = Self-timer mark (see page 49.) (S) = Single advance When you press the shutter ...release button, the motor drive advances the film to the DRIVE position until the subject is held at a speed of the Fl (Focus Indication) system. 29 • AF SERVO If the subject moves...
... switch to the next frame and stops. = Consecutive advance As long as you hold the shutter release button down, the motor drive keeps advancing the film at one position, the marks will change continuously. (L)) = Self-timer mark (see page 49.) (S) = Single advance When you press the shutter ...release button, the motor drive advances the film to the DRIVE position until the subject is held at a speed of the Fl (Focus Indication) system. 29 • AF SERVO If the subject moves...
SF-1 Manual
Page 40
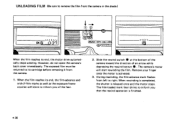
... is activated. 3. J,do not open the camera's back cover immediately. When the film reaches its end, the film-advance and end-of-film marks as well as the exposure frame counter will start rewinding the film. During rewinding, the film-advance mark flashes from the camera in the shade.) ♦ % I I I... at the bottom of the camera toward the direction of the fact. 2. However, do , When the film reaches its cartridge before removing it from the camera. 1. The film-loaded mark then blinks to inform you that the rewind operation is finished. • 36 Remove your finger...
... is activated. 3. J,do not open the camera's back cover immediately. When the film reaches its end, the film-advance and end-of-film marks as well as the exposure frame counter will start rewinding the film. During rewinding, the film-advance mark flashes from the camera in the shade.) ♦ % I I I... at the bottom of the camera toward the direction of the fact. 2. However, do , When the film reaches its cartridge before removing it from the camera. 1. The film-loaded mark then blinks to inform you that the rewind operation is finished. • 36 Remove your finger...

SF-1 Manual
Page 41
Open the back cover and remove the film by pulling out the bottom of the film cartridge with your finger. • Rewind time is approximately 20 seconds for a 24exposure roll of film. • Open the back cover only after confirming completion of the rewind operation by the blinking film-loaded mark. • If the film is exposed for a greater number of frames than designated on the film cartridge, the extra frames may be cut off at the developing laboratory. 0 0 370 4.
Open the back cover and remove the film by pulling out the bottom of the film cartridge with your finger. • Rewind time is approximately 20 seconds for a 24exposure roll of film. • Open the back cover only after confirming completion of the rewind operation by the blinking film-loaded mark. • If the film is exposed for a greater number of frames than designated on the film cartridge, the extra frames may be cut off at the developing laboratory. 0 0 370 4.

SF-1 Manual
Page 43
...is automatically shifted to EV 20 (f/22, 1/2000 sec.). The inside of the diagram indicate different coupling ranges when lenses with ISO 100 film is changed. Normal Program, Program Action and Program Depth. The thin solid lines and thin dotted lines on the lens in relation to ...control an exposure. For example, the metering range for a 50mm f/1.4 standard lens with different maximum and minimum apertures are used, or when the ISO film speed is from EV 1 (f/1.4, 1 sec.) to a program for proper exposure control can be shifted up to the maximum aperture of three sub-modes ...
...is automatically shifted to EV 20 (f/22, 1/2000 sec.). The inside of the diagram indicate different coupling ranges when lenses with ISO 100 film is changed. Normal Program, Program Action and Program Depth. The thin solid lines and thin dotted lines on the lens in relation to ...control an exposure. For example, the metering range for a 50mm f/1.4 standard lens with different maximum and minimum apertures are used, or when the ISO film speed is from EV 1 (f/1.4, 1 sec.) to a program for proper exposure control can be shifted up to the maximum aperture of three sub-modes ...
SF-1 Manual
Page 44
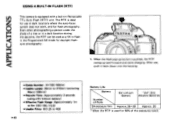
PENTAX II 9- 1. After use in dark locations where the auto-focus system does not work, and for daylight ...Approximately 3 seconds (using a 6V lithium battery) • Effective Flash Range: Approximately lm to 5m (ISO 100, f/2.8) • Usable Films: ISO 25 to 400 • 40 Battery Life Battery 6V Lithium "AA"-Size Battery Alkaline Batteries Number of Rolls 24-exposure... film Approx.25-30 Approx. 20 * When the RTF is used for 50% of a tree or in a dark...
PENTAX II 9- 1. After use in dark locations where the auto-focus system does not work, and for daylight ...Approximately 3 seconds (using a 6V lithium battery) • Effective Flash Range: Approximately lm to 5m (ISO 100, f/2.8) • Usable Films: ISO 25 to 400 • 40 Battery Life Battery 6V Lithium "AA"-Size Battery Alkaline Batteries Number of Rolls 24-exposure... film Approx.25-30 Approx. 20 * When the RTF is used for 50% of a tree or in a dark...
SF-1 Manual
Page 48
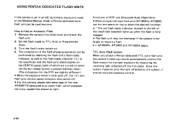
...flash-charging operation can be confirmed by the subject, it ensures accurate exposure control. • 44 TTL Auto Flash System When you attach a Pentax dedicated TTL auto flash unit, the camera's metering circuits automatically control the flash output for the RTF are slightly different.) • When the ...exposure meter's timer goes off, the 51 and flash-sync shutter speed indicators also switch off the film plane. How to TTL Auto or Programmed Auto. 3. Functions of RTF and Dedicated Auto Flash Units • When using an old-type flash...
...flash-charging operation can be confirmed by the subject, it ensures accurate exposure control. • 44 TTL Auto Flash System When you attach a Pentax dedicated TTL auto flash unit, the camera's metering circuits automatically control the flash output for the RTF are slightly different.) • When the ...exposure meter's timer goes off, the 51 and flash-sync shutter speed indicators also switch off the film plane. How to TTL Auto or Programmed Auto. 3. Functions of RTF and Dedicated Auto Flash Units • When using an old-type flash...

SF-1 Manual
Page 49
... appropriate aperture value is set an f-number using the lens aperture ring. Successful flash discharge is confirmed by measuring the amount of light striking the film plane during exposure. (TTL Auto Flash) Slow shutter-speed sync operation under 1/100 second is possible in dark locations. Built-in AF spotbeam projector for...
... appropriate aperture value is set an f-number using the lens aperture ring. Successful flash discharge is confirmed by measuring the amount of light striking the film plane during exposure. (TTL Auto Flash) Slow shutter-speed sync operation under 1/100 second is possible in dark locations. Built-in AF spotbeam projector for...
SF-1 Manual
Page 56
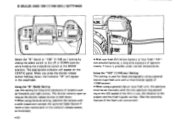
... with a solid tripod and connect the optional Cable Switch F (with a fixed shutter speed of the flash unit concerned.) ing to the ISO speed of the film in the viewfinder. Using the "100" (1/100 sec.) Setting This setting is held down , the indicator "M" will appear on type flash unit with a lock mechanism...
... with a solid tripod and connect the optional Cable Switch F (with a fixed shutter speed of the flash unit concerned.) ing to the ISO speed of the film in the viewfinder. Using the "100" (1/100 sec.) Setting This setting is held down , the indicator "M" will appear on type flash unit with a lock mechanism...

SF-1 Manual
Page 57
INFRARED INDEX 11111111111111111111111111111111 ft. As illustrated at the MANUAL position before shooting. (See the film's instructions for exposure settings.) • Be sure to compensate for infrared rays, which are different from the visible rays of normal photography. c°10 3 2 +t... 22 S6 22 16 5.63 22 16 11 8 5.6 4 2.6 21A i216 11 8 5.6 4 2.8 214 In infrared photography when using infrared film and an R2 or 02 filter, you need to adjust the focusing to set the focus-mode switch at left, memorize the subject's distance indicated...
INFRARED INDEX 11111111111111111111111111111111 ft. As illustrated at the MANUAL position before shooting. (See the film's instructions for exposure settings.) • Be sure to compensate for infrared rays, which are different from the visible rays of normal photography. c°10 3 2 +t... 22 S6 22 16 5.63 22 16 11 8 5.6 4 2.6 21A i216 11 8 5.6 4 2.8 214 In infrared photography when using infrared film and an R2 or 02 filter, you need to adjust the focusing to set the focus-mode switch at left, memorize the subject's distance indicated...

SF-1 Manual
Page 63
... to worry about. • With one fresh 6V lithium battery or four fresh "AA"size alkaline batteries, approximately 55 rolls of 24exposure film can be using the camera for a long period of time, remove the batteries from it. This is natural, and nothing to avoid...into a fire; they can cause damage to the battery compartment. • Never try to prevent camera malfunctions. • Carry a spare set of the Pentax laboratory). 0 0 CD IPc 59 • PRECAUTIONS ON BATTERIES • Always handle batteries properly. Always check the batteries' polarity markings when inserting them. &#...
... to worry about. • With one fresh 6V lithium battery or four fresh "AA"size alkaline batteries, approximately 55 rolls of 24exposure film can be using the camera for a long period of time, remove the batteries from it. This is natural, and nothing to avoid...into a fire; they can cause damage to the battery compartment. • Never try to prevent camera malfunctions. • Carry a spare set of the Pentax laboratory). 0 0 CD IPc 59 • PRECAUTIONS ON BATTERIES • Always handle batteries properly. Always check the batteries' polarity markings when inserting them. &#...


