

Operation Manual
Page 2
... no effect on taking pictures even for display. Regarding trademarks • The SD logo is a trademark. • PENTAX is a trademark of PENTAX Corporation. • All other brands or product names are for buying the PENTAX Optio S4i Digital Camera. You can be aware that the camera may illuminate when they should not. All Rights Reserved. When used outside the...
... no effect on taking pictures even for display. Regarding trademarks • The SD logo is a trademark. • PENTAX is a trademark of PENTAX Corporation. • All other brands or product names are for buying the PENTAX Optio S4i Digital Camera. You can be aware that the camera may illuminate when they should not. All Rights Reserved. When used outside the...
Operation Manual
Page 3
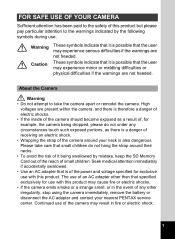
... may experience serious difficulties if the warnings are not heeded. Please take the camera apart or remodel the camera. About the Camera Warning • Do not attempt to the warnings indicated by mistake, keep the SD Memory Card out of the reach of small children. Continued use . These ...product. Warning Caution These symbols indicate that it being dropped, please do not hang the strap around your nearest PENTAX service center. FOR SAFE USE OF YOUR CAMERA Sufficient attention has been paid to the safety of this product but please pay particular attention to take care ...
... may experience serious difficulties if the warnings are not heeded. Please take the camera apart or remodel the camera. About the Camera Warning • Do not attempt to the warnings indicated by mistake, keep the SD Memory Card out of the reach of small children. Continued use . These ...product. Warning Caution These symbols indicate that it being dropped, please do not hang the strap around your nearest PENTAX service center. FOR SAFE USE OF YOUR CAMERA Sufficient attention has been paid to the safety of this product but please pay particular attention to take care ...

Operation Manual
Page 7
... sand, dust, water, toxic gases, salt, etc. • If the camera is subjected to rapid temperature changes, condensation may cause damage to the camera. Therefore put the camera in a bag or plastic bag, and take the camera out when the difference in temperature has subsided. • Avoid contact with the... camera in your back pocket as this may damage the exterior of the camera or the LCD monitor. • When using an SD Memory Card" (p.21) regarding the SD Memory Card. •...
... sand, dust, water, toxic gases, salt, etc. • If the camera is subjected to rapid temperature changes, condensation may cause damage to the camera. Therefore put the camera in a bag or plastic bag, and take the camera out when the difference in temperature has subsided. • Avoid contact with the... camera in your back pocket as this may damage the exterior of the camera or the LCD monitor. • When using an SD Memory Card" (p.21) regarding the SD Memory Card. •...
Operation Manual
Page 8
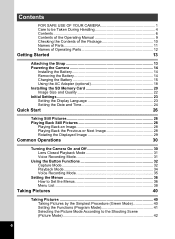
... Installing the Battery 14 Removing the Battery 14 Charging the Battery 15 Using the AC Adapter (optional 18 Installing the SD Memory Card 20 Image Size and Quality 22 Initial Settings 23 Setting the Display Language 23 Setting the Date and Time 24 Quick Start 26 ... Pictures 28 Playing Back an Image 28 Playing Back the Previous or Next Image 28 Rotating the Displayed Image 29 Common Operations 30 Turning the Camera On and Off 30 Lens Closed Playback Mode 31 Voice Recording Mode 31 Using the Button Functions 32 Capture Mode 32 Playback Mode 34 Voice...
... Installing the Battery 14 Removing the Battery 14 Charging the Battery 15 Using the AC Adapter (optional 18 Installing the SD Memory Card 20 Image Size and Quality 22 Initial Settings 23 Setting the Display Language 23 Setting the Date and Time 24 Quick Start 26 ... Pictures 28 Playing Back an Image 28 Playing Back the Previous or Next Image 28 Rotating the Displayed Image 29 Common Operations 30 Turning the Camera On and Off 30 Lens Closed Playback Mode 31 Voice Recording Mode 31 Using the Button Functions 32 Capture Mode 32 Playback Mode 34 Voice...

Operation Manual
Page 10
...on a TV 99 Setting the Printing Service (DPOF 100 Printing Single Images 100 Printing All Images 102 Direct Printing Using PictBridge 103 Connecting the Camera to the Printer 103 Printing Single Images 104 Printing All Images 105 Printing Using the DPOF Settings 105 Disconnecting the... the Printer 106 Editing Images 107 Changing the Image Size and Quality 107 Trimming Images 109 Copying Files 110 Settings 112 Camera Settings 112 Formatting an SD Memory Card or the Built-in Memory 112 Changing the Start-up Screen 113 Changing the Sound Settings 114 Changing the Date and ...
...on a TV 99 Setting the Printing Service (DPOF 100 Printing Single Images 100 Printing All Images 102 Direct Printing Using PictBridge 103 Connecting the Camera to the Printer 103 Printing Single Images 104 Printing All Images 105 Printing Using the DPOF Settings 105 Disconnecting the... the Printer 106 Editing Images 107 Changing the Image Size and Quality 107 Trimming Images 109 Copying Files 110 Settings 112 Camera Settings 112 Formatting an SD Memory Card or the Built-in Memory 112 Changing the Start-up Screen 113 Changing the Sound Settings 114 Changing the Date and ...
Operation Manual
Page 22
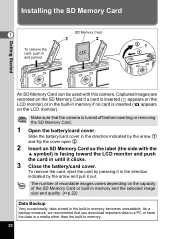
...flip the cover open 2 . 2 Insert an SD Memory Card so the label (the side with this camera. As a backup measure, we recommend that the camera is turned off before inserting or removing the SD Memory Card. 1 Open the battery/card cover. Installing the SD Memory Card 1 To remove the card, push ...in and pull out SD Memory Card 3 2 21 1 Getting Started An SD Memory Card ...
...flip the cover open 2 . 2 Insert an SD Memory Card so the label (the side with this camera. As a backup measure, we recommend that the camera is turned off before inserting or removing the SD Memory Card. 1 Open the battery/card cover. Installing the SD Memory Card 1 To remove the card, push ...in and pull out SD Memory Card 3 2 21 1 Getting Started An SD Memory Card ...

Operation Manual
Page 23
... static electricity or electrical interference. • Avoid using the camera, as the card may be hot. • Do not remove the SD Memory Card or turn the camera off before opening the card cover. • The SD Memory Card is equipped with your nearest PENTAX service center. 21 Inquiries on the card may be exposed...
... static electricity or electrical interference. • Avoid using the camera, as the card may be hot. • Do not remove the SD Memory Card or turn the camera off before opening the card cover. • The SD Memory Card is equipped with your nearest PENTAX service center. 21 Inquiries on the card may be exposed...

Operation Manual
Page 24
...Quality Level 1p.73 Appropriate Sizes According to e-mails or creating websites The default setting is D. Approximate Number of Recordable Images by PENTAX and may vary depending on the [A Rec. Image Size and Quality Choose the image size and quality best suited to Use C... Best Lowest compression ratio. Higher quality levels and numbers of recorded pixels and quality level on the subject, shooting conditions, capture mode, SD Memory Card, etc. 22 D Better Standard compression ratio. Suitable for large A4-size photo prints. Mode] menu. Choose the appropriate number...
...Quality Level 1p.73 Appropriate Sizes According to e-mails or creating websites The default setting is D. Approximate Number of Recordable Images by PENTAX and may vary depending on the [A Rec. Image Size and Quality Choose the image size and quality best suited to Use C... Best Lowest compression ratio. Higher quality levels and numbers of recorded pixels and quality level on the subject, shooting conditions, capture mode, SD Memory Card, etc. 22 D Better Standard compression ratio. Suitable for large A4-size photo prints. Mode] menu. Choose the appropriate number...

Operation Manual
Page 28
...button Power switch 2 QUICK button LCD monitor Zoom/f/y button Quick Start The simplest procedure for one second (Instant Review) and is recorded on the SD Memory Card or in the built-in memory. (The green and red lamps on the right of automatic focusing. "Taking Pictures by pressing the ... the LCD monitor indicates the zone of the viewfinder blink alternately while the image is the easiest way to the Green mode and let the camera set all the shooting functions automatically, press the QUICK button. The focus frame on the LCD monitor. The focus frame in focus. 4 Press...
...button Power switch 2 QUICK button LCD monitor Zoom/f/y button Quick Start The simplest procedure for one second (Instant Review) and is recorded on the SD Memory Card or in the built-in memory. (The green and red lamps on the right of automatic focusing. "Taking Pictures by pressing the ... the LCD monitor indicates the zone of the viewfinder blink alternately while the image is the easiest way to the Green mode and let the camera set all the shooting functions automatically, press the QUICK button. The focus frame on the LCD monitor. The focus frame in focus. 4 Press...

Operation Manual
Page 41
... off the power automatically For registering a function on the four-way controller (45) For registering a function on the QUICK button For returning the camera settings to an image p.88 Quick Zoom Quick Delete For playing back images at the maximum zoom size by pressing the Zoom/f/y button only once...-up Screen Video Out USB Connection Mode Sleep Timeout Auto Power Off Custom Function QUICK Button Reset Description For formatting the SD Memory Card or built-in memory to the SD Memory Card and vice versa p.110 Alarm For setting the alarm to ring at a specific time p.124 Record Voice...
... off the power automatically For registering a function on the four-way controller (45) For registering a function on the QUICK button For returning the camera settings to an image p.88 Quick Zoom Quick Delete For playing back images at the maximum zoom size by pressing the Zoom/f/y button only once...-up Screen Video Out USB Connection Mode Sleep Timeout Auto Power Off Custom Function QUICK Button Reset Description For formatting the SD Memory Card or built-in memory to the SD Memory Card and vice versa p.110 Alarm For setting the alarm to ring at a specific time p.124 Record Voice...

Operation Manual
Page 64
2 1 Taking Pictures RBH
2 1 Taking Pictures RBH

Operation Manual
Page 86
... not included in [Memory] will also be saved in the settings selected on the menus for each function when the camera is turned off. • The zoom position setting in the digital zoom range will not be saved even if [Zoom Position] is set to O(On) in [Memory]. • ... P White Balance The [White Balance] setting on the ) button is saved. P Digital Zoom The [Digital Zoom] setting on the [A Rec.Mode] menu is inserted, file numbers are assigned sequentially. The file number is saved. If a new SD Memory Card is saved. P AE Metering Sensitivity The [AE Metering] setting on the ...
... not included in [Memory] will also be saved in the settings selected on the menus for each function when the camera is turned off. • The zoom position setting in the digital zoom range will not be saved even if [Zoom Position] is set to O(On) in [Memory]. • ... P White Balance The [White Balance] setting on the ) button is saved. P Digital Zoom The [Digital Zoom] setting on the [A Rec.Mode] menu is inserted, file numbers are assigned sequentially. The file number is saved. If a new SD Memory Card is saved. P AE Metering Sensitivity The [AE Metering] setting on the ...
Operation Manual
Page 88
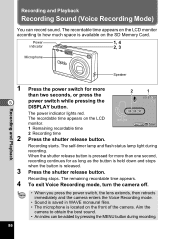
...the power switch while pressing the 2 1 00:57:30 DISPLAY button. Press the shutter release button. Aim the camera to how much space is released. The recordable time appears on the SD Memory Card. Power 1, 4 indicator 2, 3 Microphone Speaker Recording and Playback 1 5 2 3 4 86 Press ... according to obtain the best sound. • An index can record sound. The recordable time appears on the front of the camera. The power indicator lights red. Recording starts. The remaining recordable time appears. Recording stops. Recording and Playback Recording Sound (Voice ...
...the power switch while pressing the 2 1 00:57:30 DISPLAY button. Press the shutter release button. Aim the camera to how much space is released. The recordable time appears on the SD Memory Card. Power 1, 4 indicator 2, 3 Microphone Speaker Recording and Playback 1 5 2 3 4 86 Press ... according to obtain the best sound. • An index can record sound. The recordable time appears on the front of the camera. The power indicator lights red. Recording starts. The remaining recordable time appears. Recording stops. Recording and Playback Recording Sound (Voice ...

Operation Manual
Page 91
Holding down the button changes the magnification continuously. • The following operations can play back images recorded on the SD Memory Card when a card is inserted in the camera, or in the built-in memory when no card is inserted. 2 1 3 Playing Back Still Pictures Press the Q Playback button. Four-way controller (2345) Moves...
Holding down the button changes the magnification continuously. • The following operations can play back images recorded on the SD Memory Card when a card is inserted in the camera, or in the built-in memory when no card is inserted. 2 1 3 Playing Back Still Pictures Press the Q Playback button. Four-way controller (2345) Moves...

Operation Manual
Page 96
.... • Recordings made in Voice Recording mode are not played back. 94 1, 3, 4 5 2 Playback/Deleting/Editing Slideshow You can play back all the images on the SD Memory Card or in the built-in memory continuously. 1 Enter the Playback mode and use the four-way controller (45) to choose the image with...
.... • Recordings made in Voice Recording mode are not played back. 94 1, 3, 4 5 2 Playback/Deleting/Editing Slideshow You can play back all the images on the SD Memory Card or in the built-in memory continuously. 1 Enter the Playback mode and use the four-way controller (45) to choose the image with...

Operation Manual
Page 100
... 3 to 100-0010 select [Protect]. 6 4 Press the OK button. Select [Unprotect] in memory. 98 Even protected images and sounds will be deleted by formatting the SD Memory Card or built-in Step 3 to cancel the Protect setting on all the images and sounds. 1 Enter the Playback mode. 2 Press the Z button twice...
... 3 to 100-0010 select [Protect]. 6 4 Press the OK button. Select [Unprotect] in memory. 98 Even protected images and sounds will be deleted by formatting the SD Memory Card or built-in Step 3 to cancel the Protect setting on all the images and sounds. 1 Enter the Playback mode. 2 Press the Z button twice...

Operation Manual
Page 102
...-0010 Copies 1 Date MENU Exit DISP AllImages OK OK Playback/Deleting/Editing 100 Date: Specify whether you want the date imprinted on the SD Memory Card using a DPOF (Digital Print Order Format) compatible printer or at a printing service. 1, 2, 3, 4 5 Printing Single Images Set the following items for each image. Setting the Printing Service...
...-0010 Copies 1 Date MENU Exit DISP AllImages OK OK Playback/Deleting/Editing 100 Date: Specify whether you want the date imprinted on the SD Memory Card using a DPOF (Digital Print Order Format) compatible printer or at a printing service. 1, 2, 3, 4 5 Printing Single Images Set the following items for each image. Setting the Printing Service...

Operation Manual
Page 110
Playback/Deleting/Editing Resizing All Images You can change the size of the original image. Resize all the images saved on the SD Memory Card or in the built-in memory. 6 4 Press the DISPLAY button in Step 3 on the previous page. 100-0010 The Resize All screen appears. ...
Playback/Deleting/Editing Resizing All Images You can change the size of the original image. Resize all the images saved on the SD Memory Card or in the built-in memory. 6 4 Press the DISPLAY button in Step 3 on the previous page. 100-0010 The Resize All screen appears. ...

Operation Manual
Page 112
... the copying method you want to select [Copy Image & Sound]. When files are copied from the built-in memory to the SD Memory Card, all the files are copied at a time. 1 Press the MENU button in Playback mode. 6 2 3 The... [Q Playback] menu appears. The Copy Image & Sound screen appears. When files are copied from the SD Memory Card to the built-in memory, the files are copied to select [ ’ ] and press the OK button. ...only be selected when a card has been inserted in the camera. Playback/Deleting/Editing To Copy Files from the built-in memory to turn the...
... the copying method you want to select [Copy Image & Sound]. When files are copied from the built-in memory to the SD Memory Card, all the files are copied at a time. 1 Press the MENU button in Playback mode. 6 2 3 The... [Q Playback] menu appears. The Copy Image & Sound screen appears. When files are copied from the SD Memory Card to the built-in memory, the files are copied to select [ ’ ] and press the OK button. ...only be selected when a card has been inserted in the camera. Playback/Deleting/Editing To Copy Files from the built-in memory to turn the...

Operation Manual
Page 113
... image has a voice memo attached, the sound file will be copied at the same time as the image. • When a file is copied from the SD Memory Card to the Built-in Memory 5 Use the four-way controller (23) to select [ ’ ] and press the OK button. 6 Use the four-way... controller (45) to select the file to copy. 7 Press the OK button. 100-0010 SD Copy this image & sound The selected file is copied to the built-in memory. To Copy Files from the...
... image has a voice memo attached, the sound file will be copied at the same time as the image. • When a file is copied from the SD Memory Card to the Built-in Memory 5 Use the four-way controller (23) to select [ ’ ] and press the OK button. 6 Use the four-way... controller (45) to select the file to copy. 7 Press the OK button. 100-0010 SD Copy this image & sound The selected file is copied to the built-in memory. To Copy Files from the...
