

MG Manual
Page 2
CONTENTS Description of parts 2 Basic operating instructions "Your MG Quick Course" 4 Inserting batteries 8 Lens mounting 10 Film loading and winding 11 Setting the ASA film speed 13 The shutter mode dial 14 Aperture setting 17 Focusing 18 Exposures on ... compensation 22 Self-timer/Multiple exposures 24 Using a tripod/Time exposures at "B" 25 Holding the camera 26 Unloading the film 27 Flash photography (with Pentax Dedicated Flash Units) 28 Other flash units 29 Shooting pointers 30 Depth-of-field scale 32 Depth-of-field table 33 Using screw mount Takumar...
CONTENTS Description of parts 2 Basic operating instructions "Your MG Quick Course" 4 Inserting batteries 8 Lens mounting 10 Film loading and winding 11 Setting the ASA film speed 13 The shutter mode dial 14 Aperture setting 17 Focusing 18 Exposures on ... compensation 22 Self-timer/Multiple exposures 24 Using a tripod/Time exposures at "B" 25 Holding the camera 26 Unloading the film 27 Flash photography (with Pentax Dedicated Flash Units) 28 Other flash units 29 Shooting pointers 30 Depth-of-field scale 32 Depth-of-field table 33 Using screw mount Takumar...

MG Manual
Page 4
DESCRIPTION OF PARTS 234 5 6 •170 ari PEN -TAX • ° 3 1/00 " 44 13 14 IS 16 I, IA 19 O Exposure counter 0 Shutter button 0 Rapid wind lever 0 Shutter cocked indicator 0 Shutter mode indications 0 Hotshoe 0 Auto flash contact 0 ASA film speed index Exposure compensation guide 0 Film rewind/Back cover release le Film rewind crank e Neck strap eyelet e Lens release lever 0 Self-timer lever 0 Lens alignment node Focusing ring 0 Distance scale 0 Depth-of-field scale 0 Aperture/Distance index 9 Aperture ring • 2
DESCRIPTION OF PARTS 234 5 6 •170 ari PEN -TAX • ° 3 1/00 " 44 13 14 IS 16 I, IA 19 O Exposure counter 0 Shutter button 0 Rapid wind lever 0 Shutter cocked indicator 0 Shutter mode indications 0 Hotshoe 0 Auto flash contact 0 ASA film speed index Exposure compensation guide 0 Film rewind/Back cover release le Film rewind crank e Neck strap eyelet e Lens release lever 0 Self-timer lever 0 Lens alignment node Focusing ring 0 Distance scale 0 Depth-of-field scale 0 Aperture/Distance index 9 Aperture ring • 2

MG Manual
Page 6
Mount the lens (Page 10). 2. Load the film with the shutter mode dial set at "100X," and advance to the first exposure. (Page 11). I aIm ci 130k S • 4 BASIC OPERATING INSTRUCTIONS "Your MG Quick Course" am. 1. Insert the batteries as shown. (Page 8);
Mount the lens (Page 10). 2. Load the film with the shutter mode dial set at "100X," and advance to the first exposure. (Page 11). I aIm ci 130k S • 4 BASIC OPERATING INSTRUCTIONS "Your MG Quick Course" am. 1. Insert the batteries as shown. (Page 8);

MG Manual
Page 7
ft m 22 16 c:ois9 5 s 12 3 8i n4A'4in8 16 '22 22 16 11 8 5.6 4 2.62 1lo1ox1$ 4. Set the shutter mode dial to "AUTO" (Page 14). 6. Set the ASA film speed (Page 13). 5. Look through the viewfinder, focus and compose the picture (Page 18). 5 • 3. Set the lens aperture. (Page 17).
ft m 22 16 c:ois9 5 s 12 3 8i n4A'4in8 16 '22 22 16 11 8 5.6 4 2.62 1lo1ox1$ 4. Set the shutter mode dial to "AUTO" (Page 14). 6. Set the ASA film speed (Page 13). 5. Look through the viewfinder, focus and compose the picture (Page 18). 5 • 3. Set the lens aperture. (Page 17).

MG Manual
Page 12
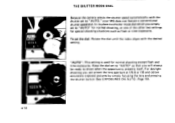
...the body mount and turn it clockwise unit it 's necessary to avoid tumbling. Never put the lens down . IMPORTANT: If it locks into place with the lens release lever ID by touch and mount the lens as described. Long telephoto lenses should be laid on the camera body with the right hand. Hold... the camera securely in the left hand and match the red dot 0 on their side to put the lens down with the front element down without the rear lens cap, make sure you rest the lens with the front element up because you can damage the rear elements. Removing the...
...the body mount and turn it clockwise unit it 's necessary to avoid tumbling. Never put the lens down . IMPORTANT: If it locks into place with the lens release lever ID by touch and mount the lens as described. Long telephoto lenses should be laid on the camera body with the right hand. Hold... the camera securely in the left hand and match the red dot 0 on their side to put the lens down with the front element down without the rear lens cap, make sure you rest the lens with the front element up because you can damage the rear elements. Removing the...

MG Manual
Page 13
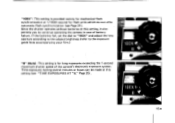
... needles in the film take-up sharply. If you must load the film with the dial set the shutter mode dial to "AUTO," remove the lens cap and aim the camera toward a bright light source. This avoids excessively long shutter speeds while advancing the film. • To open the camera back...
... needles in the film take-up sharply. If you must load the film with the dial set the shutter mode dial to "AUTO," remove the lens cap and aim the camera toward a bright light source. This avoids excessively long shutter speeds while advancing the film. • To open the camera back...
MG Manual
Page 16
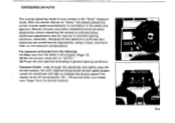
To set to "AUTO" so that you can preset the lens aperture at f/5.6 or f/8 and obtain accurately exposed pictures by simply focusing the lens and pressing the shutter button (See EXPOSURES ON AUTO -Page 191. "AUTO": This setting is a shutter mode dial which you simply set to "AUTO" for ... as flash or time exposures. Keep the dial set the dial: Rotate the dial until the index aligns with the shutter set to "AUTO," your MG does not feature a conventional shutter speed dial.
To set to "AUTO" so that you can preset the lens aperture at f/5.6 or f/8 and obtain accurately exposed pictures by simply focusing the lens and pressing the shutter button (See EXPOSURES ON AUTO -Page 191. "AUTO": This setting is a shutter mode dial which you simply set to "AUTO" for ... as flash or time exposures. Keep the dial set the dial: Rotate the dial until the index aligns with the shutter set to "AUTO," your MG does not feature a conventional shutter speed dial.
MG Manual
Page 17
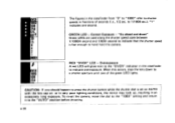
If the batteries fail, set the dial to "100X" and adjust the lens aperture according to the subject brightness (refer to continue operating the camera in case of the camera's electronic exposure system. Time exposures lasting several minutes ...
If the batteries fail, set the dial to "100X" and adjust the lens aperture according to the subject brightness (refer to continue operating the camera in case of the camera's electronic exposure system. Time exposures lasting several minutes ...
MG Manual
Page 19
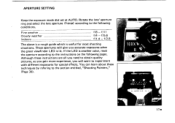
... useful for special effects. f/2.8 The above is a rough guide which is another color, reset the aperture according to the following pages. Rotate the lens' aperture ring and select the lens aperture (f-stop) according to the instructions on the following conditions. Fine weather Cloudy weather Indoors f/8 - APERTURE SETTING Keep the exposure mode dial...
... useful for special effects. f/2.8 The above is a rough guide which is another color, reset the aperture according to the following pages. Rotate the lens' aperture ring and select the lens aperture (f-stop) according to the instructions on the following conditions. Fine weather Cloudy weather Indoors f/8 - APERTURE SETTING Keep the exposure mode dial...

MG Manual
Page 20
...Simply turn the focusing ring on the matte field. • 18 You can focus using the microprism collar surrounding the center spot, rotate the lens focusing ring until the "shimmering" effect in the center spot of the focusing screen. To focus with the microprism collar: When using all three ...areas of the viewfinder aligns as one. To focus, turn the lens focusing ring until the image appears sharp and crisp on the lens until the broken image in the collar area disappears. I PIMA FOCUSING 11-os The...
...Simply turn the focusing ring on the matte field. • 18 You can focus using the microprism collar surrounding the center spot, rotate the lens focusing ring until the "shimmering" effect in the center spot of the focusing screen. To focus with the microprism collar: When using all three ...areas of the viewfinder aligns as one. To focus, turn the lens focusing ring until the image appears sharp and crisp on the lens until the broken image in the collar area disappears. I PIMA FOCUSING 11-os The...
MG Manual
Page 21
Exposure Check: Look through the viewfinder and lightly press the shutter button; Generally, changing the lens aperture is the "Auto" exposure mode. the LED (light-emitting-diode) shutter speed display inside the viewfinder will light to indicate the ...to general lighting conditions. With the shutter dial set properly (Page 13). (2) Set the shutter mode dial to "AUTO." (3) Preset the lens aperture according to the preset lens aperture. Sharply focused, accurately exposed pictures are easily obtained by using a tripod, electronic flash, or the exposure compensation. EXPOSURES ON AUTO ...
Exposure Check: Look through the viewfinder and lightly press the shutter button; Generally, changing the lens aperture is the "Auto" exposure mode. the LED (light-emitting-diode) shutter speed display inside the viewfinder will light to indicate the ...to general lighting conditions. With the shutter dial set properly (Page 13). (2) Set the shutter mode dial to "AUTO." (3) Preset the lens aperture according to the preset lens aperture. Sharply focused, accurately exposed pictures are easily obtained by using a tripod, electronic flash, or the exposure compensation. EXPOSURES ON AUTO ...
MG Manual
Page 22
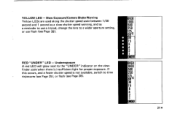
RED "OVER" LED - When this occurs, stop the lens down to a smaller aperture until one second. CAUTION: If you should happen to press the shutter button while the shutter dial is fast enough to ... will glow next to the "OVER" indicator in fractions of the green LED lights. GREEN LED - Correct Exposure - To re-set on AUTO with the lens cap on or in very poor lighting conditions, the mirror may lock up, resulting in an excessively long exposure. "Go ahead and shoot" Green LEDs...
RED "OVER" LED - When this occurs, stop the lens down to a smaller aperture until one second. CAUTION: If you should happen to press the shutter button while the shutter dial is fast enough to ... will glow next to the "OVER" indicator in fractions of the green LED lights. GREEN LED - Correct Exposure - To re-set on AUTO with the lens cap on or in very poor lighting conditions, the mirror may lock up, resulting in an excessively long exposure. "Go ahead and shoot" Green LEDs...
MG Manual
Page 23
... are used along the shutter speed scale between 1/30 second and 1 second as a slow shutter speed warning, and as a reminder to use a tripod, change the lens to the "UNDER" indicator on the viewfinder scale when there is not available, switch to time exposures (see Page 25), or flash (see Page 28).
... are used along the shutter speed scale between 1/30 second and 1 second as a slow shutter speed warning, and as a reminder to use a tripod, change the lens to the "UNDER" indicator on the viewfinder scale when there is not available, switch to time exposures (see Page 25), or flash (see Page 28).
MG Manual
Page 32
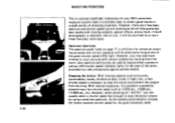
... of shooting situations. However, there are a few basic techniques. However, you take precautions against camera shake/. Any aperture setting may add more interest to your MG's automatic exposure system make it will be obtained as long as one of the green shutter speed LEDs light. • 30 SHOOTING POINTERS The tri... be used as long as either a green or yellow LED shutter speed indicator lights (in flight, etc., a fast shutter speed is solved by using a wide lens aperture. Stopping the Action: With moving subjects, special effects, and so forth.
... of shooting situations. However, there are a few basic techniques. However, you take precautions against camera shake/. Any aperture setting may add more interest to your MG's automatic exposure system make it will be obtained as long as one of the green shutter speed LEDs light. • 30 SHOOTING POINTERS The tri... be used as long as either a green or yellow LED shutter speed indicator lights (in flight, etc., a fast shutter speed is solved by using a wide lens aperture. Stopping the Action: With moving subjects, special effects, and so forth.
MG Manual
Page 33
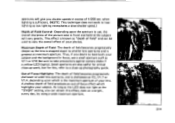
when lighting is greatest at minimum aperture. A shallow depth of field produces an out-of-focus effect which is known as the lens is stopped down to smaller lens apertures and is sufficient. (NOTE: This technique does not work , but for this effect, even on a bright, sunny day, by using ...take precautions against camera shake if a yellow LED (lights). Thus, if you desire to have both your lens. Out-of-Focus Highlights: The depth of field becomes progressively shallower at wide lens apertures, and is shallowest at the "OVER" setting, you shutter speeds in excess of 1/250 sec. ...
when lighting is greatest at minimum aperture. A shallow depth of field produces an out-of-focus effect which is known as the lens is stopped down to smaller lens apertures and is sufficient. (NOTE: This technique does not work , but for this effect, even on a bright, sunny day, by using ...take precautions against camera shake if a yellow LED (lights). Thus, if you desire to have both your lens. Out-of-Focus Highlights: The depth of field becomes progressively shallower at wide lens apertures, and is shallowest at the "OVER" setting, you shutter speeds in excess of 1/250 sec. ...

MG Manual
Page 34
... refer to the next page. ' 5 3 8 2^- 5 9 k+k 8 '6 ' ?2 22 16 11 8 5 6 4 282 • 32 7 6 5 4 3 2 1 0 Distance (ml f/4 DEPTH-OF-FIELD SCALE Depth of in-focus distance for different lens aperture. The calibrations on each side of the distance index correspond to know how great the depth of field is in focus. If you want... and indicate the range of field is the range between the nearest and farthest distances which are in focus at that is, the lens is set at the depth-of-field scale on a subject 5 meters away. In the photograph below the distance scale is focused on the...
... refer to the next page. ' 5 3 8 2^- 5 9 k+k 8 '6 ' ?2 22 16 11 8 5 6 4 282 • 32 7 6 5 4 3 2 1 0 Distance (ml f/4 DEPTH-OF-FIELD SCALE Depth of in-focus distance for different lens aperture. The calibrations on each side of the distance index correspond to know how great the depth of field is in focus. If you want... and indicate the range of field is the range between the nearest and farthest distances which are in focus at that is, the lens is set at the depth-of-field scale on a subject 5 meters away. In the photograph below the distance scale is focused on the...
MG Manual
Page 36
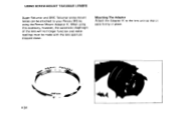
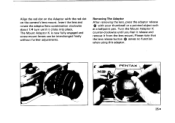
Mounting The Adaptor Attach the Adaptor K to your Pentax MG by using this accessory, however, the automatic diaphragm of the lens will not longer function and meter readings must be attached to the lens unit so that it seats firmly in place. • 34 When using the Pentax Mount Adaptor K. USING SCREW-MOUNT TAKUMAR LENSES Super-Takumar and SMC Takumar screw-mount lenses can be made with the lens aperture stopped down.
Mounting The Adaptor Attach the Adaptor K to your Pentax MG by using this accessory, however, the automatic diaphragm of the lens will not longer function and meter readings must be attached to the lens unit so that it seats firmly in place. • 34 When using the Pentax Mount Adaptor K. USING SCREW-MOUNT TAKUMAR LENSES Super-Takumar and SMC Takumar screw-mount lenses can be made with the lens aperture stopped down.
MG Manual
Page 37
...Mount Adaptor K is now fully engaged and screw-mount lenses can be interchanged freely without further adjustments. 1C Removing The Adaptor After removing the lens, press the adaptor release with the red dot on the Adaptor with your thumbnail or a pointed object such as a ballpoint pen. Please...when using this adaptor. Turn the Mount Adaptor K counter-clockwise until it from the lens mount. Align the red dot on the camera's lens mount. PEN'. 350 Insert the lens and rotate the adaptor/lens combination clockwise about 1/4 turn until you feel it release and remove it clicks into ...
...Mount Adaptor K is now fully engaged and screw-mount lenses can be interchanged freely without further adjustments. 1C Removing The Adaptor After removing the lens, press the adaptor release with the red dot on the Adaptor with your thumbnail or a pointed object such as a ballpoint pen. Please...when using this adaptor. Turn the Mount Adaptor K counter-clockwise until it from the lens mount. Align the red dot on the camera's lens mount. PEN'. 350 Insert the lens and rotate the adaptor/lens combination clockwise about 1/4 turn until you feel it release and remove it clicks into ...

MG Manual
Page 38
... (co) mark to the infra-red mark. • NOTE: An infra-red focusing adjustment is not required when working with an orange line on the lens. C°1522.82 8ICI°I4145 4" I I I8 I 2.82 • 36 INFRA-RED PHOTOGRAPHY If you intend to take infra-red photographs, remember to use the...
... (co) mark to the infra-red mark. • NOTE: An infra-red focusing adjustment is not required when working with an orange line on the lens. C°1522.82 8ICI°I4145 4" I I I8 I 2.82 • 36 INFRA-RED PHOTOGRAPHY If you intend to take infra-red photographs, remember to use the...
MG Manual
Page 39
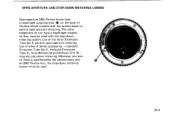
Use of these is used between the camera body and A an SMC Pentax lens, the stop-down metering system. OPEN-APERTURE AND STOP-DOWN METERING LENSES Open-aperture SMC Pentax lenses have a diaphragm coupler, so they must be used . 0 • 0 37* The ultra telephotos do not have a ...diaphragm coupling lever QI on the back of the Auto-Extension Tube Set K permits open -aperture metering. Use of the lens which couples with the...
Use of these is used between the camera body and A an SMC Pentax lens, the stop-down metering system. OPEN-APERTURE AND STOP-DOWN METERING LENSES Open-aperture SMC Pentax lenses have a diaphragm coupler, so they must be used . 0 • 0 37* The ultra telephotos do not have a ...diaphragm coupling lever QI on the back of the Auto-Extension Tube Set K permits open -aperture metering. Use of the lens which couples with the...


