

ME Manual
Page 2
or actual damage to precise Asahi Pentax specifications. a Pentax camera. IMPORTANT SMC Pentax lenses and Pentax accessories are not produced to these precise specifications and, therefore, may cause difficulties with an Asahi Pentax camera. Asahi Pentax cannot assume any responsibility or liability for difficulties resulting from other brand of lenses or accessories with - Lenses and accessories from the use of any other manufacturers are engineered and produced meticulously to -
or actual damage to precise Asahi Pentax specifications. a Pentax camera. IMPORTANT SMC Pentax lenses and Pentax accessories are not produced to these precise specifications and, therefore, may cause difficulties with an Asahi Pentax camera. Asahi Pentax cannot assume any responsibility or liability for difficulties resulting from other brand of lenses or accessories with - Lenses and accessories from the use of any other manufacturers are engineered and produced meticulously to -
ME Manual
Page 3
... Aperture setting 13 Automatic exposure control 14 The "100X" and "B" settings 16 Composing and Focusing 17 Holding the camera 18 Unloading film 79 Depth-of-field scale 20 Depth-of-field table: SMC Pentax-M 50mm f/1.4 lens 21 Meter coupling range 22 Self-timer 23 Flash synchronization 24 Infra-red photography 25 Multiple...-mount Takumar lenses 28 How to use Mount Adaptor K 29 Open-aperture and stop-down metering lenses 30 Resistance to temperature extremes and changes 31 Camera maintenance 32 Warranty policy 34 Pentax ME Belt Clip 3E •1
... Aperture setting 13 Automatic exposure control 14 The "100X" and "B" settings 16 Composing and Focusing 17 Holding the camera 18 Unloading film 79 Depth-of-field scale 20 Depth-of-field table: SMC Pentax-M 50mm f/1.4 lens 21 Meter coupling range 22 Self-timer 23 Flash synchronization 24 Infra-red photography 25 Multiple...-mount Takumar lenses 28 How to use Mount Adaptor K 29 Open-aperture and stop-down metering lenses 30 Resistance to temperature extremes and changes 31 Camera maintenance 32 Warranty policy 34 Pentax ME Belt Clip 3E •1
ME Manual
Page 6
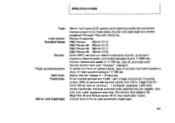
... synchronization Self-timer Viewfinder Mi►ror and diaphragm 35mm full-frame SLR camera with shutter button lock and "Cocked" indicator. X socket on front of camera body, plus over and under exposure warning. Silver-coated pentaprism finder; manual... mechanical speed of picture-taking area visible and 0.97x magnification (with 50mm lens at 1/100 sec. split-image microprism focusing screen; 92% of 1/100 sec. SMC Pentax 50mm f/1.2 SMC Pentax-M 50mm f/1.4 SMC Pentax-M 50mm f/1.7 SMC Pentax...
... synchronization Self-timer Viewfinder Mi►ror and diaphragm 35mm full-frame SLR camera with shutter button lock and "Cocked" indicator. X socket on front of camera body, plus over and under exposure warning. Silver-coated pentaprism finder; manual... mechanical speed of picture-taking area visible and 0.97x magnification (with 50mm lens at 1/100 sec. split-image microprism focusing screen; 92% of 1/100 sec. SMC Pentax 50mm f/1.2 SMC Pentax-M 50mm f/1.4 SMC Pentax-M 50mm f/1.7 SMC Pentax...
ME Manual
Page 7
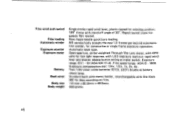
...; throw with Dial Data ME for data recording on film. 131mm x 82.5mm x 49.5mm. 460 grams. •5 New magic-needle quick/sure loading. ME camera body accepts the new 1.5 -frames-per-second automatic film winder, for speedy film rewind. Automatic reset type• Open-aperture, center-weighted Through-The-Lens...
...; throw with Dial Data ME for data recording on film. 131mm x 82.5mm x 49.5mm. 460 grams. •5 New magic-needle quick/sure loading. ME camera body accepts the new 1.5 -frames-per-second automatic film winder, for speedy film rewind. Automatic reset type• Open-aperture, center-weighted Through-The-Lens...

ME Manual
Page 8
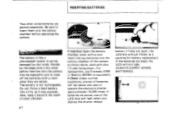
Then turn it only front-elementdown, never front-element-up. Match the red dot Q on the camera body with your right hand. 0 Z itall111111111111 If you have to see, align $ the upraised white dot on the lens. Insert the lens into the body ... clockwise until the 'en≤, locks with a click. 3. Remove the rear lens and body caps. 2. To detach, hold the camera with the red dot on the lens barrel with film in the camera, avoid direct sunlight. 6• When changing lenses outdoors with the lens release lever ® by touch. Depress the ®...
Then turn it only front-elementdown, never front-element-up. Match the red dot Q on the camera body with your right hand. 0 Z itall111111111111 If you have to see, align $ the upraised white dot on the lens. Insert the lens into the body ... clockwise until the 'en≤, locks with a click. 3. Remove the rear lens and body caps. 2. To detach, hold the camera with the red dot on the lens barrel with film in the camera, avoid direct sunlight. 6• When changing lenses outdoors with the lens release lever ® by touch. Depress the ®...
ME Manual
Page 9
Insert the two batteries into the battery chamber of the camera as shown above, each with a dry cloth before operating the camera. If they are active, one year or operate the electronic shutter approximately 10,000 times. If the batteries are packed separately. iC The ...battery is not rechargeable. Do not throw a dead battery into the battery chamber before insertion into the camera. ALWAYS CARRY SPARE BATTERIES. 111 Handle by skin acids. If batteries are salted. Also be damaged by the edges with plus (+) side facing down...
Insert the two batteries into the battery chamber of the camera as shown above, each with a dry cloth before operating the camera. If they are active, one year or operate the electronic shutter approximately 10,000 times. If the batteries are packed separately. iC The ...battery is not rechargeable. Do not throw a dead battery into the battery chamber before insertion into the camera. ALWAYS CARRY SPARE BATTERIES. 111 Handle by skin acids. If batteries are salted. Also be damaged by the edges with plus (+) side facing down...
ME Manual
Page 10
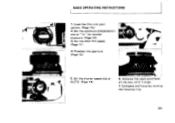
Compose and focus by turning the focusing ring. 8* Set the exposure compensation dial at AUTO. (Page 14) 6. Set the shutter speed dial at "Ix" for normal exposure. (Page 12) 3. Set the ASA film speed. (Page 11) 4. Advance the rapid-wind lever all the way until it stops. 7. BASIC OPERATING INSTRUCTIONS a s '1 I S II '6 I OIL I 53 . • •• =*IIMINGalitut EMS 1. Preselect the aperture. (Page 13) It 5. Load the film into your camera. (Page 10.) 2.
Compose and focus by turning the focusing ring. 8* Set the exposure compensation dial at AUTO. (Page 14) 6. Set the shutter speed dial at "Ix" for normal exposure. (Page 12) 3. Set the ASA film speed. (Page 11) 4. Advance the rapid-wind lever all the way until it stops. 7. BASIC OPERATING INSTRUCTIONS a s '1 I S II '6 I OIL I 53 . • •• =*IIMINGalitut EMS 1. Preselect the aperture. (Page 13) It 5. Load the film into your camera. (Page 10.) 2.
ME Manual
Page 12
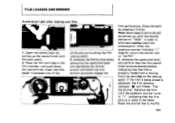
If the film is ready to be carried out with the shutter dial set to "100X" in order to eliminate needless electrical consumption. Open the camera back by pulling up the rewind knob until both top and bottom sprockets engage the ■ film perforations. Close the back by alternately advancing the ...
If the film is ready to be carried out with the shutter dial set to "100X" in order to eliminate needless electrical consumption. Open the camera back by pulling up the rewind knob until both top and bottom sprockets engage the ■ film perforations. Close the back by alternately advancing the ...
ME Manual
Page 13
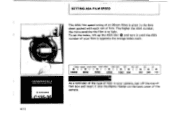
... 800 400 200 100 64 32 20 12 As a reminder of the type of film in the data sheet packed with each roll of the camera. SETTING ASA FILM SPEED The ASA film speed rating of all 35mm films is to light. The higher the ASA number, the more sensitive the... film is given in your camera, tear off the top of film box and insert it until the ASA number of your film is opposite the orange index mark. To set...
... 800 400 200 100 64 32 20 12 As a reminder of the type of film in the data sheet packed with each roll of the camera. SETTING ASA FILM SPEED The ASA film speed rating of all 35mm films is to light. The higher the ASA number, the more sensitive the... film is given in your camera, tear off the top of film box and insert it until the ASA number of your film is opposite the orange index mark. To set...
ME Manual
Page 14
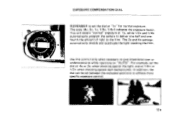
... indicated positions to achieve more specific exposure control. ; EXPOSURE COMPENSATION DIAL REMEMBER to set the dial at lx, while 1/2x and 1/4x automatically program the camera to deliver one half and one fourth the amount of light to the film.
... indicated positions to achieve more specific exposure control. ; EXPOSURE COMPENSATION DIAL REMEMBER to set the dial at lx, while 1/2x and 1/4x automatically program the camera to deliver one half and one fourth the amount of light to the film.
ME Manual
Page 16
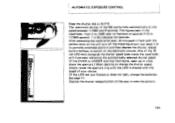
... and then depress the shutter release button halfway to change the shutter speed, simply rotate the aperture ring until the LED is aligned with the camera body as this will illuminate indicating the automatically selected shutter speed. (If the OVER or UNDER warning illuminates, open up or close down the aperture...
... and then depress the shutter release button halfway to change the shutter speed, simply rotate the aperture ring until the LED is aligned with the camera body as this will illuminate indicating the automatically selected shutter speed. (If the OVER or UNDER warning illuminates, open up or close down the aperture...

ME Manual
Page 20
... your body. Often, blurred pictures are due to camera movement. the hand that releases the shutter - Vertical position C Hold your camera tightly to your forehead with the right hand - this may cause camera movement. HOLDING THE CAMERA As a general rule, your camera can be held more firmly in the left arm ...to your body. 18• If you hold your camera with your left hand, raise your right arm and draw your ...
... your body. Often, blurred pictures are due to camera movement. the hand that releases the shutter - Vertical position C Hold your camera tightly to your forehead with the right hand - this may cause camera movement. HOLDING THE CAMERA As a general rule, your camera can be held more firmly in the left arm ...to your body. 18• If you hold your camera with your left hand, raise your right arm and draw your ...
ME Manual
Page 24
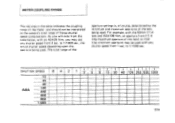
... used with an ASA25 film, you will note from the table below, with any shutter speed from 1 sec. As you may be interpreted as the camera's total range of f/stop-shutter speed combinations.
... used with an ASA25 film, you will note from the table below, with any shutter speed from 1 sec. As you may be interpreted as the camera's total range of f/stop-shutter speed combinations.
ME Manual
Page 26
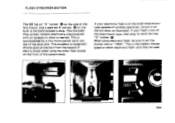
... • 100X' 24. FLASH SYNCHRONIZATION 0 The ME has an "X" socket on the side of the lens mount, and a separate X contact Q on the front of the camera body. This excellent arrangement affords good protection from the hazard of the shoe rails.
... • 100X' 24. FLASH SYNCHRONIZATION 0 The ME has an "X" socket on the side of the lens mount, and a separate X contact Q on the front of the camera body. This excellent arrangement affords good protection from the hazard of the shoe rails.
ME Manual
Page 27
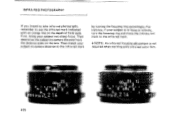
... If you intend to take infra-red photographs, remember to the infra-red mark by turning the focusing ring accordingly. Then match your subject-to-camera distance to use the infra-red mark indicated with infra-red color film. a) 25 5 m 11444 i8 111 si 412 1.4 •25 X1525 ri ft 1 18...-red mark. • NOTE: An infra-red focusing adjustment is in focus at infinity, turn the focusing ring and move the infinity toot mark to -camera distance from the distance scale on the depth-of-field scale. For instance, if your subject into sharp focus.
... If you intend to take infra-red photographs, remember to the infra-red mark by turning the focusing ring accordingly. Then match your subject-to-camera distance to use the infra-red mark indicated with infra-red color film. a) 25 5 m 11444 i8 111 si 412 1.4 •25 X1525 ri ft 1 18...-red mark. • NOTE: An infra-red focusing adjustment is in focus at infinity, turn the focusing ring and move the infinity toot mark to -camera distance from the distance scale on the depth-of-field scale. For instance, if your subject into sharp focus.
ME Manual
Page 30
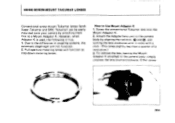
How to the camera body, simply unscrew the lens counterclockwise. Screw the conventional Takumar lens into the Mount Adaptor K. 2. Other screw- ps i /op:NI Per -14pAsis ,*'• 289 However, ... K. USING SCREW-MOUNT TAKUMAR LENSES Conventional screw-mount Takumar lenses (both Super-Takumar and SMC Takumar) can be easily mounted onto your camera by attaching them first to the camera body by aligning the red dots 0 and O, and turning the lens clockwise until it locks with a click. (This takes slightly less than...
How to the camera body, simply unscrew the lens counterclockwise. Screw the conventional Takumar lens into the Mount Adaptor K. 2. Other screw- ps i /op:NI Per -14pAsis ,*'• 289 However, ... K. USING SCREW-MOUNT TAKUMAR LENSES Conventional screw-mount Takumar lenses (both Super-Takumar and SMC Takumar) can be easily mounted onto your camera by attaching them first to the camera body by aligning the red dots 0 and O, and turning the lens clockwise until it locks with a click. (This takes slightly less than...

ME Manual
Page 31
Since the mechanism for locking in the Mount Adapter K is totally different from the camera body, first remove the screw-mount lens. To remove the Mount Adaptor K from that which locks in the normal way. 1. Turn the Mount Adaptor K counterclockwise until you feel it release, and take it out. 3. Then press, with your thumbnail or a pointed object such as a ballpoint pen, against the spring pin 2. T%1 0 •29 1 mount Takumar lenses can then be attached in an SMC Pentax bayonet-mount lens, the lens release lever 0 on the camera body plays no part at all.
Since the mechanism for locking in the Mount Adapter K is totally different from the camera body, first remove the screw-mount lens. To remove the Mount Adaptor K from that which locks in the normal way. 1. Turn the Mount Adaptor K counterclockwise until you feel it release, and take it out. 3. Then press, with your thumbnail or a pointed object such as a ballpoint pen, against the spring pin 2. T%1 0 •29 1 mount Takumar lenses can then be attached in an SMC Pentax bayonet-mount lens, the lens release lever 0 on the camera body plays no part at all.
ME Manual
Page 32
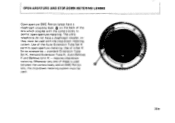
... of the lens which couples with the stop-down metering system. Use of these is used between the camera body and an SMC Pentax A lens, the stop -down metering system must be used with the camera body to permit open -aperture metering. The ultra telephotos do not have a diaphragm coupling lever on the...
... of the lens which couples with the stop-down metering system. Use of these is used between the camera body and an SMC Pentax A lens, the stop -down metering system must be used with the camera body to permit open -aperture metering. The ultra telephotos do not have a diaphragm coupling lever on the...

ME Manual
Page 33
... a rapid temperature change of the battery. This is to the mechanism. However, resistance to -20°C. Put the batteries into the camera right before shooting. RESISTANCE TO TEMPERATURE EXTREMES AND CHANGES The temperature range at least 30 minutes. If this is not possible, keeping the... camera in its case or bag will help somewhat in temperature will continue to function properly stretches from a warm temperature to a sub-freezing...
... a rapid temperature change of the battery. This is to the mechanism. However, resistance to -20°C. Put the batteries into the camera right before shooting. RESISTANCE TO TEMPERATURE EXTREMES AND CHANGES The temperature range at least 30 minutes. If this is not possible, keeping the... camera in its case or bag will help somewhat in temperature will continue to function properly stretches from a warm temperature to a sub-freezing...

ME Manual
Page 34
ISM 4 IIIM CAMERA MAINTENANCE 1. it against anything solid. Never touch the mirror or the shutter leaves. Minor dirt or spots on the lens before wiping is effective; Take ... lens cleaners are particularly good for this. Always keep the viewfinder eyepiece, lens and filters as clean as fingerprints, should be sure to drop the camera or knock it 's an excellent way of your pictures. 3. Breathing on the mirror will not affect the clarity of scratching the glass. but be carefully...
ISM 4 IIIM CAMERA MAINTENANCE 1. it against anything solid. Never touch the mirror or the shutter leaves. Minor dirt or spots on the lens before wiping is effective; Take ... lens cleaners are particularly good for this. Always keep the viewfinder eyepiece, lens and filters as clean as fingerprints, should be sure to drop the camera or knock it 's an excellent way of your pictures. 3. Breathing on the mirror will not affect the clarity of scratching the glass. but be carefully...


