
KM Manual
Page 2
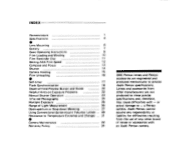
... actual damage to precise Asahi Pentax specifications. Asahi Pentax cannot assume any other manufacturers are engineered and produced meticulously to - INDEX Nomenclature 1 Specifications 4 • Lens Mounting 6 Battery 7 Basic Operating Instructions 8 Film Loading and Winding 10 Film Reminder ...aperture or Stop-down Metering 27 Using Conventional Screw-mount Takumar Lenses 28 Resistance to Temperature Extremes and Changes 31 • Camera Maintenance 32 Warranty Policy 34 SMC Pentax lenses and Pentax accessories are not produced to these precise specifications ...
... actual damage to precise Asahi Pentax specifications. Asahi Pentax cannot assume any other manufacturers are engineered and produced meticulously to - INDEX Nomenclature 1 Specifications 4 • Lens Mounting 6 Battery 7 Basic Operating Instructions 8 Film Loading and Winding 10 Film Reminder ...aperture or Stop-down Metering 27 Using Conventional Screw-mount Takumar Lenses 28 Resistance to Temperature Extremes and Changes 31 • Camera Maintenance 32 Warranty Policy 34 SMC Pentax lenses and Pentax accessories are not produced to these precise specifications ...

KM Manual
Page 3
NOMENCLATURE 1 2 3 IMP 9 10 11 12 13 14 • Rapid-wind lever Shutter speed dial 15 • Shutter speed index 91 X contact hot shoe 16 • Accessory shoe o Film reminder dial 17 0 Film rewind knob 18 19 o Film rewind crank •1 6ISMOB O Exposure counter a) "Cocked" indicator O Shutter release button ® Film speed indicator ® Depth-of-field preview button • Lens release lever ® Lens mounting guide bump • Depth-of-field guide e Distance scale • Diaphragm/distance index ® Diaphragm ring
NOMENCLATURE 1 2 3 IMP 9 10 11 12 13 14 • Rapid-wind lever Shutter speed dial 15 • Shutter speed index 91 X contact hot shoe 16 • Accessory shoe o Film reminder dial 17 0 Film rewind knob 18 19 o Film rewind crank •1 6ISMOB O Exposure counter a) "Cocked" indicator O Shutter release button ® Film speed indicator ® Depth-of-field preview button • Lens release lever ® Lens mounting guide bump • Depth-of-field guide e Distance scale • Diaphragm/distance index ® Diaphragm ring
KM Manual
Page 6
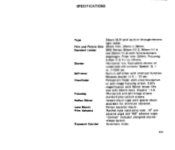
... self-timer with interrupt function. Film and Picture Size 35mm film. 24mm x 36mm. size with fully-automatic diaphragm. Lens Mount Pentax bayonet mount. Film Advance Ratchet-type rapid-wind lever. 10° pre- advance angle and 160° advance angle. Shutter Horizontal... size: 52mm. Speeds: B, 1 to infinity. "Cocked" indicator alongside shutter release button. Standard Lenses SMC Pentax 50mm f/1.2, 50mm f/1.4 and 55mm f/1.8 with 55mm lens). Viewfinder Pentaprism finder with cross-microprism or split-image focusing screen. 0.87x magnification with special shock absorbers for ...
... self-timer with interrupt function. Film and Picture Size 35mm film. 24mm x 36mm. size with fully-automatic diaphragm. Lens Mount Pentax bayonet mount. Film Advance Ratchet-type rapid-wind lever. 10° pre- advance angle and 160° advance angle. Shutter Horizontal... size: 52mm. Speeds: B, 1 to infinity. "Cocked" indicator alongside shutter release button. Standard Lenses SMC Pentax 50mm f/1.2, 50mm f/1.4 and 55mm f/1.8 with 55mm lens). Viewfinder Pentaprism finder with cross-microprism or split-image focusing screen. 0.87x magnification with special shock absorbers for ...
KM Manual
Page 8
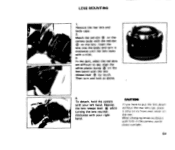
...right hand. ANY In the dark, when the red dots are difficult to put the lens down without the rear lens cap, place it D , clockwise until the lens locks •c with a click. 3. Insert the • lens into the body and turn and lock as above. 4. To detach, hold the ... bump on the 9( lens barrel with the lens release lever Q by touch. • Then turn it only on its front end, never on the lens. Match the red dot ID on the camera body with your left hand. LENS MOUNTING 1. Depress the lens release lever C) while turning the lens counterclockwise with the red ...
...right hand. ANY In the dark, when the red dots are difficult to put the lens down without the rear lens cap, place it D , clockwise until the lens locks •c with a click. 3. Insert the • lens into the body and turn and lock as above. 4. To detach, hold the ... bump on the 9( lens barrel with the lens release lever Q by touch. • Then turn it only on its front end, never on the lens. Match the red dot ID on the camera body with your left hand. LENS MOUNTING 1. Depress the lens release lever C) while turning the lens counterclockwise with the red ...
KM Manual
Page 30
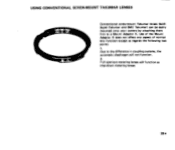
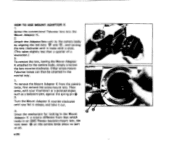
USING CONVENTIONAL SCREW-MOUNT TAKUMAR LENSES Conventional screw-mount Takumar lenses (both Super-Takumar and SMC Takumar) can be easily mounted onto your camera by attaching them first to the difference in coupling systems, the automatic diaphragm will function as regards the following two points: 1. Use of the Mount Adaptor K does not affect any aspect of normal lens function except as stop-down metering lenses. 28 • Due to a Mount Adaptor K. Full-aperture metering lenses will not function. 2.
USING CONVENTIONAL SCREW-MOUNT TAKUMAR LENSES Conventional screw-mount Takumar lenses (both Super-Takumar and SMC Takumar) can be easily mounted onto your camera by attaching them first to the difference in coupling systems, the automatic diaphragm will function as regards the following two points: 1. Use of the Mount Adaptor K does not affect any aspect of normal lens function except as stop-down metering lenses. 28 • Due to a Mount Adaptor K. Full-aperture metering lenses will not function. 2.
KM Manual
Page 31
...pointed object such as a ballpoint pen, against the spring pin ISt 2. Turn the Mount Adaptor K counter-clockwise until it out. 3. Other screw-mount Takumar lenses can then be attached in an SMC Pentax bayonet-mount lens, the e lock lever on the camera body plays no part at all. &#...8226;29 .tograwammaxik. Screw the conventional Takumar lens into the Mount Adaptor K. 2. Then press, with a click....
...pointed object such as a ballpoint pen, against the spring pin ISt 2. Turn the Mount Adaptor K counter-clockwise until it out. 3. Other screw-mount Takumar lenses can then be attached in an SMC Pentax bayonet-mount lens, the e lock lever on the camera body plays no part at all. &#...8226;29 .tograwammaxik. Screw the conventional Takumar lens into the Mount Adaptor K. 2. Then press, with a click....
KM Manual
Page 35
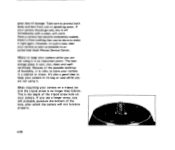
...screw hole on a tripod, be done to store your camera as soon as possible to protect both body and lens from rain or splashing water. If you use a longer screw, you are not using it right again. ... case, take your camera in its bag or case while you will not function properly. •33 When mounting your camera on your camera in a cabinet or closet. great deal of the hole, after which the camera... camera. This is an important point. Take care to an authorized Asahi Pentax Service Center. Where to keep your camera should get wet, dry it is no longer than 5.5mm.
...screw hole on a tripod, be done to store your camera as soon as possible to protect both body and lens from rain or splashing water. If you use a longer screw, you are not using it right again. ... case, take your camera in its bag or case while you will not function properly. •33 When mounting your camera on your camera in a cabinet or closet. great deal of the hole, after which the camera... camera. This is an important point. Take care to an authorized Asahi Pentax Service Center. Where to keep your camera should get wet, dry it is no longer than 5.5mm.


