

efina T Manual
Page 2
... (p.23) • Viewfinder window • Autofocus window • Light sensor window • Built-in this manual carefully before operating the camera to take consistently superior pictures. • Pay special attention to the notes in flash • Spotbeam window (p.35) • Lens &#... lamp (p.32) • Green lamp (p.32) • Diopter adjustment lever (p.24) • Viewfinder eyepiece • Print selection lever (p.30) • Zoom lever (p.25) • LCD panel • Film cartridge chamber cover (p.26) • Tripod socket • Date button (p.55) • Title/Language ...
... (p.23) • Viewfinder window • Autofocus window • Light sensor window • Built-in this manual carefully before operating the camera to take consistently superior pictures. • Pay special attention to the notes in flash • Spotbeam window (p.35) • Lens &#... lamp (p.32) • Green lamp (p.32) • Diopter adjustment lever (p.24) • Viewfinder eyepiece • Print selection lever (p.30) • Zoom lever (p.25) • LCD panel • Film cartridge chamber cover (p.26) • Tripod socket • Date button (p.55) • Title/Language ...

efina T Manual
Page 4
Holding the camera 5. Selecting the print type 3. Viewfinder displays 4. Lamp indications 5. Diopter adjustment 6. Loading the film cartridge 2. Removing the film cartridge • Rewind a film cartridge in ... OF CONTENTS Names of working parts Outline of basic operations For safe use of your camera Precautions for your camera Precautions for battery Advanced Photo System Features Practical shooting guide PREPARATIONS BEFORE TAKING PHOTOGRAPHS 1. Operating the 23-69mm zoom lens TAKING PHOTOGRAPHS 1. Strap attachment 2. Installing/Replacing battery • Battery exhaustion warning ...
Holding the camera 5. Selecting the print type 3. Viewfinder displays 4. Lamp indications 5. Diopter adjustment 6. Loading the film cartridge 2. Removing the film cartridge • Rewind a film cartridge in ... OF CONTENTS Names of working parts Outline of basic operations For safe use of your camera Precautions for your camera Precautions for battery Advanced Photo System Features Practical shooting guide PREPARATIONS BEFORE TAKING PHOTOGRAPHS 1. Operating the 23-69mm zoom lens TAKING PHOTOGRAPHS 1. Strap attachment 2. Installing/Replacing battery • Battery exhaustion warning ...

efina T Manual
Page 8
...children do not get the strap caught their neck. • Be sure to disassemble the camera yourself. • Never touch internal parts of the camera if they become exposed from dropping the camera or for safe operation, please be sure to follow precautions given in this page. &WARNING ... result in serious Injury to the equipment. &WARNING • The electric circuits inside the camera contain high voltage working parts. FOR SAFE USE OF YOUR CAMERA Although we have carefully designed this camera for some other reason, as there is danger of electric shock. • Wrapping the strap...
...children do not get the strap caught their neck. • Be sure to disassemble the camera yourself. • Never touch internal parts of the camera if they become exposed from dropping the camera or for safe operation, please be sure to follow precautions given in this page. &WARNING ... result in serious Injury to the equipment. &WARNING • The electric circuits inside the camera contain high voltage working parts. FOR SAFE USE OF YOUR CAMERA Although we have carefully designed this camera for some other reason, as there is danger of electric shock. • Wrapping the strap...

efina T Manual
Page 9
Be careful not to smoke. Also, do not dispose of the battery in fire, as it may explode. • Remove the battery from the camera immediately if it becomes hot or begin to burn yourself during removal. 7 &CAUTION • Never try to disassemble, short or recharge the battery.
Be careful not to smoke. Also, do not dispose of the battery in fire, as it may explode. • Remove the battery from the camera immediately if it becomes hot or begin to burn yourself during removal. 7 &CAUTION • Never try to disassemble, short or recharge the battery.

efina T Manual
Page 10
.... Do not remove it from rain, splashing water, or any changes in temperature difference is minimized. PRECAUTIONS FOR YOUR CAMERA Precautions when taking pictures • Do not use the camera where it may come in contact with rain, water or any other liquid, wipe it off immediately with a dry... soft cloth. • Be careful not to subject the camera to strong vibrations, shock or pressure. In such a case, put the camera into a case or plastic bag so that any other liquid, because the camera is taken from warm temperature to a subfreezing one or vice versa, the ...
.... Do not remove it from rain, splashing water, or any changes in temperature difference is minimized. PRECAUTIONS FOR YOUR CAMERA Precautions when taking pictures • Do not use the camera where it may come in contact with rain, water or any other liquid, wipe it off immediately with a dry... soft cloth. • Be careful not to subject the camera to strong vibrations, shock or pressure. In such a case, put the camera into a case or plastic bag so that any other liquid, because the camera is taken from warm temperature to a subfreezing one or vice versa, the ...

efina T Manual
Page 11
... Precautions for storage • Avoid leaving the camera for proper care •Use a blower and lens brush to remove dust accumulated on the lens or the viewfinder window. •Never use solvents such as in a car. • Do not store the camera in a closet with good air circulation to ...clean the camera. but not glass surfaces; To clean the external camera surfaces, - Store it in a place with mothballs or in places where temperature and humidity are...
... Precautions for storage • Avoid leaving the camera for proper care •Use a blower and lens brush to remove dust accumulated on the lens or the viewfinder window. •Never use solvents such as in a car. • Do not store the camera in a closet with good air circulation to ...clean the camera. but not glass surfaces; To clean the external camera surfaces, - Store it in a place with mothballs or in places where temperature and humidity are...

efina T Manual
Page 12
...° to-10C° (122°F to 14°F). • To maintain optimum performance, it is recommended that you have the camera inspected or test shoot with it. • The PENTAX warranty provided only for the repair of defects in response to lower temperatures, but when the temperature normalizes, it is caused...
...° to-10C° (122°F to 14°F). • To maintain optimum performance, it is recommended that you have the camera inspected or test shoot with it. • The PENTAX warranty provided only for the repair of defects in response to lower temperatures, but when the temperature normalizes, it is caused...

efina T Manual
Page 14
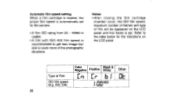
ADVANCED PHOTO SYSTEM FEATURES • The visual exposure indicators on the top of the film cartridge show the film status. • A film cartridge with X , or • visual film indicator cannot be loaded as simply as installing the battery. 12 A 135mm (35mm) film cannot be used. • The film cartridge can be used in this camera. 1 • Unexposed 2 1 Partially exposed 3 X Exposed 4 • Processed 4 i f,j A2 • Use IX240 type film designed for use in Advanced Photo System cameras.
ADVANCED PHOTO SYSTEM FEATURES • The visual exposure indicators on the top of the film cartridge show the film status. • A film cartridge with X , or • visual film indicator cannot be loaded as simply as installing the battery. 12 A 135mm (35mm) film cannot be used. • The film cartridge can be used in this camera. 1 • Unexposed 2 1 Partially exposed 3 X Exposed 4 • Processed 4 i f,j A2 • Use IX240 type film designed for use in Advanced Photo System cameras.
efina T Manual
Page 17
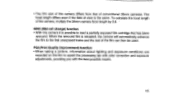
...is possible to load a partially exposed film cartridge that of conventional 35mm cameras. The focal length differs even if the field of the film can then be used. To calculate the focal length of the camera, multiply the 35mm camera focal length by 0.8. ' MRC (Mid-roll change) function •...; With this camera differs from that has been rewound. POI (Print Quality Improvement) function • When taking a picture...
...is possible to load a partially exposed film cartridge that of conventional 35mm cameras. The focal length differs even if the field of the film can then be used. To calculate the focal length of the camera, multiply the 35mm camera focal length by 0.8. ' MRC (Mid-roll change) function •...; With this camera differs from that has been rewound. POI (Print Quality Improvement) function • When taking a picture...

efina T Manual
Page 20
PREPARATIONS BEFORE TAKING PHOTOGRAPHS For optimum performance you should familiarize yourself with certain fundamentals befor taking any photographs. 18 1 STRAP ATTACHMENT Fit the strap on the camera as illustrated. • Use the illustrated part for pushing the mid-roll rewind button to rewind a film.
PREPARATIONS BEFORE TAKING PHOTOGRAPHS For optimum performance you should familiarize yourself with certain fundamentals befor taking any photographs. 18 1 STRAP ATTACHMENT Fit the strap on the camera as illustrated. • Use the illustrated part for pushing the mid-roll rewind button to rewind a film.
efina T Manual
Page 24
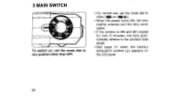
3 MAIN SWITCH To switch on, set the mode dial to any position other than OFF. • For normal use, set the mode dial to either NEN or [ODI]. • When the power turns ON, the lens slightly extends and the lens cover opens. • If the camera is ON and left unused for over 3 minutes, the lens automatically retracts to the shortest focal length. •See page 21 when the battery exhaustion symbol ( Q ) appears on the LCD panel. 22
3 MAIN SWITCH To switch on, set the mode dial to any position other than OFF. • For normal use, set the mode dial to either NEN or [ODI]. • When the power turns ON, the lens slightly extends and the lens cover opens. • If the camera is ON and left unused for over 3 minutes, the lens automatically retracts to the shortest focal length. •See page 21 when the battery exhaustion symbol ( Q ) appears on the LCD panel. 22

efina T Manual
Page 25
4 HOLDING THE CAMERA Keep the camera as still as a wall. Notes: • Do not hold the zoom lens because it moves back and forth while in ...operation. • Make sure not to obstruct the autofocus window, lens, light sensor window or the built-in flash with your fingers, hair or other object. • When using the flash with the camera... positioned vertically, hold the camera so that the flash is likely to shake, and the picture will be blurred.) Try to...
4 HOLDING THE CAMERA Keep the camera as still as a wall. Notes: • Do not hold the zoom lens because it moves back and forth while in ...operation. • Make sure not to obstruct the autofocus window, lens, light sensor window or the built-in flash with your fingers, hair or other object. • When using the flash with the camera... positioned vertically, hold the camera so that the flash is likely to shake, and the picture will be blurred.) Try to...

efina T Manual
Page 26
While looking through the viewfinder, move the diopter adjustment lever the right or left until the AF frame appears in the sharpest focus. 24 5 DIOPTER ADJUSTMENT © r icp _./ Aim the camera towards a bright subject.
While looking through the viewfinder, move the diopter adjustment lever the right or left until the AF frame appears in the sharpest focus. 24 5 DIOPTER ADJUSTMENT © r icp _./ Aim the camera towards a bright subject.

efina T Manual
Page 27
6 OPERATING 23-69mm ZOOM LENS 4 When you move the zoom lever to the right (4), the lens moves towards the 23mm setting. When the lens zooms to the desired setting, release the zoom lever and depress the shutter release button fully to take pictures. • Do not apply force to the zoom lens as doing so causes damage to the left ( 444 ), the lens moves towards the 69mm setting and frames the subject more closely. When you move the zoom lever to the camera. • The shutter cannot be released while the lens is zooming. 444 25
6 OPERATING 23-69mm ZOOM LENS 4 When you move the zoom lever to the right (4), the lens moves towards the 23mm setting. When the lens zooms to the desired setting, release the zoom lever and depress the shutter release button fully to take pictures. • Do not apply force to the zoom lens as doing so causes damage to the left ( 444 ), the lens moves towards the 69mm setting and frames the subject more closely. When you move the zoom lever to the camera. • The shutter cannot be released while the lens is zooming. 444 25
efina T Manual
Page 28
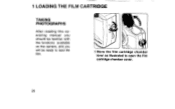
1 LOADING THE FILM CARTRIDGE TAKING PHOTOGRAPHS After reading this operating manual you should be familiar with the functions available on the camera, and you will be ready to load the film. 1 Move the film cartridge chamber lever as illustrated to open the film cartridge chamber cover. 26
1 LOADING THE FILM CARTRIDGE TAKING PHOTOGRAPHS After reading this operating manual you should be familiar with the functions available on the camera, and you will be ready to load the film. 1 Move the film cartridge chamber lever as illustrated to open the film cartridge chamber cover. 26
efina T Manual
Page 30
... film speed, maximum number of frames and type of the photographic situations. Type of Film ISO film speed (e.g. Refer to the table below for the camera. • A film ISO rating from 25 - 10000 is usable. •A film with ISO 400 film speed is recommended to get less image blur and to...
... film speed, maximum number of frames and type of the photographic situations. Type of Film ISO film speed (e.g. Refer to the table below for the camera. • A film ISO rating from 25 - 10000 is usable. •A film with ISO 400 film speed is recommended to get less image blur and to...

efina T Manual
Page 31
... develop IX240 films, consult them for details of the strong magnetic fields. 29 • A film cartridge with the X , or indicator cannot be used in this camera. A 135 (35mm) film cannot be used . • Do not place film cartridges near sources of their services. • Use an IX240 type film in this...
... develop IX240 films, consult them for details of the strong magnetic fields. 29 • A film cartridge with the X , or indicator cannot be used in this camera. A 135 (35mm) film cannot be used . • Do not place film cartridges near sources of their services. • Use an IX240 type film in this...

efina T Manual
Page 32
TAX rk I mdl Type C print 30 Type H print Type P print SELECTING THE PRINT TYPE 111111-U 11 1 IfI H X41 s Three types of print can be switched at any time. Turn the print selection lever to select the desired print type. The type of prints are chosen in this camera.
TAX rk I mdl Type C print 30 Type H print Type P print SELECTING THE PRINT TYPE 111111-U 11 1 IfI H X41 s Three types of print can be switched at any time. Turn the print selection lever to select the desired print type. The type of prints are chosen in this camera.

efina T Manual
Page 33
O Autofocus frame Focus on the subject with this frame. 31 3 VIEWFINDER DISPLAYS • When the camera-to -subject distance is closer than 1.2m, type P print set is less than 1.2m, compose the scene within this frame. 0 Spot AF Frame Select the Spot AF Frame to focus on particular spot in the frame. 0 Close distance compensation frame When the camera-to - subject distance is not recommended due to a substantial difference between what you see through the viewfinder versus the image you will obtain the final print.
O Autofocus frame Focus on the subject with this frame. 31 3 VIEWFINDER DISPLAYS • When the camera-to -subject distance is closer than 1.2m, type P print set is less than 1.2m, compose the scene within this frame. 0 Spot AF Frame Select the Spot AF Frame to focus on particular spot in the frame. 0 Close distance compensation frame When the camera-to - subject distance is not recommended due to a substantial difference between what you see through the viewfinder versus the image you will obtain the final print.

efina T Manual
Page 36
Notes: • Confirm that the green lamp will be focused properly. • If the autofocus window is blinking. But the picture will not be released. The shutter will light up. The green lamp blinks when the subject is too close. • The shooting range (effective camerato-subject distance) of this camera is from 0.65m (2.1ft) to (infinity). • You can release the shutter even if the green lamp is dirty, the autofocus may not function properly. 34 3 Depress the shutter release button fully.
Notes: • Confirm that the green lamp will be focused properly. • If the autofocus window is blinking. But the picture will not be released. The shutter will light up. The green lamp blinks when the subject is too close. • The shooting range (effective camerato-subject distance) of this camera is from 0.65m (2.1ft) to (infinity). • You can release the shutter even if the green lamp is dirty, the autofocus may not function properly. 34 3 Depress the shutter release button fully.

