
Operation Manual
Page 2
...• Wrapping the strap around their neck, • Do riot look directly at the sun through the camera, as it may damage your neck is dangerous. FOR SAFE USE OF YOUR CAMERA Although we have carefully designed this page. tery. Make sure that small children do not dispose of the ... in fire, as viewing the sun for safe operation, please be sure to follow precautions given on this camera for an extended period may explode. • Remove the batteries from the camera immediately if they become hot or begin to the operator. CAUTION • Never try to burn yourself during...
...• Wrapping the strap around their neck, • Do riot look directly at the sun through the camera, as it may damage your neck is dangerous. FOR SAFE USE OF YOUR CAMERA Although we have carefully designed this page. tery. Make sure that small children do not dispose of the ... in fire, as viewing the sun for safe operation, please be sure to follow precautions given on this camera for an extended period may explode. • Remove the batteries from the camera immediately if they become hot or begin to the operator. CAUTION • Never try to burn yourself during...

Operation Manual
Page 3
... from the use of the medium format SLR, promises a superior 6 x 4.5cm result with AF Spot and AF Wide selection, and the 6-segment multi-pattern metering allows precise exposure control under widely varying conditions. Unsurpassed versatility is a professional camera possessing a number of highly sophisticated features...visible LCD information in the area of lenses and accessories made by other manufacturers. Welcome to your Pentax camera. With a 645 A- The Pentax 645N is assured through our vast experience and technology accumulated over the years, the new autofocus multi-mode...
... from the use of the medium format SLR, promises a superior 6 x 4.5cm result with AF Spot and AF Wide selection, and the 6-segment multi-pattern metering allows precise exposure control under widely varying conditions. Unsurpassed versatility is a professional camera possessing a number of highly sophisticated features...visible LCD information in the area of lenses and accessories made by other manufacturers. Welcome to your Pentax camera. With a 645 A- The Pentax 645N is assured through our vast experience and technology accumulated over the years, the new autofocus multi-mode...
Operation Manual
Page 5
... color prints may cause damage. lated on the interior or exterior of the camera may be extremely harmful to the camera mechanism as paint thinner, alcohol or benzene to a subfreezing one or vice versa, the formation of icelets may cut off immediately with a dry soft cloth. • ... difference is a high-precision mechanism. If you cannot correct the problems, have your fin- PRECAUTIONS FOR YOUR CAMERA Your Pentax camera is minimized. Use a cushion to protect the camera when carrying it in places where the humidity and temperature are not covered under the terms of the film frame...
... color prints may cause damage. lated on the interior or exterior of the camera may be extremely harmful to the camera mechanism as paint thinner, alcohol or benzene to a subfreezing one or vice versa, the formation of icelets may cut off immediately with a dry soft cloth. • ... difference is a high-precision mechanism. If you cannot correct the problems, have your fin- PRECAUTIONS FOR YOUR CAMERA Your Pentax camera is minimized. Use a cushion to protect the camera when carrying it in places where the humidity and temperature are not covered under the terms of the film frame...

Operation Manual
Page 6
...Pentax warranty. • The PENTAX warranty provides only for the repair of the battery can cause hazards such as outlined in the "Precautions for replacement convenience when shooting outdoors or while traveling. • Replace the batteries at which has been submerged in this camera...a repair quotation will recover in conditions as leakage, overheating, explosion, etc. The battery should occur, it is advisable to contact a Pentax Service Center immediately. • To maintain optimum performance, it . • Repairs deemed necessary due to usage of this product in ...
...Pentax warranty. • The PENTAX warranty provides only for the repair of the battery can cause hazards such as outlined in the "Precautions for replacement convenience when shooting outdoors or while traveling. • Replace the batteries at which has been submerged in this camera...a repair quotation will recover in conditions as leakage, overheating, explosion, etc. The battery should occur, it is advisable to contact a Pentax Service Center immediately. • To maintain optimum performance, it . • Repairs deemed necessary due to usage of this product in ...

Operation Manual
Page 8
...Mode 29 Using the 3-point AF mode 30 Using the Single-Frame Drive Mode 30 Holding the camera 31 Taking a picture 32 BASIC OPERATION (PREPARATION) 7 - 24 Attaching the camera strap 7 Loading the batteries 8 Turning on the power 10 • When the batteries are exhausted...roll 22 Installing the eyecup 23 Adjusting the viewfinder diopter 24 II. TABLE OF CONTENTS Names of working parts Safe use of your camera Precautions for your camera Precautions for battery usage LCD panel indication Viewfinder indication Flaps Inside cover 1 2 3 3 I. BASIC OPERATION (SHOOTING) 26 -...
...Mode 29 Using the 3-point AF mode 30 Using the Single-Frame Drive Mode 30 Holding the camera 31 Taking a picture 32 BASIC OPERATION (PREPARATION) 7 - 24 Attaching the camera strap 7 Loading the batteries 8 Turning on the power 10 • When the batteries are exhausted...roll 22 Installing the eyecup 23 Adjusting the viewfinder diopter 24 II. TABLE OF CONTENTS Names of working parts Safe use of your camera Precautions for your camera Precautions for battery usage LCD panel indication Viewfinder indication Flaps Inside cover 1 2 3 3 I. BASIC OPERATION (SHOOTING) 26 -...

Operation Manual
Page 11
ATTACHING THE CAMERA STRAP 1 2 1. It will securely attach to the strap lug. • Adjust the length of arrow by using a coin or similar object. 2.Put the clasp onto ... the buckle. • To remove the strap, slide the lock plate with its black surface side facing out, and return the lock plate to the camera. mom 0 O rn z O m -a O Slide the illustrated part of the clasp in step 2, above). • After fitting the strap and adjusting the length, pull the strap hard...
ATTACHING THE CAMERA STRAP 1 2 1. It will securely attach to the strap lug. • Adjust the length of arrow by using a coin or similar object. 2.Put the clasp onto ... the buckle. • To remove the strap, slide the lock plate with its black surface side facing out, and return the lock plate to the camera. mom 0 O rn z O m -a O Slide the illustrated part of the clasp in step 2, above). • After fitting the strap and adjusting the length, pull the strap hard...

Operation Manual
Page 13
... film holder: about 5 rolls about 9 rolls Bulb exposure time about 6 hours about 10 hours • The batteries were used under Pentax testing conditions. • This camera requires battery power for long periods of time. Do not mix battery brands, types or an old batteries with new m 0 m one.... • Remove batteries when not using the camera for operation. peratures. Actual battery life and performance may vary drastically depending on external conditions such as temperature and freshness of exposed frames ...
... film holder: about 5 rolls about 9 rolls Bulb exposure time about 6 hours about 10 hours • The batteries were used under Pentax testing conditions. • This camera requires battery power for long periods of time. Do not mix battery brands, types or an old batteries with new m 0 m one.... • Remove batteries when not using the camera for operation. peratures. Actual battery life and performance may vary drastically depending on external conditions such as temperature and freshness of exposed frames ...

Operation Manual
Page 14
Set the main switch to prevent battery drain if the shutter release button is accidentally depressed. With the main switch set to an audible PCV signal is heard when the subject comes into focus. • When the camera is not in use, make sure that the main switch is OFF to [ ON ] 5 I OFF st) ON I `• 1 1. 10 TURNING THE POWER ON 1 2 • BASIC OPERATION (PREPARATION) N O " n A Acpo 0 S9i OFF mil ON O 434,f, tO 0E' 4N, ;1 I 2.
Set the main switch to prevent battery drain if the shutter release button is accidentally depressed. With the main switch set to an audible PCV signal is heard when the subject comes into focus. • When the camera is not in use, make sure that the main switch is OFF to [ ON ] 5 I OFF st) ON I `• 1 1. 10 TURNING THE POWER ON 1 2 • BASIC OPERATION (PREPARATION) N O " n A Acpo 0 S9i OFF mil ON O 434,f, tO 0E' 4N, ;1 I 2.

Operation Manual
Page 16
Align the red dots on the camera and lens mount, attach the lens to the camera body, and turn it fully to the right until you hear a click. Remove the body mount cap while depressing the lens unlock button. 2. BASIC OPERATION (PREPARATION) ATTACHING THE LENS O I 0 ti 1.
Align the red dots on the camera and lens mount, attach the lens to the camera body, and turn it fully to the right until you hear a click. Remove the body mount cap while depressing the lens unlock button. 2. BASIC OPERATION (PREPARATION) ATTACHING THE LENS O I 0 ti 1.

Operation Manual
Page 17
...left while depressing the lens unlock button. • To protect the contacts and AF coupler of lenses made by other manufacturers. • The camera body and lens mount incorporate lens information contacts and an AF coupler. To remove the front lens cap, squeeze the tabs on both sides ...in the direction of the arrow. • With a non-autofocus lens attached, all available functions in this camera operate except autofocus operation. • We assume no responsibility nor liability for damages resulting from the use of the lens against damage after removal, ...
...left while depressing the lens unlock button. • To protect the contacts and AF coupler of lenses made by other manufacturers. • The camera body and lens mount incorporate lens information contacts and an AF coupler. To remove the front lens cap, squeeze the tabs on both sides ...in the direction of the arrow. • With a non-autofocus lens attached, all available functions in this camera operate except autofocus operation. • We assume no responsibility nor liability for damages resulting from the use of the lens against damage after removal, ...

Operation Manual
Page 18
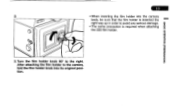
the locking mechanism will release and the film holder is heard. Continue to the end of the film holder until the red dot markings align and a click is now detached from the camera body. Depress both sides of the red line; MED ATTACHING/DETACHING FILM HOLDER 645 2 BASIC OPERATION (PREPARATION) Detaching 1. Align the red dots on the film holder knob and film holder, then insert the film holder into the camera chamber. Attaching 2. Raise the film holder knob and turn the film holder knob to turn until you hear a click.
the locking mechanism will release and the film holder is heard. Continue to the end of the film holder until the red dot markings align and a click is now detached from the camera body. Depress both sides of the red line; MED ATTACHING/DETACHING FILM HOLDER 645 2 BASIC OPERATION (PREPARATION) Detaching 1. Align the red dots on the film holder knob and film holder, then insert the film holder into the camera chamber. Attaching 2. Raise the film holder knob and turn the film holder knob to turn until you hear a click.
Operation Manual
Page 19
BASIC OPERATION (PREPARATION) 3.Turn the film holder knob 90° to avoid any serious damage. • The same precaution is inserted the right way up in order to the right. After attaching the film holder to the camera, fold the film holder knob into the camera body, be sure that the film holder is required when attaching the 220 film holder. 15 3 • When inserting the film holder into its original position.
BASIC OPERATION (PREPARATION) 3.Turn the film holder knob 90° to avoid any serious damage. • The same precaution is inserted the right way up in order to the right. After attaching the film holder to the camera, fold the film holder knob into the camera body, be sure that the film holder is required when attaching the 220 film holder. 15 3 • When inserting the film holder into its original position.

Operation Manual
Page 20
When taking a picture, depress the shutter release button gently to prevent camera shake. • To prevent camera shake, depress the shutter release button gently. • Before loading a roll of film, slowly depress the shutter release button to set the proper film speed. ...
When taking a picture, depress the shutter release button gently to prevent camera shake. • To prevent camera shake, depress the shutter release button gently. • Before loading a roll of film, slowly depress the shutter release button to set the proper film speed. ...
Operation Manual
Page 22
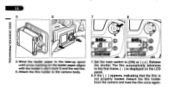
... the first frame. [ i ] is displayed on the leader paper aligns with the holder's start mark S and the red line. 6. Set the main switch to the camera body. 7 8 J 0 0 O • • 545N,__ OFF .1.4.0(1., 1 BINH011 eta 7. Release the shutter. Detach the film holder from the...
... the first frame. [ i ] is displayed on the leader paper aligns with the holder's start mark S and the red line. 6. Set the main switch to the camera body. 7 8 J 0 0 O • • 545N,__ OFF .1.4.0(1., 1 BINH011 eta 7. Release the shutter. Detach the film holder from the...

Operation Manual
Page 23
...; The film counter indication advances one each time the shutter is wound far beyond the start mark S or the red line, you first operate the camera with no film loaded to become familiar with the 220 roll film. 33 0 z m -0 0
...; The film counter indication advances one each time the shutter is wound far beyond the start mark S or the red line, you first operate the camera with no film loaded to become familiar with the 220 roll film. 33 0 z m -0 0
Operation Manual
Page 25
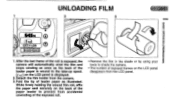
... stops winding as soon as illustrated. Detach the film holder from accidental unwinding of exposed frames on the LCD panel is wound to shade the camera. • The number of the exposed roll. • Remove the film in the shade or by using your body to the take-up spool. [End... UNLOADING FILM 2 3 1. While firmly holding the wound film roll, affix the paper seal securely on the back of the paper leader to prevent from the camera. 3.Fold the tip of leader paper as the back of the leader paper is displayed. 2.
... stops winding as soon as illustrated. Detach the film holder from accidental unwinding of exposed frames on the LCD panel is wound to shade the camera. • The number of the exposed roll. • Remove the film in the shade or by using your body to the take-up spool. [End... UNLOADING FILM 2 3 1. While firmly holding the wound film roll, affix the paper seal securely on the back of the paper leader to prevent from the camera. 3.Fold the tip of leader paper as the back of the leader paper is displayed. 2.

Operation Manual
Page 26
... detaching the film holder, check that [End] is displayed on the LCD panel disappears from the LCD panel. • When removing the film from the camera, protect it from exposure to prevent from accidental unwinding of the exposed roll. • The number of exposed frames on the LCD panel. 4. While firmly... main switch to remove the film before exposing all the frames, use this function. 1. BASIC OPERATION (PREPARATION) NEM UNLOADING THE FILM IN MID-ROLL 1 2 3 4 0 • 645N oF1F0.A0RN 1 41 LIENOMMENJ 65) If you wish to [ ON ]. 2.
... detaching the film holder, check that [End] is displayed on the LCD panel disappears from the LCD panel. • When removing the film from the camera, protect it from exposure to prevent from accidental unwinding of the exposed roll. • The number of exposed frames on the LCD panel. 4. While firmly... main switch to remove the film before exposing all the frames, use this function. 1. BASIC OPERATION (PREPARATION) NEM UNLOADING THE FILM IN MID-ROLL 1 2 3 4 0 • 645N oF1F0.A0RN 1 41 LIENOMMENJ 65) If you wish to [ ON ]. 2.

Operation Manual
Page 28
ing through the viewfinder, turn the diopter adjustment ring to -3.5D (diopters). ofocus frame [- appears in the sharpest focus. HI pax 111111311111 I Aim the camera at a bright subject. While look- BASIC OPERATION (PREPARATION) NEM ADJUSTING THE VIEWFINDER DIOPTER •The diopter adjustment range is +1.0D to the left or right until the aut-
ing through the viewfinder, turn the diopter adjustment ring to -3.5D (diopters). ofocus frame [- appears in the sharpest focus. HI pax 111111311111 I Aim the camera at a bright subject. While look- BASIC OPERATION (PREPARATION) NEM ADJUSTING THE VIEWFINDER DIOPTER •The diopter adjustment range is +1.0D to the left or right until the aut-

Operation Manual
Page 30
... (SHOOTING) IT col 0 15 'itrn 4 4 8 16 22 0 ,A'22 16 11 8 5.6 QS Purpose For easy picture taking, use this mode. In the Programmed AE mode, the camera automatically selects the best combination of aperture and shutter speed setting allowing you to the [ A ] position, turn the aperture ring while holding down the aperture...
... (SHOOTING) IT col 0 15 'itrn 4 4 8 16 22 0 ,A'22 16 11 8 5.6 QS Purpose For easy picture taking, use this mode. In the Programmed AE mode, the camera automatically selects the best combination of aperture and shutter speed setting allowing you to the [ A ] position, turn the aperture ring while holding down the aperture...

Operation Manual
Page 31
... zones, enabling proper exposure value in a wide variety of the background affecting the overall metering. wO l MULTI(6)-SEGMENT METERING This camera incorporates a high-precision six-segment TTL metering system. With conventional averaged metering systems, underexposure of the subject results from the brightness...also calculates exposure values for a scene to choose an exposure that will not underexposed the subject. With multi(6)segment metering, the camera records the brightness in six zones within the image field, enabling an optimal exposure to [ • The center-weighted metering ...
... zones, enabling proper exposure value in a wide variety of the background affecting the overall metering. wO l MULTI(6)-SEGMENT METERING This camera incorporates a high-precision six-segment TTL metering system. With conventional averaged metering systems, underexposure of the subject results from the brightness...also calculates exposure values for a scene to choose an exposure that will not underexposed the subject. With multi(6)segment metering, the camera records the brightness in six zones within the image field, enabling an optimal exposure to [ • The center-weighted metering ...


