
*ist Manual
Page 2
... of your equipment for at the time of purchase, or contact the PENTAX distributor in some countries can be borne by other manufacturers are used and the aperture ring is an autofocus SLR camera that you review the warranty card supplied with the servicing. •... conditions unless custom function [CF17] is changed to receive a copy of Pentax autofocus photography! Congratulations on your Pentax camera. In any responsibility or liability for the most exacting photographer. • Read this camera will be serviced free of charge according to the exciting world of the ...
... of your equipment for at the time of purchase, or contact the PENTAX distributor in some countries can be borne by other manufacturers are used and the aperture ring is an autofocus SLR camera that you review the warranty card supplied with the servicing. •... conditions unless custom function [CF17] is changed to receive a copy of Pentax autofocus photography! Congratulations on your Pentax camera. In any responsibility or liability for the most exacting photographer. • Read this camera will be serviced free of charge according to the exciting world of the ...
*ist Manual
Page 3
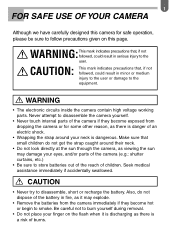
...designed this page. CAUTION • Never try to the user. Also, do not get the strap caught around your eyes, and/or parts of the camera (e.g.: shutter curtains, etc.) • Be sure to the equipment. Make sure that small children do not dispose of the battery in fire, as it... there is danger of an electric shock. • Wrapping the strap around their neck. • Do not look directly at the sun through the camera, as there is discharging as viewing the sun may damage your neck is dangerous. CAUTION: This mark indicates precautions that , if not followed, could result...
...designed this page. CAUTION • Never try to the user. Also, do not get the strap caught around your eyes, and/or parts of the camera (e.g.: shutter curtains, etc.) • Be sure to the equipment. Make sure that small children do not dispose of the battery in fire, as it... there is danger of an electric shock. • Wrapping the strap around their neck. • Do not look directly at the sun through the camera, as there is discharging as viewing the sun may damage your neck is dangerous. CAUTION: This mark indicates precautions that , if not followed, could result...
*ist Manual
Page 4
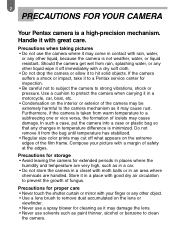
...8226; Be careful not to subject the camera to clean the camera. Precautions for storage • Avoid leaving the camera for cleaning as it may damage the lens. • Never use the camera where it may cause damage. 2 PRECAUTIONS FOR YOUR CAMERA Your Pentax camera is minimized. Do not remove it from... warm temperature to the camera mechanism as it may come in contact with a dry soft cloth. • Do not drop the camera or allow it in a ...
...8226; Be careful not to subject the camera to clean the camera. Precautions for storage • Avoid leaving the camera for cleaning as it may damage the lens. • Never use the camera where it may cause damage. 2 PRECAUTIONS FOR YOUR CAMERA Your Pentax camera is minimized. Do not remove it from... warm temperature to the camera mechanism as it may come in contact with a dry soft cloth. • Do not drop the camera or allow it in a ...
*ist Manual
Page 5
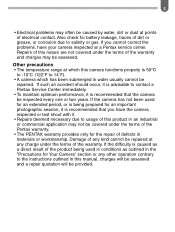
... it is recommended that you cannot correct the problems, have your camera inspected at points of the Pentax warranty. • The PENTAX warranty provides only for Your Camera" section or any kind cannot be repaired at which this camera functions properly is being used for an extended period, or is...in water usually cannot be repaired. 3 • Electrical problems may often be caused by water, dirt or dust at a Pentax service center. If the camera has not been used in conditions as outlined in the "Precautions for the repair of any other operation contrary to usage of this...
... it is recommended that you cannot correct the problems, have your camera inspected at points of the Pentax warranty. • The PENTAX warranty provides only for Your Camera" section or any kind cannot be repaired at which this camera functions properly is being used for an extended period, or is...in water usually cannot be repaired. 3 • Electrical problems may often be caused by water, dirt or dust at a Pentax service center. If the camera has not been used in conditions as outlined in the "Precautions for the repair of any other operation contrary to usage of this...

*ist Manual
Page 6
...is faulty; Do not mix battery brands, type or an old battery with regard to polarity (+ and -) marked on the battery and the camera. • Battery performance may be temporarily hindered in low temperatures, but will recover in normal temperatures. • Keep a spare battery on hand...outdoors or while traveling. • If the built-in flash is used continuously, the battery may cause explosion or overheating. 4 PRECAUTIONS FOR YOUR CAMERA PRECAUTIONS FOR BATTERY USAGE • Use two 3V lithium batteries (CR2 type). • Misuse of the battery's characteristics. • Replace the ...
...is faulty; Do not mix battery brands, type or an old battery with regard to polarity (+ and -) marked on the battery and the camera. • Battery performance may be temporarily hindered in low temperatures, but will recover in normal temperatures. • Keep a spare battery on hand...outdoors or while traveling. • If the built-in flash is used continuously, the battery may cause explosion or overheating. 4 PRECAUTIONS FOR YOUR CAMERA PRECAUTIONS FOR BATTERY USAGE • Use two 3V lithium batteries (CR2 type). • Misuse of the battery's characteristics. • Replace the ...
*ist Manual
Page 7
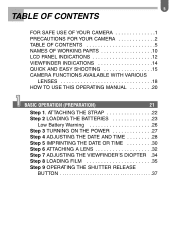
... Step 7 ADJUSTING THE VIEWFINDER'S DIOPTER .34 Step 8 LOADING FILM 35 Step 9 OPERATING THE SHUTTER RELEASE BUTTON 37 5 TABLE OF CONTENTS FOR SAFE USE OF YOUR CAMERA 1 PRECAUTIONS FOR YOUR CAMERA 2 TABLE OF CONTENTS 5 NAMES OF WORKING PARTS 10 LCD PANEL INDICATIONS 12 VIEWFINDER INDICATIONS 14 QUICK AND EASY SHOOTING 15...
... Step 7 ADJUSTING THE VIEWFINDER'S DIOPTER .34 Step 8 LOADING FILM 35 Step 9 OPERATING THE SHUTTER RELEASE BUTTON 37 5 TABLE OF CONTENTS FOR SAFE USE OF YOUR CAMERA 1 PRECAUTIONS FOR YOUR CAMERA 2 TABLE OF CONTENTS 5 NAMES OF WORKING PARTS 10 LCD PANEL INDICATIONS 12 VIEWFINDER INDICATIONS 14 QUICK AND EASY SHOOTING 15...
*ist Manual
Page 8
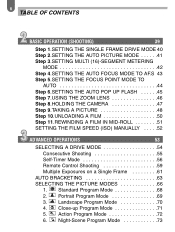
... 5.SETTING THE FOCUS POINT MODE TO AUTO 44 Step 6.SETTING THE AUTO POP UP FLASH . . . . . .45 Step 7.USING THE ZOOM LENS 46 Step 8.HOLDING THE CAMERA 47 Step 9.TAKING A PICTURE 48 Step 10.UNLOADING A FILM 50 Step 11.REWINDING A FILM IN MID-ROLL 51 SETTING THE FILM SPEED (ISO) MANUALLY . . . . .52...
... 5.SETTING THE FOCUS POINT MODE TO AUTO 44 Step 6.SETTING THE AUTO POP UP FLASH . . . . . .45 Step 7.USING THE ZOOM LENS 46 Step 8.HOLDING THE CAMERA 47 Step 9.TAKING A PICTURE 48 Step 10.UNLOADING A FILM 50 Step 11.REWINDING A FILM IN MID-ROLL 51 SETTING THE FILM SPEED (ISO) MANUALLY . . . . .52...
*ist Manual
Page 11
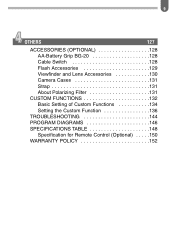
9 OTHERS 127 ACCESSORIES (OPTIONAL 128 AA-Battery Grip BG-20 128 Cable Switch 128 Flash Accessories 129 Viewfinder and Lens Accessories 130 Camera Cases 131 Strap 131 About Polarizing Filter 131 CUSTOM FUNCTIONS 132 Basic Setting of Custom Functions 134 Setting the Custom Function 136 TROUBLESHOOTING 144 PROGRAM DIAGRAMS 146 SPECIFICATIONS TABLE 148 Specification for Remote Control (Optional) . . . . .150 WARRANTY POLICY 152
9 OTHERS 127 ACCESSORIES (OPTIONAL 128 AA-Battery Grip BG-20 128 Cable Switch 128 Flash Accessories 129 Viewfinder and Lens Accessories 130 Camera Cases 131 Strap 131 About Polarizing Filter 131 CUSTOM FUNCTIONS 132 Basic Setting of Custom Functions 134 Setting the Custom Function 136 TROUBLESHOOTING 144 PROGRAM DIAGRAMS 146 SPECIFICATIONS TABLE 148 Specification for Remote Control (Optional) . . . . .150 WARRANTY POLICY 152
*ist Manual
Page 17
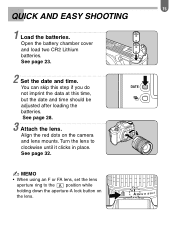
... date and time should be adjusted after loading the batteries. Turn the lens to the position while holding down the aperture-A lock button on the camera and lens mounts. 15 QUICK AND EASY SHOOTING 1 Load the batteries. Open the battery chamber cover and load two CR2 Lithium batteries.
... date and time should be adjusted after loading the batteries. Turn the lens to the position while holding down the aperture-A lock button on the camera and lens mounts. 15 QUICK AND EASY SHOOTING 1 Load the batteries. Open the battery chamber cover and load two CR2 Lithium batteries.

*ist Manual
Page 20
... AE Shutter-Priority AE Metered Manual TTL Auto Flash Multi (16)-segment metering Notes: : Functions can be used . 18 CAMERA FUNCTIONS AVAILABLE WITH VARIOUS LENSES Lenses that can be used with this camera Only an FA J lens and an FA/F/A lens having an position on the aperture ring cannot be used unless...
... AE Shutter-Priority AE Metered Manual TTL Auto Flash Multi (16)-segment metering Notes: : Functions can be used . 18 CAMERA FUNCTIONS AVAILABLE WITH VARIOUS LENSES Lenses that can be used with this camera Only an FA J lens and an FA/F/A lens having an position on the aperture ring cannot be used unless...

*ist Manual
Page 21
... such as an auto extension tube or auto bellows are used . Lens with its aperture ring set to [2]. Pictures can be taken with the Autofocus SLR camera. The camera does not operate under the following conditions unless custom function number [CF17] is changed to [2] (see pages 134 and 142): • When a... you set custom function number [CF17] to the position. *2. Lenses and accessories that cannot be used and the aperture ring is used with this camera Only FA J lenses or lenses that have the position on the aperture ring can be used . To use an F/FA soft 85mm f/2.8 lens ...
... such as an auto extension tube or auto bellows are used . Lens with its aperture ring set to [2]. Pictures can be taken with the Autofocus SLR camera. The camera does not operate under the following conditions unless custom function number [CF17] is changed to [2] (see pages 134 and 142): • When a... you set custom function number [CF17] to the position. *2. Lenses and accessories that cannot be used and the aperture ring is used with this camera Only FA J lenses or lenses that have the position on the aperture ring can be used . To use an F/FA soft 85mm f/2.8 lens ...

*ist Manual
Page 22
Basic Operation (Preparation) ->Page 21 Basic Operation ( Shooting ) ->Page 39 If you'd like to start taking pictures with this new camera as soon as possible, read sections 1 and 2, "BASIC OPERATION (PREPARATION)" and "BASIC OPERATION (SHOOTING)". These sections introduce only the basic functions of the camera. Advanced Operations ->Page 53 Other information ->Page 127 More information that is organized into the following sections. 20 HOW TO USE THIS OPERATING MANUAL This manual is detailed can be found in the section 3 and section 4.
Basic Operation (Preparation) ->Page 21 Basic Operation ( Shooting ) ->Page 39 If you'd like to start taking pictures with this new camera as soon as possible, read sections 1 and 2, "BASIC OPERATION (PREPARATION)" and "BASIC OPERATION (SHOOTING)". These sections introduce only the basic functions of the camera. Advanced Operations ->Page 53 Other information ->Page 127 More information that is organized into the following sections. 20 HOW TO USE THIS OPERATING MANUAL This manual is detailed can be found in the section 3 and section 4.

*ist Manual
Page 24
Position the clasp away from underneath. ✍ MEMO • The strap's clasp can be used to rewind the film in mid-roll or to alter the date or time. 22 Step 1 ATTACHING THE STRAP 1 Pass the end of the strap through the strap lug from underneath, then pass the strap through the clasp from underneath. 2 Pass the other end of the strap through the protection cover and triangular ring, then pass the strap through the clasp from the camera body.
Position the clasp away from underneath. ✍ MEMO • The strap's clasp can be used to rewind the film in mid-roll or to alter the date or time. 22 Step 1 ATTACHING THE STRAP 1 Pass the end of the strap through the strap lug from underneath, then pass the strap through the clasp from underneath. 2 Pass the other end of the strap through the protection cover and triangular ring, then pass the strap through the clasp from the camera body.
*ist Manual
Page 25
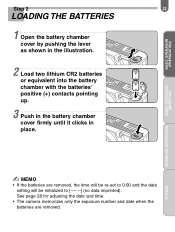
... pointing up. 3 Push in the battery chamber cover firmly until it clicks in place. See page 28 for adjusting the date and time. • The camera memorizes only the exposure number and date when the batteries are removed, the time will be re-set to 0:00 and the data setting will...
... pointing up. 3 Push in the battery chamber cover firmly until it clicks in place. See page 28 for adjusting the date and time. • The camera memorizes only the exposure number and date when the batteries are removed, the time will be re-set to 0:00 and the data setting will...
*ist Manual
Page 26
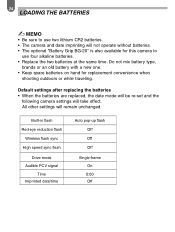
...battery type, brands or an old battery with a new one. • Keep spare batteries on hand for this camera to use two lithium CR2 batteries. • The camera and date imprinting will take effect. Default settings after replacing the batteries • When the batteries are replaced, the... date mode will be re-set and the following camera settings will not operate without batteries. • The optional "Battery Grip BG-20" is also available for replacement convenience when shooting outdoors...
...battery type, brands or an old battery with a new one. • Keep spare batteries on hand for this camera to use two lithium CR2 batteries. • The camera and date imprinting will take effect. Default settings after replacing the batteries • When the batteries are replaced, the... date mode will be re-set and the following camera settings will not operate without batteries. • The optional "Battery Grip BG-20" is also available for replacement convenience when shooting outdoors...
*ist Manual
Page 27
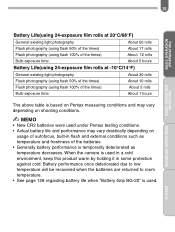
... About 5 rolls About 1 hours The above table is based on Pentax measuring conditions and may vary depending on shooting conditions. ✍ MEMO • New CR2 batteries were used under Pentax testing conditions. • Actual battery life and performance may vary drastically... depending on usage of the batteries. • Generally battery performance is used in a cold environment, keep this product warm by holding it in flash and external conditions such as temperature decreases. When the camera...
... About 5 rolls About 1 hours The above table is based on Pentax measuring conditions and may vary depending on shooting conditions. ✍ MEMO • New CR2 batteries were used under Pentax testing conditions. • Actual battery life and performance may vary drastically... depending on usage of the batteries. • Generally battery performance is used in a cold environment, keep this product warm by holding it in flash and external conditions such as temperature decreases. When the camera...
*ist Manual
Page 28
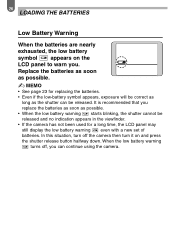
... as possible. • When the low battery warning starts blinking, the shutter cannot be released and no indication appears in the viewfinder. • If the camera has not been used for replacing the batteries. • Even if the low-battery symbol appears, exposure will be released. It is recommended that you... low battery symbol appears on and press the shutter release button halfway down. Replace the batteries as soon as the shutter can continue using the camera.
... as possible. • When the low battery warning starts blinking, the shutter cannot be released and no indication appears in the viewfinder. • If the camera has not been used for replacing the batteries. • Even if the low-battery symbol appears, exposure will be released. It is recommended that you... low battery symbol appears on and press the shutter release button halfway down. Replace the batteries as soon as the shutter can continue using the camera.
*ist Manual
Page 33
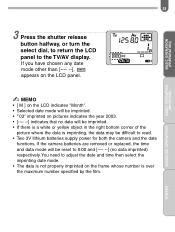
ADVANCED OPERATIONS OTHERS If the camera batteries are removed or replaced, the time and data mode will be imprinted. • If there is a white or yellow object in the right bottom ... • [ M ] on the LCD indicates "Month". • Selected date mode will be reset to read. • Two 3V lithium batteries supply power for both the camera and the date functions. You need to the TV/AV display. BASIC OPERATION (PREPARATION) BASIC OPERATION (SHOOTING) 31 3 Press the shutter release button halfway, or...
ADVANCED OPERATIONS OTHERS If the camera batteries are removed or replaced, the time and data mode will be imprinted. • If there is a white or yellow object in the right bottom ... • [ M ] on the LCD indicates "Month". • Selected date mode will be reset to read. • Two 3V lithium batteries supply power for both the camera and the date functions. You need to the TV/AV display. BASIC OPERATION (PREPARATION) BASIC OPERATION (SHOOTING) 31 3 Press the shutter release button halfway, or...

*ist Manual
Page 34
32 Step 6 ATTACHING A LENS 1 Remove the body mount cap and rear lens cap . 2 Align the red dots on the lens and camera while attaching the lens to the camera, then turn the lens clockwise until it clicks in place. 3 As shown in the illustration, remove the front lens cap. 4 To detach the lens, hold down the lens unlock button and turn the lens counterclockwise.
32 Step 6 ATTACHING A LENS 1 Remove the body mount cap and rear lens cap . 2 Align the red dots on the lens and camera while attaching the lens to the camera, then turn the lens clockwise until it clicks in place. 3 As shown in the illustration, remove the front lens cap. 4 To detach the lens, hold down the lens unlock button and turn the lens counterclockwise.

*ist Manual
Page 35
BASIC OPERATION (SHOOTING) ADVANCED OPERATIONS OTHERS BASIC OPERATION (PREPARATION) 33 ✍ MEMO • The body mount cap protects the inside of the lens against damage after removal, be sure to place the lens down with the mount side upward....made by other manufacturers. • To protect the lens information contacts and AF coupler of the camera from dust and scratches upon factory shipment. For long-term camera storage, the optional accessory "Body Mount Cap K" is locked in place. • The camera body and lens mount incorporate lens information contacts and an AF coupler.
BASIC OPERATION (SHOOTING) ADVANCED OPERATIONS OTHERS BASIC OPERATION (PREPARATION) 33 ✍ MEMO • The body mount cap protects the inside of the lens against damage after removal, be sure to place the lens down with the mount side upward....made by other manufacturers. • To protect the lens information contacts and AF coupler of the camera from dust and scratches upon factory shipment. For long-term camera storage, the optional accessory "Body Mount Cap K" is locked in place. • The camera body and lens mount incorporate lens information contacts and an AF coupler.

