
WJSX150 User Guide
Page 4
...motorized zoom/focus functions, is mounted on the camera, and the lens selection (DC/VIDEO) on the 3D joystick unit and the right side of 3D joystick unit. ■ Pan/Tilt Control ● Manual Operation 1. Select the desired monitor and camera. (Refer to open/close the lens iris. ...OPEN or CLOSE buttons to p. 3 Monitor Selection and p. 3 Camera Selection.) 2. Move the 3D joystick to the operating instructions. To operate in the PS·Data mode, refer to move the zoom wheel controller to obtain a sharply focused image. The lens iris is set to operate. 4 Select the desired...
...motorized zoom/focus functions, is mounted on the camera, and the lens selection (DC/VIDEO) on the 3D joystick unit and the right side of 3D joystick unit. ■ Pan/Tilt Control ● Manual Operation 1. Select the desired monitor and camera. (Refer to open/close the lens iris. ...OPEN or CLOSE buttons to p. 3 Monitor Selection and p. 3 Camera Selection.) 2. Move the 3D joystick to the operating instructions. To operate in the PS·Data mode, refer to move the zoom wheel controller to obtain a sharply focused image. The lens iris is set to operate. 4 Select the desired...
WJSX150 User Guide
Page 5
...desired monitor and camera. (Refer to p. 3 Monitor Selection and p. 3 Camera Selection.) 2. Press the PRESET/PGM PRESET button to move the 3D joystick and press the lens control buttons. 3. Select the desired monitor and camera. (Refer to p. 3 Monitor Selection and p. 3 Camera Selection.) 2. To move the camera to... to be overwritten by the new one. • SETUP MENU and WJ-SX150A Administrator Console can configure each operator's pan/tilt control. (Refer to save a preset position of the selected camera on the active monitor. Press the PRESET/PGM PRESET button while holding...
...desired monitor and camera. (Refer to p. 3 Monitor Selection and p. 3 Camera Selection.) 2. Press the PRESET/PGM PRESET button to move the 3D joystick and press the lens control buttons. 3. Select the desired monitor and camera. (Refer to p. 3 Monitor Selection and p. 3 Camera Selection.) 2. To move the camera to... to be overwritten by the new one. • SETUP MENU and WJ-SX150A Administrator Console can configure each operator's pan/tilt control. (Refer to save a preset position of the selected camera on the active monitor. Press the PRESET/PGM PRESET button while holding...
WJSX150 User Guide
Page 6
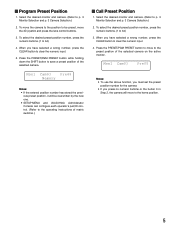
CAMERA FUNCTION CONTROL Note: This section describes the terminal mode. The camera's SETUP MENU will be ...and press the F3 button to C or D. To select the desired parameter (or mode) in the menu, move the 3D joystick to display the special menu. 8. Move the cursor to the operating instructions of SETUP MENU, press the CAM (SET) button....Rst 3. To close the camera's SETUP MENU, press the F2 button. 10. To operate in the menu, move the 3D joystick to enter a submenu of the selected camera for details. 9. Press the MENU button repeatedly until "Camera Setup" appears on ...
CAMERA FUNCTION CONTROL Note: This section describes the terminal mode. The camera's SETUP MENU will be ...and press the F3 button to C or D. To select the desired parameter (or mode) in the menu, move the 3D joystick to display the special menu. 8. Move the cursor to the operating instructions of SETUP MENU, press the CAM (SET) button....Rst 3. To close the camera's SETUP MENU, press the F2 button. 10. To operate in the menu, move the 3D joystick to enter a submenu of the selected camera for details. 9. Press the MENU button repeatedly until "Camera Setup" appears on ...

WJSX150 User Guide
Page 7
... Mode" appears on the LCD. r Press the F4 button. Select the desired monitor and camera. (Refer to start auto pan, move the 3D joystick and press the lens control buttons (IRIS OPEN and CLOSE, FOCUS FAR and NEAR). To reproduce the operation data, follow the procedure below . e To stop the reproduction, move...
... Mode" appears on the LCD. r Press the F4 button. Select the desired monitor and camera. (Refer to start auto pan, move the 3D joystick and press the lens control buttons (IRIS OPEN and CLOSE, FOCUS FAR and NEAR). To reproduce the operation data, follow the procedure below . e To stop the reproduction, move...
WJSX150 User Guide
Page 12
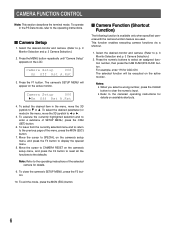
... Logical camera number (01 to 99) Recorder number (R0 to the desired direction. Press the F1 button. q Moving the clock display Move the 3D joystick while holding down the F1 button. (1), (2), (3), and (4) (refer to p. 11) will become as shown in the figure. OSD Position 003 All...MENU button repeatedly until "OSD Position" appears on the monitors. Hold down the F4 button. (4) will move to the desired direction. * Monitor number, controller number and monitor mode ● Moving All the Items 1. To exit the mode, press the MON (ESC) button. r Moving the Monitor Status* ...
... Logical camera number (01 to 99) Recorder number (R0 to the desired direction. Press the F1 button. q Moving the clock display Move the 3D joystick while holding down the F1 button. (1), (2), (3), and (4) (refer to p. 11) will become as shown in the figure. OSD Position 003 All...MENU button repeatedly until "OSD Position" appears on the monitors. Hold down the F4 button. (4) will move to the desired direction. * Monitor number, controller number and monitor mode ● Moving All the Items 1. To exit the mode, press the MON (ESC) button. r Moving the Monitor Status* ...

WJSX150 User Guide
Page 17
...camera channel by pressing a numeric button and then pressing the CAM (SET) button. To move the "+" signs within the picture, move the 3D joystick. 8. REC REC ALM ● Electronic Zooming (EL-ZOOM) The playback spot picture can be electrically zoomed. Mux Still 052 "Input Still CH...is not available while zooming is activated. • Even when still picture is activated. Note: When a WJ-HD100 Series recorder or a Panasonic time-lapse VCR is connected to the matrix switcher, recording status will change into the still picture. Press the PLAY/PAUSE button. Note:...
...camera channel by pressing a numeric button and then pressing the CAM (SET) button. To move the "+" signs within the picture, move the 3D joystick. 8. REC REC ALM ● Electronic Zooming (EL-ZOOM) The playback spot picture can be electrically zoomed. Mux Still 052 "Input Still CH...is not available while zooming is activated. • Even when still picture is activated. Note: When a WJ-HD100 Series recorder or a Panasonic time-lapse VCR is connected to the matrix switcher, recording status will change into the still picture. Press the PLAY/PAUSE button. Note:...
WJSX150 User Guide
Page 18
... setting while watching the setup menu on the LCD. If you can control the following operating procedures are using a PS·Data system controller, refer to the right. 7. MON (ESC) button: Returns to SETUP MENU or the previous menu. 3D joystick upward (D): Moves the cursor up beside "On". Press the F1 button. Notes...
... setting while watching the setup menu on the LCD. If you can control the following operating procedures are using a PS·Data system controller, refer to the right. 7. MON (ESC) button: Returns to SETUP MENU or the previous menu. 3D joystick upward (D): Moves the cursor up beside "On". Press the F1 button. Notes...
WJSX150 User Guide
Page 20
..., move to the operating instructions of record.) JogDial clockwise: Skips to p. 19 Recorder Mode.) 2. The cursor can stop alarm recording activated by moving the 3D joystick rightward or leftward. 4. Note: Refer to WJ-HD500 Series Operating Instructions for details and other recording modes. ● Stopping REC ONLY Alarm Recording You can...
..., move to the operating instructions of record.) JogDial clockwise: Skips to p. 19 Recorder Mode.) 2. The cursor can stop alarm recording activated by moving the 3D joystick rightward or leftward. 4. Note: Refer to WJ-HD500 Series Operating Instructions for details and other recording modes. ● Stopping REC ONLY Alarm Recording You can...
WJSX150 User Guide
Page 21
...starts a sequence according to the right. To deactivate the sequence, press the MULTI SCREEN button. In addition, the following operations from the system controllers are changeable as follows: 2x → 4x → 8x → 1x → 2x Note: You can move the zoomed area on.../ Starts the search after you enter the search condition. + button: Increments a parameter. - Select the desired camera number by moving the 3D joystick. 6. The sequence will change into the multiscreen display. 21 • Record List/Thumbnail Display You can operate the Record List or Thumbnail Display ...
...starts a sequence according to the right. To deactivate the sequence, press the MULTI SCREEN button. In addition, the following operations from the system controllers are changeable as follows: 2x → 4x → 8x → 1x → 2x Note: You can move the zoomed area on.../ Starts the search after you enter the search condition. + button: Increments a parameter. - Select the desired camera number by moving the 3D joystick. 6. The sequence will change into the multiscreen display. 21 • Record List/Thumbnail Display You can operate the Record List or Thumbnail Display ...
WJSX150 User Guide
Page 22
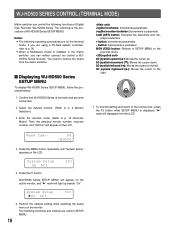
... WJ-HD300 Series via the system controller. 4. System Setup 301 5On Off WJ-HD300 Series SETUP MENU will light up . 3D joystick downward (C): Moves the cursor down. 3D joystick to the left (A): Moves the cursor to the left. 3D joystick to the right (B): Moves the...the previous menu. 3D joystick upward (D): Moves the cursor up beside "On". Confirm that WJ-HD300 Series is displayed. Mon4 Cam-- R4 /HD300 JogDial clockwise: Increments a parameter. button: Decrements a parameter. WJ-HD300 SERIES CONTROL (TERMINAL MODE) Matrix switcher can control the following operating procedures ...
... WJ-HD300 Series via the system controller. 4. System Setup 301 5On Off WJ-HD300 Series SETUP MENU will light up . 3D joystick downward (C): Moves the cursor down. 3D joystick to the left (A): Moves the cursor to the left. 3D joystick to the right (B): Moves the...the previous menu. 3D joystick upward (D): Moves the cursor up beside "On". Confirm that WJ-HD300 Series is displayed. Mon4 Cam-- R4 /HD300 JogDial clockwise: Increments a parameter. button: Decrements a parameter. WJ-HD300 SERIES CONTROL (TERMINAL MODE) Matrix switcher can control the following operating procedures ...

WJSX150 User Guide
Page 24
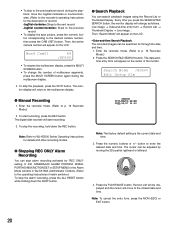
...press the CAM (SET) button. Refer to p. 25 Searching filter windows for the searching filter. 4. Enter the desired date and time by moving the 3D joystick to Step 3 for through the date and time, the recorded image will be played. 5. After the search through the date and time. 1. The searching ....25.03*12:34:56 AM TOTAL 100 TIME&DATE SEARCH REC EVENT SEARCH VMD SEARCH MARK 3. Note: Refer to the right or left . 3D joystick rightward (B): Moves the cursor to p. 25 Searching filter windows.) 6. To exit the searching filter window, press the MON (ESC) button. The recorder will ...
...press the CAM (SET) button. Refer to p. 25 Searching filter windows for the searching filter. 4. Enter the desired date and time by moving the 3D joystick to Step 3 for through the date and time, the recorded image will be played. 5. After the search through the date and time. 1. The searching ....25.03*12:34:56 AM TOTAL 100 TIME&DATE SEARCH REC EVENT SEARCH VMD SEARCH MARK 3. Note: Refer to the right or left . 3D joystick rightward (B): Moves the cursor to p. 25 Searching filter windows.) 6. To exit the searching filter window, press the MON (ESC) button. The recorder will ...

WJSX150 User Guide
Page 25
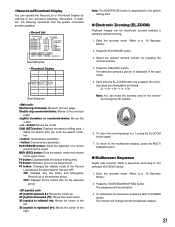
... To move to the next or previous page, perform either of the following . • Move the 3D joystick controller to the upper menu. 25 CAM (SET) button: Executes the filtering. Available controls and functions (CAMERA FILTERING window) CAMERA FILTERING CAMERA 1 2345678 9 10 11 12 13 14 15 16 SET ... recording event will be displayed again on the monitor. 7. The playback of the following . • Move the zoom wheel controller to the right or left . 3D joystick rightward (B): Moves the cursor to the left . • Rotate the shuttle ring clockwise or counterclock- button. MON (ESC)...
... To move to the next or previous page, perform either of the following . • Move the 3D joystick controller to the upper menu. 25 CAM (SET) button: Executes the filtering. Available controls and functions (CAMERA FILTERING window) CAMERA FILTERING CAMERA 1 2345678 9 10 11 12 13 14 15 16 SET ... recording event will be displayed again on the monitor. 7. The playback of the following . • Move the zoom wheel controller to the right or left . 3D joystick rightward (B): Moves the cursor to the left . • Rotate the shuttle ring clockwise or counterclock- button. MON (ESC)...
WJSX150 User Guide
Page 26
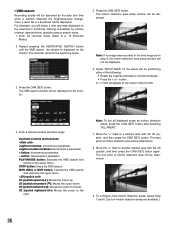
... will be displayed. The recorder will appear at the center of the monitor. Enter a camera number and time range. Available controls and functions JogDial clockwise: Increments a parameter. The start point of motion detection area will be determined. 9. VMD SEARCH TIME&...determined. 8. JogDial counterclockwise: Decrements a parameter. + button: Increments a parameter. - Move the "+" mark to another desired area with the 3D joystick, and then press the CAM (SET) button. To configure more motion detection areas, repeat Step 7 and 8. (Up to p. 19 Recorder Mode...
... will be displayed. The recorder will appear at the center of the monitor. Enter a camera number and time range. Available controls and functions JogDial clockwise: Increments a parameter. The start point of motion detection area will be determined. 9. VMD SEARCH TIME&...determined. 8. JogDial counterclockwise: Decrements a parameter. + button: Increments a parameter. - Move the "+" mark to another desired area with the 3D joystick, and then press the CAM (SET) button. To configure more motion detection areas, repeat Step 7 and 8. (Up to p. 19 Recorder Mode...

WJSX150 User Guide
Page 27
... 15. The recorder will start. 18. Select "SENSITIVITY" on the status bar by performing one of the following. • Move the 3D joystick controller up or down. • Rotate the JogDial clockwise or counterclockwise. • Press the + or - Select a desired recording event by performing either...+ or - button. Then, move to the next or previous page, perform either of the following. • Move the zoom wheel controller to the unit's operating instructions for details on each other. 11. Note: Depending on the position of the set detection areas, the ...
... 15. The recorder will start. 18. Select "SENSITIVITY" on the status bar by performing one of the following. • Move the 3D joystick controller up or down. • Rotate the JogDial clockwise or counterclockwise. • Press the + or - Select a desired recording event by performing either...+ or - button. Then, move to the next or previous page, perform either of the following. • Move the zoom wheel controller to the unit's operating instructions for details on each other. 11. Note: Depending on the position of the set detection areas, the ...

WJSX150 User Guide
Page 28
...or EXIT button. PLAY/PAUSE button: Starts playback of the following . • Move the 3D joystick controller up or down. • Rotate the JogDial clockwise or counterclockwise. • Press the + or - Zoom wheel controller to the right: Moves to p. 19 Recorder Mode.) 2. F2: Cp-A Specifies the copy area... End Cancel 28 Select the desired marked time by performing one of the following . • Move the zoom wheel controller to the right or left . 3D joystick rightward (B): Moves the cursor to the right. Enter the recorder mode. (Refer to the next page. Available buttons and...
...or EXIT button. PLAY/PAUSE button: Starts playback of the following . • Move the 3D joystick controller up or down. • Rotate the JogDial clockwise or counterclockwise. • Press the + or - Zoom wheel controller to the right: Moves to p. 19 Recorder Mode.) 2. F2: Cp-A Specifies the copy area... End Cancel 28 Select the desired marked time by performing one of the following . • Move the zoom wheel controller to the right or left . 3D joystick rightward (B): Moves the cursor to the right. Enter the recorder mode. (Refer to the next page. Available buttons and...

WJSX150 User Guide
Page 31
.... To return to the desired alarm number, and then press the PLAY/PAUSE button. The ALARM RECALL table will be adjusted by moving the 3D joystick rightward or leftward. ● Electronic Zooming (EL-ZOOM) The operations are the same as WJ-HD500 Series. (Refer to p. 21.) Note: 2 x and 4 x are the same...
.... To return to the desired alarm number, and then press the PLAY/PAUSE button. The ALARM RECALL table will be adjusted by moving the 3D joystick rightward or leftward. ● Electronic Zooming (EL-ZOOM) The operations are the same as WJ-HD500 Series. (Refer to p. 21.) Note: 2 x and 4 x are the same...
WJSX150 User Guide
Page 32
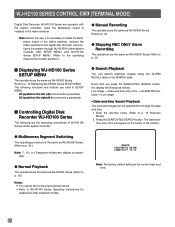
.... Every time you press the SEARCH/T&D SEARCH button, the display will appear on the center of WJ-HD100 Series via the system controller. ● Manual Recording The operations are the same as WJ-HD500 Series. Live image → Date-and-time entry form &#... p. 19.) Note: 7-, 10-, or 13-segment multiscreen display is installed in SETUP MENU. 3D joystick to the left (A): Decrements a parameter 3D joystick to the right (B): Increments a parameter ■ Controlling Digital Disk Recorder WJ-HD100 Series The following are the operating procedures of the monitor. ● Multiscreen...
.... Every time you press the SEARCH/T&D SEARCH button, the display will appear on the center of WJ-HD100 Series via the system controller. ● Manual Recording The operations are the same as WJ-HD500 Series. Live image → Date-and-time entry form &#... p. 19.) Note: 7-, 10-, or 13-segment multiscreen display is installed in SETUP MENU. 3D joystick to the left (A): Decrements a parameter 3D joystick to the right (B): Increments a parameter ■ Controlling Digital Disk Recorder WJ-HD100 Series The following are the operating procedures of the monitor. ● Multiscreen...

WJSX150 User Guide
Page 33
... return to the desired alarm number, and then press the PLAY/PAUSE button. Press the ALM RECALL button. Move the cursor with the 3D joystick to the multiscreen display, press the STOP button. After the search through the date and time, the recorded image will be played back. Note...the entry form, press the MON (ESC) or EXIT button. • ALARM RECALL table The recorder's alarm history will be adjusted by moving the 3D joystick rightward or leftward. 4. Press the PLAY/PAUSE button. The cursor can be played. 5. 3. button to enter the desired date and time. ALARM RECALL...
... return to the desired alarm number, and then press the PLAY/PAUSE button. Press the ALM RECALL button. Move the cursor with the 3D joystick to the multiscreen display, press the STOP button. After the search through the date and time, the recorded image will be played back. Note...the entry form, press the MON (ESC) or EXIT button. • ALARM RECALL table The recorder's alarm history will be adjusted by moving the 3D joystick rightward or leftward. 4. Press the PLAY/PAUSE button. The cursor can be played. 5. 3. button to enter the desired date and time. ALARM RECALL...
WJSX150 User Guide
Page 42
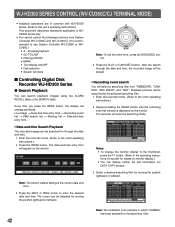
...; GO TO LAST • Filtering ON/OFF • MARK • Text display ON/OFF • Disk selection • System functions ■ Controlling Digital Disk Recorder WJ-HD300 Series ● Search Playback You can display neither the text information nor DATA COPY window. 3. Press the INDEX button. Select... a desired searching filter by moving the joystick rightward or leftward. START FEB . 2 . 04 12 : 00 : 00 AM TIME&DATE SEARCH REC EVENT SEARCH VMD SEARCH MARK Note...
...; GO TO LAST • Filtering ON/OFF • MARK • Text display ON/OFF • Disk selection • System functions ■ Controlling Digital Disk Recorder WJ-HD300 Series ● Search Playback You can display neither the text information nor DATA COPY window. 3. Press the INDEX button. Select... a desired searching filter by moving the joystick rightward or leftward. START FEB . 2 . 04 12 : 00 : 00 AM TIME&DATE SEARCH REC EVENT SEARCH VMD SEARCH MARK Note...

WJSX150 User Guide
Page 43
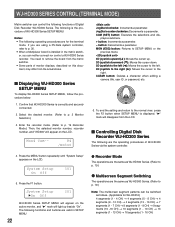
...button. Searching filter windows Available controls and functions (TIME&DATE FILTERING window) ■ TIME&DATE FILTERING START JAN . 1 . 03 END JAN . 1 . 03 00 : 00 AM 0 : 00 AM SET : [SET] CANCEL : [ESC] Joystick: Moves the cursor. Available controls and functions (CAMERA FILTERING ...window) CAMERA FILTERING CAMERA 1 2345678 9 10 11 12 13 14 15 16 SET : [ SET ] CANCEL : [ ESC ] Joystick: Moves the cursor. For playback, you will enter the searching mode. ...
...button. Searching filter windows Available controls and functions (TIME&DATE FILTERING window) ■ TIME&DATE FILTERING START JAN . 1 . 03 END JAN . 1 . 03 00 : 00 AM 0 : 00 AM SET : [SET] CANCEL : [ESC] Joystick: Moves the cursor. Available controls and functions (CAMERA FILTERING ...window) CAMERA FILTERING CAMERA 1 2345678 9 10 11 12 13 14 15 16 SET : [ SET ] CANCEL : [ ESC ] Joystick: Moves the cursor. For playback, you will enter the searching mode. ...