Operating Instructions
Page 2
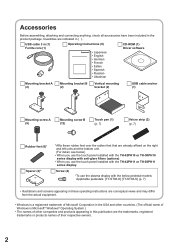
...ROM (1) Driver software Mounting bracket A (2) Mounting bracket B (2) Vertical mounting bracket (2) USB cable anchor (1) Mounting screw A (9) Mounting screw B (12) Touch pen (1) (p. 7) Velcro strip (2) (p. 7) Rubber feet (6)* Spacer (2)* *Affix these rubber feet over the rubber feet that are already af&#...and left units and the bottom unit. (For detail, see below pedestal models Applicable pedestals: [TY-ST08-K] [TY-ST08-S] (p. 7) • Illustrations and screens appearing in these operating instructions are conceptual views and may differ from the actual equipment. •...
...ROM (1) Driver software Mounting bracket A (2) Mounting bracket B (2) Vertical mounting bracket (2) USB cable anchor (1) Mounting screw A (9) Mounting screw B (12) Touch pen (1) (p. 7) Velcro strip (2) (p. 7) Rubber feet (6)* Spacer (2)* *Affix these rubber feet over the rubber feet that are already af&#...and left units and the bottom unit. (For detail, see below pedestal models Applicable pedestals: [TY-ST08-K] [TY-ST08-S] (p. 7) • Illustrations and screens appearing in these operating instructions are conceptual views and may differ from the actual equipment. •...

Operating Instructions
Page 5
Do not touch the infrared transmissive area until the PC has completed the starting OS. • After turning on the screen until starting of electrical noise (generators, air conditioners etc.) 5 If this is not observed, device errors may be detected by following ...the precautions below. Do not place heavy objects on the equipment. • The touch panel is dangerous to touch the infrared transmissive area on...
Do not touch the infrared transmissive area until the PC has completed the starting OS. • After turning on the screen until starting of electrical noise (generators, air conditioners etc.) 5 If this is not observed, device errors may be detected by following ...the precautions below. Do not place heavy objects on the equipment. • The touch panel is dangerous to touch the infrared transmissive area on...

Operating Instructions
Page 6
...a cloth in the level of wiping with excessive force. Also, be careful of infrared light available for repair. 6 Maintenance Maintenance * Be sure to touch the infrared transmissive area on the setup location; if in such a malfunctioning state. Cleaning of the infrared transmissive area. • Once a day, use...starts to a reduction in neutral detergent diluted by gently wiping the soiling off. Failure to do so will vary depending on the screen of water, wring well, wipe off any soiling or debris on such an occurrence you can restore normal function simply by 100 times...
...a cloth in the level of wiping with excessive force. Also, be careful of infrared light available for repair. 6 Maintenance Maintenance * Be sure to touch the infrared transmissive area on the setup location; if in such a malfunctioning state. Cleaning of the infrared transmissive area. • Once a day, use...starts to a reduction in neutral detergent diluted by gently wiping the soiling off. Failure to do so will vary depending on the screen of water, wring well, wipe off any soiling or debris on such an occurrence you can restore normal function simply by 100 times...
Operating Instructions
Page 13
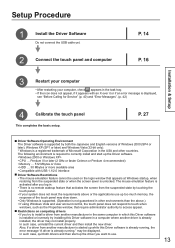
... and then install the new driver. may not install properly. P. 27 ■ Driver Software Operating Environment The Driver software is supported by touching the touch panel. • If your computer, check appears in the task tray. • If the icon does not appear, if it or... Driver software. • CPU ... Also, if a driver from the suspended state or when the screen saver is displayed, see "Before Calling for Service" (p. 40) and "Error Messages". (p. 42) 4 Calibrate the touch panel This completes the basic setup. Pentium III or later (2 GHz or faster Celeron or Pentium 4...
... and then install the new driver. may not install properly. P. 27 ■ Driver Software Operating Environment The Driver software is supported by touching the touch panel. • If your computer, check appears in the task tray. • If the icon does not appear, if it or... Driver software. • CPU ... Also, if a driver from the suspended state or when the screen saver is displayed, see "Before Calling for Service" (p. 40) and "Error Messages". (p. 42) 4 Calibrate the touch panel This completes the basic setup. Pentium III or later (2 GHz or faster Celeron or Pentium 4...

Operating Instructions
Page 16
... the USB cable anchor to your computer. open the core. For details, see the instruction manual of your fingers, for instance, or touching the screen while connecting the USB cable might slow down. Check that the USB power supply of the plasma display.) 1. Run the USB cable into the ...connect to the USB cable. ㊎ Align the screw holes on the USB cable anchor with the USB cable. Pull the tabs on the touch panel. ㊏ Tighten mounting screw A by hand. If used as defective elements. In such case, with the computer started up . 2 Connect the...
... the USB cable anchor to your computer. open the core. For details, see the instruction manual of your fingers, for instance, or touching the screen while connecting the USB cable might slow down. Check that the USB power supply of the plasma display.) 1. Run the USB cable into the ...connect to the USB cable. ㊎ Align the screw holes on the USB cable anchor with the USB cable. Pull the tabs on the touch panel. ㊏ Tighten mounting screw A by hand. If used as defective elements. In such case, with the computer started up . 2 Connect the...

Operating Instructions
Page 20
...two ways to Use the Driver Software ■ Driver Software Startup The Driver software starts up automatically when the computer starts up. Touch Panel Setup How to start up the setup panel. Method 2 Select [Start] → [All programs] → [LSaDrv]... menu that appears. 20 The Driver software starts up . The setup panel starts up the Drive software. Note The touch panel may not respond smoothly for manually starting up . ■ Exit Driver Software Click on the icon in two ...The setup panel starts up , the icon will appear at the bottom right-hand corner of the screen.
...two ways to Use the Driver Software ■ Driver Software Startup The Driver software starts up automatically when the computer starts up. Touch Panel Setup How to start up the setup panel. Method 2 Select [Start] → [All programs] → [LSaDrv]... menu that appears. 20 The Driver software starts up . The setup panel starts up the Drive software. Note The touch panel may not respond smoothly for manually starting up . ■ Exit Driver Software Click on the icon in two ...The setup panel starts up , the icon will appear at the bottom right-hand corner of the screen.

Operating Instructions
Page 21
... panel. Cancel: Ends the setup panel without doing anything. If the touched panel is selected when setting up registered touch panels. OK: Applies the setup to the operation. Operation 21 Select: Opens the "Please touch a touch screen" dialog box. It is used to select touch panels for "Common setting" is applied when the "Use common settings...
... panel. Cancel: Ends the setup panel without doing anything. If the touched panel is selected when setting up registered touch panels. OK: Applies the setup to the operation. Operation 21 Select: Opens the "Please touch a touch screen" dialog box. It is used to select touch panels for "Common setting" is applied when the "Use common settings...

Operating Instructions
Page 26
...follow degrades slightly. ■ Direction setting direction of sensor against screen: This area sets the sensor position of the touch panel. (p. 39) Setting of area button: This button creates virtual (area) buttons in the touch area and assigns operations to them. (p. 32) 26 Precise ... (correction of sensor characteristics, the pen is neutralized, by delaying the touch recognition. When you select this checkbox, the displacement between the touched position and cursor position is sometimes judged to have touched the touch panel in detail. (p. 28) The higher the setting, the wider ...
...follow degrades slightly. ■ Direction setting direction of sensor against screen: This area sets the sensor position of the touch panel. (p. 39) Setting of area button: This button creates virtual (area) buttons in the touch area and assigns operations to them. (p. 32) 26 Precise ... (correction of sensor characteristics, the pen is neutralized, by delaying the touch recognition. When you select this checkbox, the displacement between the touched position and cursor position is sometimes judged to have touched the touch panel in detail. (p. 28) The higher the setting, the wider ...


