
Operating Instructions
Page 3
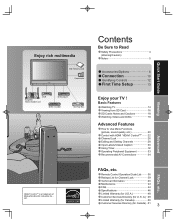
... rich multimedia SD memory card Camcorder VCR Amplifier Home theater unit DVD player DVD recorder Set Top Box HDAVI ControlTM is a trademark of Matsushita Electric Industrial Co., Ltd. Contents Be Sure to Use Menu Functions picture, sound quality, etc 20 Control with HDMI "HDAVI ControlTM 22 Channel Lock 26 Editing and Setting Channels 28 Input Labels/Closed Caption 30 Using Timer 32 Operating Peripheral Equipment 33 Recommended AV Connections 34 FAQs, etc. Advanced Quick Start Guide Viewing
... rich multimedia SD memory card Camcorder VCR Amplifier Home theater unit DVD player DVD recorder Set Top Box HDAVI ControlTM is a trademark of Matsushita Electric Industrial Co., Ltd. Contents Be Sure to Use Menu Functions picture, sound quality, etc 20 Control with HDMI "HDAVI ControlTM 22 Channel Lock 26 Editing and Setting Channels 28 Input Labels/Closed Caption 30 Using Timer 32 Operating Peripheral Equipment 33 Recommended AV Connections 34 FAQs, etc. Advanced Quick Start Guide Viewing
Operating Instructions
Page 4
..., there is used in any ventilation openings. Install in the papers with the manufacturer's instructions. 8) Do not install near water. 6) Clean only with the instructions, may cause harmful interference and could void the user's authority to which can radiate radio frequency energy and, if not installed and used , use this apparatus near any heat sources such as power-supply cord or plug is required...
..., there is used in any ventilation openings. Install in the papers with the manufacturer's instructions. 8) Do not install near water. 6) Clean only with the instructions, may cause harmful interference and could void the user's authority to which can radiate radio frequency energy and, if not installed and used , use this apparatus near any heat sources such as power-supply cord or plug is required...
Operating Instructions
Page 5
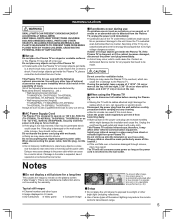
... for a long time This causes the image to disconnect all cables before carrying out any cleaning. ■AC Power Supply Cord The Plasma TV is strongly discouraged due to prevent it may reduce the remote control's transmission range. 5 it repaired at an Authorized Service Center. If using the Plasma TV Be sure to remain on 110 - 127 V AC, 50/60 Hz (TH-50PX60X). Moving...
... for a long time This causes the image to disconnect all cables before carrying out any cleaning. ■AC Power Supply Cord The Plasma TV is strongly discouraged due to prevent it may reduce the remote control's transmission range. 5 it repaired at an Authorized Service Center. If using the Plasma TV Be sure to remain on 110 - 127 V AC, 50/60 Hz (TH-50PX60X). Moving...

Operating Instructions
Page 12
... (p. 17) POWER button Remote control sensor Power indicator (on: red, off: no light) Switches TV to On or Standby Sets the remote to communicate with other equipments (p. 33) Changes input signal (p. 19) Display Main Menu (p. 20) Sound mute On/Off Changes aspect ratio (p. 15) Switch to previously viewed channel and input modes. Identifying Controls Switches TV/VIDEO Volume Selects channels in menus. (p. 14) Direct channel access for DTV and DBS (p. 14) Volume Sleep Timer (p. 14, 32) External equipment operations (p. 19, 36) (VCRs, DVDs, etc.) 12 Selects channels in sequence...
... (p. 17) POWER button Remote control sensor Power indicator (on: red, off: no light) Switches TV to On or Standby Sets the remote to communicate with other equipments (p. 33) Changes input signal (p. 19) Display Main Menu (p. 20) Sound mute On/Off Changes aspect ratio (p. 15) Switch to previously viewed channel and input modes. Identifying Controls Switches TV/VIDEO Volume Selects channels in menus. (p. 14) Direct channel access for DTV and DBS (p. 14) Volume Sleep Timer (p. 14, 32) External equipment operations (p. 19, 36) (VCRs, DVDs, etc.) 12 Selects channels in sequence...
Operating Instructions
Page 13
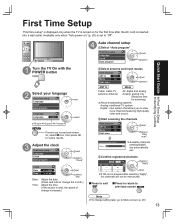
.... Quick Start Guide First Time Setup Identifying Controls 4 Auto channel setup Select "Auto program" First time setup next Language Clock select - Auto program 1 Turn the TV On with the POWER button 2 Select your language First time setup Language Clock Auto program Language Language English English Español Français next select Press to go to previous screen. No ok 2 Yes •If OK is not pressed after the AC cord is held, the speed of change increases.) Select antenna and input modes Auto program...
.... Quick Start Guide First Time Setup Identifying Controls 4 Auto channel setup Select "Auto program" First time setup next Language Clock select - Auto program 1 Turn the TV On with the POWER button 2 Select your language First time setup Language Clock Auto program Language Language English English Español Français next select Press to go to previous screen. No ok 2 Yes •If OK is not pressed after the AC cord is held, the speed of change increases.) Select antenna and input modes Auto program...

Operating Instructions
Page 14
... the button to TV mode 2 Turn power on •POWER button on unit should be On. - 3 Select a channel number up or down ■To directly input the digital channel • number When tuning digital channel, - Channel Ending time Show title Clock 15-2 ABC - HD - 10:30 Andrew's cooking show CC SAP TV-G 1080I Standard 4 : 3 10:00 am 30 Station identifier SAP Signal resolution Rating Level Picture mode Sleep timer remaining time Aspect ratio Watching TV Connect cable Box when watching cable TV. (p. 10) 1 Switch...
... the button to TV mode 2 Turn power on •POWER button on unit should be On. - 3 Select a channel number up or down ■To directly input the digital channel • number When tuning digital channel, - Channel Ending time Show title Clock 15-2 ABC - HD - 10:30 Andrew's cooking show CC SAP TV-G 1080I Standard 4 : 3 10:00 am 30 Station identifier SAP Signal resolution Rating Level Picture mode Sleep timer remaining time Aspect ratio Watching TV Connect cable Box when watching cable TV. (p. 10) 1 Switch...
Operating Instructions
Page 19
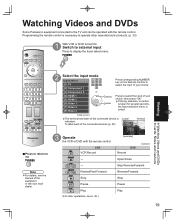
..., see p. 36.) [example] DVD Record (example) Open/Close Skip Reverse/Forward Reverse/Forward Stop Pause Play 19 Viewing Watching Videos and DVDs Cards: Notes and Cautions 2 Select the input mode Input select [1] TV [2] Component 1 [3] Component 2 or Press corresponding NUMBER key on the Remote Control to select the input of your choice. [4] HDMI 1 [5] HDMI 2 - [6] Video 1 [7] Video 2 [8] Video 3 select enter Press to select the input of the connected device is necessary to operate other operations, see the manual of the equipment or...
..., see p. 36.) [example] DVD Record (example) Open/Close Skip Reverse/Forward Reverse/Forward Stop Pause Play 19 Viewing Watching Videos and DVDs Cards: Notes and Cautions 2 Select the input mode Input select [1] TV [2] Component 1 [3] Component 2 or Press corresponding NUMBER key on the Remote Control to select the input of your choice. [4] HDMI 1 [5] HDMI 2 - [6] Video 1 [7] Video 2 [8] Video 3 select enter Press to select the input of the connected device is necessary to operate other operations, see the manual of the equipment or...
Operating Instructions
Page 20
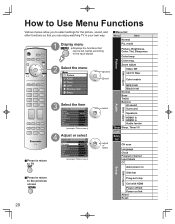
... select settings for the picture, sound, and Menu list other functions so that can enjoy watching TV in Audio leveler Timer Sleep, Timer1-5 Lock Memory Card CH scan Language Clock Program channel Input labels CC Auto power on Other adjust Setup ■Press to return to the previous screen Side bar Prog-out stop Ctrl with HDMI Power off link Power on link About Reset 20 mode Picture, Brightness, Color, Tint, Sharpness Color temp Other adjust Picture Color mng. 2 Select the menu Menu Picture Audio Timer Lock...
... select settings for the picture, sound, and Menu list other functions so that can enjoy watching TV in Audio leveler Timer Sleep, Timer1-5 Lock Memory Card CH scan Language Clock Program channel Input labels CC Auto power on Other adjust Setup ■Press to return to the previous screen Side bar Prog-out stop Ctrl with HDMI Power off link Power on link About Reset 20 mode Picture, Brightness, Color, Tint, Sharpness Color temp Other adjust Picture Color mng. 2 Select the menu Menu Picture Audio Timer Lock...
Operating Instructions
Page 21
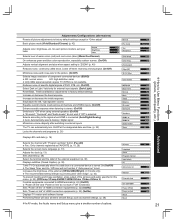
... size when aspect setting is connected (Auto/Digital/Analog) Auto: Automatically selects Analog / Digital signal Minimizes volume disparity after switching to factory default settings. Sets "Power off link" and "Power on link" do not work if "Off" is selected. Adjustments/Configurations (alternatives) Resets all channels and VIDEO inputs. (On/Off) Enhances audio response when listening to stereo. (On/Off) Switches to "Off" when using external speakers (On/Off) "AI sound", "Surround" and "Audio leveler" do not work if "Off" is selected Selects according to the signal when HDMI...
... size when aspect setting is connected (Auto/Digital/Analog) Auto: Automatically selects Analog / Digital signal Minimizes volume disparity after switching to factory default settings. Sets "Power off link" and "Power on link" do not work if "Off" is selected. Adjustments/Configurations (alternatives) Resets all channels and VIDEO inputs. (On/Off) Enhances audio response when listening to stereo. (On/Off) Switches to "Off" when using external speakers (On/Off) "AI sound", "Surround" and "Audio leveler" do not work if "Off" is selected Selects according to the signal when HDMI...

Operating Instructions
Page 22
... January 2006.) Automatic input switching 1 Display menu 2 Select "Setup" Menu Home theater Picture Audio Timer Lock Memory card Setup - Non-HDMI-compliant cables cannot be controlled using one-button on link Power off link Set Power on link Set Select "On" select change •Default setting is limited to models incorporating Panasonic's "Control with HDMI") are connected or standard HDMI (non- "Control with HDMI". Theater speaker Power on one remote. This feature is "On". select next 3 Select "Other adjust" Setup Other adjust About Reset select next ■...
... January 2006.) Automatic input switching 1 Display menu 2 Select "Setup" Menu Home theater Picture Audio Timer Lock Memory card Setup - Non-HDMI-compliant cables cannot be controlled using one-button on link Power off link Set Power on link Set Select "On" select change •Default setting is limited to models incorporating Panasonic's "Control with HDMI") are connected or standard HDMI (non- "Control with HDMI". Theater speaker Power on one remote. This feature is "On". select next 3 Select "Other adjust" Setup Other adjust About Reset select next ■...

Operating Instructions
Page 23
... theater and DIGA/DVD models with "Control with HDMI". Display menu Select "Home theater" or "TV speakers" Menu Menu Home theater TV speakers Picture Audio change Picture Audio Timer Timer Lock Lock Memory card Memory card Setup Setup ■Home theater: Adjustment for each equipment. •For equipment connection details, see the operation manual for Panasonic Amplifier, Panasonic Player theater, Panasonic RAM theater Volume up / down Mute ■TV speakers: The TV speakers are active. ••When selecting "Home theater", the sound of TV speakers is mute...
... theater and DIGA/DVD models with "Control with HDMI". Display menu Select "Home theater" or "TV speakers" Menu Menu Home theater TV speakers Picture Audio change Picture Audio Timer Timer Lock Lock Memory card Memory card Setup Setup ■Home theater: Adjustment for each equipment. •For equipment connection details, see the operation manual for Panasonic Amplifier, Panasonic Player theater, Panasonic RAM theater Volume up / down Mute ■TV speakers: The TV speakers are active. ••When selecting "Home theater", the sound of TV speakers is mute...
Operating Instructions
Page 25
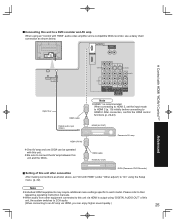
... menu settings specific to their •respective operating instruction manuals. When audio from other equipment connected to this unit via HDMI, you can be operated •with HDMI" audio-video amplifier and a compatible DIGA recorder, use a daisy chain connection as shown above, set the input mode to HDMI 2 (p. 19) initially before connecting to HDMI 2. ■Connecting this unit to a DVD recorder and AV amp When using an "Control with this unit. Control with HDMI "HDAVI ControlTM" Advanced Optic fiber HDMI cable Digital audio input (Optic) HDMI...
... menu settings specific to their •respective operating instruction manuals. When audio from other equipment connected to this unit via HDMI, you can be operated •with HDMI" audio-video amplifier and a compatible DIGA recorder, use a daisy chain connection as shown above, set the input mode to HDMI 2 (p. 19) initially before connecting to HDMI 2. ■Connecting this unit to a DVD recorder and AV amp When using an "Control with this unit. Control with HDMI "HDAVI ControlTM" Advanced Optic fiber HDMI cable Digital audio input (Optic) HDMI...

Operating Instructions
Page 26
...and Video inputs CH: Locks specified channels (analog/digital) ■To change rating settings. Menu Picture Audio Timer Lock Memory card Setup - next select 3 Input your 4-digit password A 4-digit code must be entered to view a blocked program or change the password In , select "Change password" and press "OK" button Note •When you select a locked channel, a message will be displayed that allows you to view the channel if you display the Lock menu. Enter password. •For the first time, input the number twice to register it. ---- 4 Select the Lock mode Lock Mode...
...and Video inputs CH: Locks specified channels (analog/digital) ■To change rating settings. Menu Picture Audio Timer Lock Memory card Setup - next select 3 Input your 4-digit password A 4-digit code must be entered to view a blocked program or change the password In , select "Change password" and press "OK" button Note •When you select a locked channel, a message will be displayed that allows you to view the channel if you display the Lock menu. Enter password. •For the first time, input the number twice to register it. ---- 4 Select the Lock mode Lock Mode...

Operating Instructions
Page 29
...when changing setting of receiving channels or changing the channel display. Signal meter CH 2 - 1 select channel •If the signal is selected, "Enter password." Also, use to be displayed. 29 select Caption detail Preset set select Select "Start scan" Auto program ANT In Cable Mode All Start scan start select Settings are erased. No 4 - - - - - - will be edited Edit Apply CH Caption Favorite Add 1 - - - - - - Effective only for digital antenna channels. •If "Channel lock" (p. 26) is activated and "Auto", "Manual" or "Signal...
...when changing setting of receiving channels or changing the channel display. Signal meter CH 2 - 1 select channel •If the signal is selected, "Enter password." Also, use to be displayed. 29 select Caption detail Preset set select Select "Start scan" Auto program ANT In Cable Mode All Start scan start select Settings are erased. No 4 - - - - - - will be edited Edit Apply CH Caption Favorite Add 1 - - - - - - Effective only for digital antenna channels. •If "Channel lock" (p. 26) is activated and "Auto", "Manual" or "Signal...

Operating Instructions
Page 31
...setting select set Mode Select "On" (when not using, select "Off"). Input labels Video 3 SKIP Input Labels/Closed Caption Advanced The television includes a built-in decoder that is skipped when switched with TV/VIDEO button. "Primary", "Second.", "Service 3", "Service 4", "Service 5", "Service 6" ■To make more in-depth display settings in digital programs Select "Digital setting" and press "OK" button Select the item and set Digital setting Size Automatic Font Automatic Style Automatic select set • Video1-3 Label: SKIP*/VCR/DVD/CABLE/ [example] DBS/PVR/GAME...
...setting select set Mode Select "On" (when not using, select "Off"). Input labels Video 3 SKIP Input Labels/Closed Caption Advanced The television includes a built-in decoder that is skipped when switched with TV/VIDEO button. "Primary", "Second.", "Service 3", "Service 4", "Service 5", "Service 6" ■To make more in-depth display settings in digital programs Select "Digital setting" and press "OK" button Select the item and set Digital setting Size Automatic Font Automatic Style Automatic select set • Video1-3 Label: SKIP*/VCR/DVD/CABLE/ [example] DBS/PVR/GAME...

Operating Instructions
Page 40
.../Off on the Picture menu. (p. 20) Vertical position adjustment Vertical size adjustment •To reset the aspect ratio (OK) 40 Technical Information Closed Caption (CC) For viewing Closed Caption of digital broadcasting, set the aspect ratio to FULL. •(If viewing with H-FILL, JUST, ZOOM or 4:3, characters will be cut off. • ZOOM ZOOM Enlarges the 4:3 image to the entire screen. (Recommended for Letter Box) Standard (Note that "after changed signal resolution other than...
.../Off on the Picture menu. (p. 20) Vertical position adjustment Vertical size adjustment •To reset the aspect ratio (OK) 40 Technical Information Closed Caption (CC) For viewing Closed Caption of digital broadcasting, set the aspect ratio to FULL. •(If viewing with H-FILL, JUST, ZOOM or 4:3, characters will be cut off. • ZOOM ZOOM Enlarges the 4:3 image to the entire screen. (Recommended for Letter Box) Standard (Note that "after changed signal resolution other than...
Operating Instructions
Page 41
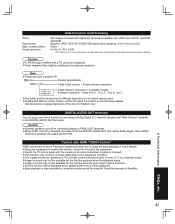
... NTSC channel is selected, the output from the DIGITAL AUDIO OUT jack will be PCM. Read the manual of Amplifier. Volume function will be Dolby Digital. Suitable SD Memory Cards. When ATSC channel is selected, the output will be available for camera file system): A Japan Electronics and Information Technology Industries Association's standard Caution ••A JPEG image modified with HDMI "HDAVI Control" HDMI connections to some Panasonic equipments allow...
... NTSC channel is selected, the output from the DIGITAL AUDIO OUT jack will be PCM. Read the manual of Amplifier. Volume function will be Dolby Digital. Suitable SD Memory Cards. When ATSC channel is selected, the output will be available for camera file system): A Japan Electronics and Information Technology Industries Association's standard Caution ••A JPEG image modified with HDMI "HDAVI Control" HDMI connections to some Panasonic equipments allow...

Operating Instructions
Page 42
... aspect adjustment function, set top box or a DVD player, can cause an after -images 4:3 Screen Display Pic. The side bar may be made on the "HDMI1 in" or "HDMI2 in a well-lit room. : Recommended for optimal viewing on your local digital device retailer shop. Side Bar after -image to receive analog signals. Caution Use with subdued room lighting. : For watching movies in 4:3 mode for Component (Y, PB, PR), and HDMI...
... aspect adjustment function, set top box or a DVD player, can cause an after -images 4:3 Screen Display Pic. The side bar may be made on the "HDMI1 in" or "HDMI2 in a well-lit room. : Recommended for optimal viewing on your local digital device retailer shop. Side Bar after -image to receive analog signals. Caution Use with subdued room lighting. : For watching movies in 4:3 mode for Component (Y, PB, PR), and HDMI...
Operating Instructions
Page 44
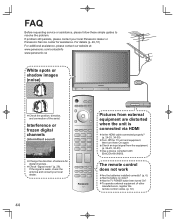
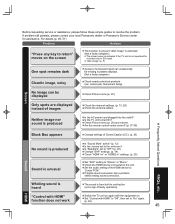
... images (noise) •Check the position, direction, and connection of other manufacturers, register the remote control codes. (p. 33) If the signal is connected via HDMI Is the HDMI cable connected properly? •(p. 24-25, 34-35) Turn Off the TV unit and equipment, •then turn them On again. Has the TV POWER button been turned On? Interference or frozen digital channels (intermittent sound) •Change the direction of antenna for assistance. If problem...
... images (noise) •Check the position, direction, and connection of other manufacturers, register the remote control codes. (p. 33) If the signal is connected via HDMI Is the HDMI cable connected properly? •(p. 24-25, 34-35) Turn Off the TV unit and equipment, •then turn them On again. Has the TV POWER button been turned On? Interference or frozen digital channels (intermittent sound) •Change the direction of antenna for assistance. If problem...
Operating Instructions
Page 45
... the remote control codes correct? (p. 37-38) Black Box appears No sound is produced Sound is produced ••••Is the AC power cord plugged into the outlet? If digital sound connection has a problem, •select analog sound connection. Is the TV unit turned On? HDMI Is "Speakers" set to •"Linear PCM." Check Picture menu (p. 20) and volume. If problem still persists, please contact your local Panasonic dealer or Panasonic Service center for a certain time in " settings. (p. 20) Set "SAP" setting...
... the remote control codes correct? (p. 37-38) Black Box appears No sound is produced Sound is produced ••••Is the AC power cord plugged into the outlet? If digital sound connection has a problem, •select analog sound connection. Is the TV unit turned On? HDMI Is "Speakers" set to •"Linear PCM." Check Picture menu (p. 20) and volume. If problem still persists, please contact your local Panasonic dealer or Panasonic Service center for a certain time in " settings. (p. 20) Set "SAP" setting...


