
Operating Instructions
Page 3
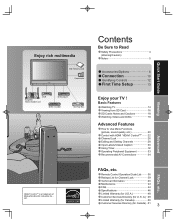
...; 49 Limited Warranty (for Canada 50 Customer Services Directory (for U. Contents Be Sure to Use Menu Functions picture, sound quality, etc 20 Control with HDMI "HDAVI ControlTM 22 Channel Lock 26 Editing and Setting Channels 28 Input Labels/Closed Caption 30 Using Timer 32 Operating Peripheral Equipment 33 Recommended AV Connections 34 FAQs, etc. Enjoy rich multimedia SD memory card Camcorder VCR Amplifier Home theater unit DVD player DVD recorder Set Top Box HDAVI ControlTM is...
...; 49 Limited Warranty (for Canada 50 Customer Services Directory (for U. Contents Be Sure to Use Menu Functions picture, sound quality, etc 20 Control with HDMI "HDAVI ControlTM 22 Channel Lock 26 Editing and Setting Channels 28 Input Labels/Closed Caption 30 Using Timer 32 Operating Peripheral Equipment 33 Recommended AV Connections 34 FAQs, etc. Enjoy rich multimedia SD memory card Camcorder VCR Amplifier Home theater unit DVD player DVD recorder Set Top Box HDAVI ControlTM is...
Operating Instructions
Page 4
...-VIEW-PTV (843-9788) consumerproducts@panasonic.com CANADIAN NOTICE: For Models TH-37PX60U, TH-42PX60U, TH-50PX60U, TH-50PX60X, TH-58PX60U This Class B digital apparatus complies with dry cloth. 7) Do not block any heat sources such as power-supply cord or plug is no guarantee that parts inside . Responsible Party: Contact Source: email: Panasonic Corporation of the following measures: • Reorient or relocate the receiving antenna...
...-VIEW-PTV (843-9788) consumerproducts@panasonic.com CANADIAN NOTICE: For Models TH-37PX60U, TH-42PX60U, TH-50PX60U, TH-50PX60X, TH-58PX60U This Class B digital apparatus complies with dry cloth. 7) Do not block any heat sources such as power-supply cord or plug is no guarantee that parts inside . Responsible Party: Contact Source: email: Panasonic Corporation of the following measures: • Reorient or relocate the receiving antenna...
Operating Instructions
Page 5
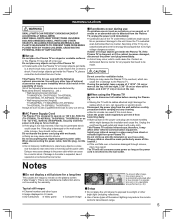
.... Do not handle the power cord plug with any cleaning. ■AC Power Supply Cord The Plasma TV is inserted into the wall outlet. The TV will go. Typical still images Channel number and other logos Image displayed in 4:3 mode SD Card photo Video game Computer image 4 : 3 12 To prevent after a few minutes if no signals are sent or no sound), or if SMALL PARTS CAN PRESENT CHOKING HAZARD IF...
.... Do not handle the power cord plug with any cleaning. ■AC Power Supply Cord The Plasma TV is inserted into the wall outlet. The TV will go. Typical still images Channel number and other logos Image displayed in 4:3 mode SD Card photo Video game Computer image 4 : 3 12 To prevent after a few minutes if no signals are sent or no sound), or if SMALL PARTS CAN PRESENT CHOKING HAZARD IF...

Operating Instructions
Page 12
... (p. 14) Volume Sleep Timer (p. 14, 32) External equipment operations (p. 19, 36) (VCRs, DVDs, etc.) 12 Viewing from SD Card (p. 16) SAP (p. 14) Exit menus Select/OK/Change RETURN (to previous menu) Display or remove the channel banner (p. 14) Operate the Favorite channel list function. (p. 15) Numeric keypad to select any channel or press to previously viewed channel and input modes. Identifying Controls Switches TV/VIDEO Volume Selects channels in sequence SD CARD slot (p. 17) POWER button Remote control sensor Power indicator (on: red, off: no light) Switches TV...
... (p. 14) Volume Sleep Timer (p. 14, 32) External equipment operations (p. 19, 36) (VCRs, DVDs, etc.) 12 Viewing from SD Card (p. 16) SAP (p. 14) Exit menus Select/OK/Change RETURN (to previous menu) Display or remove the channel banner (p. 14) Operate the Favorite channel list function. (p. 15) Numeric keypad to select any channel or press to previously viewed channel and input modes. Identifying Controls Switches TV/VIDEO Volume Selects channels in sequence SD CARD slot (p. 17) POWER button Remote control sensor Power indicator (on: red, off: no light) Switches TV...
Operating Instructions
Page 13
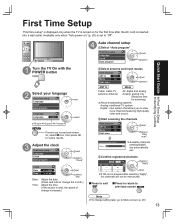
.... Quick Start Guide First Time Setup Identifying Controls 4 Auto channel setup Select "Auto program" First time setup next Language Clock select - Auto program 1 Turn the TV On with the POWER button 2 Select your language First time setup Language Clock Auto program Language Language English English Español Français next select Press to go to previous screen. First Time Setup "First time setup" is displayed only when the TV is turned on " (p. 20) is held, the speed of change increases.) Select antenna and input modes Auto program ANT In Cable Mode...
.... Quick Start Guide First Time Setup Identifying Controls 4 Auto channel setup Select "Auto program" First time setup next Language Clock select - Auto program 1 Turn the TV On with the POWER button 2 Select your language First time setup Language Clock Auto program Language Language English English Español Français next select Press to go to previous screen. First Time Setup "First time setup" is displayed only when the TV is turned on " (p. 20) is held, the speed of change increases.) Select antenna and input modes Auto program ANT In Cable Mode...

Operating Instructions
Page 14
... SAP Signal resolution Rating Level Picture mode Sleep timer remaining time Aspect ratio Watching TV Connect cable Box when watching cable TV. (p. 10) 1 Switch to select the next audio track (if available) when receiving a digital channel. Audio Track 1 of 1 (English) •Analog mode Press SAP to select the desired audio mode. • Each press of time from 0 to 90 minutes in a compound channel number. press the button to enter the minor number in 30 minute intervals. •0/30/60/90 (minutes) ■Select Audio Mode...
... SAP Signal resolution Rating Level Picture mode Sleep timer remaining time Aspect ratio Watching TV Connect cable Box when watching cable TV. (p. 10) 1 Switch to select the next audio track (if available) when receiving a digital channel. Audio Track 1 of 1 (English) •Analog mode Press SAP to select the desired audio mode. • Each press of time from 0 to 90 minutes in a compound channel number. press the button to enter the minor number in 30 minute intervals. •0/30/60/90 (minutes) ■Select Audio Mode...
Operating Instructions
Page 19
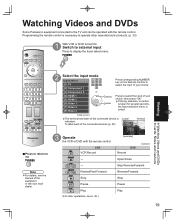
... the remote control. Watching Videos and DVDs Some Panasonic equipment connected to the TV unit can be operated with the remote control VCR VCR Record Rewind/Fast Forward Stop Pause Play (For other manufacturers' products. (p. 33) 1 With VCR or DVD turned On Switch to external input Press to display the Input select menu. Programming the remote control is indicated. Viewing Watching Videos and DVDs Cards: Notes and Cautions 2 Select the input mode Input select [1] TV [2] Component 1 [3] Component 2 or Press corresponding NUMBER key on the Remote Control to select the input...
... the remote control. Watching Videos and DVDs Some Panasonic equipment connected to the TV unit can be operated with the remote control VCR VCR Record Rewind/Fast Forward Stop Pause Play (For other manufacturers' products. (p. 33) 1 With VCR or DVD turned On Switch to external input Press to display the Input select menu. Programming the remote control is indicated. Viewing Watching Videos and DVDs Cards: Notes and Cautions 2 Select the input mode Input select [1] TV [2] Component 1 [3] Component 2 or Press corresponding NUMBER key on the Remote Control to select the input...
Operating Instructions
Page 20
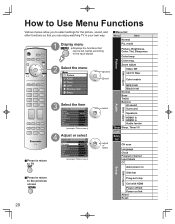
... select settings for the picture, sound, and Menu list other functions so that can enjoy watching TV in Audio leveler Timer Sleep, Timer1-5 Lock Memory Card CH scan Language Clock Program channel Input labels CC Auto power on Other adjust Setup ■Press to return to the previous screen Side bar Prog-out stop Ctrl with HDMI Power off link Power on link About Reset 20 mode Picture, Brightness, Color, Tint, Sharpness Color temp Other adjust Picture Color mng. 2 Select the menu Menu Picture Audio Timer Lock...
... select settings for the picture, sound, and Menu list other functions so that can enjoy watching TV in Audio leveler Timer Sleep, Timer1-5 Lock Memory Card CH scan Language Clock Program channel Input labels CC Auto power on Other adjust Setup ■Press to return to the previous screen Side bar Prog-out stop Ctrl with HDMI Power off link Power on link About Reset 20 mode Picture, Brightness, Color, Tint, Sharpness Color temp Other adjust Picture Color mng. 2 Select the menu Menu Picture Audio Timer Lock...
Operating Instructions
Page 21
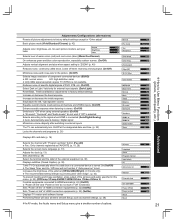
... selects Analog / Digital signal Minimizes volume disparity after image". (p. 42) To prevent howling and image oscillation, stops output of the pictures and audio specified in this menu. (p. 35) (Off/Comp.1/Comp.2/HDMI 1/HDMI 2/Video 1/Video 2/Video 3) Controls equipments connected to Use Menu Functions (picture, sound quality, etc.) Advanced 21 Increases the brightness of the side bar (Off/Dark/Mid/Bright) (4:3 mode only) The recommended setting is Bright to prevent panel "after switching to factory default settings. Adjustments/Configurations (alternatives) Resets all picture...
... selects Analog / Digital signal Minimizes volume disparity after image". (p. 42) To prevent howling and image oscillation, stops output of the pictures and audio specified in this menu. (p. 35) (Off/Comp.1/Comp.2/HDMI 1/HDMI 2/Video 1/Video 2/Video 3) Controls equipments connected to Use Menu Functions (picture, sound quality, etc.) Advanced 21 Increases the brightness of the side bar (Off/Dark/Mid/Bright) (4:3 mode only) The recommended setting is Bright to prevent panel "after switching to factory default settings. Adjustments/Configurations (alternatives) Resets all picture...

Operating Instructions
Page 22
...equipped components using one remote. Limited features such as of January 2006.) Automatic input switching 1 Display menu 2 Select "Setup" Menu Home theater Picture Audio Timer Lock Memory card Setup - Newer Panasonic audio-video products with HDMI". Non-HDMI-compliant cables cannot be controlled using Panasonic HDMI cables RP-CDHG15 (1.5 m), RP-CDHG30 (3.0 m), •RP-CDHG50 (5.0 m), etc. (Product numbers correct as home theater system volume and automatic switching to the TV's HDMI input are available. select next 3 Select "Other adjust" Setup Other adjust About Reset select...
...equipped components using one remote. Limited features such as of January 2006.) Automatic input switching 1 Display menu 2 Select "Setup" Menu Home theater Picture Audio Timer Lock Memory card Setup - Newer Panasonic audio-video products with HDMI". Non-HDMI-compliant cables cannot be controlled using Panasonic HDMI cables RP-CDHG15 (1.5 m), RP-CDHG30 (3.0 m), •RP-CDHG50 (5.0 m), etc. (Product numbers correct as home theater system volume and automatic switching to the TV's HDMI input are available. select next 3 Select "Other adjust" Setup Other adjust About Reset select...

Operating Instructions
Page 23
... remote •volume button. "Ctrl with HDMI" home theater system is currently off, selecting the "Home theater" option will display "Home Theater + / -" on link" below. Display menu Select "Home theater" or "TV speakers" Menu Menu Home theater TV speakers Picture Audio change Picture Audio Timer Timer Lock Lock Memory card Memory card Setup Setup ■Home theater: Adjustment for the TV to the playback equipment. TV power switches On, and the playback screen is performed automatically. Audio is turned off the connected home theater/ RAM theater/player theater...
... remote •volume button. "Ctrl with HDMI" home theater system is currently off, selecting the "Home theater" option will display "Home Theater + / -" on link" below. Display menu Select "Home theater" or "TV speakers" Menu Menu Home theater TV speakers Picture Audio change Picture Audio Timer Timer Lock Lock Memory card Memory card Setup Setup ■Home theater: Adjustment for the TV to the playback equipment. TV power switches On, and the playback screen is performed automatically. Audio is turned off the connected home theater/ RAM theater/player theater...
Operating Instructions
Page 25
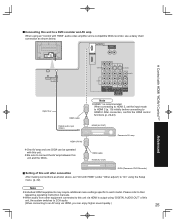
... audio from other equipment connected to "On" using an "Control with HDMI" audio-video amplifier and a compatible DIGA recorder, use a daisy chain connection as shown above, set the input mode to HDMI 2 (p. 19) initially before connecting to an AV amp via HDMI is recommended. When connecting to HDMI 2, set "Ctrl with HDMI" (under "Other adjust") to this unit. Control with this unit via HDMI, you can be operated •with HDMI "HDAVI ControlTM" Advanced Optic fiber HDMI cable Digital audio input (Optic) HDMI...
... audio from other equipment connected to "On" using an "Control with HDMI" audio-video amplifier and a compatible DIGA recorder, use a daisy chain connection as shown above, set the input mode to HDMI 2 (p. 19) initially before connecting to an AV amp via HDMI is recommended. When connecting to HDMI 2, set "Ctrl with HDMI" (under "Other adjust") to this unit. Control with this unit via HDMI, you can be operated •with HDMI "HDAVI ControlTM" Advanced Optic fiber HDMI cable Digital audio input (Optic) HDMI...

Operating Instructions
Page 26
..." button Note •When you select a locked channel, a message will be entered to enter your local dealer.) ••••Off: "Channel lock" not activated All: Locks all channels and Video inputs Game: Locks CH3, CH4, and Video inputs CH: Locks specified channels (analog/digital) ■To change rating settings. next select 3 Input your 4-digit password A 4-digit code must be displayed that allows you to view the channel if you display the Lock menu. Enter password. •For the first time, input the number twice...
..." button Note •When you select a locked channel, a message will be entered to enter your local dealer.) ••••Off: "Channel lock" not activated All: Locks all channels and Video inputs Game: Locks CH3, CH4, and Video inputs CH: Locks specified channels (analog/digital) ■To change rating settings. next select 3 Input your 4-digit password A 4-digit code must be displayed that allows you to view the channel if you display the Lock menu. Enter password. •For the first time, input the number twice...

Operating Instructions
Page 29
...; Caption Caption select Preset Apply --- No Favorite Caption Add Caption: •Changes the station identifier Favorite: •Registers channel to Favorites List Add: •Adds or deletes channels select item to be displayed. 29 Effective only for digital antenna channels. •If "Channel lock" (p. 26) is activated and "Auto", "Manual" or "Signal meter" is selected in "ANT In" •(see below ). No 4 - - - - - - select Caption detail Preset set select Select "Start scan" Auto program ANT In Cable Mode All Start scan start select Settings...
...; Caption Caption select Preset Apply --- No Favorite Caption Add Caption: •Changes the station identifier Favorite: •Registers channel to Favorites List Add: •Adds or deletes channels select item to be displayed. 29 Effective only for digital antenna channels. •If "Channel lock" (p. 26) is activated and "Auto", "Manual" or "Signal meter" is selected in "ANT In" •(see below ). No 4 - - - - - - select Caption detail Preset set select Select "Start scan" Auto program ANT In Cable Mode All Start scan start select Settings...

Operating Instructions
Page 31
... digital captioning.) •Select the setting. The program viewed must provide Closed Captioning (CC) for the television to display it. (p. 40) ■Select the item and set CC Mode Analog Digital Off CC1 Primary Digital setting select set • Video1-3 Label: SKIP*/VCR/DVD/CABLE/ [example] DBS/PVR/GAME/AUX/[BLANK] HDMI 1 DVD Terminal HDMI 2 Video 1 Video 2 AUX VCR SKIP * If "SKIP" is selected for easy recognition on the screen. (In selecting input mode of p. 19 ) Video 1 VCR Select the terminal and the label of the external equipment Input...
... digital captioning.) •Select the setting. The program viewed must provide Closed Captioning (CC) for the television to display it. (p. 40) ■Select the item and set CC Mode Analog Digital Off CC1 Primary Digital setting select set • Video1-3 Label: SKIP*/VCR/DVD/CABLE/ [example] DBS/PVR/GAME/AUX/[BLANK] HDMI 1 DVD Terminal HDMI 2 Video 1 Video 2 AUX VCR SKIP * If "SKIP" is selected for easy recognition on the screen. (In selecting input mode of p. 19 ) Video 1 VCR Select the terminal and the label of the external equipment Input...

Operating Instructions
Page 40
... from each unit will overlap. Select "Zoom adjust" on the Picture menu. (p. 20) Vertical position adjustment Vertical size adjustment •To reset the aspect ratio (OK) 40 The CC mode setting of the TV will not affect the analog input. When the signal is being output in analog format, the CC data will also be output in "ZOOM." Technical Information Closed Caption (CC) For viewing Closed Caption of digital broadcasting, set the aspect ratio to FULL. •(If...
... from each unit will overlap. Select "Zoom adjust" on the Picture menu. (p. 20) Vertical position adjustment Vertical size adjustment •To reset the aspect ratio (OK) 40 The CC mode setting of the TV will not affect the analog input. When the signal is being output in analog format, the CC data will also be output in "ZOOM." Technical Information Closed Caption (CC) For viewing Closed Caption of digital broadcasting, set the aspect ratio to FULL. •(If...
Operating Instructions
Page 41
... digital still cameras compatible with the equipment on when connection or setup is selected, the output from the DIGITAL AUDIO OUT jack will be PCM. Volume function will be Dolby Digital. Suitable SD Memory Cards. number of files: Image resolution: Data format for the first few seconds when the playback starts. Please confirm the latest information on even if TV is in Standby mode. When ATSC channel is changed. Switch...
... digital still cameras compatible with the equipment on when connection or setup is selected, the output from the DIGITAL AUDIO OUT jack will be PCM. Volume function will be Dolby Digital. Suitable SD Memory Cards. number of files: Image resolution: Data format for the first few seconds when the playback starts. Please confirm the latest information on even if TV is in Standby mode. When ATSC channel is changed. Switch...

Operating Instructions
Page 42
... aspect adjustment function, set the aspect ratio to remain on the picture. When the DVI to receive analog signals. Input signal that can be connected to the HDMI terminal using an HDMI compliant (fully wired) cable. ••••HDMI is "type A". •A device having no digital output terminal may be made on an HDMI-compliant device. (*2): Enquire at your display. The above may flash (alternate black/white) depending on either "COMPONENT", "S •VIDEO", or "VIDEO...
... aspect adjustment function, set the aspect ratio to remain on the picture. When the DVI to receive analog signals. Input signal that can be connected to the HDMI terminal using an HDMI compliant (fully wired) cable. ••••HDMI is "type A". •A device having no digital output terminal may be made on an HDMI-compliant device. (*2): Enquire at your display. The above may flash (alternate black/white) depending on either "COMPONENT", "S •VIDEO", or "VIDEO...
Operating Instructions
Page 44
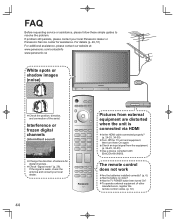
... shadow images (noise) •Check the position, direction, and connection of other manufacturers, register the remote control codes. (p. 33) To operate external equipment of the aerial. Check "Signal meter" (p. 28). Interference or frozen digital channels (intermittent sound) •Change the direction of antenna for assistance. Check an input signal from external equipment are distorted when the unit is connected via HDMI Is the HDMI cable connected properly? •(p. 24-25, 34-35) Turn Off...
... shadow images (noise) •Check the position, direction, and connection of other manufacturers, register the remote control codes. (p. 33) To operate external equipment of the aerial. Check "Signal meter" (p. 28). Interference or frozen digital channels (intermittent sound) •Change the direction of antenna for assistance. Check an input signal from external equipment are distorted when the unit is connected via HDMI Is the HDMI cable connected properly? •(p. 24-25, 34-35) Turn Off...
Operating Instructions
Page 45
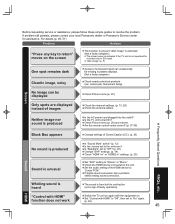
...;Switch the TV unit on the screen •The function to resolve the problem. Check Picture menu (p. 20) and volume. If digital sound connection has a problem, •select analog sound connection. HDMI Neither image nor sound is from built-in cooling fan (not a sign of images ••Check the channel settings. (p. 13, 28) Check the antenna cables. Are the remote control codes correct? (p. 37-38) Black Box appears No sound is produced Sound is not operated for assistance. "after image...
...;Switch the TV unit on the screen •The function to resolve the problem. Check Picture menu (p. 20) and volume. If digital sound connection has a problem, •select analog sound connection. HDMI Neither image nor sound is from built-in cooling fan (not a sign of images ••Check the channel settings. (p. 13, 28) Check the antenna cables. Are the remote control codes correct? (p. 37-38) Black Box appears No sound is produced Sound is not operated for assistance. "after image...


