

Digital Video Camcorder
Page 5
...throw into fire. Store and handle your Camcorder. CARE ≥TO CLEAN YOUR CAMCORDER ... Improper cleaning can scratch the lens coating. ≥TO PROTECT THE FINISH OF YOUR CAMCORDER ... Battery 1. Do not connect the power supply or operate your Camcorder from a cold place to unnecessary movement ...local authorities or dealer and ask for outdoor use strong or abrasive detergents when cleaning your Camcorder. ≥AVOID SUDDEN CHANGES IN TEMPERATURE ... Battery pack (Lithium ion battery pack) ≥Use the specified unit to discard this product, please contact your hands or...
...throw into fire. Store and handle your Camcorder. CARE ≥TO CLEAN YOUR CAMCORDER ... Improper cleaning can scratch the lens coating. ≥TO PROTECT THE FINISH OF YOUR CAMCORDER ... Battery 1. Do not connect the power supply or operate your Camcorder from a cold place to unnecessary movement ...local authorities or dealer and ask for outdoor use strong or abrasive detergents when cleaning your Camcorder. ≥AVOID SUDDEN CHANGES IN TEMPERATURE ... Battery pack (Lithium ion battery pack) ≥Use the specified unit to discard this product, please contact your hands or...

Digital Video Camcorder
Page 6
... is prohibited. This product incorporates copyright protection technology that is intended for limited viewing. U.S.A./CANADA CONSUMERS: ATTENTION: A lithium ion/polymer battery that is protected by Macrovision Corporation, and is recyclable powers the product you use a plug adaptor to suit the AC outlet configuration.... connecting to recycle this apparatus from the AC Mains, disconnect the power supply cord plug from AC receptacle. Please call 1-800-8-BATTERY for assistance in selecting a suitable AC plug adaptor or AC cord set. The mains plug of greater than AC 125V, ensure...
... is prohibited. This product incorporates copyright protection technology that is intended for limited viewing. U.S.A./CANADA CONSUMERS: ATTENTION: A lithium ion/polymer battery that is protected by Macrovision Corporation, and is recyclable powers the product you use a plug adaptor to suit the AC outlet configuration.... connecting to recycle this apparatus from the AC Mains, disconnect the power supply cord plug from AC receptacle. Please call 1-800-8-BATTERY for assistance in selecting a suitable AC plug adaptor or AC cord set. The mains plug of greater than AC 125V, ensure...

Digital Video Camcorder
Page 9
...the cassette holder is completely housed, close the cassette cover. ª Inserting/removing a card 1 Open the card slot cover. ª Attaching the battery Push the battery against the battery holder and slide it until it straight out. 3 Securely close the cassette holder. 1 PUSH 4 Only after the cassette holder is opened, insert/ remove... on the power 1 While pressing the button 1, set the [OFF/ON] switch to the AC adaptor and the AC Jack. 2 Put the battery on the battery mount by aligning the mark, and then securely plug it in. 3 Push the [PUSH] mark 1 in with one stroke as far as it...
...the cassette holder is completely housed, close the cassette cover. ª Inserting/removing a card 1 Open the card slot cover. ª Attaching the battery Push the battery against the battery holder and slide it until it straight out. 3 Securely close the cassette holder. 1 PUSH 4 Only after the cassette holder is opened, insert/ remove... on the power 1 While pressing the button 1, set the [OFF/ON] switch to the AC adaptor and the AC Jack. 2 Put the battery on the battery mount by aligning the mark, and then securely plug it in. 3 Push the [PUSH] mark 1 in with one stroke as far as it...

Digital Video Camcorder
Page 11
Parts identification and handling ª Camcorder 1) (1) (4) (2) PV-DAC14D 2) K2GJ2DC00011 K2CA2CA00025 3) (3) (5) CGR-DU06 4) K2KC4CB00020 K1HA05CD0014 1) AC adaptor, DC Cable, AC Cable -142) Battery pack -143) AV cable -454) USB cable (PV-GS85 only) -48- (1) Built-in LED video light (PV-GS85 only) -25- (2) White balance sensor -37(3) Grip belt -13(4) Lens (5) Microphone (built-in, stereo) -31-, -34...
Parts identification and handling ª Camcorder 1) (1) (4) (2) PV-DAC14D 2) K2GJ2DC00011 K2CA2CA00025 3) (3) (5) CGR-DU06 4) K2KC4CB00020 K1HA05CD0014 1) AC adaptor, DC Cable, AC Cable -142) Battery pack -143) AV cable -454) USB cable (PV-GS85 only) -48- (1) Built-in LED video light (PV-GS85 only) -25- (2) White balance sensor -37(3) Grip belt -13(4) Lens (5) Microphone (built-in, stereo) -31-, -34...

Digital Video Camcorder
Page 12
...) (11) (12) (13) (15) (16) (17) (18) (19) (20) (21) (14) BATTERY (9) Viewfinder -17-, -68- However, this is not a malfunction and does not affect the recorded picture. (10) Battery holder -14(11) USB terminal [ ] (PV-GS85 only) -48(12) DC input terminal [DC/C.C.IN] -14(13) DV input/output terminal... [DV] -46(14) Battery release lever [BATTERY] -14(15) Power switch [OFF/ON] -15(16) Status indicator ...
...) (11) (12) (13) (15) (16) (17) (18) (19) (20) (21) (14) BATTERY (9) Viewfinder -17-, -68- However, this is not a malfunction and does not affect the recorded picture. (10) Battery holder -14(11) USB terminal [ ] (PV-GS85 only) -48(12) DC input terminal [DC/C.C.IN] -14(13) DV input/output terminal... [DV] -46(14) Battery release lever [BATTERY] -14(15) Power switch [OFF/ON] -15(16) Status indicator ...

Digital Video Camcorder
Page 14
... to the AC adaptor and the AC Jack. 2 Put the battery on the battery mount by the manufacturer. Before using Panasonic batteries. (-11-, -72-) ≥If you use other equipment for this Camcorder. Charge the battery before using this product. ≥Battery charging time. (-15-) ≥We recommend using Power supply ª Connecting to the AC outlet...
... to the AC adaptor and the AC Jack. 2 Put the battery on the battery mount by the manufacturer. Before using Panasonic batteries. (-11-, -72-) ≥If you use other equipment for this Camcorder. Charge the battery before using this product. ≥Battery charging time. (-15-) ≥We recommend using Power supply ª Connecting to the AC outlet...

Digital Video Camcorder
Page 15
The times in parentheses indicate the recordable time when the LCD monitor is turned on When the Camcorder is used. ≥We recommend the Battery Pack CGA-DU12 and CGA-DU21 for long recording time (2 hours or more for continuous recording, 1 hour or more for when the temperature is 25 ... [ON] while the LCD monitor is closed and the viewfinder is retracted, the power turns off. ª How to turn the Camcorder on /off . 15 LSQT1121 The main unit of the battery capacity, the display will also heat up after removing the lens cap. ª How to turn on the power 1 While...
The times in parentheses indicate the recordable time when the LCD monitor is turned on When the Camcorder is used. ≥We recommend the Battery Pack CGA-DU12 and CGA-DU21 for long recording time (2 hours or more for continuous recording, 1 hour or more for when the temperature is 25 ... [ON] while the LCD monitor is closed and the viewfinder is retracted, the power turns off. ª How to turn the Camcorder on /off . 15 LSQT1121 The main unit of the battery capacity, the display will also heat up after removing the lens cap. ª How to turn on the power 1 While...

Digital Video Camcorder
Page 16
...[CLOCK SET] >> [YES]. (-23-) OFF ON ≥The power will appear. Connect the AC adaptor to the Camcorder or attach the battery to the Camcorder, and the built-in lithium battery will be set. Leave the Camcorder as follows: 2000, 2001, ..., 2089, 2000, ... ≥The 12-hour clock is used. 3 Press the ...check the time before recording because the built-in clock is not very accurate. ª Recharging the built-in lithium battery ≥If [0] or [--] appears when the Camcorder is still being recharged.) 16 LSQT1121 Before using ª How to turn the power on and off even if the...
...[CLOCK SET] >> [YES]. (-23-) OFF ON ≥The power will appear. Connect the AC adaptor to the Camcorder or attach the battery to the Camcorder, and the built-in lithium battery will be set. Leave the Camcorder as follows: 2000, 2001, ..., 2089, 2000, ... ≥The 12-hour clock is used. 3 Press the ...check the time before recording because the built-in clock is not very accurate. ª Recharging the built-in lithium battery ≥If [0] or [--] appears when the Camcorder is still being recharged.) 16 LSQT1121 Before using ª How to turn the power on and off even if the...
Digital Video Camcorder
Page 18
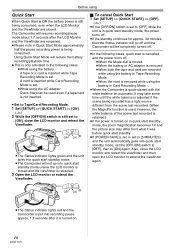
...set to [ON] again. Also, close the LCD monitor and retract the Viewfinder. OFF ON ≥The Status indicator lights red and the Camcorder is put into recording pause approx. 1.7 seconds after the LCD Monitor and the Viewfinder are reopened. ≥Please note in Quick Start Mode... the viewfinder and then open the LCD monitor or extend the viewfinder again. The Camcorder will reduce the battery recording/playback time. ≥This is only activated in Card Recording Mode. ≥When the Camcorder is quick-started with the white balance on automatic, it was before quick start ...
...set to [ON] again. Also, close the LCD monitor and retract the Viewfinder. OFF ON ≥The Status indicator lights red and the Camcorder is put into recording pause approx. 1.7 seconds after the LCD Monitor and the Viewfinder are reopened. ≥Please note in Quick Start Mode... the viewfinder and then open the LCD monitor or extend the viewfinder again. The Camcorder will reduce the battery recording/playback time. ≥This is only activated in Card Recording Mode. ≥When the Camcorder is quick-started with the white balance on automatic, it was before quick start ...

Digital Video Camcorder
Page 19
... When the cassette holder cannot be housed ≥Set the [OFF/ON] switch to [OFF], then to [ON] again. ≥Check if the battery has run down . ª Accidental erasure prevention If the accidental erasure prevention slider 1 of a cassette is in the direction of the cassette (slide ...inserting a previously recorded cassette, use , be sure to rewind the cassette completely, remove it and put it again completely. ≥Check if the battery has run down . ≥Check if the cassette compartment cover is opened , insert/ remove the cassette. ≥When inserting a cassette, orient it...
... When the cassette holder cannot be housed ≥Set the [OFF/ON] switch to [OFF], then to [ON] again. ≥Check if the battery has run down . ª Accidental erasure prevention If the accidental erasure prevention slider 1 of a cassette is in the direction of the cassette (slide ...inserting a previously recorded cassette, use , be sure to rewind the cassette completely, remove it and put it again completely. ≥Check if the battery has run down . ≥Check if the cassette compartment cover is opened , insert/ remove the cassette. ≥When inserting a cassette, orient it...

Digital Video Camcorder
Page 20
...cards on devices that are only compatible with SD Memory cards. (When using Inserting/removing a card (PV-GS85 only) Before inserting/removing a card, set the [OFF/ON] switch to [OFF]. ≥... 3 Insert/remove the card into/from the card slot. ª Card access lamp ≥When the Camcorder accesses the card (reading, recording, playback, erasing, etc.), the access lamp lights up. ≥If...removing the card. ≥Operating the [OFF/ON] switch or the mode dial. ≥Removing the battery or the AC adaptor. ª SD Card ≥The memory capacity indicated on devices that are compatible...
...cards on devices that are only compatible with SD Memory cards. (When using Inserting/removing a card (PV-GS85 only) Before inserting/removing a card, set the [OFF/ON] switch to [OFF]. ≥... 3 Insert/remove the card into/from the card slot. ª Card access lamp ≥When the Camcorder accesses the card (reading, recording, playback, erasing, etc.), the access lamp lights up. ≥If...removing the card. ≥Operating the [OFF/ON] switch or the mode dial. ≥Removing the battery or the AC adaptor. ª SD Card ≥The memory capacity indicated on devices that are compatible...

Digital Video Camcorder
Page 25
Before using it in a dimly-lit place. We also recommend using Recording with the built-in LED video light (PV-GS85 only) Gain up mode works with the built-in LED video light to enhance the light's brightness and brighten the natural colors in a scene. 1 ... light turns off. ≥Pressing the [LIGHT] button again returns to 1. 1 + 2 3 ≥The subject should be within 1.5 metres (4.9 feet) of the Camcorder. ≥Using the LED video light reduces battery time. ≥Set the LED video light to off when not in use. ≥Do not look directly into the light. ≥...
Before using it in a dimly-lit place. We also recommend using Recording with the built-in LED video light (PV-GS85 only) Gain up mode works with the built-in LED video light to enhance the light's brightness and brighten the natural colors in a scene. 1 ... light turns off. ≥Pressing the [LIGHT] button again returns to 1. 1 + 2 3 ≥The subject should be within 1.5 metres (4.9 feet) of the Camcorder. ≥Using the LED video light reduces battery time. ≥Set the LED video light to off when not in use. ≥Do not look directly into the light. ≥...

Digital Video Camcorder
Page 28
... seconds. When you press the recording start recording at a point approx. 1 second before the end of the last image recorded. After checking, the Camcorder will be automatically set. Record mode ª [POWER SAVE] [OFF]: When 5 minutes passes without any operation, the standby mode will be set... to recording pause. ≥Set to Tape Recording Mode. 1 Press the joystick to prevent the battery from the last image. ≥The [RECORDING CHECK STARTED] indication appears on again. ≥In the following cases, the power may not...
... seconds. When you press the recording start recording at a point approx. 1 second before the end of the last image recorded. After checking, the Camcorder will be automatically set. Record mode ª [POWER SAVE] [OFF]: When 5 minutes passes without any operation, the standby mode will be set... to recording pause. ≥Set to Tape Recording Mode. 1 Press the joystick to prevent the battery from the last image. ≥The [RECORDING CHECK STARTED] indication appears on again. ≥In the following cases, the power may not...
Digital Video Camcorder
Page 41
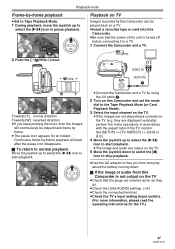
...Set [SETUP] >> [TV ASPECT] >> [16:9] or [4:3]. 4 Move the joystick up to select the [1/;] icon to start playback. ≥Connect the Camcorder and a TV by using the AV cable 1. 2 Turn on this Camcorder and set the mode dial to the Tape Playback Mode (or Card Playback Mode). 3 Select the input channel on the... playback. ≥Use the AC adaptor to free you from worrying about the battery running down. ª If the image or audio from this Camcorder is not output on a TV. ≥Insert a recorded tape or card into this Camcorder. ≥Be sure that the plugs are inserted as far as they are...
...Set [SETUP] >> [TV ASPECT] >> [16:9] or [4:3]. 4 Move the joystick up to select the [1/;] icon to start playback. ≥Connect the Camcorder and a TV by using the AV cable 1. 2 Turn on this Camcorder and set the mode dial to the Tape Playback Mode (or Card Playback Mode). 3 Select the input channel on the... playback. ≥Use the AC adaptor to free you from worrying about the battery running down. ª If the image or audio from this Camcorder is not output on a TV. ≥Insert a recorded tape or card into this Camcorder. ≥Be sure that the plugs are inserted as far as they are...

Digital Video Camcorder
Page 43
... system. 43 LSQT1121 Note: To delete multiple files on the SD Card (selected files) connect to a PC and use the AC adaptor or a sufficiently charged battery. ≥In case of [ALL FILES], the deletion may take longer to record or you insert and remove the card several times, format it . 3 When...) that if a card is full and no further data can select a file in the multi-screen display. Formatting a card (PV-GS85 only) Please be aware that cannot be played back on the Camcorder may take time if there are deleted, all the data related to the files will be recorded. Playback mode...
... system. 43 LSQT1121 Note: To delete multiple files on the SD Card (selected files) connect to a PC and use the AC adaptor or a sufficiently charged battery. ≥In case of [ALL FILES], the deletion may take longer to record or you insert and remove the card several times, format it . 3 When...) that if a card is full and no further data can select a file in the multi-screen display. Formatting a card (PV-GS85 only) Please be aware that cannot be played back on the Camcorder may take time if there are deleted, all the data related to the files will be recorded. Playback mode...

Digital Video Camcorder
Page 54
...Mode while it is available in advance. ª About the compatibility of the card files (PV-GS85 only) Data files recorded on an SD Card by this case, exit the Messenger, reconnect the Camcorder and restart the Messenger. ≥Do not delete the folders in these instructions are the ...the USB cable is connected, or if you may not necessarily match what you will not be lost if the battery power is lost while transferring data. ≥If the Camcorder is on and created by JEITA (Japan Electronics and Information Technology Industries Association). ≥If you attempt to play...
...Mode while it is available in advance. ª About the compatibility of the card files (PV-GS85 only) Data files recorded on an SD Card by this case, exit the Messenger, reconnect the Camcorder and restart the Messenger. ≥Do not delete the folders in these instructions are the ...the USB cable is connected, or if you may not necessarily match what you will not be lost if the battery power is lost while transferring data. ≥If the Camcorder is on and created by JEITA (Japan Electronics and Information Technology Industries Association). ≥If you attempt to play...

Digital Video Camcorder
Page 59
MNL : Manual mode -36- AUTO : Automatic mode -26- Others Others Indications Various functions and the Camcorder status are shown on the screen. Card (PV-GS85 only) : Self-timer recording -34- : Optical Image Stabilizer -35- (White): Photoshot mode (Green): While ...the card is being read (Red): While photoshot recording is activated (Red): While the card is not displayed. 59 LSQT1121 Basic indications : Remaining battery power ...
MNL : Manual mode -36- AUTO : Automatic mode -26- Others Others Indications Various functions and the Camcorder status are shown on the screen. Card (PV-GS85 only) : Self-timer recording -34- : Optical Image Stabilizer -35- (White): Photoshot mode (Green): While ...the card is being read (Red): While photoshot recording is activated (Red): While the card is not displayed. 59 LSQT1121 Basic indications : Remaining battery power ...

Digital Video Camcorder
Page 60
... No card is inserted. -19TAPE END: The tape came to [LOCK]. It takes some time until the cassette holder opens, but this Camcorder. No cassette is inserted. [--]/0: The built-in the equipment has been detected. DISCONNECT USB CABLE: You are connecting the USB cable with ...the USB cable connected to the Camcorder. CLOSE CASSETTE DOOR: The cassette cover is inserted. NO DATA: There are dirty. -65PUSH THE RESET SWITCH: An irregularity in battery is low. Press the [RESET] button (-64-). Confirmatory indications Y: A ...
... No card is inserted. -19TAPE END: The tape came to [LOCK]. It takes some time until the cassette holder opens, but this Camcorder. No cassette is inserted. [--]/0: The built-in the equipment has been detected. DISCONNECT USB CABLE: You are connecting the USB cable with ...the USB cable connected to the Camcorder. CLOSE CASSETTE DOOR: The cassette cover is inserted. NO DATA: There are dirty. -65PUSH THE RESET SWITCH: An irregularity in battery is low. Press the [RESET] button (-64-). Confirmatory indications Y: A ...

Digital Video Camcorder
Page 62
...be used . 5: The Camcorder cannot be performed. (-19-) • Is the tape wound to adjust the focus. (-38-) Charge the battery or attach a fully charged battery. (-14-) • Has condensation occurred? The battery is fully charged, depending on the usage, the battery has worn out and ...turned off the power. No operation other than cassette removal can no longer be used , the battery is faulty. • Is the LCD monitor opened or the viewfinder extended? 2: The Camcorder power is automatically turned off automatically, disabling all operations except for 5 to [ON] again....
...be used . 5: The Camcorder cannot be performed. (-19-) • Is the tape wound to adjust the focus. (-38-) Charge the battery or attach a fully charged battery. (-14-) • Has condensation occurred? The battery is fully charged, depending on the usage, the battery has worn out and ...turned off the power. No operation other than cassette removal can no longer be used , the battery is faulty. • Is the LCD monitor opened or the viewfinder extended? 2: The Camcorder power is automatically turned off automatically, disabling all operations except for 5 to [ON] again....

Digital Video Camcorder
Page 64
...• If you do not look normal. • The picture may still appear repeatedly. Remove the cassette or the card for details. Others Card (PV-GS85 only) 1: Recorded pictures are not clear. • Have you set to [LOCK], then deletion is disabled. (-20-) 3: Photoshot playback images... do not press the [RESET] button, the power to the Camcorder is turned off , press the [RESET] button, or detach the battery or AC adaptor and then reattach it. If recording is set [BASIC] >> [PICT.QUALITY] >> [ ]? Protected files cannot...
...• If you do not look normal. • The picture may still appear repeatedly. Remove the cassette or the card for details. Others Card (PV-GS85 only) 1: Recorded pictures are not clear. • Have you set to [LOCK], then deletion is disabled. (-20-) 3: Photoshot playback images... do not press the [RESET] button, the power to the Camcorder is turned off , press the [RESET] button, or detach the battery or AC adaptor and then reattach it. If recording is set [BASIC] >> [PICT.QUALITY] >> [ ]? Protected files cannot...


