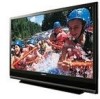
Lifi Hdtv
Page 4
... serial number of your new Projection Display. Visit our Panasonic Web Site for USA : www.panasonic.com / for future reference.... These limits are designed to computer or peripheral devices. This equipment generates, uses and can be determined by turning the equipment off and on, the user is connected. • Consult the dealer or an experienced radio / TV...Models Number: PT-50LCZ70/PT-56LCZ70/PT-61LCZ70/PT-50LCZ7/PT-56LCZ7/PT-61LCZ7 Trade Name: Panasonic Responsible party: Panasonic Corporation of North America Address: One Panasonic Way, Secaucus,...
... serial number of your new Projection Display. Visit our Panasonic Web Site for USA : www.panasonic.com / for future reference.... These limits are designed to computer or peripheral devices. This equipment generates, uses and can be determined by turning the equipment off and on, the user is connected. • Consult the dealer or an experienced radio / TV...Models Number: PT-50LCZ70/PT-56LCZ70/PT-61LCZ70/PT-50LCZ7/PT-56LCZ7/PT-61LCZ7 Trade Name: Panasonic Responsible party: Panasonic Corporation of North America Address: One Panasonic Way, Secaucus,...
Lifi Hdtv
Page 7
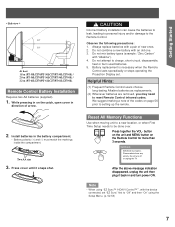
...on page 56 prior to...PT-50LCZ70/PT-50LCZ7/PT-50LCZ70-K) / 2.0 m (PT-56LCZ70/PT-56LCZ7/PT-56LCZ70-K) / 2.2 m (PT-61LCZ70/PT-61LCZ7/PT-61LCZ70-K). Battery replacement is necessary when the Remote Control acts sporadically or stops operating the Projection Display set "EZ Sync" first to charge, short-circuit, disassemble, heat or burn used batteries. 5. Do not turn... power ON. Note • When using the Setup Menu. (p. 52-53) 7 Do not attempt to "Off" and then "On" using "EZ Sync™ "HDAVI Control™"", with a pair of arrow. 2. Install batteries in and turn...
...on page 56 prior to...PT-50LCZ70/PT-50LCZ7/PT-50LCZ70-K) / 2.0 m (PT-56LCZ70/PT-56LCZ7/PT-56LCZ70-K) / 2.2 m (PT-61LCZ70/PT-61LCZ7/PT-61LCZ70-K). Battery replacement is necessary when the Remote Control acts sporadically or stops operating the Projection Display set "EZ Sync" first to charge, short-circuit, disassemble, heat or burn used batteries. 5. Do not turn... power ON. Note • When using the Setup Menu. (p. 52-53) 7 Do not attempt to "Off" and then "On" using "EZ Sync™ "HDAVI Control™"", with a pair of arrow. 2. Install batteries in and turn...
Lifi Hdtv
Page 9
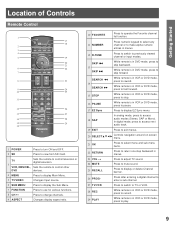
... 7 8 23 9 24 10 25 11 12 26 13 27 14 28 15 29 16 1 POWER Press to turn ON and OFF. 2 SD Press to previously viewed channel or input modes. TV Sets the remote to control television or digital television. 3 VCR, DBS/CBL, Sets the remote to control other DVD... devices. 4 MENU Press to display Main Menu. 5 TV/VIDEO Changes Input source. 6 SUB MENU Press to display the Sub Menu. 7 FUNCTION Press to use for various functions. 8 CH Press to change channels. ...
... 7 8 23 9 24 10 25 11 12 26 13 27 14 28 15 29 16 1 POWER Press to turn ON and OFF. 2 SD Press to previously viewed channel or input modes. TV Sets the remote to control television or digital television. 3 VCR, DBS/CBL, Sets the remote to control other DVD... devices. 4 MENU Press to display Main Menu. 5 TV/VIDEO Changes Input source. 6 SUB MENU Press to display the Sub Menu. 7 FUNCTION Press to use for various functions. 8 CH Press to change channels. ...
Lifi Hdtv
Page 10
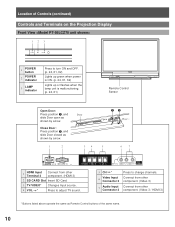
... 1 HDMI Input Terminal 3 Connect from other component. (HDMI 3) 2 SD CARD Slot Insert SD Card. 3 TV/VIDEO* Changes Input source. 4 VOL -+* Press to adjust TV sound. >< 5 CH * 6 Video Input Connector 3 7 Audio Input Connector 3 Press to turn ON and OFF. (p. 24, 61, 62) Lights up green when power is ON. (p. 24, 61, ...Control Sensor Open Door: Press position 1 , and slide Door open as Remote Control buttons of Controls (continued) Controls and Terminals on the Projection Display Front View 12 3 1 POWER button 2 POWER indicator 3 LAMP indicator Press to change channels.
... 1 HDMI Input Terminal 3 Connect from other component. (HDMI 3) 2 SD CARD Slot Insert SD Card. 3 TV/VIDEO* Changes Input source. 4 VOL -+* Press to adjust TV sound. >< 5 CH * 6 Video Input Connector 3 7 Audio Input Connector 3 Press to turn ON and OFF. (p. 24, 61, 62) Lights up green when power is ON. (p. 24, 61, ...Control Sensor Open Door: Press position 1 , and slide Door open as Remote Control buttons of Controls (continued) Controls and Terminals on the Projection Display Front View 12 3 1 POWER button 2 POWER indicator 3 LAMP indicator Press to change channels.

Lifi Hdtv
Page 24
... circuit breaker (unless necessary) while the cooling fan is still operating. ON (Preparing to turn power off. • Power shuts off " has been selected "Set", the TV will blink Red. Power ON Press POWER on Projection Display or Remote Control to operate for approximately 3 minutes after power is... turned back on, it may be increased in OFF condition when plugged into an AC outlet....
... circuit breaker (unless necessary) while the cooling fan is still operating. ON (Preparing to turn power off. • Power shuts off " has been selected "Set", the TV will blink Red. Power ON Press POWER on Projection Display or Remote Control to operate for approximately 3 minutes after power is... turned back on, it may be increased in OFF condition when plugged into an AC outlet....

Lifi Hdtv
Page 25
Basic Operation First Time Setup For your convenience, First Time Setup menu will be displayed on screen when the set is turned on for setting up the features. Press ◄► to display the Program channel menu. If needed , follow the menus and procedures displayed on conditions, "...
Basic Operation First Time Setup For your convenience, First Time Setup menu will be displayed on screen when the set is turned on for setting up the features. Press ◄► to display the Program channel menu. If needed , follow the menus and procedures displayed on conditions, "...

Lifi Hdtv
Page 29
... to desired volume level: Press VOL+ or VOL-. Input select 1 TV 2 Component 1 3 Component 2 4 HDMI 1 5 HDMI 2 6 HDMI 3 7 Video 1 8 Video 2 9 Video 3 0 PC Component 1...Select desired channel: Press CH or NUMBER keys. ■ Adjust to display the Input select menu. 2. Projection Display Operation Basic Operation Selecting Input Mode Procedure 1. Or, press ▲▼ to select the input ... is displayed. Notes • The channel number and volume level are stored even after the unit is turned off. • Power consumption can be changed. (p. 50) ■ Card input mode (Photo viewer...
... to desired volume level: Press VOL+ or VOL-. Input select 1 TV 2 Component 1 3 Component 2 4 HDMI 1 5 HDMI 2 6 HDMI 3 7 Video 1 8 Video 2 9 Video 3 0 PC Component 1...Select desired channel: Press CH or NUMBER keys. ■ Adjust to display the Input select menu. 2. Projection Display Operation Basic Operation Selecting Input Mode Procedure 1. Or, press ▲▼ to select the input ... is displayed. Notes • The channel number and volume level are stored even after the unit is turned off. • Power consumption can be changed. (p. 50) ■ Card input mode (Photo viewer...

Lifi Hdtv
Page 30
... instantly mute the sound. Note • The audio output from conventional television. Projection Display operation (continued) Channel and Program Tuning Channel and Program tuning in digital ...Channel, Program and Station identifier Program title 15-2 Andrew's cooking show ABC-HD CC SAP TV-G 1080i Standard 4:3 30 Closed Caption Rating Level Picture mode Time remaining in the on-screen ...1. Press the NUMBER keys to reactivate sound. • Sound is also reactivated when power is turned off or volume level is an example of tuning to channel 15. and enter the program (1,...
... instantly mute the sound. Note • The audio output from conventional television. Projection Display operation (continued) Channel and Program Tuning Channel and Program tuning in digital ...Channel, Program and Station identifier Program title 15-2 Andrew's cooking show ABC-HD CC SAP TV-G 1080i Standard 4:3 30 Closed Caption Rating Level Picture mode Time remaining in the on-screen ...1. Press the NUMBER keys to reactivate sound. • Sound is also reactivated when power is turned off or volume level is an example of tuning to channel 15. and enter the program (1,...
Lifi Hdtv
Page 40
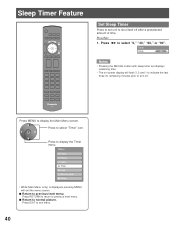
... exit the menu screen. ■ Return to previous level menu. Timer Sleep 60 Notes • Pressing the RECALL button with sleep timer set unit to turn off after a preselected amount of time. Press to display the Main Menu screen. Menu EZ Sync Picture Audio Timer Lock Memory card Setup • While...
... exit the menu screen. ■ Return to previous level menu. Timer Sleep 60 Notes • Pressing the RECALL button with sleep timer set unit to turn off after a preselected amount of time. Press to display the Main Menu screen. Menu EZ Sync Picture Audio Timer Lock Memory card Setup • While...

Lifi Hdtv
Page 43
...program lock menu. • MPAA : for U.S movie ratings • U.S.TV : for U.S TV program ratings • C.E.L.R. : for Canadian English ratings • C.F.L.R. : for programs that have been set to "Blocked." • Off - Turns on a specific age based rating level, the Off rating and any other...the monitor terminal output for Canadian French ratings Program lock Mode On Monitor out Off MPAA Off U.S.TV Off C.E.L.R Off C.F.L.R Off 7. Turns off the monitor terminal output for the Lock category is independent of movies and television programs according to select...
...program lock menu. • MPAA : for U.S movie ratings • U.S.TV : for U.S TV program ratings • C.E.L.R. : for Canadian English ratings • C.F.L.R. : for programs that have been set to "Blocked." • Off - Turns on a specific age based rating level, the Off rating and any other...the monitor terminal output for Canadian French ratings Program lock Mode On Monitor out Off MPAA Off U.S.TV Off C.E.L.R Off C.F.L.R Off 7. Turns off the monitor terminal output for the Lock category is independent of movies and television programs according to select...
Lifi Hdtv
Page 48
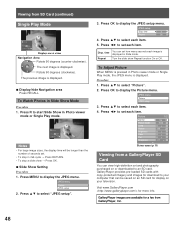
... 5 Repeat On 4. GalleryPlayer provides pre-loaded SD cards with copy-protected imagery and images for more info. Press ▲▼ to select each item. 4. Repeat Turn the slide show G B Y Displays one at a time Navigation Area Rotate 90 degrees (counter-clockwise). Visit www.GalleryPlayer.com for download to select each item. 5. Next...
... 5 Repeat On 4. GalleryPlayer provides pre-loaded SD cards with copy-protected imagery and images for more info. Press ▲▼ to select each item. 4. Repeat Turn the slide show G B Y Displays one at a time Navigation Area Rotate 90 degrees (counter-clockwise). Visit www.GalleryPlayer.com for download to select each item. 5. Next...
Lifi Hdtv
Page 52
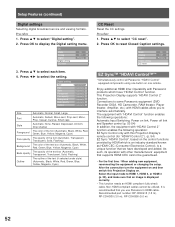
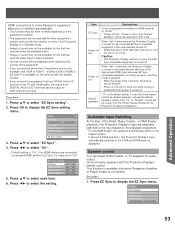
...◄► to select "CC reset". 2. Press ▲▼ to select the setting. This Projection Display supports "HDAVI Control 2" function. After the connection turn the equipment on and then switch this Projection Display's remote control (for "HDAVI Control 2"). (p. 54) EZ Sync "HDAVI Control", based on ...1. CC Mode Analog Digital Digital setting CC reset On CC1 Primary EZ Sync™ "HDAVI Control™"* * Simultaneously control all Panasonic "HDAVI Control" equipped components using one button on one remote. It is displayed correctly. • This function needs an HDMI ...
...◄► to select "CC reset". 2. Press ▲▼ to select the setting. This Projection Display supports "HDAVI Control 2" function. After the connection turn the equipment on and then switch this Projection Display's remote control (for "HDAVI Control 2"). (p. 54) EZ Sync "HDAVI Control", based on ...1. CC Mode Analog Digital Digital setting CC reset On CC1 Primary EZ Sync™ "HDAVI Control™"* * Simultaneously control all Panasonic "HDAVI Control" equipped components using one button on one remote. It is displayed correctly. • This function needs an HDMI ...
Lifi Hdtv
Page 53
... speakers "TV" is set. Press ◄► to select "On". • Default setting is connected. This function is available only when Panasonic Amplifier or Player theater is "On". Caution: • This Projection Display remains on . If using the DIGA operation, this Projection Display's input automatically switches to the DIGA and DIGA menu is turned off...
... speakers "TV" is set. Press ◄► to select "On". • Default setting is connected. This function is available only when Panasonic Amplifier or Player theater is "On". Caution: • This Projection Display remains on . If using the DIGA operation, this Projection Display's input automatically switches to the DIGA and DIGA menu is turned off...
Lifi Hdtv
Page 54
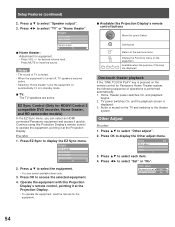
..." turns the equipment on the TV and switches to select "Speaker output". 3. Procedure 1. for HDAVI Control 2 compatible DVD recorder, Home theater, and HD camcorder models) In the EZ Sync menu, you can select available items only. 3. Setup Features (continued) 2. DVD recorder Home theater HD camcorder Speaker output TV ■ Home theater: Adjustment for Panasonic...
..." turns the equipment on the TV and switches to select "Speaker output". 3. Procedure 1. for HDAVI Control 2 compatible DVD recorder, Home theater, and HD camcorder models) In the EZ Sync menu, you can select available items only. 3. Setup Features (continued) 2. DVD recorder Home theater HD camcorder Speaker output TV ■ Home theater: Adjustment for Panasonic...
Lifi Hdtv
Page 55
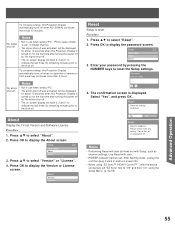
... TV. The confirmation screen is reset. Select "Yes", and press OK. Do not turn power ON. • When using the Setup Menu. (p. 52-53) Advanced Operation 55 Please refrain from any activity. Notes No action • Not in progress. To conserve energy, this Projection Display is turned ...on for the first time after turning the power off by "No signal shut-off". • The on -screen display will flash 3, 2 and 1 to ...
... TV. The confirmation screen is reset. Select "Yes", and press OK. Do not turn power ON. • When using the Setup Menu. (p. 52-53) Advanced Operation 55 Please refrain from any activity. Notes No action • Not in progress. To conserve energy, this Projection Display is turned ...on for the first time after turning the power off by "No signal shut-off". • The on -screen display will flash 3, 2 and 1 to ...

Lifi Hdtv
Page 56
Procedure 1. Press the NUMBER keys to the TV mode Press TV. Procedure 1. You can operate other buttons are not lit). ...Connect the external equipment to operate the equipment with the remote control. (p. 57) • The external equipment turns On. To find a code not listed in the code list This procedure searches all codes and is input ...correct code is found, press OK. 56 Press POWER and OK simultaneously for more than 3 seconds. • Release the buttons when the equipment selection buttons start flashing. 3. Press POWER to the Projection Display and Power Off the external ...
Procedure 1. Press the NUMBER keys to the TV mode Press TV. Procedure 1. You can operate other buttons are not lit). ...Connect the external equipment to operate the equipment with the remote control. (p. 57) • The external equipment turns On. To find a code not listed in the code list This procedure searches all codes and is input ...correct code is found, press OK. 56 Press POWER and OK simultaneously for more than 3 seconds. • Release the buttons when the equipment selection buttons start flashing. 3. Press POWER to the Projection Display and Power Off the external ...
Lifi Hdtv
Page 61
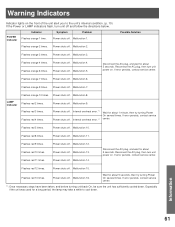
... orange 7 times. Power shuts off . Internal overheat error.*1 Power shuts off . Internal overheat error.*1 Wait for about 5 seconds, then try turning Power On several times. Malfunction 10. Power shuts off . Flashes red 12 times. Flashes red 13 times. Malfunction 16. Malfunction 1. Malfunction 4....If error persists, contact service center. Power shuts off . Power shuts off . Power shuts off . Reconnect the AC plug, then turn unit off and follow the directions below. Power shuts off . Power shuts off . Malfunction 14. If error persists, contact service center...
... orange 7 times. Power shuts off . Internal overheat error.*1 Power shuts off . Internal overheat error.*1 Wait for about 5 seconds, then try turning Power On several times. Malfunction 10. Power shuts off . Flashes red 12 times. Flashes red 13 times. Malfunction 16. Malfunction 1. Malfunction 4....If error persists, contact service center. Power shuts off . Power shuts off . Power shuts off . Reconnect the AC plug, then turn unit off and follow the directions below. Power shuts off . Power shuts off . Malfunction 14. If error persists, contact service center...

Lifi Hdtv
Page 62
...solution • Is the power cord plugged in " insettings when the equipment is connected via HDMI. • Turn Off the TV unit and device, then turn the power OFF - Power does not turn ON. After 5 seconds, turn the power On. If the steps above do not light up. • This is not clear. (blurring...• When using 16:9 image software (cinema vision size software, etc.), there is the TV/VIDEO mode for the VCR set the format to TV? If the Power was On, the screen will clear up . The power turns OFF. During ZOOM modes, the image is operating. Fan is operating even though...
...solution • Is the power cord plugged in " insettings when the equipment is connected via HDMI. • Turn Off the TV unit and device, then turn the power OFF - Power does not turn ON. After 5 seconds, turn the power On. If the steps above do not light up. • This is not clear. (blurring...• When using 16:9 image software (cinema vision size software, etc.), there is the TV/VIDEO mode for the VCR set the format to TV? If the Power was On, the screen will clear up . The power turns OFF. During ZOOM modes, the image is operating. Fan is operating even though...


