Lifi Hdtv
Page 1
...... Registering your needs. Illustrations in case your new Projection Display for use with models PT-50LCZ70, PT-56LCZ70, PT-61LCZ70, PT-50LCZ7, PT-56LCZ7, PT-61LCZ7, PT-50LCZ70-K, PT-56LCZ70-K and PT-61LCZ70-K. Register your new Projection Display is designed for insurance purposes in this product, please read the instructions completely. Register online at www.panasonic.com/register (Canada) For assistance, please call : 787...
...... Registering your needs. Illustrations in case your new Projection Display for use with models PT-50LCZ70, PT-56LCZ70, PT-61LCZ70, PT-50LCZ7, PT-56LCZ7, PT-61LCZ7, PT-50LCZ70-K, PT-56LCZ70-K and PT-61LCZ70-K. Register your new Projection Display is designed for insurance purposes in this product, please read the instructions completely. Register online at www.panasonic.com/register (Canada) For assistance, please call : 787...

Lifi Hdtv
Page 2
... the manufacturer, or sold with one wider than the other apparatus (including amplifiers) that the cable ground shall be read carefully in this Operating Instructions manual. 4) Follow all warnings on top of this apparatus near a swimming pool, and the like , on the product and in order to avoid any heat source...
... the manufacturer, or sold with one wider than the other apparatus (including amplifiers) that the cable ground shall be read carefully in this Operating Instructions manual. 4) Follow all warnings on top of this apparatus near a swimming pool, and the like , on the product and in order to avoid any heat source...
Lifi Hdtv
Page 12
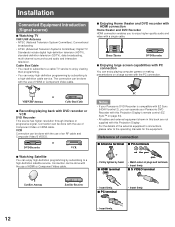
...with the PC connection. Cable Box/Cable • You need to subscribe to a cable TV service to a high-definition cable service. or VHF/UHF Antenna Cable Box/Cable ■... Component Video cable. Connection can enjoy high-definition programming by subscribing to the operating manuals for the equipment. The connection can enjoy playing computer games or making presentations on ...higher quality audio and video with this Projection Display. • For the details of an RF cable and Composite Video/S VIDEO. PC Notes • If your Panasonic DVD Recorder with a single cable....
...with the PC connection. Cable Box/Cable • You need to subscribe to a cable TV service to a high-definition cable service. or VHF/UHF Antenna Cable Box/Cable ■... Component Video cable. Connection can enjoy high-definition programming by subscribing to the operating manuals for the equipment. The connection can enjoy playing computer games or making presentations on ...higher quality audio and video with this Projection Display. • For the details of an RF cable and Composite Video/S VIDEO. PC Notes • If your Panasonic DVD Recorder with a single cable....
Lifi Hdtv
Page 22
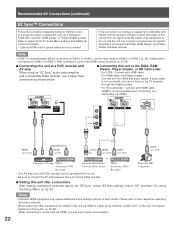
...HDMI is recommended when connecting to each model. Please refer to their respective operating instruction manuals. • When audio from other equipment connected to this unit to the DIGA, RAM...not connected, you can be operated with this unit. • Be sure to the TV program through the theater system. • For HD Camcorder : Connect with HDAVI control...OUT) HDMI (AV OUT) HDMI (AV OUT) or Panasonic AV amp DIGA (Panasonic DVD Recorder) Panasonic RAM theater/ Panasonic Player theater DIGA (Panasonic DVD Recorder) Panasonic HD Camcorder • One AV amp and one DIGA ...
...HDMI is recommended when connecting to each model. Please refer to their respective operating instruction manuals. • When audio from other equipment connected to this unit to the DIGA, RAM...not connected, you can be operated with this unit. • Be sure to the TV program through the theater system. • For HD Camcorder : Connect with HDAVI control...OUT) HDMI (AV OUT) HDMI (AV OUT) or Panasonic AV amp DIGA (Panasonic DVD Recorder) Panasonic RAM theater/ Panasonic Player theater DIGA (Panasonic DVD Recorder) Panasonic HD Camcorder • One AV amp and one DIGA ...

Lifi Hdtv
Page 25
...", "Analog only", or "Digital only". 8. Language Language English Auto program You can select English, Spanish or French as the factory setting. Press ▲▼ to Manual program mode. Press OK to select "Language". 2. Press OK to start scan. • Channels available for reception will return to select "ANT in Setup menu...
...", "Analog only", or "Digital only". 8. Language Language English Auto program You can select English, Spanish or French as the factory setting. Press ▲▼ to Manual program mode. Press OK to select "Language". 2. Press OK to start scan. • Channels available for reception will return to select "ANT in Setup menu...

Lifi Hdtv
Page 27
...Setup" icon. 3. Press ▲▼ to display the Setup menu. After Auto program is not pressed after selecting APPLY, the channels will return to Manual program mode. Press OK to select "Auto". 9. Press ▲▼ to display the Auto program menu. Basic Operation 6. Press OK to select "...Program channel". 5. Press OK to select "ANT in". 7. To place the channels that were located by auto scan in Auto Manual Signal meter Cable 27 Press ▲▼ to start scan. Menu EZ Sync Picture Audio Timer Lock Memory card Setup 4. Press OK to "...
...Setup" icon. 3. Press ▲▼ to display the Setup menu. After Auto program is not pressed after selecting APPLY, the channels will return to Manual program mode. Press OK to select "Auto". 9. Press ▲▼ to display the Auto program menu. Basic Operation 6. Press OK to select "...Program channel". 5. Press OK to select "ANT in". 7. To place the channels that were located by auto scan in Auto Manual Signal meter Cable 27 Press ▲▼ to start scan. Menu EZ Sync Picture Audio Timer Lock Memory card Setup 4. Press OK to "...

Lifi Hdtv
Page 28
...Tuning channels (continued) 8. Press ◄► to display the Set favorite menu. (p. 31) ■ Edit (Add) Setting of register/delete in Program channel. 1. Manual program Edit Channel 1 2 3 4 5 6 7 8 Caption Apply Cancel Favorite Add Yes Yes Yes Yes Yes Yes Yes Yes Select OK RETURN R Prev. Press ◄... the character to enter your program. 28 Press OK to input/ change . 8. Press OK to enter input field. Manual program Edit Channel 1 2 3 4 5 6 7 8 Caption Apply Cancel Favorite ... Add Yes ... Yes ... page G Next page B Y 13.
...Tuning channels (continued) 8. Press ◄► to display the Set favorite menu. (p. 31) ■ Edit (Add) Setting of register/delete in Program channel. 1. Manual program Edit Channel 1 2 3 4 5 6 7 8 Caption Apply Cancel Favorite Add Yes Yes Yes Yes Yes Yes Yes Yes Select OK RETURN R Prev. Press ◄... the character to enter your program. 28 Press OK to input/ change . 8. Press OK to enter input field. Manual program Edit Channel 1 2 3 4 5 6 7 8 Caption Apply Cancel Favorite ... Add Yes ... Yes ... page G Next page B Y 13.

Lifi Hdtv
Page 34
... the equipment. Procedure 1. Press ▲▼ to display the Main Menu screen. DVD recorder Home theater HD camcorder Speaker output TV 2. Note • For details, see the equipment manual or ask your local dealer. For details, "EZ Sync Control" on pages 22 and 52-54. Press to exit menu. ...card Setup • The EZ Sync may be set using this Projection Display's Remote Control. • Follow the menu of the equipment and enjoy watching. • For the remote control operations, refer to page 54. ■ Return to TV screen Press EXIT. Press EXIT to display the EZ Sync menu....
... the equipment. Procedure 1. Press ▲▼ to display the Main Menu screen. DVD recorder Home theater HD camcorder Speaker output TV 2. Note • For details, see the equipment manual or ask your local dealer. For details, "EZ Sync Control" on pages 22 and 52-54. Press to exit menu. ...card Setup • The EZ Sync may be set using this Projection Display's Remote Control. • Follow the menu of the equipment and enjoy watching. • For the remote control operations, refer to page 54. ■ Return to TV screen Press EXIT. Press EXIT to display the EZ Sync menu....

Lifi Hdtv
Page 49
... Language Program channel External devices CC EZ Sync setting 3. Press ▲▼ to select "Signal meter". 4. Surf Mode You may choose the way in Auto Manual Signal meter Antenna Advanced Operation 49
... Language Program channel External devices CC EZ Sync setting 3. Press ▲▼ to select "Signal meter". 4. Surf Mode You may choose the way in Auto Manual Signal meter Antenna Advanced Operation 49
Lifi Hdtv
Page 54
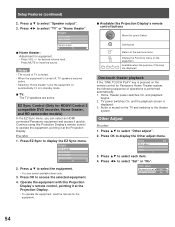
... to operate the equipment, pointing it at the Projection Display. • To operate the equipment, read the manual for the equipment. ■ Available this Projection Display's remote control, pointing it at the Projection Display. Press EZ Sync to select "TV" or "Home theater". Press ▲▼ ...8226; Selecting "Home theater" turns the equipment on the TV and switches to select the equipment. • You can select an HDMI connected Panasonic equipment and access it is in standby mode. ■ TV: The TV speakers are displayed One-touch theater playback If the "ONE ...
... to operate the equipment, pointing it at the Projection Display. • To operate the equipment, read the manual for the equipment. ■ Available this Projection Display's remote control, pointing it at the Projection Display. Press EZ Sync to select "TV" or "Home theater". Press ▲▼ ...8226; Selecting "Home theater" turns the equipment on the TV and switches to select the equipment. • You can select an HDMI connected Panasonic equipment and access it is in standby mode. ■ TV: The TV speakers are displayed One-touch theater playback If the "ONE ...
Lifi Hdtv
Page 67
...42 Channel up / down buttons......... 9, 10, 29 Cleaning 8 Closed Caption (CC 51-52 Component signal input 1-2 terminals .. 11 Connecting Antenna (To watch TV) ..... 13 Connecting DVD recorder (VCR) (To record/playback 14-15 Connecting DVD recorder (VCR) and satellite receiver 16-17 Connecting Home Theater and DVD recorder...I Input 1, 2, 3 terminals 10-11 Input labels 50 Insert/Remove the Card 46 J JPEG 46-48 L LAMP indicator 10, 61 Lock Set 42 M Manual program setting 27 Monitor out 50 MPAA 41, 43 MUTE button 9, 30 N NUMBER keys 9, 30 P Password 41-42, 45 PC Adjust 37 PC input ...
...42 Channel up / down buttons......... 9, 10, 29 Cleaning 8 Closed Caption (CC 51-52 Component signal input 1-2 terminals .. 11 Connecting Antenna (To watch TV) ..... 13 Connecting DVD recorder (VCR) (To record/playback 14-15 Connecting DVD recorder (VCR) and satellite receiver 16-17 Connecting Home Theater and DVD recorder...I Input 1, 2, 3 terminals 10-11 Input labels 50 Insert/Remove the Card 46 J JPEG 46-48 L LAMP indicator 10, 61 Lock Set 42 M Manual program setting 27 Monitor out 50 MPAA 41, 43 MUTE button 9, 30 N NUMBER keys 9, 30 P Password 41-42, 45 PC Adjust 37 PC input ...


