
Quick Reference Guide
Page 1
... Electric Industrial Co., Ltd. For more details, please refer to the KX-NT307 Bluetooth® Module Installation Instructions. Quick Reference Guide IP Proprietary Telephone Model No. KX-NT343/KX-NT346/KX-NT366 Thank you for KX-TDE100/KX-TDE200. • For information on connecting the KX-NT307, refer to the manuals of each model number is under licence...
... Electric Industrial Co., Ltd. For more details, please refer to the KX-NT307 Bluetooth® Module Installation Instructions. Quick Reference Guide IP Proprietary Telephone Model No. KX-NT343/KX-NT346/KX-NT366 Thank you for KX-TDE100/KX-TDE200. • For information on connecting the KX-NT307, refer to the manuals of each model number is under licence...
Quick Reference Guide
Page 2
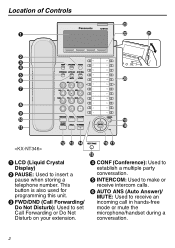
This button is also used for programming this unit. D CONF (Conference): Used to receive an incoming call in hands-free mode or mute the microphone/handset during a conversation. 2 F AUTO ANS (Auto Answer)/ MUTE: Used to establish a multiple party conversation. C FWD/DND (Call Forwarding/ Do Not Disturb): Used to make or receive intercom calls. E INTERCOM: Used to set Call Forwarding or Do Not Disturb on your extension. Location of Controls LCoocnatrtoiolsn of A W V U B C D E F T G H I J S K R LMN O PQ A LCD (Liquid Crystal Display) B PAUSE: Used to insert a ...
This button is also used for programming this unit. D CONF (Conference): Used to receive an incoming call in hands-free mode or mute the microphone/handset during a conversation. 2 F AUTO ANS (Auto Answer)/ MUTE: Used to establish a multiple party conversation. C FWD/DND (Call Forwarding/ Do Not Disturb): Used to make or receive intercom calls. E INTERCOM: Used to set Call Forwarding or Do Not Disturb on your extension. Location of Controls LCoocnatrtoiolsn of A W V U B C D E F T G H I J S K R LMN O PQ A LCD (Liquid Crystal Display) B PAUSE: Used to insert a ...

Quick Reference Guide
Page 3
... M HOLD: Used to disconnect the current call on the bottom line of Controls G AUTO DIAL/STORE: Used for the Self Labelling feature. (KX-NT366 only) P ENTER: Used to redial the last dialled number. H TRANSFER: Used to transfer a call to select the item displayed on hold...Used to switch the page for System/Personal Speed Dialling or storing programme changes. Q Microphone: Used for performing hands-free operations. N SP-PHONE (Speakerphone): Used for hands free conversations. I REDIAL: Used to assign the selected item. When someone has left you receive an intercom call...
... M HOLD: Used to disconnect the current call on the bottom line of Controls G AUTO DIAL/STORE: Used for the Self Labelling feature. (KX-NT366 only) P ENTER: Used to redial the last dialled number. H TRANSFER: Used to transfer a call to select the item displayed on hold...Used to switch the page for System/Personal Speed Dialling or storing programme changes. Q Microphone: Used for performing hands-free operations. N SP-PHONE (Speakerphone): Used for hands free conversations. I REDIAL: Used to assign the selected item. When someone has left you receive an intercom call...
Quick Reference Guide
Page 5
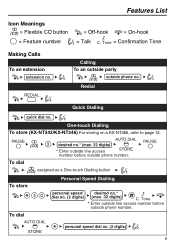
... Features List = Off-hook = On-hook = Talk C. One-touch Dialling To store (KX-NT343/KX-NT346) For storing on a KX-NT366, refer to page 12. PAUSE (CO) AUTO DIAL desired no . (2 digits) (max. 32 digits) C. REDIAL Calling To an outside party (CO) outside phone no . (2 digits) 5 PAUSE To dial (CO) assigned as a One-touch Dialling...
... Features List = Off-hook = On-hook = Talk C. One-touch Dialling To store (KX-NT343/KX-NT346) For storing on a KX-NT366, refer to page 12. PAUSE (CO) AUTO DIAL desired no . (2 digits) (max. 32 digits) C. REDIAL Calling To an outside party (CO) outside phone no . (2 digits) 5 PAUSE To dial (CO) assigned as a One-touch Dialling...

Quick Reference Guide
Page 8
...VPS extension no password, you can skip the last step. Enter the desired mailbox number Leave a message To send the message immediately (KX-TVM series) (KX-TVP series) To set the delivery time Follow the guidance 8 Features List Making Use of the Voice Mail Service Listening to a ... Mailbox Management Automated Attendant Message Notification From someone else's extension mailbox no. Other Features End Call KX-TVP series Listen to Message Mailbox Password* * If you have no . KX-TVM series Listen to Message mailbox no password, you can skip the last step. From your own...
...VPS extension no password, you can skip the last step. Enter the desired mailbox number Leave a message To send the message immediately (KX-TVM series) (KX-TVP series) To set the delivery time Follow the guidance 8 Features List Making Use of the Voice Mail Service Listening to a ... Mailbox Management Automated Attendant Message Notification From someone else's extension mailbox no. Other Features End Call KX-TVP series Listen to Message Mailbox Password* * If you have no . KX-TVM series Listen to Message mailbox no password, you can skip the last step. From your own...

Quick Reference Guide
Page 11
... Keith Murray Log-in/out LCS CO 13 NEXT PAGE is pressed • This feature is only available for the KX-TDE100/KX-TDE200. 11 Self Labelling (KX-NT366 only) The KX-NT366 SelfLabelling(KX-NT366only) IP-PT features 12 flexible buttons, with an LCD screen next to reflect the function of 48 items to...
... Keith Murray Log-in/out LCS CO 13 NEXT PAGE is pressed • This feature is only available for the KX-TDE100/KX-TDE200. 11 Self Labelling (KX-NT366 only) The KX-NT366 SelfLabelling(KX-NT366only) IP-PT features 12 flexible buttons, with an LCD screen next to reflect the function of 48 items to...
Quick Reference Guide
Page 12
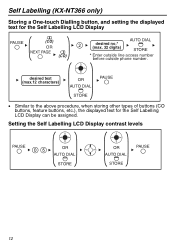
Setting the Self Labelling LCD Display contrast levels PAUSE OR AUTO DIAL STORE OR AUTO DIAL STORE PAUSE 12 Self Labelling (KX-NT366 only) Storing a One-touch Dialling button, and setting the displayed text for the Self Labelling LCD Display can be assigned. desired text (max.12 ... for the Self Labelling LCD Display PAUSE (CO) OR (CO) desired no.* (max. 32 digits) AUTO DIAL STORE * Enter outside line access number before outside phone number.
Setting the Self Labelling LCD Display contrast levels PAUSE OR AUTO DIAL STORE OR AUTO DIAL STORE PAUSE 12 Self Labelling (KX-NT366 only) Storing a One-touch Dialling button, and setting the displayed text for the Self Labelling LCD Display can be assigned. desired text (max.12 ... for the Self Labelling LCD Display PAUSE (CO) OR (CO) desired no.* (max. 32 digits) AUTO DIAL STORE * Enter outside line access number before outside phone number.
Quick Reference Guide
Page 13
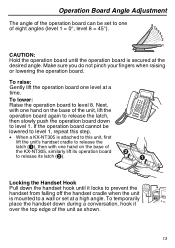
... Operation Board Angle Adjustment Operation Board Angle Adjustment The angle of the operation board can be lowered to level 1, repeat this step. • When a KX-NT305 is secured at a time. To temporarily place the handset down the handset hook until the operation board is attached to this unit, first lift... the unit's handset cradle to release the latch (A), then with one hand on the base of the KX-NT305, similarly lift its latch (B). To raise: Gently lift the operation board one hand on the base of the unit, lift the operation board...
... Operation Board Angle Adjustment Operation Board Angle Adjustment The angle of the operation board can be lowered to level 1, repeat this step. • When a KX-NT305 is secured at a time. To temporarily place the handset down the handset hook until the operation board is attached to this unit, first lift... the unit's handset cradle to release the latch (A), then with one hand on the base of the KX-NT305, similarly lift its latch (B). To raise: Gently lift the operation board one hand on the base of the unit, lift the operation board...
Quick Reference Guide
Page 14
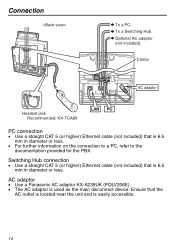
... AC outlet is located near the unit and is 6.5 mm in diameter or less. Ensure that is easily accessible. 14 AC adaptor • Use a Panasonic AC adaptor KX-A239UK (PQLV206E). • The AC adaptor is 6.5 mm in diameter or less. • For further information on the connection to a PC, refer to the...
... AC outlet is located near the unit and is 6.5 mm in diameter or less. Ensure that is easily accessible. 14 AC adaptor • Use a Panasonic AC adaptor KX-A239UK (PQLV206E). • The AC adaptor is 6.5 mm in diameter or less. • For further information on the connection to a PC, refer to the...
Quick Reference Guide
Page 16
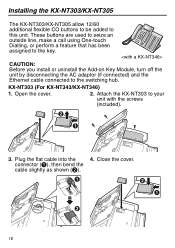
KX-NT303 (For KX-NT343/KX-NT346) 1. connector (A), then bend the cable slightly as shown (B). 16 CAUTION: Before you install or uninstall the Add-on Key Module, turn off the unit by ... unit with the screws (included). 3. Plug the flat cable into the 4. Close the cover. Attach the KX-NT303 to the switching hub. Open the cover. 2. Installing the KX-NT303/KX-NT305 Installing the KX-NT303/KX-NT305 The KX-NT303/KX-NT305 allow 12/60 additional flexible CO buttons to be added to the key. These buttons...
KX-NT303 (For KX-NT343/KX-NT346) 1. connector (A), then bend the cable slightly as shown (B). 16 CAUTION: Before you install or uninstall the Add-on Key Module, turn off the unit by ... unit with the screws (included). 3. Plug the flat cable into the 4. Close the cover. Attach the KX-NT303 to the switching hub. Open the cover. 2. Installing the KX-NT303/KX-NT305 Installing the KX-NT303/KX-NT305 The KX-NT303/KX-NT305 allow 12/60 additional flexible CO buttons to be added to the key. These buttons...

Quick Reference Guide
Page 17
Attach the KX-NT305 to the unit For wall mounting 17 For attaching to your unit with the KXNT305, as shown below. Close the cover. Open the cover. 2. connector (A), then bend the cable slightly as shown (B). * Two types of screws (2 screws of each type) are included with the screws* (included). 3. Installing the KX-NT303/KX-NT305 KX-NT305 (For KX-NT343/KX-NT346) 1. Plug the flat cable into the 4.
Attach the KX-NT305 to the unit For wall mounting 17 For attaching to your unit with the KXNT305, as shown below. Close the cover. Open the cover. 2. connector (A), then bend the cable slightly as shown (B). * Two types of screws (2 screws of each type) are included with the screws* (included). 3. Installing the KX-NT303/KX-NT305 KX-NT305 (For KX-NT343/KX-NT346) 1. Plug the flat cable into the 4.
Quick Reference Guide
Page 18
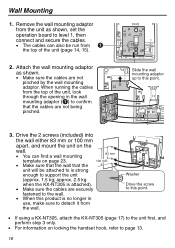
approx. 2.5 kg when the KX-NT305 is attached). • Make sure the cables are securely fastened to the wall. • When this product is strong enough to support the unit (... wall that the cables are not pinched by the wall mounting adaptor. Slide the wall mounting adaptor up to this point. • If using a KX-NT305, attach the KX-NT305 (page 17) to this point. 3. Drive the 2 screws (included) into the wall either 83 mm or 100 mm apart, and mount the...
approx. 2.5 kg when the KX-NT305 is attached). • Make sure the cables are securely fastened to the wall. • When this product is strong enough to support the unit (... wall that the cables are not pinched by the wall mounting adaptor. Slide the wall mounting adaptor up to this point. • If using a KX-NT305, attach the KX-NT305 (page 17) to this point. 3. Drive the 2 screws (included) into the wall either 83 mm or 100 mm apart, and mount the...

Quick Reference Guide
Page 19
...in damp or humid environments, such as bathrooms or swimming pools. • 999 and 112 can be disassembled and repaired by an authorised Panasonic factory service centre. Then return this unit. Take special care to the unit exposes any internal parts, immediately disconnect the cable or cord....operate properly, disconnect the unit from the AC outlet, if you are using KX-NT300 series IP-PTs, keep the following conditions in the Quick Reference Guide or as benzene or thinner. • Use only the correct Panasonic handset. • Do not disassemble this unit to a service centre. &#...
...in damp or humid environments, such as bathrooms or swimming pools. • 999 and 112 can be disassembled and repaired by an authorised Panasonic factory service centre. Then return this unit. Take special care to the unit exposes any internal parts, immediately disconnect the cable or cord....operate properly, disconnect the unit from the AC outlet, if you are using KX-NT300 series IP-PTs, keep the following conditions in the Quick Reference Guide or as benzene or thinner. • Use only the correct Panasonic handset. • Do not disassemble this unit to a service centre. &#...
Quick Reference Guide
Page 20
... unit. 2) Care should also be taken so that a separate telephone, not dependent on local power, is available for use this unit near water, for the Panasonic PBX. • If an error message is less than 5 °C or greater than 40 °C. THIS HANDSET EARPIECE IS MAGNETISED AND MAY RETAIN SMALL FERROUS... 1) Do not use in remote sites in rooms where the temperature is shown on your display, consult the network administrator. • The firmware of the KX-NT343, KX-NT346, and KX-NT366 are not spilled into, the unit.
... unit. 2) Care should also be taken so that a separate telephone, not dependent on local power, is available for use this unit near water, for the Panasonic PBX. • If an error message is less than 5 °C or greater than 40 °C. THIS HANDSET EARPIECE IS MAGNETISED AND MAY RETAIN SMALL FERROUS... 1) Do not use in remote sites in rooms where the temperature is shown on your display, consult the network administrator. • The firmware of the KX-NT343, KX-NT346, and KX-NT366 are not spilled into, the unit.

Quick Reference Guide
Page 23
Drive the screws into the wall as indicated above. Note: If the KX-NT305 is abbreviated in this template and must be measured. 2. Hook the unit onto the screw heads. One screw at either point One screw at either point 23 This space is attached to the unit, leave 157 mm of space between the 2 screws for the unit and the 2 screws for base unit One screw here 157 mm One screw here WALL MOUNTING TEMPLATE 1. for KX-NT305 Add-on 60 Key Module 83 mm 100 mm 100 mm 83 mm for the KX-NT305, as indicated.
Drive the screws into the wall as indicated above. Note: If the KX-NT305 is abbreviated in this template and must be measured. 2. Hook the unit onto the screw heads. One screw at either point One screw at either point 23 This space is attached to the unit, leave 157 mm of space between the 2 screws for the unit and the 2 screws for base unit One screw here 157 mm One screw here WALL MOUNTING TEMPLATE 1. for KX-NT305 Add-on 60 Key Module 83 mm 100 mm 100 mm 83 mm for the KX-NT305, as indicated.


