

Quick Reference Guide
Page 1
... Matsushita Electric Industrial Co., Ltd. This model supports the following optional devices and features: KX-NT343 KX-NT346 KX-NT366*1 Display 3-Line 6-Line 6-Line Flexible Outside (CO) Line Buttons 24 Self Labelling KX-NT303 Add-on 12 key module Q 24 48 (12×4) Q Q KX-NT305 Add-on 60 key module*2 Q Q KX-NT307(PSLP1528) Bluetooth Module KX-A239UK Optional AC Adaptor CODEC Q Q Q Q Q Q G.729A, G.711, G.722*3 Q: Available *1 KX-NT366 is only available for KX-TDE100/KX-TDE200. *2 KX-NT305...
... Matsushita Electric Industrial Co., Ltd. This model supports the following optional devices and features: KX-NT343 KX-NT346 KX-NT366*1 Display 3-Line 6-Line 6-Line Flexible Outside (CO) Line Buttons 24 Self Labelling KX-NT303 Add-on 12 key module Q 24 48 (12×4) Q Q KX-NT305 Add-on 60 key module*2 Q Q KX-NT307(PSLP1528) Bluetooth Module KX-A239UK Optional AC Adaptor CODEC Q Q Q Q Q Q G.729A, G.711, G.722*3 Q: Available *1 KX-NT366 is only available for KX-TDE100/KX-TDE200. *2 KX-NT305...
Quick Reference Guide
Page 2
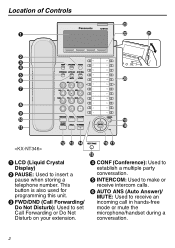
This button is also used for programming this unit. E INTERCOM: Used to receive an incoming call in hands-free mode or mute the microphone/handset during a conversation. 2 F AUTO ANS (Auto Answer)/ MUTE: Used to make or receive intercom calls. C FWD/DND (Call Forwarding/ Do Not Disturb): Used to insert a pause when storing a telephone number. Location of Controls LCoocnatrtoiolsn of A W V U B C D E F T G H I J S K R LMN O PQ A LCD (Liquid Crystal Display) B PAUSE: Used to set Call Forwarding or Do Not Disturb on your extension. D CONF (Conference): Used to ...
This button is also used for programming this unit. E INTERCOM: Used to receive an incoming call in hands-free mode or mute the microphone/handset during a conversation. 2 F AUTO ANS (Auto Answer)/ MUTE: Used to make or receive intercom calls. C FWD/DND (Call Forwarding/ Do Not Disturb): Used to insert a pause when storing a telephone number. Location of Controls LCoocnatrtoiolsn of A W V U B C D E F T G H I J S K R LMN O PQ A LCD (Liquid Crystal Display) B PAUSE: Used to set Call Forwarding or Do Not Disturb on your extension. D CONF (Conference): Used to ...

Quick Reference Guide
Page 3
...-free operations. J MESSAGE: Used to assign the selected item. O NEXT PAGE Key: Used to switch the page for System/Personal Speed Dialling or storing programme changes. I REDIAL: Used to the desired angle. U LCD Panel: Can be adjusted to redial the last dialled number. When someone has left the message waiting indication. M HOLD: Used to cancel the selected item. W Message/Ringer Lamp: When you a message, the lamp stays on an outside line or perform a feature that has been assigned to another call...
...-free operations. J MESSAGE: Used to assign the selected item. O NEXT PAGE Key: Used to switch the page for System/Personal Speed Dialling or storing programme changes. I REDIAL: Used to the desired angle. U LCD Panel: Can be adjusted to redial the last dialled number. When someone has left the message waiting indication. M HOLD: Used to cancel the selected item. W Message/Ringer Lamp: When you a message, the lamp stays on an outside line or perform a feature that has been assigned to another call...

Quick Reference Guide
Page 4
While on -hook PAUSE PAUSE Ring Tone PAUSE (CO) OR INTERCOM Press 2 times. While on -hook PAUSE LCD Backlight OR AUTO DIAL STORE PAUSE OR AUTO DIAL STORE Automatic Always ON Always OFF OR AUTO DIAL PAUSE STORE * If you hear your own voice through the handset or headset, decrease the volume. 4 Settings Settings Speaker volume While in a hands-free conversation Handset/Headset While using the handset or volume* headset Ringer volume LCD Contrast (for the main display) While on-hook or receiving a call Press Up to increase or Down to decrease the volume.
While on -hook PAUSE PAUSE Ring Tone PAUSE (CO) OR INTERCOM Press 2 times. While on -hook PAUSE LCD Backlight OR AUTO DIAL STORE PAUSE OR AUTO DIAL STORE Automatic Always ON Always OFF OR AUTO DIAL PAUSE STORE * If you hear your own voice through the handset or headset, decrease the volume. 4 Settings Settings Speaker volume While in a hands-free conversation Handset/Headset While using the handset or volume* headset Ringer volume LCD Contrast (for the main display) While on-hook or receiving a call Press Up to increase or Down to decrease the volume.
Quick Reference Guide
Page 5
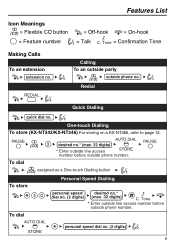
... dial (CO) assigned as a One-touch Dialling button Personal Speed Dialling To store personal speed desired no.* dial no . (2 digits) 5 To dial AUTO DIAL STORE personal speed dial no . (2 digits) (max. 32 digits) C. Features List Icon Meanings (CO) = Flexible CO button = Feature number Features List = Off-hook = On-hook = Talk C. Tone = Confirmation Tone Making Calls To an extension extension no . One-touch Dialling To store (KX-NT343/KX-NT346) For storing on a KX-NT366, refer to page 12. Redial Quick Dialling quick dial no . Tone * Enter outside line access number...
... dial (CO) assigned as a One-touch Dialling button Personal Speed Dialling To store personal speed desired no.* dial no . (2 digits) 5 To dial AUTO DIAL STORE personal speed dial no . (2 digits) (max. 32 digits) C. Features List Icon Meanings (CO) = Flexible CO button = Feature number Features List = Off-hook = On-hook = Talk C. Tone = Confirmation Tone Making Calls To an extension extension no . One-touch Dialling To store (KX-NT343/KX-NT346) For storing on a KX-NT366, refer to page 12. Redial Quick Dialling quick dial no . Tone * Enter outside line access number...

Quick Reference Guide
Page 6
... another extension (CO) Call Transfer TRANSFER C. Tone Talk with multiple parties. To leave a conference CONF C. Tone Call Hold To retrieve a call at the holding extension / INTERCOM (CO) To retrieve an outside (CO) phone no . Tone extension no . Tone 6 party Useful Features Multiple Party Conversation To add other parties during a conversation (i.e., conference) CONF C. Tone desired phone no . (2 digits) C. Tone During a Conversation To hold HOLD C. CONF Talk to the new party. Features List To dial AUTO DIAL STORE System Speed Dialling system speed dial no...
... another extension (CO) Call Transfer TRANSFER C. Tone Talk with multiple parties. To leave a conference CONF C. Tone Call Hold To retrieve a call at the holding extension / INTERCOM (CO) To retrieve an outside (CO) phone no . Tone extension no . Tone 6 party Useful Features Multiple Party Conversation To add other parties during a conversation (i.e., conference) CONF C. Tone desired phone no . (2 digits) C. Tone During a Conversation To hold HOLD C. CONF Talk to the new party. Features List To dial AUTO DIAL STORE System Speed Dialling system speed dial no...
Quick Reference Guide
Page 7
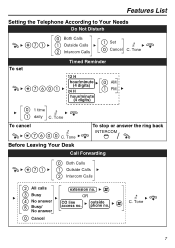
Tone To stop or answer the ring back / INTERCOM Before Leaving Your Desk Call Forwarding Both Calls Outside Calls Intercom Calls All calls Busy No answer Busy/ No answer Cancel extension no . Tone To set Timed Reminder 12 H hour/minute AM (4 digits) 24 H PM hour/minute (4 digits) 1 time daily C. OR CO line outside access no . phone no. C. Tone To cancel C. Tone 7 Features List Setting the Telephone According to Your Needs Do Not Disturb Both Calls Outside Calls Intercom Calls Set Cancel C.
Tone To stop or answer the ring back / INTERCOM Before Leaving Your Desk Call Forwarding Both Calls Outside Calls Intercom Calls All calls Busy No answer Busy/ No answer Cancel extension no . Tone To set Timed Reminder 12 H hour/minute AM (4 digits) 24 H PM hour/minute (4 digits) 1 time daily C. OR CO line outside access no . phone no. C. Tone To cancel C. Tone 7 Features List Setting the Telephone According to Your Needs Do Not Disturb Both Calls Outside Calls Intercom Calls Set Cancel C.

Quick Reference Guide
Page 8
... no password, you can skip the last step. Other Features End Call KX-TVP series Listen to a message From your own extension Mailbox Password* From someone else's extension VPS extension no. From your own extension VPS extension no. KX-TVM series Listen to Message Mailbox Password* * If you have no password, you can skip the last step. Mailbox Password* * If you have no password, you can skip the last step. Features List Making Use of the Voice Mail Service Listening to Message mailbox no...
... no password, you can skip the last step. Other Features End Call KX-TVP series Listen to a message From your own extension Mailbox Password* From someone else's extension VPS extension no. From your own extension VPS extension no. KX-TVM series Listen to Message Mailbox Password* * If you have no password, you can skip the last step. Mailbox Password* * If you have no password, you can skip the last step. Features List Making Use of the Voice Mail Service Listening to Message mailbox no...

Quick Reference Guide
Page 9
... and digits using the dialling buttons. For a list of Controls" on the Navigator Key while this unit is possible to the next page. 9 Accessing Features Using the Display Using the LCD Display It is idle: Extension Number Directory System Speed Dialling Directory Personal Speed Dialling Directory Outgoing Call Log Incoming Call Log Entering Characters You can be found in the following directories, logs, and menus by pressing left and right Navigator keys and delete characters with the TRANSFER button.
... and digits using the dialling buttons. For a list of Controls" on the Navigator Key while this unit is possible to the next page. 9 Accessing Features Using the Display Using the LCD Display It is idle: Extension Number Directory System Speed Dialling Directory Personal Speed Dialling Directory Outgoing Call Log Incoming Call Log Entering Characters You can be found in the following directories, logs, and menus by pressing left and right Navigator keys and delete characters with the TRANSFER button.

Quick Reference Guide
Page 11
...buttons can be named on the LCD screen through personal or system programming to the 12 flexible buttons. Sales Chris Walace Andre Romel Sean Carter Keith Murray Log-in/out LCS CO 13 NEXT PAGE is pressed • This feature is only available for the KX-TDE100/KX-TDE200. 11 You can be organised into 4 "pages", allowing you to assign... PAGE key, as follows: CO 12 CO 11 CO 10 CO 09 CO 08 CO 07 CO 06 CO 05 CO 04 CO 03 CO 02 CO 01 Bank Home London offc. NY offc. Self Labelling (KX-NT366 only) The KX-NT366 SelfLabelling(KX-NT366only) IP-PT features 12 flexible buttons, with an LCD screen ...
...buttons can be named on the LCD screen through personal or system programming to the 12 flexible buttons. Sales Chris Walace Andre Romel Sean Carter Keith Murray Log-in/out LCS CO 13 NEXT PAGE is pressed • This feature is only available for the KX-TDE100/KX-TDE200. 11 You can be organised into 4 "pages", allowing you to assign... PAGE key, as follows: CO 12 CO 11 CO 10 CO 09 CO 08 CO 07 CO 06 CO 05 CO 04 CO 03 CO 02 CO 01 Bank Home London offc. NY offc. Self Labelling (KX-NT366 only) The KX-NT366 SelfLabelling(KX-NT366only) IP-PT features 12 flexible buttons, with an LCD screen ...
Quick Reference Guide
Page 12
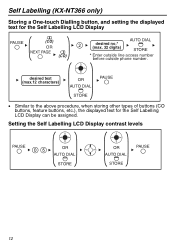
... Self Labelling LCD Display can be assigned. desired text (max.12 characters) OR AUTO DIAL PAUSE STORE • Similar to the above procedure, when storing other types of buttons (CO buttons, feature buttons, etc.), the displayed text for the Self Labelling LCD Display PAUSE (CO) OR (CO) desired no.* (max. 32 digits) AUTO DIAL STORE * Enter outside line access number before outside phone number. Setting the Self Labelling LCD Display contrast levels PAUSE OR AUTO DIAL STORE OR AUTO DIAL STORE PAUSE 12...
... Self Labelling LCD Display can be assigned. desired text (max.12 characters) OR AUTO DIAL PAUSE STORE • Similar to the above procedure, when storing other types of buttons (CO buttons, feature buttons, etc.), the displayed text for the Self Labelling LCD Display PAUSE (CO) OR (CO) desired no.* (max. 32 digits) AUTO DIAL STORE * Enter outside line access number before outside phone number. Setting the Self Labelling LCD Display contrast levels PAUSE OR AUTO DIAL STORE OR AUTO DIAL STORE PAUSE 12...
Quick Reference Guide
Page 13
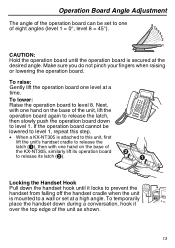
... Angle Adjustment Operation Board Angle Adjustment The angle of the operation board can be lowered to level 1, repeat this step. • When a KX-NT305 is attached to this unit, first lift the unit's handset cradle to release the latch (A), then with one hand on the base of the KX-NT305, similarly lift its operation board to release its latch (B). Make...
... Angle Adjustment Operation Board Angle Adjustment The angle of the operation board can be lowered to level 1, repeat this step. • When a KX-NT305 is attached to this unit, first lift the unit's handset cradle to release the latch (A), then with one hand on the base of the KX-NT305, similarly lift its operation board to release its latch (B). Make...
Quick Reference Guide
Page 14
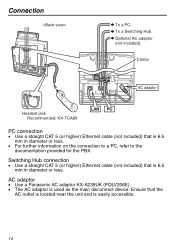
Ensure that is easily accessible. 14 Optional AC adaptor (not included). To a Switching Hub. AC adaptor • Use a Panasonic AC adaptor KX-A239UK (PQLV206E). • The AC adaptor is 6.5 mm in diameter or less. Switching Hub connection • Use a straight CAT 5 (or higher) Ethernet cable (... to a PC, refer to the documentation provided for the PBX. Clamp AC adaptor Headset jack Recommended: KX-TCA89 PC connection • Use a straight CAT 5 (or higher) Ethernet cable (not included) that is used as the main disconnect device. Connection Connection To a PC.
Ensure that is easily accessible. 14 Optional AC adaptor (not included). To a Switching Hub. AC adaptor • Use a Panasonic AC adaptor KX-A239UK (PQLV206E). • The AC adaptor is 6.5 mm in diameter or less. Switching Hub connection • Use a straight CAT 5 (or higher) Ethernet cable (... to a PC, refer to the documentation provided for the PBX. Clamp AC adaptor Headset jack Recommended: KX-TCA89 PC connection • Use a straight CAT 5 (or higher) Ethernet cable (not included) that is used as the main disconnect device. Connection Connection To a PC.
Quick Reference Guide
Page 15
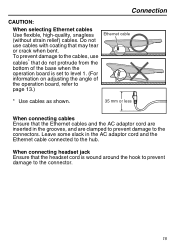
... headset jack Ensure that the headset cord is set to level 1. (For information on adjusting the angle of the operation board, refer to page 13.) Ethernet cable * Use cables as shown. 35 mm or less When connecting cables Ensure that the Ethernet cables and the AC adaptor cord are inserted in the AC adaptor cord ...and the Ethernet cable connected to the connector. 15 To prevent damage to the cables, use cables with coating that do not protrude from the bottom of the base when the operation board is wound around...
... headset jack Ensure that the headset cord is set to level 1. (For information on adjusting the angle of the operation board, refer to page 13.) Ethernet cable * Use cables as shown. 35 mm or less When connecting cables Ensure that the Ethernet cables and the AC adaptor cord are inserted in the AC adaptor cord ...and the Ethernet cable connected to the connector. 15 To prevent damage to the cables, use cables with coating that do not protrude from the bottom of the base when the operation board is wound around...
Quick Reference Guide
Page 16
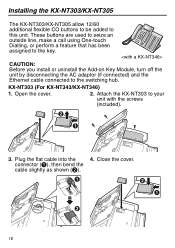
... buttons are used to seize an outside line, make a call using One-touch Dialling, or perform a feature that has been assigned to your unit with the screws (included). 3. Open the cover. 2. Close the cover. KX-NT303 (For KX-NT343/KX-NT346) 1. Attach the KX-NT303 to the key. connector (A), then bend the cable slightly as shown (B). 16 CAUTION: Before you install or uninstall the Add-on Key...
... buttons are used to seize an outside line, make a call using One-touch Dialling, or perform a feature that has been assigned to your unit with the screws (included). 3. Open the cover. 2. Close the cover. KX-NT303 (For KX-NT343/KX-NT346) 1. Attach the KX-NT303 to the key. connector (A), then bend the cable slightly as shown (B). 16 CAUTION: Before you install or uninstall the Add-on Key...
Quick Reference Guide
Page 18
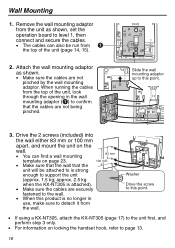
...template on page 23. 100 mm • Make sure that the wall that the cables are not pinched by the wall mounting adaptor. Drive the 2 screws (included) into the wall either 83 mm or 100 mm apart, and mount the unit on locking the handset hook, refer to support the unit (approx. 1.5 kg; Wall Mounting Wall Mounting 1. approx. 2.5 kg when the KX... is strong enough to page 13. 18 Washer Drive the screw to detach it from the top of the unit, look through the opening in use, make sure to this point. 3. Remove the wall mounting adaptor from the top of the unit (page 14, 15). 2....
...template on page 23. 100 mm • Make sure that the wall that the cables are not pinched by the wall mounting adaptor. Drive the 2 screws (included) into the wall either 83 mm or 100 mm apart, and mount the unit on locking the handset hook, refer to support the unit (approx. 1.5 kg; Wall Mounting Wall Mounting 1. approx. 2.5 kg when the KX... is strong enough to page 13. 18 Washer Drive the screw to detach it from the top of the unit, look through the opening in use, make sure to this point. 3. Remove the wall mounting adaptor from the top of the unit (page 14, 15). 2....

Quick Reference Guide
Page 19
..., have the defective IP-PT repaired by qualified service technicians. • If damage to a power supply of making calls, disconnect the Ethernet cable and connect a known working IP-PT does not operate properly, check the PBX and the Ethernet cable. • Wipe the unit with chemical agents such as benzene or thinner. • Use only the correct Panasonic handset. • Do not disassemble...
..., have the defective IP-PT repaired by qualified service technicians. • If damage to a power supply of making calls, disconnect the Ethernet cable and connect a known working IP-PT does not operate properly, check the PBX and the Ethernet cable. • Wipe the unit with chemical agents such as benzene or thinner. • Use only the correct Panasonic handset. • Do not disassemble...
Quick Reference Guide
Page 20
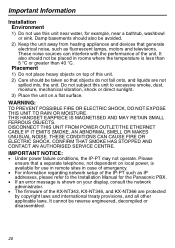
...to the Installation Manual for example, near a bathtub, washbowl or sink. THESE CONDITIONS CAN CAUSE FIRE OR ELECTRIC SHOCK. Please ensure that a separate telephone, not dependent on local power, is available for use this unit near water, for the Panasonic PBX. • If an error message is ... AND CONTACT AN AUTHORISED SERVICE CENTRE. Important Information Installation Environment 1) Do not use in remote sites in rooms where the temperature is shown on your display, consult the network administrator. • The firmware of the KX-NT343, KX-NT346, and KX-NT366 are not spilled into...
...to the Installation Manual for example, near a bathtub, washbowl or sink. THESE CONDITIONS CAN CAUSE FIRE OR ELECTRIC SHOCK. Please ensure that a separate telephone, not dependent on local power, is available for use this unit near water, for the Panasonic PBX. • If an error message is ... AND CONTACT AN AUTHORISED SERVICE CENTRE. Important Information Installation Environment 1) Do not use in remote sites in rooms where the temperature is shown on your display, consult the network administrator. • The firmware of the KX-NT343, KX-NT346, and KX-NT366 are not spilled into...
Quick Reference Guide
Page 21
...handset should be set to designated collection points, where they will help to save valuable resources and prevent any potential negative effects on a free of this waste, in other Countries outside the European Union This symbol is capable of Waste Electrical & Electronic Equipment (private households) This symbol on Disposal for Users of being used electrical... For business users in the operating instructions for further information. If you wish to discard this product correctly will be held as directed in the European Union If you wish to discard electrical and ...
...handset should be set to designated collection points, where they will help to save valuable resources and prevent any potential negative effects on a free of this waste, in other Countries outside the European Union This symbol is capable of Waste Electrical & Electronic Equipment (private households) This symbol on Disposal for Users of being used electrical... For business users in the operating instructions for further information. If you wish to discard this product correctly will be held as directed in the European Union If you wish to discard electrical and ...

Quick Reference Guide
Page 22
Declarations of Conformity for download by visiting: http://www.doc.panasonic.de Contact: Panasonic Services Europe a Division of Radio & Telecommunications Terminal Equipment (R&TTE) Directive 1999/5/EC. Panasonic Communications Company (U.K.) Ltd. declares that this manual are available for the relevant Panasonic products described in this equipment is intended to be connected to a Panasonic PBX only. Important Information 0682 This product is in...
Declarations of Conformity for download by visiting: http://www.doc.panasonic.de Contact: Panasonic Services Europe a Division of Radio & Telecommunications Terminal Equipment (R&TTE) Directive 1999/5/EC. Panasonic Communications Company (U.K.) Ltd. declares that this manual are available for the relevant Panasonic products described in this equipment is intended to be connected to a Panasonic PBX only. Important Information 0682 This product is in...


