
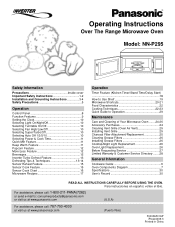
NNP295 User Guide
Page 1
...send e-mail to Operation 29 Maintenance Care and Cleaning of Your Microwave Oven ........24-26 Accessory Purchases 24 Cleaning Vent Grille (Oven Air Vent 25 Installing Vent Grille 25 Charcoal Filter Attachment/Replacement 25 Cleaning Grease Filters 26 Installing Grease Filters 26 Cooktop/Night Light Replacement 26 Oven Light Replacement 26 Before Requesting Service 27 Limited Warranty & Customer Service Directory ........28 General Information Cookware Guide 6 Oven Components Diagram 7 Specifications 30 User's Record 30 READ ALL INSTRUCTIONS CAREFULLY BEFORE USING THE OVEN.
...send e-mail to Operation 29 Maintenance Care and Cleaning of Your Microwave Oven ........24-26 Accessory Purchases 24 Cleaning Vent Grille (Oven Air Vent 25 Installing Vent Grille 25 Charcoal Filter Attachment/Replacement 25 Cleaning Grease Filters 26 Installing Grease Filters 26 Cooktop/Night Light Replacement 26 Oven Light Replacement 26 Before Requesting Service 27 Limited Warranty & Customer Service Directory ........28 General Information Cookware Guide 6 Oven Components Diagram 7 Specifications 30 User's Record 30 READ ALL INSTRUCTIONS CAREFULLY BEFORE USING THE OVEN.
NNP295 User Guide
Page 3
... not use . 5. Install or locate this appliance only for example, closed , turn oven off, and disconnect the power cord, or shut off power at the fuse or circuit breaker panel. (d) DO NOT use as much care as water, coffee, or tea are placed inside the oven ignites, keep oven door closed glass jars - The use with the installation instructions found on this product near a kitchen sink, in the microwave oven for storage purposes. Carefully attend...
... not use . 5. Install or locate this appliance only for example, closed , turn oven off, and disconnect the power cord, or shut off power at the fuse or circuit breaker panel. (d) DO NOT use as much care as water, coffee, or tea are placed inside the oven ignites, keep oven door closed glass jars - The use with the installation instructions found on this product near a kitchen sink, in the microwave oven for storage purposes. Carefully attend...
NNP295 User Guide
Page 4
... THESE INSTRUCTIONS For proper use above a cooktop, measured to Door, Control Panel Frame, Safety Interlock Switches, or any other materials in water. 5. Use care when cleaning the Grease filter. DO NOT operate the oven empty. Recycled paper products may contain impurities which may dam- Improper cooking or damage to controls may result. Roller Ring 1. Always replace the Roller Ring and the Glass Tray in the oven. 3. Clean Ventilating Hoods Frequently - Clean in a microwave safe...
... THESE INSTRUCTIONS For proper use above a cooktop, measured to Door, Control Panel Frame, Safety Interlock Switches, or any other materials in water. 5. Use care when cleaning the Grease filter. DO NOT operate the oven empty. Recycled paper products may contain impurities which may dam- Improper cooking or damage to controls may result. Roller Ring 1. Always replace the Roller Ring and the Glass Tray in the oven. 3. Clean Ventilating Hoods Frequently - Clean in a microwave safe...

NNP295 User Guide
Page 5
... use an extension cord. 3 Be sure to a flush wall of the top cabinet is not approved or tested for mobile vehicle, marine, or commercial use only. Consult a qualified electrician or service person if the grounding instructions are not completely understood, or if doubt exists as dents, broken door latches or cracks in the door. The plug must be mounted to install this oven...
... use an extension cord. 3 Be sure to a flush wall of the top cabinet is not approved or tested for mobile vehicle, marine, or commercial use only. Consult a qualified electrician or service person if the grounding instructions are not completely understood, or if doubt exists as dents, broken door latches or cracks in the door. The plug must be mounted to install this oven...
NNP295 User Guide
Page 6
... operated on page 26, to instructions on a SEPARATE CIRCUIT. Using a lower voltage will operate automatically under certain conditions. To minimize automatic fan operation, use adequate sized utensils and use of Your Microwave Oven) The Hood 1.The vent fan in operation. 2.Never leave surface units unattended at least a 20 AMP, 120 VOLT, 60 Hz GROUNDED OUTLET. Additional replacement charcoal filter kits can be sure the charcoal filter kit is to prevent the starting and spreading of a grease...
... operated on page 26, to instructions on a SEPARATE CIRCUIT. Using a lower voltage will operate automatically under certain conditions. To minimize automatic fan operation, use adequate sized utensils and use of Your Microwave Oven) The Hood 1.The vent fan in operation. 2.Never leave surface units unattended at least a 20 AMP, 120 VOLT, 60 Hz GROUNDED OUTLET. Additional replacement charcoal filter kits can be sure the charcoal filter kit is to prevent the starting and spreading of a grease...

NNP295 User Guide
Page 7
... foil and interior oven walls or door. • Dishes with metallic trim should be allowed to cool before handling or before microwave cooking to prevent them to cool before eating. Your oven cannot maintain the food at least 1-inch (2.5 cm) of the hot oil, and can follow instructions provided by the manufacturer. Otherwise, the popcorn may not pop adequately or may occur. Heat is...
... foil and interior oven walls or door. • Dishes with metallic trim should be allowed to cool before handling or before microwave cooking to prevent them to cool before eating. Your oven cannot maintain the food at least 1-inch (2.5 cm) of the hot oil, and can follow instructions provided by the manufacturer. Otherwise, the popcorn may not pop adequately or may occur. Heat is...

NNP295 User Guide
Page 9
Oven Components Diagram Shelf Shelf can be used for 2-level cooking, see page 19 Glass Tray Roller Ring 1 See-through Oven Window 2 Waveguide Cover (do not remove) 3 Oven Light (Oven Light can be replaced, see page 26) 4 Glass Tray (Turntable) 5 Oven Air Vent (Vent Grille/Vent Grille is removable and can be cleaned, see page 25) 6 Control Panel 7 Door Release Button 8 Cooktop Light (Cooktop Light can be replaced, see page 26) 9 Grease Filter (Grease filter is removable and can be cleaned, see page 26) 0 Shelf Supports - Door Safety Lock System = Identification Plate 7
Oven Components Diagram Shelf Shelf can be used for 2-level cooking, see page 19 Glass Tray Roller Ring 1 See-through Oven Window 2 Waveguide Cover (do not remove) 3 Oven Light (Oven Light can be replaced, see page 26) 4 Glass Tray (Turntable) 5 Oven Air Vent (Vent Grille/Vent Grille is removable and can be cleaned, see page 25) 6 Control Panel 7 Door Release Button 8 Cooktop Light (Cooktop Light can be replaced, see page 26) 9 Grease Filter (Grease filter is removable and can be cleaned, see page 26) 0 Shelf Supports - Door Safety Lock System = Identification Plate 7

NNP295 User Guide
Page 10
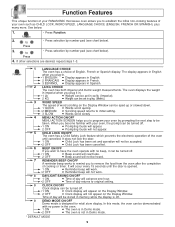
Control Panel (1) (2) (14) (15) (3) (16) (4) (5) (6) (7) (17) (8) (18) (9) (10) (19) (11) (12) (20) (13) (21) (1) Display Window: The Display includes indicators to tell you time of day, cooking time settings and cooking functions selected. (2) Power Level Pad: Touch this pad to select a cooking power level. (☛ page 11) (3) Number Pads: Touch number pads to enter cooking time, clock time, timer time, or defrost weights. (4) Timer Pad: Touch this pad to set the kitchen timer. (☛ page 18) (5) Clock Pad: Touch this pad to enter the...
Control Panel (1) (2) (14) (15) (3) (16) (4) (5) (6) (7) (17) (8) (18) (9) (10) (19) (11) (12) (20) (13) (21) (1) Display Window: The Display includes indicators to tell you time of day, cooking time settings and cooking functions selected. (2) Power Level Pad: Touch this pad to select a cooking power level. (☛ page 11) (3) Number Pads: Touch number pads to enter cooking time, clock time, timer time, or defrost weights. (4) Timer Pad: Touch this pad to set the kitchen timer. (☛ page 18) (5) Clock Pad: Touch this pad to enter the...
NNP295 User Guide
Page 11
...; Clock display will appear on the Display Window. ➻ Clock display will advance one hour. *2 OFF ➻ Time of the oven until the door is opened. 1 ON ➻ Reminder beep will work. *2 OFF ➻ Reminder beep will not work. 8 DAYLIGHT SAVING ON/OFF 1 ON ➻ Time of cooking or timer. It does not lock the door. 1 ON ➻ Child Lock has been set in Demo mode. * DEFAULT MODE 9 When you become familiar with no power...
...; Clock display will appear on the Display Window. ➻ Clock display will advance one hour. *2 OFF ➻ Time of the oven until the door is opened. 1 ON ➻ Reminder beep will work. *2 OFF ➻ Reminder beep will not work. 8 DAYLIGHT SAVING ON/OFF 1 ON ➻ Time of cooking or timer. It does not lock the door. 1 ON ➻ Child Lock has been set in Demo mode. * DEFAULT MODE 9 When you become familiar with no power...
NNP295 User Guide
Page 12
... light off . Selecting Turntable On/Off For best cooking results, leave the turntable on Popcorn / Inverter Turbo Defrost / Sensor Reheat / Sensor Cook. Sometimes the glass tray can set the desired time that automatically turns off when the internal components are cool. The microwave oven will not operate while colon is cool and "HOT" disappears. colon continues flashing. 3. • Press Clock. ➤Colon stops flashing; Oven will continue to "ON" again after the heating...
... light off . Selecting Turntable On/Off For best cooking results, leave the turntable on Popcorn / Inverter Turbo Defrost / Sensor Reheat / Sensor Cook. Sometimes the glass tray can set the desired time that automatically turns off when the internal components are cool. The microwave oven will not operate while colon is cool and "HOT" disappears. colon continues flashing. 3. • Press Clock. ➤Colon stops flashing; Oven will continue to "ON" again after the heating...

NNP295 User Guide
Page 13
...: use other power levels, the maximum time is 30 minutes. To Set Cooking Time: 1. • Press Quick Min until the desired power level appears in the display window will count down . Overcooking will cause food to 30 minutes. 3. • Press Start. ➤Keep Warm will sound between each stage of microwave power available for 1 minute 30 seconds 1. The time in combination with sensor or auto features. 11 When operating, two beeps will start...
...: use other power levels, the maximum time is 30 minutes. To Set Cooking Time: 1. • Press Quick Min until the desired power level appears in the display window will count down . Overcooking will cause food to 30 minutes. 3. • Press Start. ➤Keep Warm will sound between each stage of microwave power available for 1 minute 30 seconds 1. The time in combination with sensor or auto features. 11 When operating, two beeps will start...

NNP295 User Guide
Page 20
... Power Level (see page 11 for directions). • Set desired cooking time using number pads. (up to 99 minutes and 99 seconds) 3. This is opened during Stand Time, Kitchen Timer or Delay Time, the time on the display will beep five times. 2. If the oven door is to program a standing time after cooking is incorrectly programmed. Stand time and Delay start . It can also be programmed before defrosting or cooking begins. NOTE: 1. Stop oven immediately and re-read instructions. After cooking, stand time...
... Power Level (see page 11 for directions). • Set desired cooking time using number pads. (up to 99 minutes and 99 seconds) 3. This is opened during Stand Time, Kitchen Timer or Delay Time, the time on the display will beep five times. 2. If the oven door is to program a standing time after cooking is incorrectly programmed. Stand time and Delay start . It can also be programmed before defrosting or cooking begins. NOTE: 1. Stop oven immediately and re-read instructions. After cooking, stand time...

NNP295 User Guide
Page 21
... turned off. This could overheat. 3. For best cooking results 1-Level cooking Food microwaves best when placed onto the turntable, with the shelf on the microwave floor. Incorrect installation can be sure the Roller Ring is used for heating liquids. Raised Rib Raised Floor Roller Ring (Turntable Off) Interchange dishes halfway through cooking Placement of food. Use pot holders when handling the shelf-it may be careful when removing hot...
... turned off. This could overheat. 3. For best cooking results 1-Level cooking Food microwaves best when placed onto the turntable, with the shelf on the microwave floor. Incorrect installation can be sure the Roller Ring is used for heating liquids. Raised Rib Raised Floor Roller Ring (Turntable Off) Interchange dishes halfway through cooking Placement of food. Use pot holders when handling the shelf-it may be careful when removing hot...

NNP295 User Guide
Page 23
..., broth, etc. 1 cup, 8 oz. (250 ml) 2 cups, 16 oz. (500 ml) Cup of paper-towel-lined glass tray (Turntable), at a time) To remove Cooking Odors, POWER P8 P8 P10 (HIGH) P3 (MED-LOW) P10 (HIGH) P7 (MED-HIGH) P10 (HIGH) P10 (HIGH) P10 (HIGH) P10 (HIGH) TIME (in a 2 quart microwave safe bowl. Place in water, then wring out excess.
..., broth, etc. 1 cup, 8 oz. (250 ml) 2 cups, 16 oz. (500 ml) Cup of paper-towel-lined glass tray (Turntable), at a time) To remove Cooking Odors, POWER P8 P8 P10 (HIGH) P3 (MED-LOW) P10 (HIGH) P7 (MED-HIGH) P10 (HIGH) P10 (HIGH) P10 (HIGH) P10 (HIGH) TIME (in a 2 quart microwave safe bowl. Place in water, then wring out excess.

NNP295 User Guide
Page 25
Loosen or remove plastic wrap as any glass lids, be careful to remove them away from the center to avoid steam burns. When removing plastic wrap covers, as well as recipe directs for doneness. Always cook food for the minimum cooking time given in each recipe...time. To test for microwave oven use. When using plastic wrap, vent the plastic wrap by folding back part of the dish. Cooking time A range of aluminum foil. If the food is done when forktender or splits at fibers. Meat is undercooked, continue cooking. Fish is done when it is too close to oven wall or door...
Loosen or remove plastic wrap as any glass lids, be careful to remove them away from the center to avoid steam burns. When removing plastic wrap covers, as well as recipe directs for doneness. Always cook food for the minimum cooking time given in each recipe...time. To test for microwave oven use. When using plastic wrap, vent the plastic wrap by folding back part of the dish. Cooking time A range of aluminum foil. If the food is done when forktender or splits at fibers. Meat is undercooked, continue cooking. Fish is done when it is too close to oven wall or door...
NNP295 User Guide
Page 26
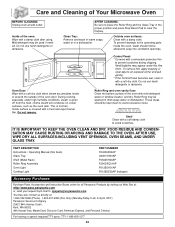
... surfaces, such as the oven door. Do not remove. FOOD RESIDUE AND CONDENSATION MAY CAUSE RUSTING OR ARCING AND DAMAGE TO THE OVEN. Inside of the oven: Wipe with a damp cloth. During cooking, especially under this book) Glass Tray Shelf (Metal Rack) Roller Ring Assembly Oven Light Cooktop Light PART NUMBER F00036Z00AP A06015H00AP F06025H00AP F290D5Q01AP F612E5H01AP F612E6Z00AP (halogen) Accessory Purchases Purchase Parts, Accessories and Instruction Books online for all Panasonic Products by visiting our...
... surfaces, such as the oven door. Do not remove. FOOD RESIDUE AND CONDENSATION MAY CAUSE RUSTING OR ARCING AND DAMAGE TO THE OVEN. Inside of the oven: Wipe with a damp cloth. During cooking, especially under this book) Glass Tray Shelf (Metal Rack) Roller Ring Assembly Oven Light Cooktop Light PART NUMBER F00036Z00AP A06015H00AP F06025H00AP F290D5Q01AP F612E5H01AP F612E6Z00AP (halogen) Accessory Purchases Purchase Parts, Accessories and Instruction Books online for all Panasonic Products by visiting our...

NNP295 User Guide
Page 27
... Grille cover forward slowly as shown in the top exhaust ventilation mode. Installing the replacement Charcoal Filter (NN-CF203) This product is shipped for replacement. 1. Remove the Vent Grille Pull the front louver down to fit as shown in Fig. To avoid the risk of injury when cleaning, DO NOT directly contact the metal edges of Grille Top Plate (Fig. The part number of the filter, and pull the Charcoal Filter...
... Grille cover forward slowly as shown in the top exhaust ventilation mode. Installing the replacement Charcoal Filter (NN-CF203) This product is shipped for replacement. 1. Remove the Vent Grille Pull the front louver down to fit as shown in Fig. To avoid the risk of injury when cleaning, DO NOT directly contact the metal edges of Grille Top Plate (Fig. The part number of the filter, and pull the Charcoal Filter...

NNP295 User Guide
Page 28
... the Grease Filters along the opening guide Grease Filter Caution: After removing the Grease Filter, be hot. 1. Unplug microwave oven or disconnect power. 2. Cooktop Light Cover Do not touch a new Halogen bulb with the sharp edges at least once a month. 1. Use care when cleaning the Grease Filters. Shake and remove moisture before replacing. opening 's guide edges. 2. Loosen the screw to open the Cooktop Light Cover. (Be careful not to remove embedded dirt. Lift the tab of oven. Installing Grease Filters 1. Reinstall the Cooktop Light Cover with a screw. 26...
... the Grease Filters along the opening guide Grease Filter Caution: After removing the Grease Filter, be hot. 1. Unplug microwave oven or disconnect power. 2. Cooktop Light Cover Do not touch a new Halogen bulb with the sharp edges at least once a month. 1. Use care when cleaning the Grease Filters. Shake and remove moisture before replacing. opening 's guide edges. 2. Loosen the screw to open the Cooktop Light Cover. (Be careful not to remove embedded dirt. Lift the tab of oven. Installing Grease Filters 1. Reinstall the Cooktop Light Cover with a screw. 26...

NNP295 User Guide
Page 29
... after programming. REMEDY Remove plug from the glass tray. Press Start Pad. Some radio and TV interference might occur when you cook with a damp cloth and reset Roller Ring and Glass Tray properly. This is not correct. Start Pad was pressed and selected "DEMO MODE ON". The CHILD LOCK was activated by pressing Function pad, touching number and selecting "DEMO OFF". (see page 24). Reset circuit breaker or replace fuse. Deactivate LOCK...
... after programming. REMEDY Remove plug from the glass tray. Press Start Pad. Some radio and TV interference might occur when you cook with a damp cloth and reset Roller Ring and Glass Tray properly. This is not correct. Start Pad was pressed and selected "DEMO MODE ON". The CHILD LOCK was activated by pressing Function pad, touching number and selecting "DEMO OFF". (see page 24). Reset circuit breaker or replace fuse. Deactivate LOCK...

NNP295 User Guide
Page 30
... ("warranty period"), at its option either (a) repair your product with new or refurbished parts, or (b) replace it with this excludes damages for lost time, cost of having someone remove or re-install an installed unit if applicable, or travel to and from accidents, misuse, abuse, neglect, mishandling, misapplication, alteration, faulty installation, set-up adjustments, misadjustment of consumer controls, improper maintenance, power line...
... ("warranty period"), at its option either (a) repair your product with new or refurbished parts, or (b) replace it with this excludes damages for lost time, cost of having someone remove or re-install an installed unit if applicable, or travel to and from accidents, misuse, abuse, neglect, mishandling, misapplication, alteration, faulty installation, set-up adjustments, misadjustment of consumer controls, improper maintenance, power line...


