
NNH624BF User Guide
Page 1
... wave plate from the surface of the oven or on the doorjamb. Locate the glass tray and roller ring. With some models, you remove all packing material from the cabinet. Before using your purchase of the oven! IMPORTANT: For complete directions, please refer to the Operating Instructions Manual and make sure to remove a blue protective film from the oven. Also, remove the protective sheet from the inside wall of a Panasonic Microwave Oven. DO NOT remove...
... wave plate from the surface of the oven or on the doorjamb. Locate the glass tray and roller ring. With some models, you remove all packing material from the cabinet. Before using your purchase of the oven! IMPORTANT: For complete directions, please refer to the Operating Instructions Manual and make sure to remove a blue protective film from the oven. Also, remove the protective sheet from the inside wall of a Panasonic Microwave Oven. DO NOT remove...
NNH624BF User Guide
Page 6
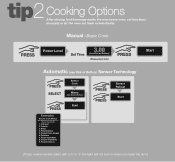
... Cooking Options After placing food/beverage inside the microwave oven, set functions manually or let the oven set them automatically. Oatmeal 2. Frozen Entres 5. Fresh Vegetables 8. Frozen Dinners (If your model number starts with a '5' or '6' the light will not turn on when you open the door.) Soup 4. Omelet 3. Frozen Vegetables 9. Manual -Basic Cook Automatic (use Dial or Button) Sensor Technology PRESS SELECT Sensor Cook Menu (use Dial or Button) PRESS Start PRESS PRESS Sensor Reheat Start Sensor Cook Menus (See Operating Instructions for Sensor Cook...
... Cooking Options After placing food/beverage inside the microwave oven, set functions manually or let the oven set them automatically. Oatmeal 2. Frozen Entres 5. Fresh Vegetables 8. Frozen Dinners (If your model number starts with a '5' or '6' the light will not turn on when you open the door.) Soup 4. Omelet 3. Frozen Vegetables 9. Manual -Basic Cook Automatic (use Dial or Button) Sensor Technology PRESS SELECT Sensor Cook Menu (use Dial or Button) PRESS Start PRESS PRESS Sensor Reheat Start Sensor Cook Menus (See Operating Instructions for Sensor Cook...
NNH624BF User Guide
Page 7
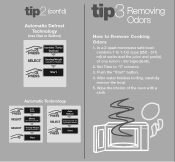
tip2 (cont'd) PRESS Inverter Turbo Defrost SELECT Serving/Weight (use Dial or Button) PRESS Start Automatic Technology PRESS SELECT Auto Cook Menu (use Dial or Button) SELECT Serving/Weight (use Dial or Button) Start PRESS Auto Reheat SELECT Select Servings by tapping the button PRESS Start tip3 Removing Odors How to "5" minutes. 3. Set Time to Remove Cooking Odors 1. In a 2 quart microwave safe bowl combine 1 to 1-1/2 cups (250 - 375 ml) of water and the juice and...
tip2 (cont'd) PRESS Inverter Turbo Defrost SELECT Serving/Weight (use Dial or Button) PRESS Start Automatic Technology PRESS SELECT Auto Cook Menu (use Dial or Button) SELECT Serving/Weight (use Dial or Button) Start PRESS Auto Reheat SELECT Select Servings by tapping the button PRESS Start tip3 Removing Odors How to "5" minutes. 3. Set Time to Remove Cooking Odors 1. In a 2 quart microwave safe bowl combine 1 to 1-1/2 cups (250 - 375 ml) of water and the juice and...
NN-SN778S Owner's Manual (English)
Page 1
... Operating Instructions Microwave Oven Model: NN-SN778 Safety Information Precautions Inside cover Important Safety Instructions .........1-3 Installation and Grounding Instructions 3-4 Safety Precautions 5-6 Operation Control Panel 9 Starting to Use Your Oven 10 Setting the Clock 10 Function Features 10-11 Selecting Power & Cook Time 12 Quick Min Feature 12 Keep Warm Feature 12 Popcorn Feature 13 More/Less Feature 13 Inverter Turbo Defrost Feature 14 Defrosting Tips & Techniques.........14-15 Sensor Reheat Feature 16 Sensor Cook Feature 16 Sensor Cook Chart 17 Operation...
... Operating Instructions Microwave Oven Model: NN-SN778 Safety Information Precautions Inside cover Important Safety Instructions .........1-3 Installation and Grounding Instructions 3-4 Safety Precautions 5-6 Operation Control Panel 9 Starting to Use Your Oven 10 Setting the Clock 10 Function Features 10-11 Selecting Power & Cook Time 12 Quick Min Feature 12 Keep Warm Feature 12 Popcorn Feature 13 More/Less Feature 13 Inverter Turbo Defrost Feature 14 Defrosting Tips & Techniques.........14-15 Sensor Reheat Feature 16 Sensor Cook Feature 16 Sensor Cook Chart 17 Operation...
NN-SN778S Owner's Manual (English)
Page 3
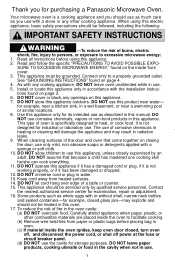
...-for example, closed , turn oven off, and disconnect the power cord, or shut off power at the fuse or circuit breaker panel. (d) DO NOT use the cavity for storage purposes. Read and follow the specific "PRECAUTIONS TO AVOID POSSIBLE EXPO- When cleaning surfaces of burns, electric shock, fire, injury to persons, or exposure to facilitate cooking. (b) Remove wire twist-ties from heated surfaces. 14. DO NOT...
...-for example, closed , turn oven off, and disconnect the power cord, or shut off power at the fuse or circuit breaker panel. (d) DO NOT use the cavity for storage purposes. Read and follow the specific "PRECAUTIONS TO AVOID POSSIBLE EXPO- When cleaning surfaces of burns, electric shock, fire, injury to persons, or exposure to facilitate cooking. (b) Remove wire twist-ties from heated surfaces. 14. DO NOT...
NN-SN778S Owner's Manual (English)
Page 4
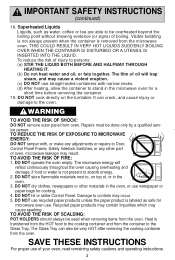
...service person. The film of your oven, read remaining safety cautions and operating instructions. 2 DO NOT use straight-sided containers with , or make any adjustments or repairs to the oven. Recycled paper products may contain impurities which may occur. 5. The Glass Tray can crack, and cause injury or damage to Door, Control Panel Frame, Safety Interlock Switches...the turntable. DO NOT hit or strike Control Panel. Visible bubbling is not always present when the container is transferred from the HOT food to the cooking container and from the microwave oven. Heat is removed ...
...service person. The film of your oven, read remaining safety cautions and operating instructions. 2 DO NOT use straight-sided containers with , or make any adjustments or repairs to the oven. Recycled paper products may contain impurities which may occur. 5. The Glass Tray can crack, and cause injury or damage to Door, Control Panel Frame, Safety Interlock Switches...the turntable. DO NOT hit or strike Control Panel. Visible bubbling is not always present when the container is transferred from the HOT food to the cooking container and from the microwave oven. Heat is removed ...
NN-SN778S Owner's Manual (English)
Page 5
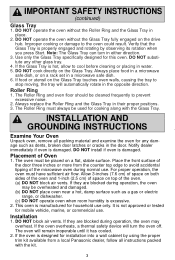
... oven for cooking along with the kit. 3 For proper operation, the oven must always be overheated and damaged. (b) DO NOT place oven near a hot, damp surface such as dents, broken door latches or cracks in their proper positions. 3. Use only the Glass Tray specifically designed for installation into a wall cabinet by observing its rotation when you press Start. DO NOT cook directly on a flat, stable surface. The oven must be cleaned...
... oven for cooking along with the kit. 3 For proper operation, the oven must always be overheated and damaged. (b) DO NOT place oven near a hot, damp surface such as dents, broken door latches or cracks in their proper positions. 3. Use only the Glass Tray specifically designed for installation into a wall cabinet by observing its rotation when you press Start. DO NOT cook directly on a flat, stable surface. The oven must be cleaned...
NN-SN778S Owner's Manual (English)
Page 6
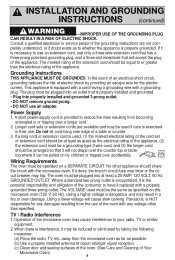
... of an electrical short circuit, grounding reduces the risk of Your Microwave Oven) 4 Power Supply 1. Wiring Requirements The oven must be reduced or eliminated by taking the following measures: (a) Place the radio, TV, etc. Operation of a table or counter. 3. Grounding Instructions THIS APPLIANCE MUST BE GROUNDED. This appliance is interference, it is necessary to use an extension cord, use only a three wire extension cord that has...
... of an electrical short circuit, grounding reduces the risk of Your Microwave Oven) 4 Power Supply 1. Wiring Requirements The oven must be reduced or eliminated by taking the following measures: (a) Place the radio, TV, etc. Operation of a table or counter. 3. Grounding Instructions THIS APPLIANCE MUST BE GROUNDED. This appliance is interference, it is necessary to use an extension cord, use only a three wire extension cord that has...

NN-SN778S Owner's Manual (English)
Page 8
... / BABY FOOD • DO NOT heat baby formula or baby food in the oven, allow at least 1-inch (2.5 cm) of space between foil and interior oven walls or door. • Dishes with metallic trim should be so hot as paper plates or microwave popcorn bags, are designed for microwave cooking only. Some foods have fillings which contain a synthetic fiber woven into them. Always follow instructions provided by...
... / BABY FOOD • DO NOT heat baby formula or baby food in the oven, allow at least 1-inch (2.5 cm) of space between foil and interior oven walls or door. • Dishes with metallic trim should be so hot as paper plates or microwave popcorn bags, are designed for microwave cooking only. Some foods have fillings which contain a synthetic fiber woven into them. Always follow instructions provided by...

NN-SN778S Owner's Manual (English)
Page 9
... microwave ovens. Do not use in these dishes. Use as a cover to a low serving temperature. Use to cover food during cooking to a low serving temperature only. Check manufacturers' use and care directions for use for microwave cooking and browning. (See CONTAINER TEST below . Ideal for cooking or reheating. Cookware Guide ITEM MICROWAVE COMMENTS Aluminum Foil Yes for recommended uses. Browning dishes are not heat resistant. Most glass jars are designed for Microwave Heating". Use...
... microwave ovens. Do not use in these dishes. Use as a cover to a low serving temperature. Use to cover food during cooking to a low serving temperature only. Check manufacturers' use and care directions for use for microwave cooking and browning. (See CONTAINER TEST below . Ideal for cooking or reheating. Cookware Guide ITEM MICROWAVE COMMENTS Aluminum Foil Yes for recommended uses. Browning dishes are not heat resistant. Most glass jars are designed for Microwave Heating". Use...

NN-SN778S Owner's Manual (English)
Page 11
.... Note: If no beep is pressed once during oven operation, Start Button must be heard. The display will automatically cancel the cooking program. Control Panel Power Level Popcorn Button (☛ page 13) Sensor Reheat Button (☛ page 16) Power Level Pad (☛ page 12) Quick Min Pad (☛ page 12) Number Pads Timer Pad (☛ page 19) Display Window Step by step instructions scroll for easy operation. If door is opened or Stop/Reset Button is heard, the unit...
.... Note: If no beep is pressed once during oven operation, Start Button must be heard. The display will automatically cancel the cooking program. Control Panel Power Level Popcorn Button (☛ page 13) Sensor Reheat Button (☛ page 16) Power Level Pad (☛ page 12) Quick Min Pad (☛ page 12) Number Pads Timer Pad (☛ page 19) Display Window Step by step instructions scroll for easy operation. If door is opened or Stop/Reset Button is heard, the unit...

NN-SN778S Owner's Manual (English)
Page 13
... oven operate with no power in the oven. 1 ON *2 OFF ➻ The oven is in oz/lb, (Imperial). ➻ Weight can be accepted. ➻ Child Lock has been cancelled. 6 BEEP ON/OFF If you become familiar with no beep, it in. *1 LB 2 KG ➻ Weight can be set in Demo mode. * DEFAULT MODE 11 When you wish to remove the food from the oven after the completion of cooking...
... oven operate with no power in the oven. 1 ON *2 OFF ➻ The oven is in oz/lb, (Imperial). ➻ Weight can be accepted. ➻ Child Lock has been cancelled. 6 BEEP ON/OFF If you become familiar with no beep, it in. *1 LB 2 KG ➻ Weight can be set in Demo mode. * DEFAULT MODE 11 When you wish to remove the food from the oven after the completion of cooking...
NN-SN778S Owner's Manual (English)
Page 14
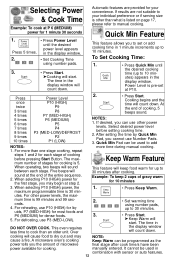
...) appears in combination with sensor or auto features. 12 Cooking begins and the time will sound between each stage of stages for cooking is pre-set or add cooking time in DO NOT OVER COOK. Quick Min Pad can be programmed as the power tells you the amount of gravy warm for the first stage, you cannot use other power levels, the maxi- When operating, two beeps will count...
...) appears in combination with sensor or auto features. 12 Cooking begins and the time will sound between each stage of stages for cooking is pre-set or add cooking time in DO NOT OVER COOK. Quick Min Pad can be programmed as the power tells you the amount of gravy warm for the first stage, you cannot use other power levels, the maxi- When operating, two beeps will count...
NN-SN778S Owner's Manual (English)
Page 18
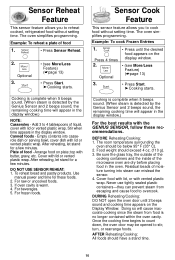
... 2 beeps sound, the remaining cooking time will appear in the display window.) NOTE: Casseroles - Residual beads of moisture turning into casserole dish or serving bowl, cover dish with lid or vented plastic wrap. To reheat bread and pastry products. Use manual power and time for these recommendations. Optional 3. • (see More/Less Feature) (☛page 13) • Press Start. ➤Cooking starts. Canned foods - DO NOT USE SENSOR...
... 2 beeps sound, the remaining cooking time will appear in the display window.) NOTE: Casseroles - Residual beads of moisture turning into casserole dish or serving bowl, cover dish with lid or vented plastic wrap. To reheat bread and pastry products. Use manual power and time for these recommendations. Optional 3. • (see More/Less Feature) (☛page 13) • Press Start. ➤Cooking starts. Canned foods - DO NOT USE SENSOR...

NN-SN778S Owner's Manual (English)
Page 21
..., a two-beep signal sounds. After cooking, stand time will start cannot be used to program a standing time after cooking is opened during Stand Time, Kitchen Timer or Delay Time, the time on the display will continue to count down. 3. Stop oven immediately and re-read instructions. Stand time and Delay start . To Use as a kitchen timer. To Set Stand Time: Example: To cook at P6 power for directions). • Set desired cooking time using number pads. • Press Timer. 4. • Set desired amount of Stand Time using number pads...
..., a two-beep signal sounds. After cooking, stand time will start cannot be used to program a standing time after cooking is opened during Stand Time, Kitchen Timer or Delay Time, the time on the display will continue to count down. 3. Stop oven immediately and re-read instructions. Stand time and Delay start . To Use as a kitchen timer. To Set Stand Time: Example: To cook at P6 power for directions). • Set desired cooking time using number pads. • Press Timer. 4. • Set desired amount of Stand Time using number pads...

NN-SN778S Owner's Manual (English)
Page 25
.... ABOUT FOOD SAFETY AND COOKING TEMPERATURE Check foods to see that they are used to distribute the heat evenly. When removing plastic wrap covers, as well as recipe directs for doneness, insert a meat thermometer in conventional cooking may be turned. Wooden toothpicks may be careful to remove them away from fat or bone. Arcing can be exercised when using foil. The time range compensates for...
.... ABOUT FOOD SAFETY AND COOKING TEMPERATURE Check foods to see that they are used to distribute the heat evenly. When removing plastic wrap covers, as well as recipe directs for doneness, insert a meat thermometer in conventional cooking may be turned. Wooden toothpicks may be careful to remove them away from fat or bone. Arcing can be exercised when using foil. The time range compensates for...
NN-SN778S Owner's Manual (English)
Page 26
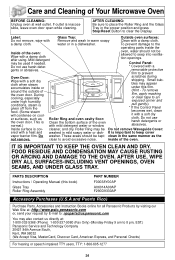
... cloth. removable protective film to place the Roller Ring and the Glass Tray in warm soapy Clean with a soft dry cloth when steam accumulates inside or around the outside of Your Microwave Oven BEFORE CLEANING: Unplug oven at wall outlet. During cooking, especially under this book) Glass Tray Roller Ring Assembly PART NUMBER F00038Y00AP A06014A00AP F290D9330AP Accessory Purchases (U.S.A and Puerto Rico) Purchase Parts, Accessories and Instruction Books online for all Panasonic Products by...
... cloth. removable protective film to place the Roller Ring and the Glass Tray in warm soapy Clean with a soft dry cloth when steam accumulates inside or around the outside of Your Microwave Oven BEFORE CLEANING: Unplug oven at wall outlet. During cooking, especially under this book) Glass Tray Roller Ring Assembly PART NUMBER F00038Y00AP A06014A00AP F290D9330AP Accessory Purchases (U.S.A and Puerto Rico) Purchase Parts, Accessories and Instruction Books online for all Panasonic Products by...
NN-SN778S Owner's Manual (English)
Page 27
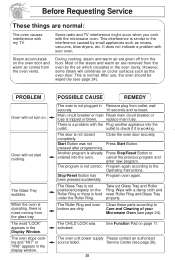
... new program. Stop/Reset Button has Program oven again. The CHILD LOCK was not Press Start Button. Service Center (see page 24). Some radio and TV interference might occur when you cook with your Microwave Oven (see page 26). 25 However, some steam will condense on cooler surfaces such as mixers, vacuums, blow dryers, etc. PROBLEM Oven will not start cooking. The word "LOCK" appears in the display window. The oven stops cooking...
... new program. Stop/Reset Button has Program oven again. The CHILD LOCK was not Press Start Button. Service Center (see page 24). Some radio and TV interference might occur when you cook with your Microwave Oven (see page 26). 25 However, some steam will condense on cooler surfaces such as mixers, vacuums, blow dryers, etc. PROBLEM Oven will not start cooking. The word "LOCK" appears in the display window. The oven stops cooking...
NN-SN778S Owner's Manual (English)
Page 28
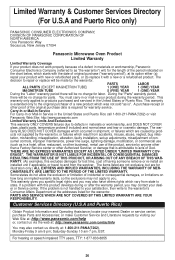
... impaired TTY users, TTY: 1-877-833-8855 26 During the "Parts" warranty period, there will be no charge for parts. sumer controls, improper maintenance, power line surge, lightning damage, modification, or commercial use of God. The items listed are not exclusive, but are caused by the warrantor, or failures which are for warranty service. This warranty only applies to repair or replace will...
... impaired TTY users, TTY: 1-877-833-8855 26 During the "Parts" warranty period, there will be no charge for parts. sumer controls, improper maintenance, power line surge, lightning damage, modification, or commercial use of God. The items listed are not exclusive, but are caused by the warrantor, or failures which are for warranty service. This warranty only applies to repair or replace will...

NN-SN778S Owner's Manual (English)
Page 29
...) Select food. Set time. Thru Set time. ( ) Input up to 10 min.) Press. Thru Select category. Set cooking time. Press. To reheat using e.g. Optional. To cook using Sensor Reheat (☛page 16) Press once. Thru Set time. Press. Thru Set weight. Press. QUICK GUIDE TO OPERATION Feature To set Power and Time Thru (☛page 12) Press to select Power Level. How to 4-stage cooking programs. Press. To set Clock (☛page 10) Press once. To use as a Kitchen Timer Thru...
...) Select food. Set time. Thru Set time. ( ) Input up to 10 min.) Press. Thru Select category. Set cooking time. Press. To reheat using e.g. Optional. To cook using Sensor Reheat (☛page 16) Press once. Thru Set time. Press. Thru Set weight. Press. QUICK GUIDE TO OPERATION Feature To set Power and Time Thru (☛page 12) Press to select Power Level. How to 4-stage cooking programs. Press. To set Clock (☛page 10) Press once. To use as a Kitchen Timer Thru...


