
NNH624BF User Guide
Page 1
... complete directions, please refer to the Operating Instructions Manual and make sure to remove a blue protective film from the surface of a Panasonic Microwave Oven. IMPORTANT: DO NOT remove the wave plate from the oven. Install roller ring and glass tray into oven. 1Initial Set-Up Make sure you may need to write down in a place easily accessible. With some models, you remove all packing material from the inside wall of the oven or...
... complete directions, please refer to the Operating Instructions Manual and make sure to remove a blue protective film from the surface of a Panasonic Microwave Oven. IMPORTANT: DO NOT remove the wave plate from the oven. Install roller ring and glass tray into oven. 1Initial Set-Up Make sure you may need to write down in a place easily accessible. With some models, you remove all packing material from the inside wall of the oven or...
NNH624BF User Guide
Page 5
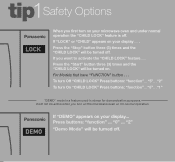
... normal operation. "2" To turn Off "CHILD LOCK" Press buttons: "function". . . If "DEMO" appears on your display... Press the "Start" button three (3) times and the "CHILD LOCK" will be turned on the microwave oven or, for demonstration purposes. For Models that have "FUNCTION" button . . . If "LOCK" or "CHILD" appears on your display . . . To turn On "CHILD LOCK" Press buttons: "function". . . If you turn on . "2" "Demo Mode" will be turned off . Press the "Stop" button three (3) times and the "CHILD LOCK" will not be turned off...
... normal operation. "2" To turn Off "CHILD LOCK" Press buttons: "function". . . If "DEMO" appears on your display... Press the "Start" button three (3) times and the "CHILD LOCK" will be turned on the microwave oven or, for demonstration purposes. For Models that have "FUNCTION" button . . . If "LOCK" or "CHILD" appears on your display . . . To turn On "CHILD LOCK" Press buttons: "function". . . If you turn on . "2" "Demo Mode" will be turned off . Press the "Stop" button three (3) times and the "CHILD LOCK" will not be turned off...
NNH624BF User Guide
Page 6
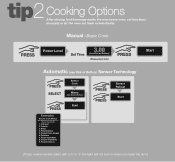
... Cooking Options After placing food/beverage inside the microwave oven, set functions manually or let the oven set them automatically. Soup 4. Potatoes 7. Oatmeal 2. Frozen Pizza (single) 6. Frozen Vegetables 9. Frozen Dinners (If your model number starts with a '5' or '6' the light will not turn on when you open the door.) Manual -Basic Cook Automatic (use Dial or Button) Sensor Technology PRESS SELECT Sensor Cook Menu (use Dial or Button) PRESS Start PRESS PRESS Sensor Reheat Start Sensor Cook Menus (See Operating Instructions for Sensor Cook Chart...
... Cooking Options After placing food/beverage inside the microwave oven, set functions manually or let the oven set them automatically. Soup 4. Potatoes 7. Oatmeal 2. Frozen Pizza (single) 6. Frozen Vegetables 9. Frozen Dinners (If your model number starts with a '5' or '6' the light will not turn on when you open the door.) Manual -Basic Cook Automatic (use Dial or Button) Sensor Technology PRESS SELECT Sensor Cook Menu (use Dial or Button) PRESS Start PRESS PRESS Sensor Reheat Start Sensor Cook Menus (See Operating Instructions for Sensor Cook Chart...
NNH624BF User Guide
Page 7
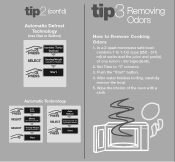
Set Time to 1-1/2 cups (250 - 375 ml) of water and the juice and peel(s) of the oven with a cloth. Wipe the interior of one lemon - In a 2 quart microwave safe bowl combine 1 to "5" minutes. 3. stir ingredients. 2. After water finishes boiling, carefully remove the bowl. 5. Push the "Start" button. 4. tip2 (cont'd) PRESS Inverter Turbo Defrost SELECT Serving/Weight (use Dial or Button) PRESS Start Automatic Technology PRESS SELECT Auto Cook Menu...
Set Time to 1-1/2 cups (250 - 375 ml) of water and the juice and peel(s) of the oven with a cloth. Wipe the interior of one lemon - In a 2 quart microwave safe bowl combine 1 to "5" minutes. 3. stir ingredients. 2. After water finishes boiling, carefully remove the bowl. 5. Push the "Start" button. 4. tip2 (cont'd) PRESS Inverter Turbo Defrost SELECT Serving/Weight (use Dial or Button) PRESS Start Automatic Technology PRESS SELECT Auto Cook Menu...
User Manual
Page 1
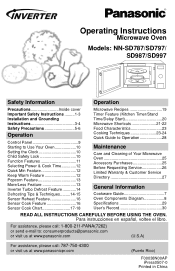
...Operating Instructions Microwave Oven Models: NN-SD787/SD797/ SD987/SD997 Safety Information Operation Precautions Inside cover Important Safety Instructions .........1-3 Installation and Grounding Instructions 3-4 Safety Precautions 5-6 Operation Control Panel 9 Starting to Use Your Oven 10 Setting the Clock 10 Child Safety Lock 10 Function Features 11 Selecting Power & Cook Time 12 Quick Min Feature 12 Keep Warm Feature 12 Popcorn Feature 13 More/Less Feature 13 Inverter Turbo Defrost Feature 14 Defrosting Tips & Techniques.........14-15 Sensor Reheat Feature 16 Sensor Cook...
...Operating Instructions Microwave Oven Models: NN-SD787/SD797/ SD987/SD997 Safety Information Operation Precautions Inside cover Important Safety Instructions .........1-3 Installation and Grounding Instructions 3-4 Safety Precautions 5-6 Operation Control Panel 9 Starting to Use Your Oven 10 Setting the Clock 10 Child Safety Lock 10 Function Features 11 Selecting Power & Cook Time 12 Quick Min Feature 12 Keep Warm Feature 12 Popcorn Feature 13 More/Less Feature 13 Inverter Turbo Defrost Feature 14 Defrosting Tips & Techniques.........14-15 Sensor Reheat Feature 16 Sensor Cook...
User Manual
Page 3
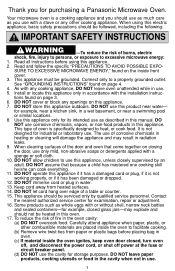
... the power cord, or shut off power at the fuse or circuit breaker panel. (d) DO NOT use the cavity for its intended use . Read all instructions before placing bag in oven. (c) If material inside the oven ignites, keep oven door closed glass jars-may result in radiation leaks. 9. tions found on the inside the oven to use this appliance, unless closely supervised by qualified service personnel. It is a cooking appliance...
... the power cord, or shut off power at the fuse or circuit breaker panel. (d) DO NOT use the cavity for its intended use . Read all instructions before placing bag in oven. (c) If material inside the oven ignites, keep oven door closed glass jars-may result in radiation leaks. 9. tions found on the inside the oven to use this appliance, unless closely supervised by qualified service personnel. It is a cooking appliance...
User Manual
Page 4
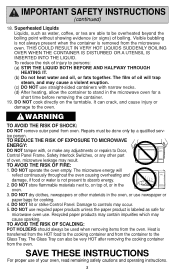
... the oven. Heat is removed from the microwave oven. DO NOT operate the oven empty. TO AVOID THE RISK OF SCALDING: POT HOLDERS should always be done only by a qualified service person. Visible bubbling is not always present when the container is transferred from the HOT food to controls may cause sparking. DO NOT cook directly on top of injury to the Glass Tray. Superheated...
... the oven. Heat is removed from the microwave oven. DO NOT operate the oven empty. TO AVOID THE RISK OF SCALDING: POT HOLDERS should always be done only by a qualified service person. Visible bubbling is not always present when the container is transferred from the HOT food to controls may cause sparking. DO NOT cook directly on top of injury to the Glass Tray. Superheated...
User Manual
Page 5
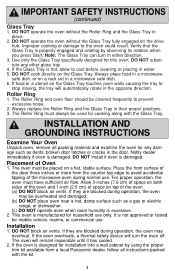
... the oven is hot, allow to prevent excessive noise. 2. If food or a utensil on a rack set in either direction. 3. INSTALLATION AND GROUNDING INSTRUCTIONS Examine Your Oven Unpack oven, remove all instructions packed with the Glass Tray. DO NOT install if oven is manufactured for this oven. Placement of the oven. (a) DO NOT block air vents. It is excessive. 2. Use only the Glass Tray specifically designed for household use . If they are blocked during operation, the oven may...
... the oven is hot, allow to prevent excessive noise. 2. If food or a utensil on a rack set in either direction. 3. INSTALLATION AND GROUNDING INSTRUCTIONS Examine Your Oven Unpack oven, remove all instructions packed with the Glass Tray. DO NOT install if oven is manufactured for this oven. Placement of the oven. (a) DO NOT block air vents. It is excessive. 2. Use only the Glass Tray specifically designed for household use . If they are blocked during operation, the oven may...
User Manual
Page 6
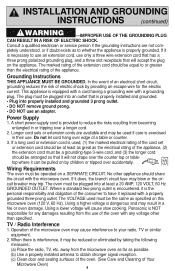
... of the oven with the microwave oven. Power Supply 1. A short power-supply cord is NOT responsible for the electric current. The VOLTAGE used must be at least a 20 AMP, 120 VOLT, 60 Hz GROUNDED OUTLET. Panasonic is provided to reduce the risks resulting from becoming entangled in or tripping over the counter top or tabletop where it does, the branch circuit fuse may...
... of the oven with the microwave oven. Power Supply 1. A short power-supply cord is NOT responsible for the electric current. The VOLTAGE used must be at least a 20 AMP, 120 VOLT, 60 Hz GROUNDED OUTLET. Panasonic is provided to reduce the risks resulting from becoming entangled in or tripping over the counter top or tabletop where it does, the branch circuit fuse may...
User Manual
Page 8
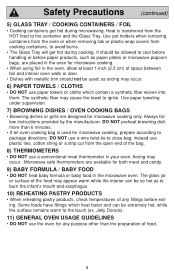
... and interior oven walls or door. • Dishes with metallic trim should be extremely hot, while the surface remains warm to ignite. Microwave safe thermometers are designed for microwave cooking, prepare according to avoid burns. • The Glass Tray will get hot during cooking. Jelly Donuts). 11) GENERAL OVEN USAGE GUIDELINES • DO NOT use plastic ties, cotton string or a strip cut from cooking containers, to package directions. Heat is used...
... and interior oven walls or door. • Dishes with metallic trim should be extremely hot, while the surface remains warm to ignite. Microwave safe thermometers are designed for microwave cooking, prepare according to avoid burns. • The Glass Tray will get hot during cooking. Jelly Donuts). 11) GENERAL OVEN USAGE GUIDELINES • DO NOT use plastic ties, cotton string or a strip cut from cooking containers, to package directions. Heat is used...
User Manual
Page 9
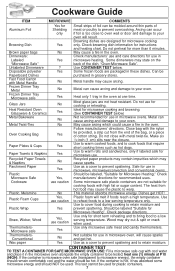
.... heat one time. Do not close to oven wall or door and damage to your oven. Dishes get hot. Cookware Guide ITEM MICROWAVE COMMENTS Aluminum Foil Yes for recommended uses. Ideal for use in microwave ovens. Recycled paper products may cause sparks. Check manufacturers' directions for Shielding only Browning Dish Yes Brown paper bags No Dinnerware: Labeled Yes "Microwave Safe" Unlabeled Dinnerware ? Use to reheat foods to...
.... heat one time. Do not close to oven wall or door and damage to your oven. Dishes get hot. Cookware Guide ITEM MICROWAVE COMMENTS Aluminum Foil Yes for recommended uses. Ideal for use in microwave ovens. Recycled paper products may cause sparks. Check manufacturers' directions for Shielding only Browning Dish Yes Brown paper bags No Dinnerware: Labeled Yes "Microwave Safe" Unlabeled Dinnerware ? Use to reheat foods to...
User Manual
Page 11
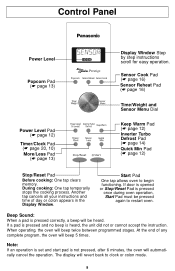
... or colon appears in the Display Window. Control Panel Power Level Popcorn Pad (☛ page 13) Power Level Pad (☛ page 12) Timer/Clock Pad (☛ page 20, 10) More/Less Pad (☛ page 13) Display Window Step by step instructions scroll for easy operation. Another tap cancels all your instructions and time of any complete program, the oven will beep 5 times. If door is opened or Stop/Reset Pad is heard, the...
... or colon appears in the Display Window. Control Panel Power Level Popcorn Pad (☛ page 13) Power Level Pad (☛ page 12) Timer/Clock Pad (☛ page 20, 10) More/Less Pad (☛ page 13) Display Window Step by step instructions scroll for easy operation. Another tap cancels all your instructions and time of any complete program, the oven will beep 5 times. If door is opened or Stop/Reset Pad is heard, the...
User Manual
Page 14
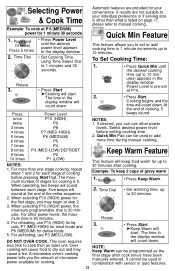
... Start. If desired, you to set at the end of cooking before setting cooking time. 2. When selecting P10 (HIGH) power, the maximum programmable time is 90 minutes. 4. For defrosting, use P10 (HIGH) for liquids, P7 (MED-HIGH) for most foods and P6 (MEDIUM) for each stage. DO NOT OVER COOK. The time in combination with sensor or auto features. 12 NOTE: Keep Warm can use other power levels. Selecting Power & Cook Time...
... Start. If desired, you to set at the end of cooking before setting cooking time. 2. When selecting P10 (HIGH) power, the maximum programmable time is 90 minutes. 4. For defrosting, use P10 (HIGH) for liquids, P7 (MED-HIGH) for most foods and P6 (MEDIUM) for each stage. DO NOT OVER COOK. The time in combination with sensor or auto features. 12 NOTE: Keep Warm can use other power levels. Selecting Power & Cook Time...

User Manual
Page 18
... food number using the Sensor Menu Select Dial to stir, turn, or rearrange foods. Use manual power and time for a few minutes. DURING Reheating/Cooking: DO NOT open the oven door until 2 beeps sound and cooking time appears on plate; Example: To reheat a plate of food - After reheating, let stand for these recommendations. BEFORE Reheating/Cooking: 1. NOTE: Casseroles - Sensor Reheat Sensor Cook Feature Feature This sensor feature allows you to overcook. The oven simplifies programming. Arrange food on the Display...
... food number using the Sensor Menu Select Dial to stir, turn, or rearrange foods. Use manual power and time for a few minutes. DURING Reheating/Cooking: DO NOT open the oven door until 2 beeps sound and cooking time appears on plate; Example: To reheat a plate of food - After reheating, let stand for these recommendations. BEFORE Reheating/Cooking: 1. NOTE: Casseroles - Sensor Reheat Sensor Cook Feature Feature This sensor feature allows you to overcook. The oven simplifies programming. Arrange food on the Display...
User Manual
Page 22
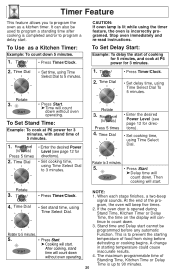
... oven lamp is lit while using Time Select Dial To 5 minutes. Then cooking will beep five times. 2. Press 5 times 2. Time Dial • Set stand time, using Time Select Dial to 90 minutes. 20 Rotate 3. • Press Timer/Clock. Function. defrosting or cooking begins. Rotate 3. gram, the oven will start . Time Dial • Set time, using Time Select Dial. Time Dial • Enter the desired Power Level (see page 12 for directions). • Set cooking time, using Time Select Dial to count down without oven operating...
... oven lamp is lit while using Time Select Dial To 5 minutes. Then cooking will beep five times. 2. Press 5 times 2. Time Dial • Set stand time, using Time Select Dial to 90 minutes. 20 Rotate 3. • Press Timer/Clock. Function. defrosting or cooking begins. Rotate 3. gram, the oven will start . Time Dial • Set time, using Time Select Dial. Time Dial • Enter the desired Power Level (see page 12 for directions). • Set cooking time, using Time Select Dial to count down without oven operating...
User Manual
Page 26
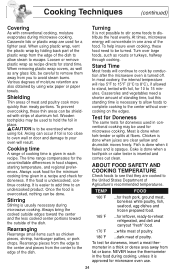
... toward the outside of meat and poultry cook more quickly than meaty portions. Always cook food for leftover, ready-to escape. Meat is given in one area of the food. Cooking Techniques (continued) Covering As with strips of aluminum foil. If the food is too close to oven wall or door and damage to be used for microwave cooking. ABOUT FOOD SAFETY AND COOKING TEMPERATURE Check foods to...
... toward the outside of meat and poultry cook more quickly than meaty portions. Always cook food for leftover, ready-to escape. Meat is given in one area of the food. Cooking Techniques (continued) Covering As with strips of aluminum foil. If the food is too close to oven wall or door and damage to be used for microwave cooking. ABOUT FOOD SAFETY AND COOKING TEMPERATURE Check foods to...
User Manual
Page 27
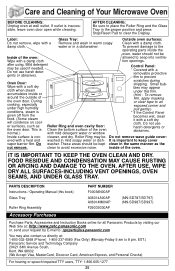
... prevent Oven Door: Wipe with a heat and washed in the same manner as the oven door. clean to keep cover vapor barrier film. AFTER CLEANING: Be sure to place the Roller Ring and the Glass Tray in a dishwasher. During cooking, especially under this book) Glass Tray Roller Ring Assembly PART NUMBER F00038N00AP A06014A00AP A06014M00AP F290D9330AP (NN-SD787/SD797) (NN-SD987/SD997) Accessory Purchases Purchase Parts, Accessories and Instruction Books online for all Panasonic Products...
... prevent Oven Door: Wipe with a heat and washed in the same manner as the oven door. clean to keep cover vapor barrier film. AFTER CLEANING: Be sure to place the Roller Ring and the Glass Tray in a dishwasher. During cooking, especially under this book) Glass Tray Roller Ring Assembly PART NUMBER F00038N00AP A06014A00AP A06014M00AP F290D9330AP (NN-SD787/SD797) (NN-SD987/SD997) Accessory Purchases Purchase Parts, Accessories and Instruction Books online for all Panasonic Products...
User Manual
Page 28
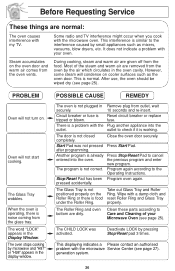
... oven causes interference with your Microwave Oven (see page 25). This displaying indicates a Please contact an authorised problem with the Plug another appliance into the oven. There is working. Stop/Reset Pad has been Program oven again. properly. The CHILD LOCK was not pressed Press Start Pad. generation system. 26 The oven stops cooking by microwave and "H97" or "H98" appears in the Display Window. The program is Reset circuit breaker or replace...
... oven causes interference with your Microwave Oven (see page 25). This displaying indicates a Please contact an authorised problem with the Plug another appliance into the oven. There is working. Stop/Reset Pad has been Program oven again. properly. The CHILD LOCK was not pressed Press Start Pad. generation system. 26 The oven stops cooking by microwave and "H97" or "H98" appears in the Display Window. The program is Reset circuit breaker or replace...
User Manual
Page 29
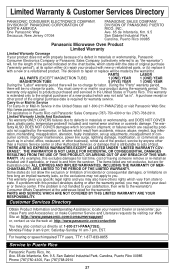
... product, service by prod- sumer controls, improper maintenance, power line surge, lightning damage, modification, or commercial use of having someone remove or re-install an installed unit if applicable, or travel to you may also contact us via the web at the addresses listed for the length of a defect in materials or workmanship, and DOES NOT COVER glass, plastic parts, temperature...
... product, service by prod- sumer controls, improper maintenance, power line surge, lightning damage, modification, or commercial use of having someone remove or re-install an installed unit if applicable, or travel to you may also contact us via the web at the addresses listed for the length of a defect in materials or workmanship, and DOES NOT COVER glass, plastic parts, temperature...
User Manual
Page 30
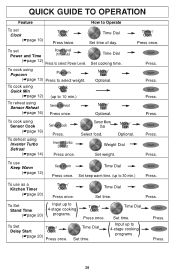
....) To reheat using Inverter Turbo Defrost (☛page 14) Press. To Set Delay Start (☛page 20) Press once. Time Dial Set time. ( ) Input up to select weight. To cook using Popcorn (☛page 13) Press to 30 min.) Press. Sensor Menu Dial Select food. Press. To use as a Kitchen Timer (☛page 20) Press once. Time Dial Set cooking time. Optional. Weight Dial Press once. Press. Time Dial Set time. Press once. To set Clock (☛...
....) To reheat using Inverter Turbo Defrost (☛page 14) Press. To Set Delay Start (☛page 20) Press once. Time Dial Set time. ( ) Input up to select weight. To cook using Popcorn (☛page 13) Press to 30 min.) Press. Sensor Menu Dial Select food. Press. To use as a Kitchen Timer (☛page 20) Press once. Time Dial Set cooking time. Optional. Weight Dial Press once. Press. Time Dial Set time. Press once. To set Clock (☛...


