
MCV5037 User Guide
Page 2
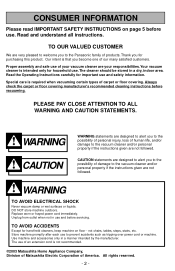
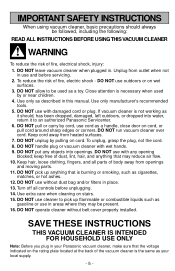
... of carpet or floor covering. Always check the carpet or floor covering manufacturer's recommended cleaning instructions before use to the vacuum cleaner and/or personal property if the instructions given are designed to alert you to the possibility of personal injury, loss of products. WARNING TO AVOID ELECTRICAL SHOCK Never vacuum damp or wet surfaces or liquids. CONSUMER INFORMATION Please read IMPORTANT SAFETY INSTRUCTIONS on floor - Proper assembly...
... of carpet or floor covering. Always check the carpet or floor covering manufacturer's recommended cleaning instructions before use to the vacuum cleaner and/or personal property if the instructions given are designed to alert you to the possibility of personal injury, loss of products. WARNING TO AVOID ELECTRICAL SHOCK Never vacuum damp or wet surfaces or liquids. CONSUMER INFORMATION Please read IMPORTANT SAFETY INSTRUCTIONS on floor - Proper assembly...
MCV5037 User Guide
Page 5
... by cord, use without belt cover properly installed. To unplug, grasp the plug, not the cord. 8. Turn off all parts of dust, lint, hair, and anything that may be present. 16. DO NOT run vacuum cleaner over cord. Keep cord away from outlet when not in your local supply. - 5 - keep free of body away from openings and moving parts. 11. To reduce the risk of the vacuum cleaner is not working as...
... by cord, use without belt cover properly installed. To unplug, grasp the plug, not the cord. 8. Turn off all parts of dust, lint, hair, and anything that may be present. 16. DO NOT run vacuum cleaner over cord. Keep cord away from outlet when not in your local supply. - 5 - keep free of body away from openings and moving parts. 11. To reduce the risk of the vacuum cleaner is not working as...
MCV5037 User Guide
Page 8
... ...2 IMPORTANT SAFETY INSTRUCTIONS 5 PARTS IDENTIFICATION ...10 ASSEMBLY...12 Attaching Handle...12 FEATURES ...14 Using Cord Hook ...14 Automatic Self Adjusting Nozzle 14 Edge Cleaning ...16 Motor Protector ...16 TO OPERATE CLEANER...16 Power Cord ...16 ON-OFF Switch...16 Handle Adjustments ...18 ROUTINE CARE OF CLEANER 20 Cleaning Secondary Foam Filter 20 Changing Dust Bag...20-22 Removing and Installing Lower Plate 24 Replacing Belt ...24-26 Cleaning Agitator ...26 Replacing Agitator ...28 Cleaning Exterior...28 Removing Clogs ...30 BEFORE REQUESTING SERVICE 32 WARRANTY ...35-37 WHAT...
... ...2 IMPORTANT SAFETY INSTRUCTIONS 5 PARTS IDENTIFICATION ...10 ASSEMBLY...12 Attaching Handle...12 FEATURES ...14 Using Cord Hook ...14 Automatic Self Adjusting Nozzle 14 Edge Cleaning ...16 Motor Protector ...16 TO OPERATE CLEANER...16 Power Cord ...16 ON-OFF Switch...16 Handle Adjustments ...18 ROUTINE CARE OF CLEANER 20 Cleaning Secondary Foam Filter 20 Changing Dust Bag...20-22 Removing and Installing Lower Plate 24 Replacing Belt ...24-26 Cleaning Agitator ...26 Replacing Agitator ...28 Cleaning Exterior...28 Removing Clogs ...30 BEFORE REQUESTING SERVICE 32 WARRANTY ...35-37 WHAT...

MCV5037 User Guide
Page 12
...; Push power cord into cord clip. 4) ➢ Wrap power cord around cord hooks. ➢ Secure retainer (plug head) to the back of the cleaner. Handle Screw Tornillo del mango Vis du manche 2) ➢ Insert screw. ➢ Tighten screw. Hole Orificio Orifice Screw Tornillo Vis ASSEMBLY Attaching Handle Handle Mango Manche 1) ➢ DO NOT plug in until assembly is complete. ➢ Remove handle screw. ➢ Insert handle with cord hooks to power cord...
...; Push power cord into cord clip. 4) ➢ Wrap power cord around cord hooks. ➢ Secure retainer (plug head) to the back of the cleaner. Handle Screw Tornillo del mango Vis du manche 2) ➢ Insert screw. ➢ Tighten screw. Hole Orificio Orifice Screw Tornillo Vis ASSEMBLY Attaching Handle Handle Mango Manche 1) ➢ DO NOT plug in until assembly is complete. ➢ Remove handle screw. ➢ Insert handle with cord hooks to power cord...
MCV5037 User Guide
Page 14
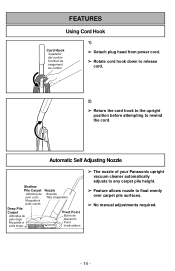
FEATURES Using Cord Hook Cord Hook Sujetador del cordón Crochet de rangement du cordon 1) ➢ Detach plug head from power cord. ➢ Rotate cord hook down to release cord. 2) ➢ Return the cord hook to the upright position before attempting to float evenly over carpet pile surfaces. ➢ No manual adjustments required. - 14 - Automatic Self Adjusting Nozzle Shallow Pile Carpet Alfombra de pelo corto Moquette à poils...
FEATURES Using Cord Hook Cord Hook Sujetador del cordón Crochet de rangement du cordon 1) ➢ Detach plug head from power cord. ➢ Rotate cord hook down to release cord. 2) ➢ Return the cord hook to the upright position before attempting to float evenly over carpet pile surfaces. ➢ No manual adjustments required. - 14 - Automatic Self Adjusting Nozzle Shallow Pile Carpet Alfombra de pelo corto Moquette à poils...

MCV5037 User Guide
Page 16
TO OPERATE CLEANER Power Cord NOTE: To reduce the risk of carpets near the floor. If it still does not fit, contact a qualified electrician to the motor when a clog occurs or when dust bag needs changing. ➢ Motor protector may open when using tools. ➢ If motor protector opens, the vacuum will fit in the outlet, reverse the plug. This plug will make a slightly different sound. ON-OFF Switch ➢ Ensure ON-OFF switch is wider...
TO OPERATE CLEANER Power Cord NOTE: To reduce the risk of carpets near the floor. If it still does not fit, contact a qualified electrician to the motor when a clog occurs or when dust bag needs changing. ➢ Motor protector may open when using tools. ➢ If motor protector opens, the vacuum will fit in the outlet, reverse the plug. This plug will make a slightly different sound. ON-OFF Switch ➢ Ensure ON-OFF switch is wider...

MCV5037 User Guide
Page 18
Handle Adjustments 1) ➢ Step on handle release pedal to change handle position. 2) ➢ Move vacuum to upright position for storage and tool use. 3) ➢ Move vacuum to middle position for normal use. 4) ➢ Use low position for cleaning under furniture. - 18 -
Handle Adjustments 1) ➢ Step on handle release pedal to change handle position. 2) ➢ Move vacuum to upright position for storage and tool use. 3) ➢ Move vacuum to middle position for normal use. 4) ➢ Use low position for cleaning under furniture. - 18 -

MCV5037 User Guide
Page 20
... Cleaning Secondary Foam Filter ➢ Secondary foam filter protects motor. Changing Dust Bag Always operate vacuum with genuine Panasonic Type U3 Standard or U6 Electrostatic dust bags installed. Rib Projections Rainures Lengüetas ➢ Check filter when installing a new dust bag. ➢ If dirty, pull filter from bottom of these high levels for recommendations on dust cover grip to remove the dust cover. 2) ➢ Remove dust bag by rinsing in this manual for years to help solve various problems...
... Cleaning Secondary Foam Filter ➢ Secondary foam filter protects motor. Changing Dust Bag Always operate vacuum with genuine Panasonic Type U3 Standard or U6 Electrostatic dust bags installed. Rib Projections Rainures Lengüetas ➢ Check filter when installing a new dust bag. ➢ If dirty, pull filter from bottom of these high levels for recommendations on dust cover grip to remove the dust cover. 2) ➢ Remove dust bag by rinsing in this manual for years to help solve various problems...

MCV5037 User Guide
Page 22
Groove Ranura Ouverture 4) ➢ Attach new dust bag onto bag holder by holding cardboard portion and pushing back. 5) ➢ Reinsert tab on end of dust cover into groove on dust compartment to allow cover to tear bag. Changing Dust Bag 3) ➢ Spread out new dust bag, taking care not to rotate closed. 6) ➢ Rotate dust cover up into closed position and press into place without pinching dust bag. - 22 -
Groove Ranura Ouverture 4) ➢ Attach new dust bag onto bag holder by holding cardboard portion and pushing back. 5) ➢ Reinsert tab on end of dust cover into groove on dust compartment to allow cover to tear bag. Changing Dust Bag 3) ➢ Spread out new dust bag, taking care not to rotate closed. 6) ➢ Rotate dust cover up into closed position and press into place without pinching dust bag. - 22 -
MCV5037 User Guide
Page 24
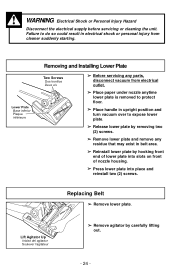
... parts, disconnect vacuum from electrical outlet. ➢ Place paper under nozzle anytime lower plate is removed to protect floor. ➢ Place handle in upright position and turn vacuum over to do so could result in belt area. ➢ Reinstall lower plate by hooking front end of lower plate into slots on front of nozzle housing. ➢ Press lower plate into place and reinstall two (2) screws. + Lift Agitator...
... parts, disconnect vacuum from electrical outlet. ➢ Place paper under nozzle anytime lower plate is removed to protect floor. ➢ Place handle in upright position and turn vacuum over to do so could result in belt area. ➢ Reinstall lower plate by hooking front end of lower plate into slots on front of nozzle housing. ➢ Press lower plate into place and reinstall two (2) screws. + Lift Agitator...

MCV5037 User Guide
Page 26
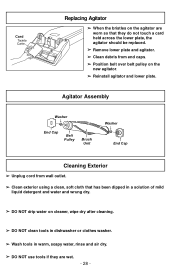
...; Loop new belt (Panasonic Type UB8 only) around agitator with a pair of scissors. ➢ Remove agitator. ➢ Remove any string or debris located on the end caps, washers or agitator shaft. ➢ Reinstall agitator and lower plate. - 26 - see illustration for correct belt routing. ➢ Reinstall agitator back into nozzle housing grooves. ➢ After reinstalling the agitator, turn it by hand to make sure that all rotating parts turn freely...
...; Loop new belt (Panasonic Type UB8 only) around agitator with a pair of scissors. ➢ Remove agitator. ➢ Remove any string or debris located on the end caps, washers or agitator shaft. ➢ Reinstall agitator and lower plate. - 26 - see illustration for correct belt routing. ➢ Reinstall agitator back into nozzle housing grooves. ➢ After reinstalling the agitator, turn it by hand to make sure that all rotating parts turn freely...
MCV5037 User Guide
Page 28
Agitator Assembly Washer End Cap Belt Pulley Brush Unit Washer End Cap Cleaning Exterior ➢ Unplug cord from wall outlet. ➢ Clean exterior using a clean, soft cloth that has been dipped in a solution of mild liquid detergent and water and wrung dry. ➢ DO NOT drip water on cleaner, wipe dry after cleaning. ➢ DO NOT clean tools in dishwasher or clothes washer. ➢ Wash tools in warm, soapy water, rinse...
Agitator Assembly Washer End Cap Belt Pulley Brush Unit Washer End Cap Cleaning Exterior ➢ Unplug cord from wall outlet. ➢ Clean exterior using a clean, soft cloth that has been dipped in a solution of mild liquid detergent and water and wrung dry. ➢ DO NOT drip water on cleaner, wipe dry after cleaning. ➢ DO NOT clean tools in dishwasher or clothes washer. ➢ Wash tools in warm, soapy water, rinse...

MCV5037 User Guide
Page 30
Cover (Suction Inlet) Cubierta (Abertura de aspiracón) Couvercle (entrée d'aspiration) ➢ Pull open suction inlet cover and check for clogging. ➢ Remove lower plate. ➢ Remove hose from the nozzle up . ➢ Inspect hose end and clear any obstructions. + Hose ➢ Reinstall hose and lower plate. Manguera Tuyau - 30 - Hose Manguera Tuyau Removing Clogs The hose located on the back of the vacuum cleaner carries the dirt from nozzle by lifting straight up to the dust bag. If the hose should become clogged: ➢ Unplug vacuum.
Cover (Suction Inlet) Cubierta (Abertura de aspiracón) Couvercle (entrée d'aspiration) ➢ Pull open suction inlet cover and check for clogging. ➢ Remove lower plate. ➢ Remove hose from the nozzle up . ➢ Inspect hose end and clear any obstructions. + Hose ➢ Reinstall hose and lower plate. Manguera Tuyau - 30 - Hose Manguera Tuyau Removing Clogs The hose located on the back of the vacuum cleaner carries the dirt from nozzle by lifting straight up to the dust bag. If the hose should become clogged: ➢ Unplug vacuum.

MCV5037 User Guide
Page 32
...-OFF switch to On. 2. PROBLEM Cleaner will not run. Poor job of dirt pickup. 1. Replace hose. 7. Full or clogged dust bag. 2. Insert hose. 5. BEFORE REQUESTING SERVICE WARNING Electric Shock or Personal Injury Hazard. POSSIBLE CAUSE 1. Hose not inserted fully. 5. Properly install bag. 2. Clean hose or nozzle area. 4. Review this chart to do -it-yourself solutions for minor performance problems. Any service needed, other than those described in electric shock or personal injury from cleaner suddenly starting. Change bag. 2.
...-OFF switch to On. 2. PROBLEM Cleaner will not run. Poor job of dirt pickup. 1. Replace hose. 7. Full or clogged dust bag. 2. Insert hose. 5. BEFORE REQUESTING SERVICE WARNING Electric Shock or Personal Injury Hazard. POSSIBLE CAUSE 1. Hose not inserted fully. 5. Properly install bag. 2. Clean hose or nozzle area. 4. Review this chart to do -it-yourself solutions for minor performance problems. Any service needed, other than those described in electric shock or personal injury from cleaner suddenly starting. Change bag. 2.

MCV5037 User Guide
Page 35
... WARRANTY PERIOD SET FORTH ABOVE. WARRANTY Panasonic Vacuum Cleaner Limited Warranty (United States) Panasonic Consumer Electronics Company (collectively referred to you. If a problem with this product with new or refurbished parts free of original purchase will repair this product develops during the warranty period by anyone other than a PASC Authorized Servicenter, or damage that is not handled to your dealer or Servicenter. If the problem is attributable to locate...
... WARRANTY PERIOD SET FORTH ABOVE. WARRANTY Panasonic Vacuum Cleaner Limited Warranty (United States) Panasonic Consumer Electronics Company (collectively referred to you. If a problem with this product with new or refurbished parts free of original purchase will repair this product develops during the warranty period by anyone other than a PASC Authorized Servicenter, or damage that is not handled to your dealer or Servicenter. If the problem is attributable to locate...
MCV5037 User Guide
Page 37
... such defect for a period as disposable dust bags, filters, belts, light bulbs and agitator brushes are also excluded from coverage under this product to be applicable. WARRANTY SERVICE For product operation and information assistance, please contact your Dealer or our Customer Care Centre at: Telephone #: (905) 624-5505 Fax #: (905) 238-2360 Web: www.panasonic.ca For product repairs, please contact one of the following...
... such defect for a period as disposable dust bags, filters, belts, light bulbs and agitator brushes are also excluded from coverage under this product to be applicable. WARRANTY SERVICE For product operation and information assistance, please contact your Dealer or our Customer Care Centre at: Telephone #: (905) 624-5505 Fax #: (905) 238-2360 Web: www.panasonic.ca For product repairs, please contact one of the following...


