MC-UL815 Owner's Manual (Multi-Language)
Page 2
...INSTRUCTIONS 7 PARTS IDENTIFICATION ...10-11 FEATURE CHART ...10 ASSEMBLY ...12 Attaching Handle ...12 Attaching Hose ...14 Attachment Storage ...14 TO OPERATE VACUUM CLEANER 16 Power Cord ...18 ON-OFF Switch...20 Adjusting the Handle ...22 Carpet/Bare Floor Selector ...24 Using the Tools ...24, 26 Tools... ...28 FEATURES ...30 Edge Cleaning ...30 Thermal Protector ...30 Carpet/Bare Floor Selector ...32 Dirt Sensor ...32 ROUTINE CARE OF VACUUM CLEANER 34 Cleaning Exterior and Tools ...34 Emptying Dust Bin...36, 38 Cleaning Pre-Filter ...40 Cleaning Primary Filter ...42, 44 Removing Clogs...
...INSTRUCTIONS 7 PARTS IDENTIFICATION ...10-11 FEATURE CHART ...10 ASSEMBLY ...12 Attaching Handle ...12 Attaching Hose ...14 Attachment Storage ...14 TO OPERATE VACUUM CLEANER 16 Power Cord ...18 ON-OFF Switch...20 Adjusting the Handle ...22 Carpet/Bare Floor Selector ...24 Using the Tools ...24, 26 Tools... ...28 FEATURES ...30 Edge Cleaning ...30 Thermal Protector ...30 Carpet/Bare Floor Selector ...32 Dirt Sensor ...32 ROUTINE CARE OF VACUUM CLEANER 34 Cleaning Exterior and Tools ...34 Emptying Dust Bin...36, 38 Cleaning Pre-Filter ...40 Cleaning Primary Filter ...42, 44 Removing Clogs...
MC-UL815 Owner's Manual (Multi-Language)
Page 4
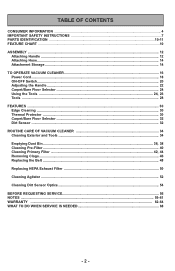
... over power cord or vacuum cleaner. • Use vacuum cleaner and accessories only in a dry, indoor area. The vacuum cleaner should be damaged which can cause electrical sparking and fire. © 2011 Panasonic Home Appliances Company of North America, Division of Panasonic Corporation of your vacuum cleaner are very pleased to welcome you for hand-held vacuum cleaners, keep vacuum cleaner on page 7 before...
... over power cord or vacuum cleaner. • Use vacuum cleaner and accessories only in a dry, indoor area. The vacuum cleaner should be damaged which can cause electrical sparking and fire. © 2011 Panasonic Home Appliances Company of North America, Division of Panasonic Corporation of your vacuum cleaner are very pleased to welcome you for hand-held vacuum cleaners, keep vacuum cleaner on page 7 before...

MC-UL815 Owner's Manual (Multi-Language)
Page 7
... electrical supply before servicing. 4. Do not leave vacuum cleaner when plugged in your Panasonic vacuum cleaner, make sure that may be present. Do not use cord as your vacuum cleaner is unable to whip when rewinding. 20. Do not use vacuum cleaner without dust bin and/or filters in this manual. If vacuum cleaner is burning or smoking, such as it...
... electrical supply before servicing. 4. Do not leave vacuum cleaner when plugged in your Panasonic vacuum cleaner, make sure that may be present. Do not use cord as your vacuum cleaner is unable to whip when rewinding. 20. Do not use vacuum cleaner without dust bin and/or filters in this manual. If vacuum cleaner is burning or smoking, such as it...

MC-UL815 Owner's Manual (Multi-Language)
Page 12
... shown. CAUTION Do not overtighten. Overtightening could result in place. - 12 - Do not operate the vacuum cleaner without the screw in electrical shock or injury. Cord Clip Crochet du cordon Soporte del cordón Handle Screw Vis du manche Tornillo del mango ...
... shown. CAUTION Do not overtighten. Overtightening could result in place. - 12 - Do not operate the vacuum cleaner without the screw in electrical shock or injury. Cord Clip Crochet du cordon Soporte del cordón Handle Screw Vis du manche Tornillo del mango ...
MC-UL815 Owner's Manual (Multi-Language)
Page 14
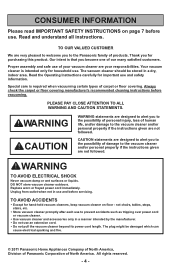
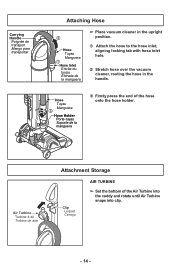
... Mango para transportar Attaching Hose ➁ Hose Tuyau Manguera ➀ Hose Inlet Entrée du tuyau Entrada de la manguera ➢ Place vacuum cleaner in the upright position. ➀ Attach the hose to the hose inlet, aligning locking tab with hose inlet hole. ➁ Stretch hose over ...the vacuum cleaner, routing the hose in the handle. Hose Tuyau ➂ Manguera Hose Holder Porte-tuyau Soporte de la manguera ➂ Firmly press the end...
... Mango para transportar Attaching Hose ➁ Hose Tuyau Manguera ➀ Hose Inlet Entrée du tuyau Entrada de la manguera ➢ Place vacuum cleaner in the upright position. ➀ Attach the hose to the hose inlet, aligning locking tab with hose inlet hole. ➁ Stretch hose over ...the vacuum cleaner, routing the hose in the handle. Hose Tuyau ➂ Manguera Hose Holder Porte-tuyau Soporte de la manguera ➂ Firmly press the end...

MC-UL815 Owner's Manual (Multi-Language)
Page 16
Always unplug from electrical outlet before servicing. Contacting the brush while it is on. Crevice Tool Suceur plat Herramienta para hendiduras ➢ Press crevice tool firmly into vacuum cleaner. TO OPERATE VACUUM CLEANER CAUTION Moving parts! To reduce the risk of personal injury, DO NOT touch the brush when vacuum cleaner is rotating can cut, bruise or cause other injuries. Use caution when operating near children. - 16 -
Always unplug from electrical outlet before servicing. Contacting the brush while it is on. Crevice Tool Suceur plat Herramienta para hendiduras ➢ Press crevice tool firmly into vacuum cleaner. TO OPERATE VACUUM CLEANER CAUTION Moving parts! To reduce the risk of personal injury, DO NOT touch the brush when vacuum cleaner is rotating can cut, bruise or cause other injuries. Use caution when operating near children. - 16 -

MC-UL815 Owner's Manual (Multi-Language)
Page 18
Power Cord NOTE: To reduce the risk of electrical shock, this vacuum cleaner has a polarized plug, one way. Keep children away and provide a clear path when rewinding the cord to prevent personal injury. • DO NOT use outlets ... could result. • The cord moves rapidly when rewinding. WARNING Personal Injury and Product Damage Hazard • DO NOT place hands or feet under the vacuum cleaner at any abnormality/failure occurs, stop using the product immediately and disconnect the power plug. - 18 - If it still does not fit, contact a qualified electrician...
Power Cord NOTE: To reduce the risk of electrical shock, this vacuum cleaner has a polarized plug, one way. Keep children away and provide a clear path when rewinding the cord to prevent personal injury. • DO NOT use outlets ... could result. • The cord moves rapidly when rewinding. WARNING Personal Injury and Product Damage Hazard • DO NOT place hands or feet under the vacuum cleaner at any abnormality/failure occurs, stop using the product immediately and disconnect the power plug. - 18 - If it still does not fit, contact a qualified electrician...

MC-UL815 Owner's Manual (Multi-Language)
Page 20
To Rewind: ➢ Turn off , press on the ON/OFF switch. On/Off Switch ➢ To turn vacuum cleaner on or off and unplug the vacuum cleaner. ➢ Hold the plug while rewinding to prevent damage or injury from the moving cord. ➢ A slight tug will release the locking pawls in the ... cord is placed into a 120 Volt outlet located near the floor. ON/OFF Switch Interrupteur Interruptor de encendidoapagado - 20 - ➢ Pull power cord out of vacuum cleaner to retract.
To Rewind: ➢ Turn off , press on the ON/OFF switch. On/Off Switch ➢ To turn vacuum cleaner on or off and unplug the vacuum cleaner. ➢ Hold the plug while rewinding to prevent damage or injury from the moving cord. ➢ A slight tug will release the locking pawls in the ... cord is placed into a 120 Volt outlet located near the floor. ON/OFF Switch Interrupteur Interruptor de encendidoapagado - 20 - ➢ Pull power cord out of vacuum cleaner to retract.
MC-UL815 Owner's Manual (Multi-Language)
Page 22
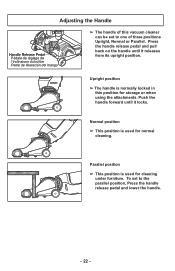
...;n del mango ➢ The handle of this position for storage or when using the attachments. Parallel position ➢ This position is normally locked in this vacuum cleaner can be set to one of three positions Upright, Normal or Parallel. Upright position ➢ The handle is used for cleaning under furniture.
...;n del mango ➢ The handle of this position for storage or when using the attachments. Parallel position ➢ This position is normally locked in this vacuum cleaner can be set to one of three positions Upright, Normal or Parallel. Upright position ➢ The handle is used for cleaning under furniture.
MC-UL815 Owner's Manual (Multi-Language)
Page 24
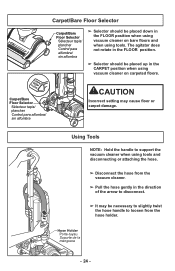
... be placed down in the FLOOR position. ➢ Selector should be necessary to slightly twist the hose handle to loosen from the vacuum cleaner. ➢ Pull the hose gently in the direction of the arrow to disconnect. ➢ It may cause floor or carpet damage.... Hose Holder Porte-tuyau Soporte de la manguera FLOCOARRPET - 24 - The agitator does not rotate in the FLOOR position when using vacuum cleaner on carpeted floors. Carpet/Bare Floor Selector FLOCOARRPET Carpet/Bare Floor Selector FLOCOARRPET Sélecteur tapis/ plancher Control para alfombra/ sin alfombra...
... be placed down in the FLOOR position. ➢ Selector should be necessary to slightly twist the hose handle to loosen from the vacuum cleaner. ➢ Pull the hose gently in the direction of the arrow to disconnect. ➢ It may cause floor or carpet damage.... Hose Holder Porte-tuyau Soporte de la manguera FLOCOARRPET - 24 - The agitator does not rotate in the FLOOR position when using vacuum cleaner on carpeted floors. Carpet/Bare Floor Selector FLOCOARRPET Carpet/Bare Floor Selector FLOCOARRPET Sélecteur tapis/ plancher Control para alfombra/ sin alfombra...
MC-UL815 Owner's Manual (Multi-Language)
Page 30
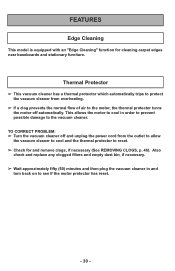
...to see if the motor protector has reset. - 30 - Thermal Protector ➢ This vacuum cleaner has a thermal protector which automatically trips to protect the vacuum cleaner from the outlet to allow the vacuum cleaner to cool and the thermal protector to the motor, the thermal protector turns the motor off ...clogs, if necessary (See REMOVING CLOGS, p. 46). This allows the motor to cool in and turn back on to the vacuum cleaner. TO CORRECT PROBLEM: ➢ Turn the vacuum cleaner off and unplug the power cord from overheating. ➢ If a clog prevents the normal flow of air to reset. ...
...to see if the motor protector has reset. - 30 - Thermal Protector ➢ This vacuum cleaner has a thermal protector which automatically trips to protect the vacuum cleaner from the outlet to allow the vacuum cleaner to cool and the thermal protector to the motor, the thermal protector turns the motor off ...clogs, if necessary (See REMOVING CLOGS, p. 46). This allows the motor to cool in and turn back on to the vacuum cleaner. TO CORRECT PROBLEM: ➢ Turn the vacuum cleaner off and unplug the power cord from overheating. ➢ If a clog prevents the normal flow of air to reset. ...

MC-UL815 Owner's Manual (Multi-Language)
Page 32
The agitator does not rotate in the FLOOR position. ➢ Selector should be placed up in the FLOOR position when using vacuum cleaner on bare floors and when using vacuum cleaner on the nozzle of the vacuum cleaner as illustrated. ➢ When there is little or no dirt present the dirt sensor is green. ➢ With normal... de poussière Indicador de polvo Dirt Sensor ➢ The electronic dirt sensor is a feature which will detect particles as they pass through the vacuum cleaner. ➢ The dirt sensor indicator is located on carpeted floors.
The agitator does not rotate in the FLOOR position. ➢ Selector should be placed up in the FLOOR position when using vacuum cleaner on bare floors and when using vacuum cleaner on the nozzle of the vacuum cleaner as illustrated. ➢ When there is little or no dirt present the dirt sensor is green. ➢ With normal... de poussière Indicador de polvo Dirt Sensor ➢ The electronic dirt sensor is a feature which will detect particles as they pass through the vacuum cleaner. ➢ The dirt sensor indicator is located on carpeted floors.
MC-UL815 Owner's Manual (Multi-Language)
Page 34
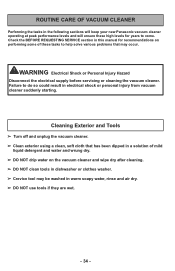
WARNING Electrical Shock or Personal Injury Hazard Disconnect the electrical supply before servicing or cleaning the vacuum cleaner. ROUTINE CARE OF VACUUM CLEANER Performing the tasks in the following sections will keep your new Panasonic vacuum cleaner operating at peak performance levels and will ensure these tasks to help solve various problems that has been dipped in a solution...
WARNING Electrical Shock or Personal Injury Hazard Disconnect the electrical supply before servicing or cleaning the vacuum cleaner. ROUTINE CARE OF VACUUM CLEANER Performing the tasks in the following sections will keep your new Panasonic vacuum cleaner operating at peak performance levels and will ensure these tasks to help solve various problems that has been dipped in a solution...

MC-UL815 Owner's Manual (Multi-Language)
Page 36
... any debris that might be located in the pre-filter. (See CLEANING PRE-FILTER, p. 40) ➢ Shake the dust bin to remove dust bin from vacuum cleaner. Emptying Dust Bin Dust Bin Release Button Bouton de dégagement du godet à poussière Botón de liberación del contenedor de...
... any debris that might be located in the pre-filter. (See CLEANING PRE-FILTER, p. 40) ➢ Shake the dust bin to remove dust bin from vacuum cleaner. Emptying Dust Bin Dust Bin Release Button Bouton de dégagement du godet à poussière Botón de liberación del contenedor de...

MC-UL815 Owner's Manual (Multi-Language)
Page 38
Make sure you hear a "click" sound to indicate that the door is empty of debris, firmly close the door. Door Couvercle Puerta Door Latch Loquet du couvercle Seguro de la puerta TO REPLACE DUST BIN ➢ After the dust bin is fully latched. ➢ Place dust bin back into vacuum cleaner by inserting the bottom first and tilting back. ➢ Push forward and lower dust bin handle to lock dust bin in place. - 38 -
Make sure you hear a "click" sound to indicate that the door is empty of debris, firmly close the door. Door Couvercle Puerta Door Latch Loquet du couvercle Seguro de la puerta TO REPLACE DUST BIN ➢ After the dust bin is fully latched. ➢ Place dust bin back into vacuum cleaner by inserting the bottom first and tilting back. ➢ Push forward and lower dust bin handle to lock dust bin in place. - 38 -

MC-UL815 Owner's Manual (Multi-Language)
Page 40
... on the pre-filter with the alignment tab inside dust bin. ➢ Rotate pre-filter clockwise to dry for 24 hours before placing back into vacuum cleaner. Cleaning Pre-Filter LOCKED (For Use) VERROUILLÉ (pour l'utilisation) CERRADO (Para Usar) ➢ Make sure the dust bin is empty. ➢ Rotate dust bin...
... on the pre-filter with the alignment tab inside dust bin. ➢ Rotate pre-filter clockwise to dry for 24 hours before placing back into vacuum cleaner. Cleaning Pre-Filter LOCKED (For Use) VERROUILLÉ (pour l'utilisation) CERRADO (Para Usar) ➢ Make sure the dust bin is empty. ➢ Rotate dust bin...

MC-UL815 Owner's Manual (Multi-Language)
Page 42
... DO NOT wash in the dishwasher. DO NOT install damp. Check the primary filter frequently and clean when dirty. ➢ Turn off and unplug the vacuum cleaner. ➢ Remove dust bin (See EMPTYING DUST BIN, p. 36). ➢ Pull the dust bin lid latch and open the lid. ➢ ...10146; Remove the filter and clean by hand and allow to air dry. ➢ Allow filter to dry for 24 hours before placing back into vacuum cleaner. DO NOT operate without primary filter installed. Filter Screen Tamis du filtre Filtro screen FILTER SCREEN ➢ Remove the filter screen. ➢ The...
... DO NOT wash in the dishwasher. DO NOT install damp. Check the primary filter frequently and clean when dirty. ➢ Turn off and unplug the vacuum cleaner. ➢ Remove dust bin (See EMPTYING DUST BIN, p. 36). ➢ Pull the dust bin lid latch and open the lid. ➢ ...10146; Remove the filter and clean by hand and allow to air dry. ➢ Allow filter to dry for 24 hours before placing back into vacuum cleaner. DO NOT operate without primary filter installed. Filter Screen Tamis du filtre Filtro screen FILTER SCREEN ➢ Remove the filter screen. ➢ The...

MC-UL815 Owner's Manual (Multi-Language)
Page 44
Filter Screen Filtre screen Filtro screen TO REPLACE FILTERS ➢ Place the filter screen into the dust bin lid. ➢ Close the dust bin lid. Be sure the lid snaps in place. Primary Filter Filtre primaire Filtro primario ➢ Place the primary filter into the dust bin lid. A noticeable "click" should be heard. ➢ Reinstall the dust bin into the vacuum cleaner (See EMPTYING DUST BIN, p. 36). - 44 -
Filter Screen Filtre screen Filtro screen TO REPLACE FILTERS ➢ Place the filter screen into the dust bin lid. ➢ Close the dust bin lid. Be sure the lid snaps in place. Primary Filter Filtre primaire Filtro primario ➢ Place the primary filter into the dust bin lid. A noticeable "click" should be heard. ➢ Reinstall the dust bin into the vacuum cleaner (See EMPTYING DUST BIN, p. 36). - 44 -

MC-UL815 Owner's Manual (Multi-Language)
Page 46
... Pestaña Nozzle Hose Tuyau court Manguera de la boquilla Removing Clogs Hose Tuyau Manguera Hose Holder Porte-tuyau Soporte de la manguera If the vacuum cleaner does not seem to loosen from hose holder by pressing locking tabs and pulling down on . ➢ Stretch the hose to maximum length and ... holder). Hose Holder Porte-tuyau Soporte de la manguera ➢ Inspect inlet of nozzle hose and clear any visible clog. ➢ Plug in the vacuum cleaner and turn it on the nozzle hose (it may be necessary to slightly twist the nozzle hose to have adequate suction, first check if the...
... Pestaña Nozzle Hose Tuyau court Manguera de la boquilla Removing Clogs Hose Tuyau Manguera Hose Holder Porte-tuyau Soporte de la manguera If the vacuum cleaner does not seem to loosen from hose holder by pressing locking tabs and pulling down on . ➢ Stretch the hose to maximum length and ... holder). Hose Holder Porte-tuyau Soporte de la manguera ➢ Inspect inlet of nozzle hose and clear any visible clog. ➢ Plug in the vacuum cleaner and turn it on the nozzle hose (it may be necessary to slightly twist the nozzle hose to have adequate suction, first check if the...

MC-UL815 Owner's Manual (Multi-Language)
Page 48
...courroie End Cap Bouchon Guía para la correa Tapa del extremo Motor shaft may be hot. ➢ Loop new belt (part number MC-V380B) around motor shaft and agitator belt groove. Nozzle Cover Couvercle de la tête d'aspiration Cubierta de la boquilla Side Latch Loquet ...by aligning front edge of nozzle and rotate cover from nozzle. ➢ Remove agitator by excessive slippage occurs. ➢ Turn off and unplug the vacuum cleaner. ➢ Push in the belt guide as shown. Ensure rear latch and side latches are locked into grooves. ➢ After reinstalling the agitator...
...courroie End Cap Bouchon Guía para la correa Tapa del extremo Motor shaft may be hot. ➢ Loop new belt (part number MC-V380B) around motor shaft and agitator belt groove. Nozzle Cover Couvercle de la tête d'aspiration Cubierta de la boquilla Side Latch Loquet ...by aligning front edge of nozzle and rotate cover from nozzle. ➢ Remove agitator by excessive slippage occurs. ➢ Turn off and unplug the vacuum cleaner. ➢ Push in the belt guide as shown. Ensure rear latch and side latches are locked into grooves. ➢ After reinstalling the agitator...


