Operating Instructions
Page 1
KX-P1121E Please carefully read this manual, and keep this documentation in a safe place for future reference. Operating Instructions Impact Dot Matrix Printer Model No.
KX-P1121E Please carefully read this manual, and keep this documentation in a safe place for future reference. Operating Instructions Impact Dot Matrix Printer Model No.
Operating Instructions
Page 2
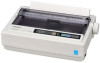
Introduction Introduction Thank you for purchasing the Panasonic KX-P1121E Impact Dot Matrix Printer. For optimum performance and safety, please read these instructions carefully. Operating Instructions (this manual) The Operating Instructions explain part names.... Installation Manual (printed documentation) The Installation Manual explains installation procedures. 2 Operating Instructions Your application software should control the printer's functions. This printer has been factory set to operate with the most cases, there will be no need to change the factory settings. This...
Introduction Introduction Thank you for purchasing the Panasonic KX-P1121E Impact Dot Matrix Printer. For optimum performance and safety, please read these instructions carefully. Operating Instructions (this manual) The Operating Instructions explain part names.... Installation Manual (printed documentation) The Installation Manual explains installation procedures. 2 Operating Instructions Your application software should control the printer's functions. This printer has been factory set to operate with the most cases, there will be no need to change the factory settings. This...
Operating Instructions
Page 5
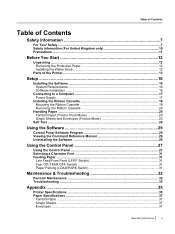
...Kingdom only 10 Precautions ...11 Before You Start 12 Unpacking ...12 Removing the Protective Paper 12 Installing the Platen Knob 12 Parts of the Printer ...13 Setup ...16 Installing the Software ...16 System Requirements ...16 Software Installation ...16 Connecting to a Computer 17 Power Supply ...17 ...TEAR OFF Switch 31 Paper Parking (LOAD/PARK Switch 31 Maintenance & Troubleshooting 32 Periodic Maintenance ...32 Troubleshooting ...33 Appendix 35 Printer Specifications ...35 Paper Specifications ...37 Fanfold Paper ...37 Single Sheets ...37 Envelopes ...37 Operating Instructions 5
...Kingdom only 10 Precautions ...11 Before You Start 12 Unpacking ...12 Removing the Protective Paper 12 Installing the Platen Knob 12 Parts of the Printer ...13 Setup ...16 Installing the Software ...16 System Requirements ...16 Software Installation ...16 Connecting to a Computer 17 Power Supply ...17 ...TEAR OFF Switch 31 Paper Parking (LOAD/PARK Switch 31 Maintenance & Troubleshooting 32 Periodic Maintenance ...32 Troubleshooting ...33 Appendix 35 Printer Specifications ...35 Paper Specifications ...37 Fanfold Paper ...37 Single Sheets ...37 Envelopes ...37 Operating Instructions 5
Operating Instructions
Page 11
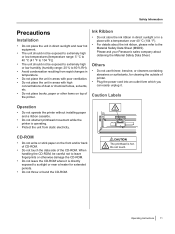
... or low humidity (humidity range: 20 % to 80 % RH). • Avoid condensation resulting from static electricity. Do not touch. Please ask your Panasonic sales company about the ink ribbon, please refer to the Material Safety Data Sheet (MSDS). Caution Labels Operation • Do not operate the... printer without installing paper and a ribbon cassette. • Do not obstruct printhead movement while the printer is hot. CD-ROM • Do not write or stick paper on top of the CD-ROM....
... or low humidity (humidity range: 20 % to 80 % RH). • Avoid condensation resulting from static electricity. Do not touch. Please ask your Panasonic sales company about the ink ribbon, please refer to the Material Safety Data Sheet (MSDS). Caution Labels Operation • Do not operate the... printer without installing paper and a ribbon cassette. • Do not obstruct printhead movement while the printer is hot. CD-ROM • Do not write or stick paper on top of the CD-ROM....

Operating Instructions
Page 12
Push the platen knob onto the platen shaft to the store from which the unit was purchased. CD-ROM Installation Manual 12 Operating Instructions Report damage or shortages to secure. Before You Start Before You Start Unpacking Having unpacked the printer, make sure none of the printer and rotate it slowly until it slips onto the shaft. Removing the Protective Paper A Printer (KX-P1121E) Ribbon Cassette (KX-P145) Platen Knob A Protective paper Installing the Platen Knob Insert the platen knob into the hole on the right side of the contents shown below is missing or damaged.
Push the platen knob onto the platen shaft to the store from which the unit was purchased. CD-ROM Installation Manual 12 Operating Instructions Report damage or shortages to secure. Before You Start Before You Start Unpacking Having unpacked the printer, make sure none of the printer and rotate it slowly until it slips onto the shaft. Removing the Protective Paper A Printer (KX-P1121E) Ribbon Cassette (KX-P145) Platen Knob A Protective paper Installing the Platen Knob Insert the platen knob into the hole on the right side of the contents shown below is missing or damaged.
Operating Instructions
Page 13
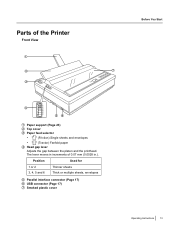
Parts of 0.07 mm (0.0028 in.). The lever moves in increments of the Printer Front View A B G C 1 D 2 3 4 5 6 EF Paper support (Page 23) Top cover Paper feed selector • " " (Friction) Single sheets and envelopes • " " (Tractor) Fanfold paper Head gap lever Adjusts the gap between the platen and the printhead. Position Used for 1 or 2 Thinner sheets 3, 4, 5 and 6 Thick or multiple sheets, envelopes Parallel interface connector (Page 17) USB connector (Page 17) Smoked plastic cover Before You Start Operating Instructions 13
Parts of 0.07 mm (0.0028 in.). The lever moves in increments of the Printer Front View A B G C 1 D 2 3 4 5 6 EF Paper support (Page 23) Top cover Paper feed selector • " " (Friction) Single sheets and envelopes • " " (Tractor) Fanfold paper Head gap lever Adjusts the gap between the platen and the printhead. Position Used for 1 or 2 Thinner sheets 3, 4, 5 and 6 Thick or multiple sheets, envelopes Parallel interface connector (Page 17) USB connector (Page 17) Smoked plastic cover Before You Start Operating Instructions 13
Operating Instructions
Page 15
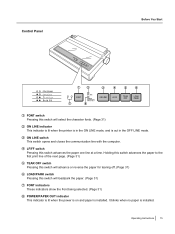
.... Operating Instructions 15 LF/FF switch Pressing this switch will select the character fonts. (Page 31) ON LINE indicator This indicator is lit when the printer is in the ON LINE mode, and is installed. Holding this switch advances the paper to the first print line of the next page. (Page...
.... Operating Instructions 15 LF/FF switch Pressing this switch will select the character fonts. (Page 31) ON LINE indicator This indicator is lit when the printer is in the ON LINE mode, and is installed. Holding this switch advances the paper to the first print line of the next page. (Page...
Operating Instructions
Page 16
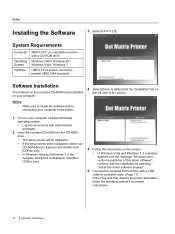
... can be displayed. • If the setup screen does not appear, select your computer to the printer with a USB cable or a parallel cable. (Page 17) Once Plug and Play detects the printer and starts, follow the operating system's on-screen instructions. 16 Operating Instructions Connect the computer to the... printer. 4. Select [Driver & Utility] from the "Installation" list on the enclosed CD-ROM can 't verify the publisher of the screen. 1. Follow the instructions...
... can be displayed. • If the setup screen does not appear, select your computer to the printer with a USB cable or a parallel cable. (Page 17) Once Plug and Play detects the printer and starts, follow the operating system's on-screen instructions. 16 Operating Instructions Connect the computer to the... printer. 4. Select [Driver & Utility] from the "Installation" list on the enclosed CD-ROM can 't verify the publisher of the screen. 1. Follow the instructions...
Operating Instructions
Page 17
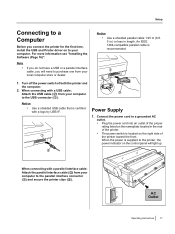
...; Use a shielded parallel cable 1.95 m (6 ft. 5 in.) or less in the rear of the printer. • The power switch is supplied to the printer, the power indicator on the right side of both the printer and the computer. 2. Note • If you do not have a USB or a parallel interface cable, you... to a Computer Before you will light up. For more information see "Installing the Software (Page 16)". Turn off the power switch of the printer toward the front. Notice • Use a shielded USB cable that is recommended. An IEEE 1284-compatible parallel cable is certified with a logo ...
...; Use a shielded parallel cable 1.95 m (6 ft. 5 in.) or less in the rear of the printer. • The power switch is supplied to the printer, the power indicator on the right side of both the printer and the computer. 2. Note • If you do not have a USB or a parallel interface cable, you... to a Computer Before you will light up. For more information see "Installing the Software (Page 16)". Turn off the power switch of the printer toward the front. Notice • Use a shielded USB cable that is recommended. An IEEE 1284-compatible parallel cable is certified with a logo ...
Operating Instructions
Page 18
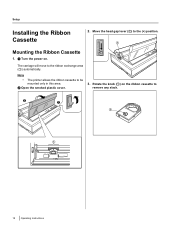
Move the head gap lever (A) to be mounted only in this area. A Turn the power on the ribbon cassette to the ribbon exchange area (A) automatically. Setup Installing the Ribbon Cassette 2. Note • The printer allows the ribbon cassette to the (+) position. The carriage will move to remove any slack. B A A A 18 Operating Instructions A Mounting the Ribbon Cassette 1. B Open the smoked plastic cover. 3. Rotate the knob (A) on .
Move the head gap lever (A) to be mounted only in this area. A Turn the power on the ribbon cassette to the ribbon exchange area (A) automatically. Setup Installing the Ribbon Cassette 2. Note • The printer allows the ribbon cassette to the (+) position. The carriage will move to remove any slack. B A A A 18 Operating Instructions A Mounting the Ribbon Cassette 1. B Open the smoked plastic cover. 3. Rotate the knob (A) on .
Operating Instructions
Page 20
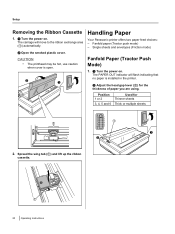
CAUTION • The printhead may be hot, use caution when cover is installed in the printer. Single sheets and envelopes (Friction mode) Fanfold Paper (Tractor Push Mode) 1. The PAPER OUT indicator will move to the ribbon exchange area (A) automatically. Position 1... 2 3, 4, 5 and 6 Used for the thickness of paper you are using. Fanfold paper (Tractor push mode) - A Turn the power on . B A Handling Paper Your Panasonic printer offers two paper feed choices: - Spread the wing tab (A) and lift up the ribbon cassette. The carriage will flash indicating that no paper is open...
CAUTION • The printhead may be hot, use caution when cover is installed in the printer. Single sheets and envelopes (Friction mode) Fanfold Paper (Tractor Push Mode) 1. The PAPER OUT indicator will move to the ribbon exchange area (A) automatically. Position 1... 2 3, 4, 5 and 6 Used for the thickness of paper you are using. Fanfold paper (Tractor push mode) - A Turn the power on . B A Handling Paper Your Panasonic printer offers two paper feed choices: - Spread the wing tab (A) and lift up the ribbon cassette. The carriage will flash indicating that no paper is open...
Operating Instructions
Page 23
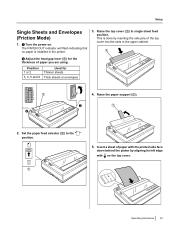
This is installed in the upper cabinet. Position 1 or 2 3, 4, 5 and 6 Used for the thickness of the top cover into the slots in the printer. 3. A Operating Instructions 23 A Turn the power on the top cover. A A 2. Set the paper feed selector (A) to single sheet feed position. Raise the top cover (A) to ...
This is installed in the upper cabinet. Position 1 or 2 3, 4, 5 and 6 Used for the thickness of the top cover into the slots in the printer. 3. A Operating Instructions 23 A Turn the power on the top cover. A A 2. Set the paper feed selector (A) to single sheet feed position. Raise the top cover (A) to ...

Operating Instructions
Page 24
Setup 6. If the ON LINE indicator (A) is not lit, press ON LINE to get ready to test the printer. 1. Load a sheet of paper, and turn the power off . 24 Operating Instructions Turn the power off . (Page 20) 2. A A sample printout will be loaded to the first print line. Self Test The printer has a self test feature which serves as a self test. 3. Turn the power on while pressing LF/FF . 7. The paper will begin, which allows you to print. Press LOAD/PARK .
Setup 6. If the ON LINE indicator (A) is not lit, press ON LINE to get ready to test the printer. 1. Load a sheet of paper, and turn the power off . 24 Operating Instructions Turn the power off . (Page 20) 2. A A sample printout will be loaded to the first print line. Self Test The printer has a self test feature which serves as a self test. 3. Turn the power on while pressing LF/FF . 7. The paper will begin, which allows you to print. Press LOAD/PARK .
Operating Instructions
Page 25
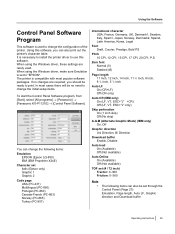
...from [Start], select [All programs] ® [Panasonic] ® [Panasonic KX-P1121E] ® [Control Panel Software]. The printer is used . In most popular software packages. When using the Windows driver, make sure Emulation is necessary to install the printer driver to "EPSON". Using the Software Using the ...(Page 27): Emulation, Page length, Auto LF, Graphic direction and Download buffer Operating Instructions 25 You can also print out the printer's character table. When using the Windows driver, these settings are required, you should be no changes are rarely used to change...
...from [Start], select [All programs] ® [Panasonic] ® [Panasonic KX-P1121E] ® [Control Panel Software]. The printer is used . In most popular software packages. When using the Windows driver, make sure Emulation is necessary to install the printer driver to "EPSON". Using the Software Using the ...(Page 27): Emulation, Page length, Auto LF, Graphic direction and Download buffer Operating Instructions 25 You can also print out the printer's character table. When using the Windows driver, these settings are required, you should be no changes are rarely used to change...
Operating Instructions
Page 26
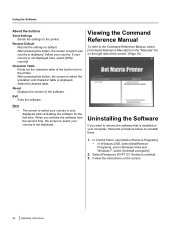
...select [Command Reference Manual] from the second time, the screen to uninstall them. 1. Note • The screen to the printer. Using the Software About the buttons Send Settings Sends the settings to select your country is only displayed when activating the software for...select your country is installed on the screen. 26 Operating Instructions Restore Default Returns the settings to uninstall. 3. If your country. Select [Panasonic KX-P1121 Series] to default. About Displays the version of the built-in font in Windows Vista and Windows 7, select [Uninstall a ...
...select [Command Reference Manual] from the second time, the screen to uninstall them. 1. Note • The screen to the printer. Using the Software About the buttons Send Settings Sends the settings to select your country is only displayed when activating the software for...select your country is installed on the screen. 26 Operating Instructions Restore Default Returns the settings to uninstall. 3. If your country. Select [Panasonic KX-P1121 Series] to default. About Displays the version of the built-in font in Windows Vista and Windows 7, select [Uninstall a ...
Operating Instructions
Page 31
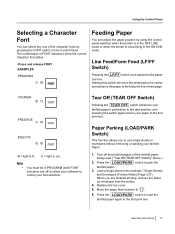
...or wasting your paper to the first print line of the character fonts by using the control panel switches when the printer is in the OFF LINE mode or when the printer is out. Operating Instructions 31 Using the Control Panel Selecting a Character Font You can adjust the paper position by... BOLD PS = light is lit. = light is not printing in PROGRAM (both FONT indicators are finished printing, remove the sheet (or envelope) from the printer. 4. Note • You must be in the ON LINE mode. Paper Parking (LOAD/PARK Switch) This function allows you are off the printed page(s) ...
...or wasting your paper to the first print line of the character fonts by using the control panel switches when the printer is in the OFF LINE mode or when the printer is out. Operating Instructions 31 Using the Control Panel Selecting a Character Font You can adjust the paper position by... BOLD PS = light is lit. = light is not printing in PROGRAM (both FONT indicators are finished printing, remove the sheet (or envelope) from the printer. 4. Note • You must be in the ON LINE mode. Paper Parking (LOAD/PARK Switch) This function allows you are off the printed page(s) ...
Operating Instructions
Page 32
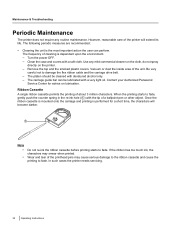
...printing is the most important action the user can be cleaned with a soft cloth. In such cases the printer needs servicing. 32 Operating Instructions The following periodic measures are recommended: a n • Cleaning the unit is performed for advice on the...to fade. b - Remove the top and the smoked plastic covers. Contact your Authorized Panasonic l Service Center for a short time, the characters will extend its n life. Vacuum or dust the inside area of the printer will t become darker. e - The platen should be lubricated with the tip of...
...printing is the most important action the user can be cleaned with a soft cloth. In such cases the printer needs servicing. 32 Operating Instructions The following periodic measures are recommended: a n • Cleaning the unit is performed for advice on the...to fade. b - Remove the top and the smoked plastic covers. Contact your Authorized Panasonic l Service Center for a short time, the characters will extend its n life. Vacuum or dust the inside area of the printer will t become darker. e - The platen should be lubricated with the tip of...
Operating Instructions
Page 33
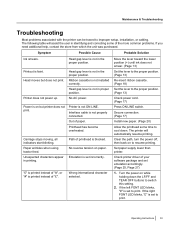
... proper position. (Page 13) Check power cord. (Page 17) Press ON LINE switch. Printout is not in the proper position. Printer does not power up. Head gap lever is faint. Ribbon cassette is not in identifying and correcting some time to cool down the LF... has become overheated. Head gap lever is set emulation accordingly. (Page 25, Page 27) 1. Set paper supply lower than printer. No AC power. Check printer driver of your software package and set incorrectly. Emulation is not in printing. Symptom Possible Cause Probable Solution Ink smears. Paper wrinkles...
... proper position. (Page 13) Check power cord. (Page 17) Press ON LINE switch. Printout is not in the proper position. Printer does not power up. Head gap lever is faint. Ribbon cassette is not in identifying and correcting some time to cool down the LF... has become overheated. Head gap lever is set emulation accordingly. (Page 25, Page 27) 1. Set paper supply lower than printer. No AC power. Check printer driver of your software package and set incorrectly. Emulation is not in printing. Symptom Possible Cause Probable Solution Ink smears. Paper wrinkles...
Operating Instructions
Page 35
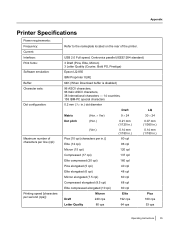
Appendix A p p e Printer Specifications n d Power requirements: i Frequency: x Refer to the nameplate located on the rear of characters per line (cpl): Pica [10 cpi (characters per in.)] Elite (12 ...; 24 Dot pitch (Hor.) 0.21 mm (1/120 in.) 0.07 mm (1/360 in.) (Ver.) 0.14 mm (1/180 in.) 0.14 mm (1/180 in.) Maximum number of the printer.
Appendix A p p e Printer Specifications n d Power requirements: i Frequency: x Refer to the nameplate located on the rear of characters per line (cpl): Pica [10 cpi (characters per in.)] Elite (12 ...; 24 Dot pitch (Hor.) 0.21 mm (1/120 in.) 0.07 mm (1/360 in.) (Ver.) 0.14 mm (1/180 in.) 0.14 mm (1/180 in.) Maximum number of the printer.
Operating Instructions
Page 36
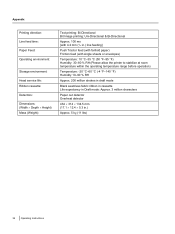
... fanfold paper) Friction feed (with single sheets or envelopes) Temperature: 10 °C-35 °C (50 °F-95 °F) Humidity: 30-80 % RH (Please allow the printer to stabilize at room temperature within the operating temperature range before operation) Temperature: -20 °C-60 °C (-4 °F-140 °F) Humidity 10-90 % RH Approx...
... fanfold paper) Friction feed (with single sheets or envelopes) Temperature: 10 °C-35 °C (50 °F-95 °F) Humidity: 30-80 % RH (Please allow the printer to stabilize at room temperature within the operating temperature range before operation) Temperature: -20 °C-60 °C (-4 °F-140 °F) Humidity 10-90 % RH Approx...


