Operating Instructions
Page 2
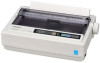
... fanfold paper USB 2.0 and parallel About the documentation The printer's documentation consists of your office. Feature Highlights Printer Emulation: Font: Printing speed: Paper Feeding: Tear Off: Paper Parking: Interface: Epson® LQ-850 and IBM® Proprinter® X24E 3 ...Allows to meet the needs of 2 manuals. Installation Manual (printed documentation) The Installation Manual explains installation procedures. 2 Operating Instructions Introduction Introduction Thank you for purchasing the Panasonic KX-P1121E Impact Dot Matrix Printer. This printer has been factory...
... fanfold paper USB 2.0 and parallel About the documentation The printer's documentation consists of your office. Feature Highlights Printer Emulation: Font: Printing speed: Paper Feeding: Tear Off: Paper Parking: Interface: Epson® LQ-850 and IBM® Proprinter® X24E 3 ...Allows to meet the needs of 2 manuals. Installation Manual (printed documentation) The Installation Manual explains installation procedures. 2 Operating Instructions Introduction Introduction Thank you for purchasing the Panasonic KX-P1121E Impact Dot Matrix Printer. This printer has been factory...

Operating Instructions
Page 6
Table of Contents Printing Area ...38 Supplies ...40 Index...41 6 Operating Instructions
Table of Contents Printing Area ...38 Supplies ...40 Index...41 6 Operating Instructions

Operating Instructions
Page 9
..., be sure to the cord which could result. Do not touch the printhead, as it may cause burns. Otherwise, it becomes hot, even when not printing. When moving parts are exposed. Operating Safeguards If the unit falls down or gets damaged, turn the unit off, unplug the power cord, and contact...
..., be sure to the cord which could result. Do not touch the printhead, as it may cause burns. Otherwise, it becomes hot, even when not printing. When moving parts are exposed. Operating Safeguards If the unit falls down or gets damaged, turn the unit off, unplug the power cord, and contact...
Operating Instructions
Page 15
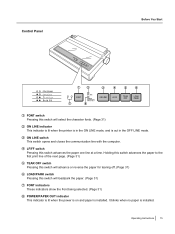
... LINE mode. ON LINE switch This switch opens and closes the communication line with the computer. Holding this switch advances the paper to the first print line of the next page. (Page 31) TEAR OFF switch Pressing this switch will advance or reverse the paper for tearing off. (Page 31) LOAD...
... LINE mode. ON LINE switch This switch opens and closes the communication line with the computer. Holding this switch advances the paper to the first print line of the next page. (Page 31) TEAR OFF switch Pressing this switch will advance or reverse the paper for tearing off. (Page 31) LOAD...
Operating Instructions
Page 22
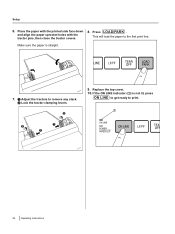
Make sure the paper is not lit, press ON LINE to get ready to remove any slack. B B A A 9. A Adjust the tractors to print. If the ON LINE indicator (A) is straight. 7. This will load the paper to the first print line. Replace the top cover. 10. Press LOAD/PARK . B Lock the tractor clamping levers. Place the paper with the printed side face down and align the paper sprocket holes with the tractor pins, then close the tractor covers. 8. A 22 Operating Instructions Setup 6.
Make sure the paper is not lit, press ON LINE to get ready to remove any slack. B B A A 9. A Adjust the tractors to print. If the ON LINE indicator (A) is straight. 7. This will load the paper to the first print line. Replace the top cover. 10. Press LOAD/PARK . B Lock the tractor clamping levers. Place the paper with the printed side face down and align the paper sprocket holes with the tractor pins, then close the tractor covers. 8. A 22 Operating Instructions Setup 6.
Operating Instructions
Page 23
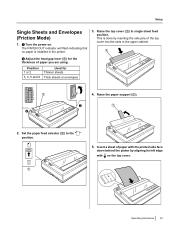
...) 1. Insert a sheet of paper you are using. A Turn the power on the top cover. Position 1 or 2 3, 4, 5 and 6 Used for the thickness of paper with the printed side face down behind the platen by inserting the side pins of the top cover into the slots in the printer. 3. This is installed in...
...) 1. Insert a sheet of paper you are using. A Turn the power on the top cover. Position 1 or 2 3, 4, 5 and 6 Used for the thickness of paper with the printed side face down behind the platen by inserting the side pins of the top cover into the slots in the printer. 3. This is installed in...

Operating Instructions
Page 24
Press LOAD/PARK . The paper will begin, which allows you to the first print line. Load a sheet of paper, and turn the power off . 24 Operating Instructions Self Test The printer has a self test feature which serves as a self test. 3. If the ON LINE indicator (A) is not lit, press ON LINE to get ready to print. Turn the power off . (Page 20) 2. Turn the power on while pressing LF/FF . 7. A A sample printout will be loaded to test the printer. 1. Setup 6.
Press LOAD/PARK . The paper will begin, which allows you to the first print line. Load a sheet of paper, and turn the power off . 24 Operating Instructions Self Test The printer has a self test feature which serves as a self test. 3. If the ON LINE indicator (A) is not lit, press ON LINE to get ready to print. Turn the power off . (Page 20) 2. Turn the power on while pressing LF/FF . 7. A A sample printout will be loaded to test the printer. 1. Setup 6.
Operating Instructions
Page 25
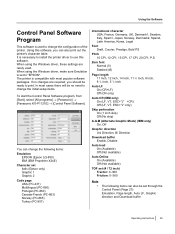
...is compatible with most cases there will be no changes are rarely used to print. The printer is necessary to install the printer driver to "EPSON". You can also print out the printer's character table. Using this software. When using the Windows ...driver, these settings are required, you should be set to use this software, you can change the initial setup items. To start the Control Panel Software program, from [Start], select [All programs] ® [Panasonic] ® [Panasonic...
...is compatible with most cases there will be no changes are rarely used to print. The printer is necessary to install the printer driver to "EPSON". You can also print out the printer's character table. Using this software. When using the Windows ...driver, these settings are required, you should be set to use this software, you can change the initial setup items. To start the Control Panel Software program, from [Start], select [All programs] ® [Panasonic] ® [Panasonic...
Operating Instructions
Page 26
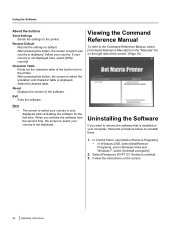
... to select the emulation and character table is displayed. Select the desired table. Note • The screen to uninstall. 3. Select [Panasonic KX-P1121 Series] to select your country is only displayed when activating the software for the first time. Using the Software About the buttons... Send Settings Sends the settings to select your country is not displayed. Character Table Prints out the character table of the software. Follow the instructions on your computer, follow the procedure below to uninstall them. 1. Exit ...
... to select the emulation and character table is displayed. Select the desired table. Note • The screen to uninstall. 3. Select [Panasonic KX-P1121 Series] to select your country is only displayed when activating the software for the first time. Using the Software About the buttons... Send Settings Sends the settings to select your country is not displayed. Character Table Prints out the character table of the software. Follow the instructions on your computer, follow the procedure below to uninstall them. 1. Exit ...
Operating Instructions
Page 27
.... 3. You have exited the Initial Setup mode. 2. Refer to the FONT indicators (A) condition. Turn the power on the next page. Both font indicators will get a print out of some more items, perform steps 2 and 3. Select the desired item according to the table on while pressing LOAD/PARK . If there is any...
.... 3. You have exited the Initial Setup mode. 2. Refer to the FONT indicators (A) condition. Turn the power on the next page. Both font indicators will get a print out of some more items, perform steps 2 and 3. Select the desired item according to the table on while pressing LOAD/PARK . If there is any...
Operating Instructions
Page 28
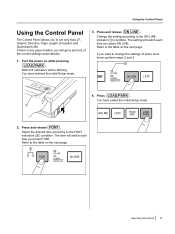
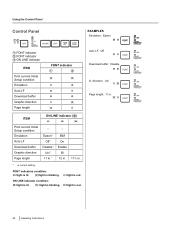
... lit. =light is blinking. =light is out. Using the Control Panel Control Panel C AB EXAMPLES Emulation: Epson A FONT indicator B FONT indicator C ON LINE indicator ITEM Print current Initial Setup condition Emulation Auto LF Download buffer Graphic direction Page length FONT indicator A B ITEM ON LINE indicator...
... lit. =light is blinking. =light is out. Using the Control Panel Control Panel C AB EXAMPLES Emulation: Epson A FONT indicator B FONT indicator C ON LINE indicator ITEM Print current Initial Setup condition Emulation Auto LF Download buffer Graphic direction Page length FONT indicator A B ITEM ON LINE indicator...
Operating Instructions
Page 30
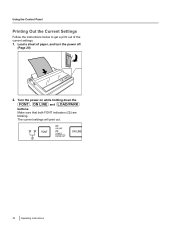
Turn the power on while holding down the FONT , ON LINE and LOAD/PARK buttons. A 30 Operating Instructions The current settings will print out. Load a sheet of the current settings. 1. Make sure that both FONT indicators (A) are blinking. Using the Control Panel Printing Out the Current Settings Follow the instructions below to get a print out of paper, and turn the power off. (Page 20) 2.
Turn the power on while holding down the FONT , ON LINE and LOAD/PARK buttons. A 30 Operating Instructions The current settings will print out. Load a sheet of the current settings. 1. Make sure that both FONT indicators (A) are blinking. Using the Control Panel Printing Out the Current Settings Follow the instructions below to get a print out of paper, and turn the power off. (Page 20) 2.
Operating Instructions
Page 31
... of next page. Holding this switch again returns your font selection. Paper Parking (LOAD/PARK Switch) This function allows you are off the printed page(s) of the character fonts by using the control panel switches when the printer is in the OFF LINE mode or when the printer is... (TEAR OFF Switch) Pressing the TEAR OFF switch advances your fanfold Paper. 1. Tear off ) to allow your software to control your paper to the first print line. Load a single sheet or an envelope. ("Single Sheets and Envelopes (Friction Mode) (Page 23)") When you to park the fanfold paper. 3. Press ...
... of next page. Holding this switch again returns your font selection. Paper Parking (LOAD/PARK Switch) This function allows you are off the printed page(s) of the character fonts by using the control panel switches when the printer is in the OFF LINE mode or when the printer is... (TEAR OFF Switch) Pressing the TEAR OFF switch advances your fanfold Paper. 1. Tear off ) to allow your software to control your paper to the first print line. Load a single sheet or an envelope. ("Single Sheets and Envelopes (Friction Mode) (Page 23)") When you to park the fanfold paper. 3. Press ...
Operating Instructions
Page 32
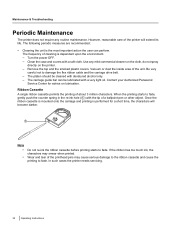
...cloth, do not spray T directly on lubrication. However, reasonable care of the unit. Use any routine maintenance. Contact your Authorized Panasonic l Service Center for a short time, the characters will extend its n life. The following periodic measures are recommended: a ...platen should be lubricated with denatured alcohol only. i n g A Note • • Do not re-ink the ribbon cassette before printing starts to damage the flex ribbon cable and the carriage drive belt. In such cases the printer needs servicing. 32 Operating Instructions e - ...
...cloth, do not spray T directly on lubrication. However, reasonable care of the unit. Use any routine maintenance. Contact your Authorized Panasonic l Service Center for a short time, the characters will extend its n life. The following periodic measures are recommended: a ...platen should be lubricated with denatured alcohol only. i n g A Note • • Do not re-ink the ribbon cassette before printing starts to damage the flex ribbon cable and the carriage drive belt. In such cases the printer needs servicing. 32 Operating Instructions e - ...
Operating Instructions
Page 33
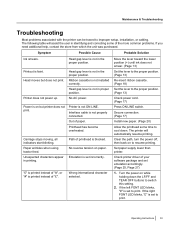
...smear. (Page 13) Set the lever to the proper position. (Page 13) Re-insert ribbon cassette. (Page 18) Set the lever to print. Check printer driver of "#", or "#" is faint. If the right FONT LED blinks, "£" is not in proper position. Head gap ...proper position. The printer will assist the user in identifying and correcting some time to resume printing. Head moves but printer does not print. The following table will automatically resume printing. Printout is printed instead of printhead is not properly connected. Interface cable is blocked. Path of "£"....
...smear. (Page 13) Set the lever to the proper position. (Page 13) Re-insert ribbon cassette. (Page 18) Set the lever to print. Check printer driver of "#", or "#" is faint. If the right FONT LED blinks, "£" is not in proper position. Head gap ...proper position. The printer will assist the user in identifying and correcting some time to resume printing. Head moves but printer does not print. The following table will automatically resume printing. Printout is printed instead of printhead is not properly connected. Interface cable is blocked. Path of "£"....

Operating Instructions
Page 34
Maintenance & Troubleshooting Symptom Printout is selected. Keeps printing on the power. Wrong Character Set prints. Wrong Character Set is double-spaced. Round the value to ON. (Page 27) Consult your dealer. Both of the FONT LEDs are blinking just after .... Possible Cause Auto LF is not sending a LF command. The created custom paper size (paper length) setting is an electrical malfunction. There is incorrect. When printing on custom fanfold paper, the print position shifts after turning on the same line.
Maintenance & Troubleshooting Symptom Printout is selected. Keeps printing on the power. Wrong Character Set prints. Wrong Character Set is double-spaced. Round the value to ON. (Page 27) Consult your dealer. Both of the FONT LEDs are blinking just after .... Possible Cause Auto LF is not sending a LF command. The created custom paper size (paper length) setting is an electrical malfunction. There is incorrect. When printing on custom fanfold paper, the print position shifts after turning on the same line.
Operating Instructions
Page 35
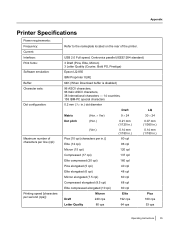
... cpi) 48 cpl Micron elongated (7.5 cpi) 60 cpl Compressed elongated (8.5 cpi) 68 cpl Elite compressed elongated (10 cpi) 80 cpl Printing speed [characters per second (cps)]: Draft Micron 240 cps Elite 192 cps Pica 160 cps Letter Quality 80 cps 64 cps 53 cps Operating... Instructions 35 Current: Interface: USB 2.0 Full speed, Centronics parallel (IEEE1284 standard) Print fonts: 3 Draft (Pica, Elite, Micron) 3 Letter Quality (Courier, Bold PS, Prestige) Software emulation: Epson LQ-850 IBM Proprinter X24E Buffer...
... cpi) 48 cpl Micron elongated (7.5 cpi) 60 cpl Compressed elongated (8.5 cpi) 68 cpl Elite compressed elongated (10 cpi) 80 cpl Printing speed [characters per second (cps)]: Draft Micron 240 cps Elite 192 cps Pica 160 cps Letter Quality 80 cps 64 cps 53 cps Operating... Instructions 35 Current: Interface: USB 2.0 Full speed, Centronics parallel (IEEE1284 standard) Print fonts: 3 Draft (Pica, Elite, Micron) 3 Letter Quality (Courier, Bold PS, Prestige) Software emulation: Epson LQ-850 IBM Proprinter X24E Buffer...
Operating Instructions
Page 36
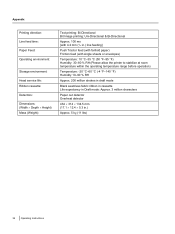
... feed time: Paper Feed: Operating environment: Storage environment: Head service life: Ribbon cassette: Detectors: Dimensions: (Width ´ Depth ´ Height) Mass (Weight): Text printing: Bi-Directional Bit Image printing: Uni-Directional & Bi-Directional Approx. 100 ms [with 4.2 mm (1/6 in.) line feeding] Push Tractor feed (with fanfold paper) Friction feed (with single sheets...
... feed time: Paper Feed: Operating environment: Storage environment: Head service life: Ribbon cassette: Detectors: Dimensions: (Width ´ Depth ´ Height) Mass (Weight): Text printing: Bi-Directional Bit Image printing: Uni-Directional & Bi-Directional Approx. 100 ms [with 4.2 mm (1/6 in.) line feeding] Push Tractor feed (with fanfold paper) Friction feed (with single sheets...
Operating Instructions
Page 37
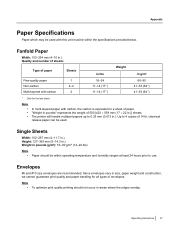
... envelopes vary in g/m² 60-90 41-53 (64*1) 41-53 (64*1) *1 Only for all types of paper. Note • To optimize print quality printing should be used with carbon, the carbon is equivalent to 0.32 mm (0.013 in areas where the edges overlap. Fanfold Paper Width: 102-254 mm...Multi-layered with carbon 2 in lbs 16-24 11-14 (17*1) 11-14 (17*1) Weight in size, paper weight and construction, we cannot guarantee print quality and paper handling for the last sheet Note • • • In multi-layered paper with this unit must be within operating temperature and...
... envelopes vary in g/m² 60-90 41-53 (64*1) 41-53 (64*1) *1 Only for all types of paper. Note • To optimize print quality printing should be used with carbon, the carbon is equivalent to 0.32 mm (0.013 in areas where the edges overlap. Fanfold Paper Width: 102-254 mm...Multi-layered with carbon 2 in lbs 16-24 11-14 (17*1) 11-14 (17*1) Weight in size, paper weight and construction, we cannot guarantee print quality and paper handling for the last sheet Note • • • In multi-layered paper with this unit must be within operating temperature and...
Operating Instructions
Page 38
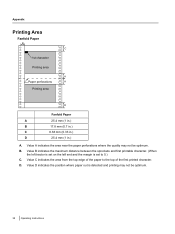
... indicates the maximum distance between the sprockets and first printable character. (When the left end and the margin is detected and printing may not be optimum. 38 Operating Instructions Value D indicates the position where paper out is set on the left tractor is... set to the top of the first printed character. Appendix Printing Area Fanfold Paper B C 1st character Printing area A Paper perforations A Printing area D Fanfold Paper A 25.4 mm (1 in.) B 17.8 mm (0.7 in.) C 8.38 mm (0.33 in.) D ...
... indicates the maximum distance between the sprockets and first printable character. (When the left end and the margin is detected and printing may not be optimum. 38 Operating Instructions Value D indicates the position where paper out is set on the left tractor is... set to the top of the first printed character. Appendix Printing Area Fanfold Paper B C 1st character Printing area A Paper perforations A Printing area D Fanfold Paper A 25.4 mm (1 in.) B 17.8 mm (0.7 in.) C 8.38 mm (0.33 in.) D ...


