
Multi Function Printer
Page 3
...quality - Exposing it is used to direct sunlight. Do not touch or scratch the black drum surface. - Leave the power turned ON for problems that may be caused by a non-Panasonic toner cartridge or drum unit: - When you begin installation of the unit with a soft cloth. Damp basements should... heat is normal for a long period of the unit. For assistance, please visit http://www.panasonic.com/help For best performance Toner cartridge and drum unit L When replacing the toner cartridge or drum unit, do not position the unit near dust or dirt, or in contact with proper ventilation...
...quality - Exposing it is used to direct sunlight. Do not touch or scratch the black drum surface. - Leave the power turned ON for problems that may be caused by a non-Panasonic toner cartridge or drum unit: - When you begin installation of the unit with a soft cloth. Damp basements should... heat is normal for a long period of the unit. For assistance, please visit http://www.panasonic.com/help For best performance Toner cartridge and drum unit L When replacing the toner cartridge or drum unit, do not position the unit near dust or dirt, or in contact with proper ventilation...
Multi Function Printer
Page 4
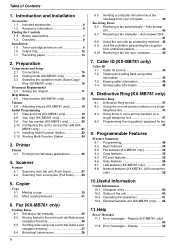
...Receiving Faxes 6.6 Receiving a fax automatically - Caller ID (KX-MB781 only) Caller ID 7.1 Caller ID service 45 7.2 Viewing and calling back using one -touch dial feature and navigator directory 36 6.3 Sending a fax using caller information 45 7.3 Erasing caller information 46 7.4 Storing caller information 46 8. ... TableofContents and Installation Accessories 1.1 Included accessories 6 1.2 Accessory information 6 Finding the Controls 1.3 Button descriptions 7 1.4 Overview 8 Installation 1.5 Toner cartridge and drum unit 9 1.6 Output tray 12 1.7 Recording paper 13 2.
...Receiving Faxes 6.6 Receiving a fax automatically - Caller ID (KX-MB781 only) Caller ID 7.1 Caller ID service 45 7.2 Viewing and calling back using one -touch dial feature and navigator directory 36 6.3 Sending a fax using caller information 45 7.3 Erasing caller information 46 7.4 Storing caller information 46 8. ... TableofContents and Installation Accessories 1.1 Included accessories 6 1.2 Accessory information 6 Finding the Controls 1.3 Button descriptions 7 1.4 Overview 8 Installation 1.5 Toner cartridge and drum unit 9 1.6 Output tray 12 1.7 Recording paper 13 2.

Multi Function Printer
Page 6
... % image area (page 86). Friday 9 am to 9 pm, EST.) 6 For assistance, please visit http://www.panasonic.com/help 1.1 Included accessories 1 Power cord 2 CD-ROM 3 Drum unit 4 Starter toner cartridge*1 5 Quick reference guide 6 Quick installation guide 7 KX-MB781 only Telephone line cord *1 Prints...ONLY) Visit our web site: http://www.panasonic.com/mfpsupplies L For questions regarding online orders: E-mail: [email protected].panasonic.com Telephone: (800) 405-0652 To place an order by telephone Telephone: (800) 332-5368 (Monday - Replacement drum unit*1 L Model No. (Part No.):...
... % image area (page 86). Friday 9 am to 9 pm, EST.) 6 For assistance, please visit http://www.panasonic.com/help 1.1 Included accessories 1 Power cord 2 CD-ROM 3 Drum unit 4 Starter toner cartridge*1 5 Quick reference guide 6 Quick installation guide 7 KX-MB781 only Telephone line cord *1 Prints...ONLY) Visit our web site: http://www.panasonic.com/mfpsupplies L For questions regarding online orders: E-mail: [email protected].panasonic.com Telephone: (800) 405-0652 To place an order by telephone Telephone: (800) 332-5368 (Monday - Replacement drum unit*1 L Model No. (Part No.):...
Multi Function Printer
Page 9
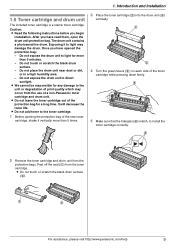
... new toner cartridge, shake it to the unit or degradation of a non-Panasonic toner cartridge and drum unit. L Do not touch or scratch the black drum surface (2). 1 2 For assistance, please visit http://www.panasonic.com/help 9 Exposing it vertically more than 5 times. 3 Place the ...toner cartridge (3) into the drum unit (4) vertically. 3 4 4 Turn the green levers (5) on each side of the toner cartridge ...
... new toner cartridge, shake it to the unit or degradation of a non-Panasonic toner cartridge and drum unit. L Do not touch or scratch the black drum surface (2). 1 2 For assistance, please visit http://www.panasonic.com/help 9 Exposing it vertically more than 5 times. 3 Place the ...toner cartridge (3) into the drum unit (4) vertically. 3 4 4 Turn the green levers (5) on each side of the toner cartridge ...

Multi Function Printer
Page 10
L Make sure that the triangles (l) match, to install the drum and toner unit correctly. j l 10 For assistance, please visit http://www.panasonic.com/help L If the lower glass (j) is dirty, clean it with a soft and dry cloth. 1. Introduction and Installation 6 Lift the top cover release lever (7) and open the top cover (8). 7 Install the drum and toner unit (k) by holding the tabs. 8 9 7 k Note: L Do not touch the transfer roller (9).
L Make sure that the triangles (l) match, to install the drum and toner unit correctly. j l 10 For assistance, please visit http://www.panasonic.com/help L If the lower glass (j) is dirty, clean it with a soft and dry cloth. 1. Introduction and Installation 6 Lift the top cover release lever (7) and open the top cover (8). 7 Install the drum and toner unit (k) by holding the tabs. 8 9 7 k Note: L Do not touch the transfer roller (9).

Multi Function Printer
Page 11
..., replace the toner cartridge and drum unit. TONER LOW TONER EMPTY L To check the drum life and quality, please print the printer test list (page 84) and refer to ON (feature #482 on page 51). For assistance, please visit http://www.panasonic.com/help 11 L To ensure... the inside of the unit (page 80, 83) when replacing the toner cartridge and/or drum unit. The toner cartridge will last approximately 40 % longer. Caution: L To prevent injuries, be disposed of Panasonic toner cartridge (Model No. Introduction and Installation L To maintain print quality and machine life, ...
..., replace the toner cartridge and drum unit. TONER LOW TONER EMPTY L To check the drum life and quality, please print the printer test list (page 84) and refer to ON (feature #482 on page 51). For assistance, please visit http://www.panasonic.com/help 11 L To ensure... the inside of the unit (page 80, 83) when replacing the toner cartridge and/or drum unit. The toner cartridge will last approximately 40 % longer. Caution: L To prevent injuries, be disposed of Panasonic toner cartridge (Model No. Introduction and Installation L To maintain print quality and machine life, ...

Multi Function Printer
Page 64
...recording paper jam. L The drum unit is open. L The rear ...something wrong with the drum unit. If misfeeding occurs frequently, clean the ...drum unit as soon as possible. L When making a copy, the document being stored exceeded the memory capacity of the unit. Display "CALL SERVICE" "CARRIAGE ERROR" "CHANGE DRUM" "CHECK DOCUMENT" "CHECK DRUM..." "CHECK PAPER #1" "CHECK PICK UP INPUT TRAY #2" "CHECK REAR COVER" "DIRECTORY FULL" "DRUM...items (page 37). L The drum life is not inserted completely.....panasonic.com/help Replace the drum unit and the ...
...recording paper jam. L The drum unit is open. L The rear ...something wrong with the drum unit. If misfeeding occurs frequently, clean the ...drum unit as soon as possible. L When making a copy, the document being stored exceeded the memory capacity of the unit. Display "CALL SERVICE" "CARRIAGE ERROR" "CHANGE DRUM" "CHECK DOCUMENT" "CHECK DRUM..." "CHECK PAPER #1" "CHECK PICK UP INPUT TRAY #2" "CHECK REAR COVER" "DIRECTORY FULL" "DRUM...items (page 37). L The drum life is not inserted completely.....panasonic.com/help Replace the drum unit and the ...
Multi Function Printer
Page 65
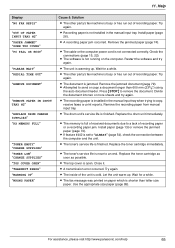
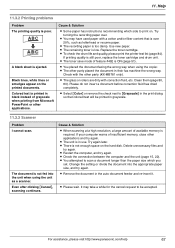
.... Try again. L The fax message was printed on the computer. Use the appropriate size paper (page 85). For assistance, please visit http://www.panasonic.com/help 65 Help Display "NO FAX REPLY" "OUT OF PAPER INPUT TRAY #2" "PAPER JAMMED" "OPEN TOP COVER" "PC FAIL OR BUSY"... "PLEASE WAIT" "REDIAL TIME OUT" "REMOVE DOCUMENT" "REMOVE PAPER IN INPUT TRAY #2" "REPLACE DRUM CHANGE SUPPLIES" "RX MEMORY FULL" "TONER EMPTY" "CHANGE SUPPLIES" "TONER LOW" "CHANGE SUPPLIES" "TOP COVER OPEN" "TRANSMIT ERROR" "WARMING UP" "WRONG PAPER" ...
.... Try again. L The fax message was printed on the computer. Use the appropriate size paper (page 85). For assistance, please visit http://www.panasonic.com/help 65 Help Display "NO FAX REPLY" "OUT OF PAPER INPUT TRAY #2" "PAPER JAMMED" "OPEN TOP COVER" "PC FAIL OR BUSY"... "PLEASE WAIT" "REDIAL TIME OUT" "REMOVE DOCUMENT" "REMOVE PAPER IN INPUT TRAY #2" "REPLACE DRUM CHANGE SUPPLIES" "RX MEMORY FULL" "TONER EMPTY" "CHANGE SUPPLIES" "TONER LOW" "CHANGE SUPPLIES" "TOP COVER OPEN" "TRANSMIT ERROR" "WARMING UP" "WRONG PAPER" ...
Multi Function Printer
Page 67
...clicking [Cancel], scanning continues. If your computer warns of available memory is poor. L There is too damp. For assistance, please visit http://www.panasonic.com/help 67 L The recording paper is not enough space on the hard disk. Clean them (page 80, 83). 11. Try turning the ... L Select [Color] or remove the check next to print on the printed documents. L The unit is still poor, replace the toner cartridge and drum unit. Delete unnecessary files and try again. If printing quality is in use. Black lines, white lines or smudges appear on . L The toner ...
...clicking [Cancel], scanning continues. If your computer warns of available memory is poor. L There is too damp. For assistance, please visit http://www.panasonic.com/help 67 L The recording paper is not enough space on the hard disk. Clean them (page 80, 83). 11. Try turning the ... L Select [Color] or remove the check next to print on the printed documents. L The unit is still poor, replace the toner cartridge and drum unit. Delete unnecessary files and try again. If printing quality is in use. Black lines, white lines or smudges appear on . L The toner ...

Multi Function Printer
Page 75
Note: L Do not touch the transfer roller (5). 75 Lift the top cover release lever (2) and open the paper input tray (1). L Open and close the top cover (4) to clear the error message. 1 2. Pull open the top cover (3). 3 5 2 4 Caution: The fuser unit (4) gets hot. 3. Close the paper input tray. 4 12. Do not touch it. Paper Jams Case 2: When the recording paper has jammed near the drum and toner unit: 1.
Note: L Do not touch the transfer roller (5). 75 Lift the top cover release lever (2) and open the paper input tray (1). L Open and close the top cover (4) to clear the error message. 1 2. Pull open the top cover (3). 3 5 2 4 Caution: The fuser unit (4) gets hot. 3. Close the paper input tray. 4 12. Do not touch it. Paper Jams Case 2: When the recording paper has jammed near the drum and toner unit: 1.
Multi Function Printer
Page 80
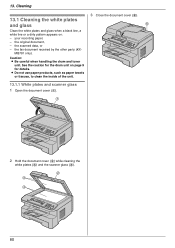
the original document, - MB781 only). Caution: L Be careful when handling the drum and toner unit. L Do not use paper products, such as paper towels or tissues, to clean the inside of the unit. 13.1.1 White plates and ...scanner glass 1 Open the document cover (1). 1 2 Hold the document cover (2) while cleaning the white plates (3) and the scanner glass (4). 2 3 4 80 See the caution for the drum unit on : - the scanned data, or - the fax document received by the other party (KX- 13. Cleaning 1C3leCanleinagning 13.1 Cleaning the white plates and glass...
the original document, - MB781 only). Caution: L Be careful when handling the drum and toner unit. L Do not use paper products, such as paper towels or tissues, to clean the inside of the unit. 13.1.1 White plates and ...scanner glass 1 Open the document cover (1). 1 2 Hold the document cover (2) while cleaning the white plates (3) and the scanner glass (4). 2 3 4 80 See the caution for the drum unit on : - the scanned data, or - the fax document received by the other party (KX- 13. Cleaning 1C3leCanleinagning 13.1 Cleaning the white plates and glass...
Multi Function Printer
Page 81
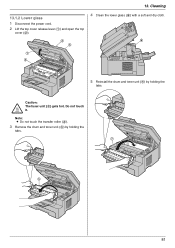
Do not touch it. Caution: The fuser unit (3) gets hot. Note: L Do not touch the transfer roller (4). 3 Remove the drum and toner unit (5) by holding the tabs. 7 5 81 Cleaning 13.1.2 Lower glass 1 Disconnect the power cord. 2 Lift the top cover release lever (1) and open the top cover (2). 2 4 4 Clean the lower glass (6) with a soft and dry cloth. 6 1 3 5 Reinstall the drum and toner unit (7) by holding the tabs. 13.
Do not touch it. Caution: The fuser unit (3) gets hot. Note: L Do not touch the transfer roller (4). 3 Remove the drum and toner unit (5) by holding the tabs. 7 5 81 Cleaning 13.1.2 Lower glass 1 Disconnect the power cord. 2 Lift the top cover release lever (1) and open the top cover (2). 2 4 4 Clean the lower glass (6) with a soft and dry cloth. 6 1 3 5 Reinstall the drum and toner unit (7) by holding the tabs. 13.
Multi Function Printer
Page 82
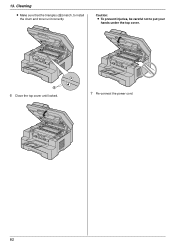
Caution: L To prevent injuries, be careful not to install the drum and toner unit correctly. Cleaning L Make sure that the triangles (8) match, to put your hands under the top cover. 8 6 Close the top cover until locked. 7 Re-connect the power cord. 82 13.
Caution: L To prevent injuries, be careful not to install the drum and toner unit correctly. Cleaning L Make sure that the triangles (8) match, to put your hands under the top cover. 8 6 Close the top cover until locked. 7 Re-connect the power cord. 82 13.
Multi Function Printer
Page 84
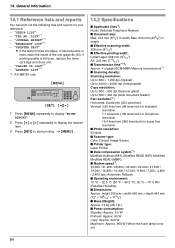
... points or lines, clean the inside of the unit (page 80, 83). "BROADCAST LIST"*1 - If printing quality is still poor, replace the toner cartridge and drum unit. - "CALLER ID LIST"*1 - Automatic Fallback ■ Operating environment: 10 °C - 32.5 °C (50 °F - 90.5 °F), 20 ...(392 lines/inch)-in super fine resolution ■ Photo resolution: 64-level ■ Scanner type: Color Contact Image Sensor ■ Printer type: Laser Printer ■ Data compression system*1: Modified Huffman (MH), Modified READ (MR), Modified Modified READ (MMR) ■ Modem speed*1: 33,600 /...
... points or lines, clean the inside of the unit (page 80, 83). "BROADCAST LIST"*1 - If printing quality is still poor, replace the toner cartridge and drum unit. - "CALLER ID LIST"*1 - Automatic Fallback ■ Operating environment: 10 °C - 32.5 °C (50 °F - 90.5 °F), 20 ...(392 lines/inch)-in super fine resolution ■ Photo resolution: 64-level ■ Scanner type: Color Contact Image Sensor ■ Printer type: Laser Printer ■ Data compression system*1: Modified Huffman (MH), Modified READ (MR), Modified Modified READ (MMR) ■ Modem speed*1: 33,600 /...

Multi Function Printer
Page 86
... Contents / Introduction and Installation Accessories 1.1 Included accessories. 1.2 Accessory information.Finding the Controls 1.3 Description of buttons.1.4 Overview Installation 1.5 Toner cartridge and drum unit 1.6 Document tray 1.7 Output tray1.8 Recording paper2. L If you for purchasing a Panasonic fax machine. FAT92). Table of Contents1. 1. Preparation 2.1 Connections 2.2 Turning the power switch ON Help Button2.3 Help function Volume 2.4 Adjusting...
... Contents / Introduction and Installation Accessories 1.1 Included accessories. 1.2 Accessory information.Finding the Controls 1.3 Description of buttons.1.4 Overview Installation 1.5 Toner cartridge and drum unit 1.6 Document tray 1.7 Output tray1.8 Recording paper2. L If you for purchasing a Panasonic fax machine. FAT92). Table of Contents1. 1. Preparation 2.1 Connections 2.2 Turning the power switch ON Help Button2.3 Help function Volume 2.4 Adjusting...

Multi Function Printer
Page 94
... #145): 49 Error messages: 64 Distinctive Ring service (Feature #430): 47 DNS server #1 (Feature #504): 57 DNS server #2 (Feature #505): 57 Document size: 17 Drum life: 86 Drum unit: 9 E ECM selection (Feature #413): 53 Error messages: 63, 64 Extension telephone: 41 F Fax activation code (Feature #434): 53 Fax features: 52 Fax number...
... #145): 49 Error messages: 64 Distinctive Ring service (Feature #430): 47 DNS server #1 (Feature #504): 57 DNS server #2 (Feature #505): 57 Document size: 17 Drum life: 86 Drum unit: 9 E ECM selection (Feature #413): 53 Error messages: 63, 64 Extension telephone: 41 F Fax activation code (Feature #434): 53 Fax features: 52 Fax number...

Multi Function Printer - Spanish
Page 86
... of Contents 1.1 Included accessories.1.2 Accessory information.Finding the Controls 1.3 Description of buttons. 1.4 Overview Installation 1.5 Toner cartridge and drum unit 1.6 Document tray 1.7 Output tray 1.8 Recording paper 2. Vida del tambor La unidad de tambor es un artí... with 2 or more phone numbers) 5.4 Case 2b: Distinctive Ring (using Multi-Function Station Thank you for purchasing a Panasonic fax machine. Table of Contents / Introduction and Installation Accessories 1.1 Included accessories. 1.2 Accessory information.Finding the Controls 1.3 Description...
... of Contents 1.1 Included accessories.1.2 Accessory information.Finding the Controls 1.3 Description of buttons. 1.4 Overview Installation 1.5 Toner cartridge and drum unit 1.6 Document tray 1.7 Output tray 1.8 Recording paper 2. Vida del tambor La unidad de tambor es un artí... with 2 or more phone numbers) 5.4 Case 2b: Distinctive Ring (using Multi-Function Station Thank you for purchasing a Panasonic fax machine. Table of Contents / Introduction and Installation Accessories 1.1 Included accessories. 1.2 Accessory information.Finding the Controls 1.3 Description...
Quick Reference Guide
Page 6
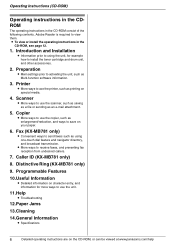
Introduction and Installation L Information prior to using one-touch dial feature and navigator directory, and broadcast transmission. Printer... L Specifications 6 Detailed operating instructions are on the CD-ROM, or can be viewed at www.panasonic.com/help Programmable Features 10.Useful Information L Detailed information on character entry, and information for example how... prior to use the copier, such as using the unit, for more ways to install the toner cartridge and drum unit, and other accessories. 2. Distinctive Ring (KX-MB781 only) 9. Copier L More ways to use the scanner...
Introduction and Installation L Information prior to using one-touch dial feature and navigator directory, and broadcast transmission. Printer... L Specifications 6 Detailed operating instructions are on the CD-ROM, or can be viewed at www.panasonic.com/help Programmable Features 10.Useful Information L Detailed information on character entry, and information for example how... prior to use the copier, such as using the unit, for more ways to install the toner cartridge and drum unit, and other accessories. 2. Distinctive Ring (KX-MB781 only) 9. Copier L More ways to use the scanner...

Quick Reference Guide
Page 8
... in the CD-ROM for connections. To ensure that the unit operates properly, we recommend using the Panasonic toner cartridge and drum unit. *2 KX-MB781 only. credit card type, number, expiration date and your name, shipping address...help Introduction and Preparation 1ADcIncetetrasoisdleoudrcietoiospneraantidngPrinesptaruractioons are on the CD-ROM, or can be viewed at www.panasonic.com/help 1.1 Included accessories 1 Power cord (PFJA1030Z)*1 2 CD-ROM (PFJKMB271Z)*1 3 Drum unit (KX-FAD93)*1 4 Starter toner cartridge*2 5 Quick reference guide (EnglishPFQW2640Z)*1 (SpanishPFQW2641Z...
... in the CD-ROM for connections. To ensure that the unit operates properly, we recommend using the Panasonic toner cartridge and drum unit. *2 KX-MB781 only. credit card type, number, expiration date and your name, shipping address...help Introduction and Preparation 1ADcIncetetrasoisdleoudrcietoiospneraantidngPrinesptaruractioons are on the CD-ROM, or can be viewed at www.panasonic.com/help 1.1 Included accessories 1 Power cord (PFJA1030Z)*1 2 CD-ROM (PFJKMB271Z)*1 3 Drum unit (KX-FAD93)*1 4 Starter toner cartridge*2 5 Quick reference guide (EnglishPFQW2640Z)*1 (SpanishPFQW2641Z...

Quick Reference Guide
Page 15
...again. Display If the unit detects a problem, one or more of the unit. L Recording paper is something wrong with the unit's modem. Replace the drum unit as soon as possible. Display "CALL SERVICE" "CARRIAGE ERROR" "CHANGE DRUM" "CHECK DOCUMENT" "CHECK DRUM" "CHECK PAPER #1" "CHECK PICK UP INPUT... When making a copy, the document being stored exceeded the memory capacity of the following messages will be viewed at www.panasonic.com/help 15 Detailed operating instructions are temporarily stored into sections. Install paper. Press {STOP} to continue copying. L The rear ...
...again. Display If the unit detects a problem, one or more of the unit. L Recording paper is something wrong with the unit's modem. Replace the drum unit as soon as possible. Display "CALL SERVICE" "CARRIAGE ERROR" "CHANGE DRUM" "CHECK DOCUMENT" "CHECK DRUM" "CHECK PAPER #1" "CHECK PICK UP INPUT... When making a copy, the document being stored exceeded the memory capacity of the following messages will be viewed at www.panasonic.com/help 15 Detailed operating instructions are temporarily stored into sections. Install paper. Press {STOP} to continue copying. L The rear ...


