
Operating Manual
Page 1
... before using the handset. Installation Manual Additional Digital Cordless Handset Model No. You must register this installation manual before it for further details. Please read the base unit's operating instructions for future reference. KX-TGMA44 KX-TGMA45 Thank you... for customers in Malaysia PNQX7795ZA PP0316KT0 TGMA44_45(en)_0426_ver021.pdf 1 2016/04/26 10:11:31 This installation manual describes only the steps needed to register and begin using the unit and save it can be used. For assistance, visit our Web site: http://shop.panasonic...
... before using the handset. Installation Manual Additional Digital Cordless Handset Model No. You must register this installation manual before it for further details. Please read the base unit's operating instructions for future reference. KX-TGMA44 KX-TGMA45 Thank you... for customers in Malaysia PNQX7795ZA PP0316KT0 TGMA44_45(en)_0426_ver021.pdf 1 2016/04/26 10:11:31 This installation manual describes only the steps needed to register and begin using the unit and save it can be used. For assistance, visit our Web site: http://shop.panasonic...
Operating Manual
Page 3
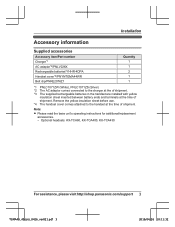
...*4/PNYNTGMA44WR Belt clip/PNKE2076Z1 Quantity 1 1 2 1 1 *1 PNLC1071ZW (White), PNLC1071ZS (Silver) *2 The AC adaptor comes connected to the handset at the time of shipment. Optional headsets: KX-TCA60, KX-TCA400, KX-TCA430 For assistance, please visit http://shop.panasonic.com/support 3 TGMA44_45(en)_0426_ver021.pdf 3 2016/04/26 10:11:32 Remove the yellow insulation sheet before...
...*4/PNYNTGMA44WR Belt clip/PNKE2076Z1 Quantity 1 1 2 1 1 *1 PNLC1071ZW (White), PNLC1071ZS (Silver) *2 The AC adaptor comes connected to the handset at the time of shipment. Optional headsets: KX-TCA60, KX-TCA400, KX-TCA430 For assistance, please visit http://shop.panasonic.com/support 3 TGMA44_45(en)_0426_ver021.pdf 3 2016/04/26 10:11:32 Remove the yellow insulation sheet before...
Operating Manual
Page 7
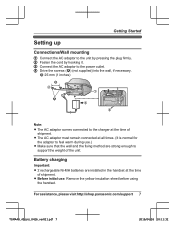
... The AC adaptor must remain connected at the time of shipment. Fasten the cord by pressing the plug firmly. For assistance, please visit http://shop.panasonic.com/support 7 TGMA44_45(en)_0426_ver021.pdf 7 2016/04/26 10:11:32 Connect the AC adaptor to the unit by hooking it. Drive the screws...the adaptor to support the weight of shipment. R Before initial use .) R Make sure that the wall and the fixing method are installed in the handset at the time of the unit. Battery charging Important: R 2 rechargeable Ni-MH batteries are strong enough to feel warm during use : Remove the ...
... The AC adaptor must remain connected at the time of shipment. Fasten the cord by pressing the plug firmly. For assistance, please visit http://shop.panasonic.com/support 7 TGMA44_45(en)_0426_ver021.pdf 7 2016/04/26 10:11:32 Connect the AC adaptor to the unit by hooking it. Drive the screws...the adaptor to support the weight of shipment. R Before initial use .) R Make sure that the wall and the fixing method are installed in the handset at the time of the unit. Battery charging Important: R 2 rechargeable Ni-MH batteries are strong enough to feel warm during use : Remove the ...

Operating Manual
Page 8
... charge again. Note: R Actual battery performance depends on and booster is on usage and ambient environment. 8 For assistance, please visit http://shop.panasonic.com/support TGMA44_45(en)_0426_ver021.pdf 8 2016/04/26 10:11:32 Getting Started Charge for about 7 hours. Empty... Panasonic Ni-MH battery performance Operation In continuous use Not in use (standby) Operating time 13 hours max.*1 9 days max.*1 *1 If eco mode is off. Handset battery level Icon Battery level High Medium Low Needs charging.
... charge again. Note: R Actual battery performance depends on and booster is on usage and ambient environment. 8 For assistance, please visit http://shop.panasonic.com/support TGMA44_45(en)_0426_ver021.pdf 8 2016/04/26 10:11:32 Getting Started Charge for about 7 hours. Empty... Panasonic Ni-MH battery performance Operation In continuous use Not in use (standby) Operating time 13 hours max.*1 9 days max.*1 *1 If eco mode is off. Handset battery level Icon Battery level High Medium Low Needs charging.
Operating Manual
Page 10
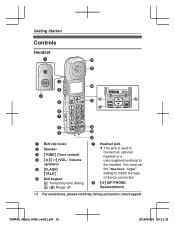
Getting Started Controls Handset A J K C L D B E MA A B F G H N I O P A Belt clip holes B Speaker C MTONEN (Tone control) D MjN/MkN (VOL.: Volume up/down) E MFLASHN MTALKN F Dial keypad *: Temporary tone dialing 0: ( ) Ringer off G Headset jack R This jack is used to connect an optional headset or a user-supplied neckloop to match the type of device connected. H MZN (SP-PHONE: Speakerphone) 10 For assistance, please visit http://shop.panasonic.com/support TGMA44_45(en)_0426_ver021.pdf 10 2016/04/26 10:11:32 You must set the "Headset type" setting to the handset.
Getting Started Controls Handset A J K C L D B E MA A B F G H N I O P A Belt clip holes B Speaker C MTONEN (Tone control) D MjN/MkN (VOL.: Volume up/down) E MFLASHN MTALKN F Dial keypad *: Temporary tone dialing 0: ( ) Ringer off G Headset jack R This jack is used to connect an optional headset or a user-supplied neckloop to match the type of device connected. H MZN (SP-PHONE: Speakerphone) 10 For assistance, please visit http://shop.panasonic.com/support TGMA44_45(en)_0426_ver021.pdf 10 2016/04/26 10:11:32 You must set the "Headset type" setting to the handset.

Operating Manual
Page 11
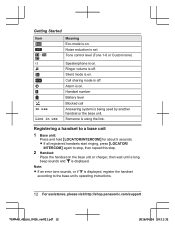
...indicator O MBOOSTN BOOST indicator R Light off: Volume booster is on. VOL. (Volume: MDN or MCN): Adjust the receiver or speaker volume while talking. - Display icons Handset display items Item Meaning Within base unit range Out of base unit range Sound enhancer is turned off. R When flashing rapidly: An incoming call is...it on . Speech booster is turned on hold. Light in use. MCN CID (Caller ID): View the caller list. For assistance, please visit http://shop.panasonic.com/support 11 TGMA44_45(en)_0426_ver021.pdf 11 2016/04/26 10:11:32 MFN W: View the phonebook entry. -
...indicator O MBOOSTN BOOST indicator R Light off: Volume booster is on. VOL. (Volume: MDN or MCN): Adjust the receiver or speaker volume while talking. - Display icons Handset display items Item Meaning Within base unit range Out of base unit range Sound enhancer is turned off. R When flashing rapidly: An incoming call is...it on . Speech booster is turned on hold. Light in use. MCN CID (Caller ID): View the caller list. For assistance, please visit http://shop.panasonic.com/support 11 TGMA44_45(en)_0426_ver021.pdf 11 2016/04/26 10:11:32 MFN W: View the phonebook entry. -
Operating Manual
Page 12
... off . Getting Started Item - Registering a handset to the base unit's operating instructions. 12 For assistance, please visit http://shop.panasonic.com/support TGMA44_45(en)_0426_ver021.pdf 12 2016/04/26 10:11:32 R If all registered handsets start ringing, press MLOCATOR/ INTERCOMN again to ...stop, then repeat this step. 2 Handset: Place the handset on . Note: R If an error ...
... off . Getting Started Item - Registering a handset to the base unit's operating instructions. 12 For assistance, please visit http://shop.panasonic.com/support TGMA44_45(en)_0426_ver021.pdf 12 2016/04/26 10:11:32 R If all registered handsets start ringing, press MLOCATOR/ INTERCOMN again to ...stop, then repeat this step. 2 Handset: Place the handset on . Note: R If an error ...

Operating Manual
Page 14
... as well, ensuring that is easier to hear and understand. Speakerphone: "Tone 1-4" - R The selected setting is heard loud and clear. http://shop.panasonic.com/amplified Tone control This feature clarifies the voice of the "Custom tone" settings, follow the instructions in "Using the MMENUN key", page 15. 14... a tone control setting while talking on the side repeatedly to , producing a more natural-sounding voice that every call is shown on the handset display while talking. Handset: - Headset: "Tone 1-4" and "Custom tone 1-20" Handset You can be set for a few seconds.
... as well, ensuring that is easier to hear and understand. Speakerphone: "Tone 1-4" - R The selected setting is heard loud and clear. http://shop.panasonic.com/amplified Tone control This feature clarifies the voice of the "Custom tone" settings, follow the instructions in "Using the MMENUN key", page 15. 14... a tone control setting while talking on the side repeatedly to , producing a more natural-sounding voice that every call is shown on the handset display while talking. Handset: - Headset: "Tone 1-4" and "Custom tone 1-20" Handset You can be set for a few seconds.
Operating Manual
Page 15
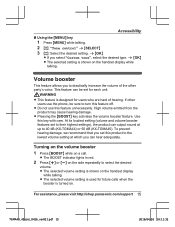
.... WARNING R This feature is shown on the handset display while talking. R The BOOST indicator lights in red. 2 Press MjN or MkN on the handset display while talking. Volume booster This feature allows ... on the volume booster 1 Press MBOOSTN while on . For assistance, please visit http://shop.panasonic.com/support 15 TGMA44_45(en)_0426_ver021.pdf 15 2016/04/26 10:11:32 R Do not...you set for future calls when the booster is shown on the side repeatedly to 40 dB (KX-TGMA44) or 50 dB (KX-TGMA45). Accessibility n Using the MMENUN key 1 Press MMENUN while talking. 2 MbN: "Tone ...
.... WARNING R This feature is shown on the handset display while talking. R The BOOST indicator lights in red. 2 Press MjN or MkN on the handset display while talking. Volume booster This feature allows ... on the volume booster 1 Press MBOOSTN while on . For assistance, please visit http://shop.panasonic.com/support 15 TGMA44_45(en)_0426_ver021.pdf 15 2016/04/26 10:11:32 R Do not...you set for future calls when the booster is shown on the side repeatedly to 40 dB (KX-TGMA44) or 50 dB (KX-TGMA45). Accessibility n Using the MMENUN key 1 Press MMENUN while talking. 2 MbN: "Tone ...

Operating Manual
Page 16
... volume booster turns on automatically when you can temporarily turn off by pressing MBOOSTN, and adjust the volume by pressing MjN or MkN on the handset display. Adjusting the volume While on auto boost If the auto boost feature is not shown if the noise reduction feature was turned off . 16... For assistance, please visit http://shop.panasonic.com/support TGMA44_45(en)_0426_ver021.pdf 16 2016/04/26 10:11:32 R The selected volume setting is applied immediately and is also used mainly...
... volume booster turns on automatically when you can temporarily turn off by pressing MBOOSTN, and adjust the volume by pressing MjN or MkN on the handset display. Adjusting the volume While on auto boost If the auto boost feature is not shown if the noise reduction feature was turned off . 16... For assistance, please visit http://shop.panasonic.com/support TGMA44_45(en)_0426_ver021.pdf 16 2016/04/26 10:11:32 R The selected volume setting is applied immediately and is also used mainly...

Operating Manual
Page 17
...too loud. WARNING R The speech booster feature can be heard by the other party. 1 Press MMENUN while on KX-TGMA44 Default Receiver: 12-40 15 Speakerphone: 18-30 21 Headset: 12-40 15 KX-TGMA45 Default Receiver: 12-50 15 Speakerphone: 18-40 21 Headset: 12-50 15 Speech booster (making your ...used unnecessarily, your voice may be used to increase the volume of your voice is too quiet to be set for each handset. For assistance, please visit http://shop.panasonic.com/support 17 TGMA44_45(en)_0426_ver021.pdf 17 2016/04/26 10:11:32 If this feature only if your voice heard...
...too loud. WARNING R The speech booster feature can be heard by the other party. 1 Press MMENUN while on KX-TGMA44 Default Receiver: 12-40 15 Speakerphone: 18-30 21 Headset: 12-40 15 KX-TGMA45 Default Receiver: 12-50 15 Speakerphone: 18-40 21 Headset: 12-50 15 Speech booster (making your ...used unnecessarily, your voice may be used to increase the volume of your voice is too quiet to be set for each handset. For assistance, please visit http://shop.panasonic.com/support 17 TGMA44_45(en)_0426_ver021.pdf 17 2016/04/26 10:11:32 If this feature only if your voice heard...

Operating Manual
Page 18
... is applied immediately and is "Low". This feature can be set for each type of the tones that sound when you press keys on the handset, or to change the volume of status. - Outside call or intercom call is sounding. "New VM" (default: On) - "Missed call " (default: On... status, as explained below. There are new messages. - Indicator Status Flashing rapidly - "Incoming call " (default: Off) 18 For assistance, please visit http://shop.panasonic.com/support TGMA44_45(en)_0426_ver021.pdf 18 2016/04/26 10:11:32 Accessibility 2 MbN: "Boost speech on" or "Boost speech off .
... is applied immediately and is "Low". This feature can be set for each type of the tones that sound when you press keys on the handset, or to change the volume of status. - Outside call or intercom call is sounding. "New VM" (default: On) - "Missed call " (default: On... status, as explained below. There are new messages. - Indicator Status Flashing rapidly - "Incoming call " (default: Off) 18 For assistance, please visit http://shop.panasonic.com/support TGMA44_45(en)_0426_ver021.pdf 18 2016/04/26 10:11:32 Accessibility 2 MbN: "Boost speech on" or "Boost speech off .

Operating Manual
Page 19
..., select it and press MSELECTN again. Accessibility - Important: R You must set for details. 2 Hold the handset near your hearing aid's operating instructions for each unit. 1 For handset: MMENUN#278 2 MbN: Select the desired setting and press MSELECTN. " " disappears. 3 MSAVEN a MOFFN ...Using assistive listening devices If you use a neckloop When using the neckloop's microphone or the handset's microphone depending on the side of the handset. For assistance, please visit http://shop.panasonic.com/support 19 TGMA44_45(en)_0426_ver021.pdf 19 2016/04/26 10:11:32 R " " is...
..., select it and press MSELECTN again. Accessibility - Important: R You must set for details. 2 Hold the handset near your hearing aid's operating instructions for each unit. 1 For handset: MMENUN#278 2 MbN: Select the desired setting and press MSELECTN. " " disappears. 3 MSAVEN a MOFFN ...Using assistive listening devices If you use a neckloop When using the neckloop's microphone or the handset's microphone depending on the side of the handset. For assistance, please visit http://shop.panasonic.com/support 19 TGMA44_45(en)_0426_ver021.pdf 19 2016/04/26 10:11:32 R " " is...

Operating Manual
Page 20
... entries can assign a phone number to each unit. While the ringer is used by pressing and holding 0 until the handset beeps to 9) on again by any handset. 20 For assistance, please visit http://shop.panasonic.com/support TGMA44_45(en)_0426_ver021.pdf 20 2016/04/26 10:11:32 "Neckloop with Mic": Disables the...
... entries can assign a phone number to each unit. While the ringer is used by pressing and holding 0 until the handset beeps to 9) on again by any handset. 20 For assistance, please visit http://shop.panasonic.com/support TGMA44_45(en)_0426_ver021.pdf 20 2016/04/26 10:11:32 "Neckloop with Mic": Disables the...
Operating Manual
Page 21
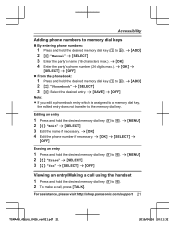
... phone numbers to memory dial keys n By entering phone numbers: 1 Press and hold the desired memory dial key (1 to 9). 2 To make a call using the handset 1 Press and hold the desired memory dial key (1 to 9). a MSAVEN a MOFFN Note: R If you edit a phonebook entry which is assigned to a memory dial... transfer to 9). Editing an entry 1 Press and hold the desired memory dial key (1 to the memory dial key. For assistance, please visit http://shop.panasonic.com/support 21 TGMA44_45(en)_0426_ver021.pdf 21 2016/04/26 10:11:32 a MOKN a MSELECTN a MOFFN n From the phonebook: 1 Press and hold...
... phone numbers to memory dial keys n By entering phone numbers: 1 Press and hold the desired memory dial key (1 to 9). 2 To make a call using the handset 1 Press and hold the desired memory dial key (1 to 9). a MSAVEN a MOFFN Note: R If you edit a phonebook entry which is assigned to a memory dial... transfer to 9). Editing an entry 1 Press and hold the desired memory dial key (1 to the memory dial key. For assistance, please visit http://shop.panasonic.com/support 21 TGMA44_45(en)_0426_ver021.pdf 21 2016/04/26 10:11:32 a MOKN a MSELECTN a MOFFN n From the phonebook: 1 Press and hold...

Operating Manual
Page 23
..., may not ensure compliance with T-Coil equipped hearing aids and cochlear implants. T TIA-1083 For assistance, please visit http://shop.panasonic.com/support 23 TGMA44_45(en)_0426_ver021.pdf 23 2016/04/26 10:11:33 If this logo have reduced noise and interference when ... Exposure Warning: R This product complies with a non-metallic accessory. Compliance with TIA-1083 standard Compatible with Hearing Aid T-Coil Telephone handsets identified with this equipment does cause harmful interference to radio or television reception, which the receiver is encouraged to try to which can ...
..., may not ensure compliance with T-Coil equipped hearing aids and cochlear implants. T TIA-1083 For assistance, please visit http://shop.panasonic.com/support 23 TGMA44_45(en)_0426_ver021.pdf 23 2016/04/26 10:11:33 If this logo have reduced noise and interference when ... Exposure Warning: R This product complies with a non-metallic accessory. Compliance with TIA-1083 standard Compatible with Hearing Aid T-Coil Telephone handsets identified with this equipment does cause harmful interference to radio or television reception, which the receiver is encouraged to try to which can ...

Installation Manual CA
Page 1
...it for purchasing a Panasonic product. Please read the base unit's operating instructions for further details. This installation manual describes only the steps needed to register and begin using the unit and save it can be used. Please read this handset with your base ...unit before using the handset. Installation Manual Additional Digital Cordless Handset Model No. For assistance, please visit our Support page: www.panasonic.ca/english/support Printed in Malaysia PNQX8213ZA TT0616KT0 TGMA44C(en)...
...it for purchasing a Panasonic product. Please read the base unit's operating instructions for further details. This installation manual describes only the steps needed to register and begin using the unit and save it can be used. Please read this handset with your base ...unit before using the handset. Installation Manual Additional Digital Cordless Handset Model No. For assistance, please visit our Support page: www.panasonic.ca/english/support Printed in Malaysia PNQX8213ZA TT0616KT0 TGMA44C(en)...

Installation Manual CA
Page 3
Optional headsets: KX-TCA400, KX-TCA430 For assistance, visit www.panasonic.ca/english/support 3 TGMA44C(en)_0610_ver021.pdf 3 2016/06/13 10:56:20 Remove the yellow insulation sheet before use. *4 The handset cover comes attached to the charger at the of shipment. *2 Please read the base unit's operating instructions for replacement battery information. *3 The...
Optional headsets: KX-TCA400, KX-TCA430 For assistance, visit www.panasonic.ca/english/support 3 TGMA44C(en)_0610_ver021.pdf 3 2016/06/13 10:56:20 Remove the yellow insulation sheet before use. *4 The handset cover comes attached to the charger at the of shipment. *2 Please read the base unit's operating instructions for replacement battery information. *3 The...

Installation Manual CA
Page 6
.... R Do not use the telephone to the instructions. To protect your private/confidential information. Compliance with TIA-1083 standard Compatible with Hearing Aid T-Coil Telephone handsets identified with this logo have reduced noise and interference when used batteries according to report a gas leak in this manual. T TIA-1083 6 For assistance, visit...
.... R Do not use the telephone to the instructions. To protect your private/confidential information. Compliance with TIA-1083 standard Compatible with Hearing Aid T-Coil Telephone handsets identified with this logo have reduced noise and interference when used batteries according to report a gas leak in this manual. T TIA-1083 6 For assistance, visit...

Installation Manual CA
Page 7
... charger at all times. (It is normal for the adaptor to feel warm during use : Remove the yellow insulation sheet before using the handset. For assistance, visit www.panasonic.ca/english/support 7 TGMA44C(en)_0610_ver021.pdf 7 2016/06/13 10:56:20 Getting Started Setting up Connections/Wall mounting Connect the AC...
... charger at all times. (It is normal for the adaptor to feel warm during use : Remove the yellow insulation sheet before using the handset. For assistance, visit www.panasonic.ca/english/support 7 TGMA44C(en)_0610_ver021.pdf 7 2016/06/13 10:56:20 Getting Started Setting up Connections/Wall mounting Connect the AC...


