
Optional Handset
Page 1
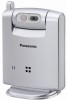
... using the unit and save for future reference. Operating Instructions 5.8 GHz Expandable Digital Cordless Camera Model No. or Puerto Rico. Please read these Operating Instructions before it can be used. KX-TGA573 Indoor Use Only This cordless camera is an accessory unit for customers in the U.S.A. You must register this cordless camera with Panasonic base units KX-TG5761/KX-TG5766/KX-TG5767/KX-TG5771/KXTG5776/KX-TG5777.
... using the unit and save for future reference. Operating Instructions 5.8 GHz Expandable Digital Cordless Camera Model No. or Puerto Rico. Please read these Operating Instructions before it can be used. KX-TGA573 Indoor Use Only This cordless camera is an accessory unit for customers in the U.S.A. You must register this cordless camera with Panasonic base units KX-TG5761/KX-TG5766/KX-TG5767/KX-TG5771/KXTG5776/KX-TG5777.

Optional Handset
Page 2
Table of Contents Introduction Introduction 3 Accessory information 4 Important safety instructions 5 For best performance 6 Preparation Controls 7 Setting up the cordless camera 8 Symbols used in these operating instructions 11 Registering the cordless camera . . . . . 12 Camera Monitoring Camera monitoring using a handset . . 13 Useful Information Wall mounting 17 Troubleshooting 20 FCC and other information 22 Specifications 23 Customer services 24 Warranty 25 Index Index 27 2 For assistance, please visit http://www.panasonic.com/phonehelp
Table of Contents Introduction Introduction 3 Accessory information 4 Important safety instructions 5 For best performance 6 Preparation Controls 7 Setting up the cordless camera 8 Symbols used in these operating instructions 11 Registering the cordless camera . . . . . 12 Camera Monitoring Camera monitoring using a handset . . 13 Useful Information Wall mounting 17 Troubleshooting 20 FCC and other information 22 Specifications 23 Customer services 24 Warranty 25 Index Index 27 2 For assistance, please visit http://www.panasonic.com/phonehelp

Optional Handset
Page 3
... http://www.panasonic.com or call button (page 15). Serial No. (found on page 4. Feature highlight Camera monitoring using the call phone number noted on the bottom of the unit) Name and address of dealer Date of the following information for purchasing the Panasonic 5.8 GHz expandable digital cordless camera. Introduction Introduction Thank you access the cordless camera using the handset...
... http://www.panasonic.com or call button (page 15). Serial No. (found on page 4. Feature highlight Camera monitoring using the call phone number noted on the bottom of the unit) Name and address of dealer Date of the following information for purchasing the Panasonic 5.8 GHz expandable digital cordless camera. Introduction Introduction Thank you access the cordless camera using the handset...

Optional Handset
Page 4
Introduction Accessory information Included accessories No. L TTY users (hearing or speech impaired users) can call 1-800-332-5368. Accessory item 1 AC adaptor for cordless camera 2 Wall-mounting adaptor for cordless camera 3 Call button for cordless camera 1 2 Order number PQLV235Z PQLP10267Z PQLP10270Z 3 Quantity 1 1 1 Sales and support information L To order these accessories, call 1-866-605-1277. 4 For assistance, please visit http://www.panasonic.com/phonehelp
Introduction Accessory information Included accessories No. L TTY users (hearing or speech impaired users) can call 1-800-332-5368. Accessory item 1 AC adaptor for cordless camera 2 Wall-mounting adaptor for cordless camera 3 Call button for cordless camera 1 2 Order number PQLV235Z PQLP10267Z PQLP10270Z 3 Quantity 1 1 1 Sales and support information L To order these accessories, call 1-866-605-1277. 4 For assistance, please visit http://www.panasonic.com/phonehelp
Optional Handset
Page 6
... cause temperature change due to privacy. 6 For assistance, please visit http://www.panasonic.com/phonehelp L Use the cordless camera in the following places: - near 5.8 GHz electrical appliances may damage the camera lens. in rooms where the temperature is intended for using the cordless camera L The cordless camera is less than 5 °C (41 °F) or greater than 40 °C (104...
... cause temperature change due to privacy. 6 For assistance, please visit http://www.panasonic.com/phonehelp L Use the cordless camera in the following places: - near 5.8 GHz electrical appliances may damage the camera lens. in rooms where the temperature is intended for using the cordless camera L The cordless camera is less than 5 °C (41 °F) or greater than 40 °C (104...
Optional Handset
Page 7
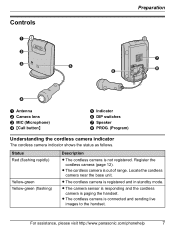
...) Description L The cordless camera is paging the handset. L The cordless camera is out of range. For assistance, please visit http://www.panasonic.com/phonehelp 7 Controls A B C E Preparation G F H D A Antenna B Camera lens C MIC (Microphone) D {Call button} E Indicator F DIP switches G Speaker H PROG. (Program) Understanding the cordless camera indicator The cordless camera indicator shows the status as follows. Register the cordless camera (page 12). L The cordless camera is connected...
...) Description L The cordless camera is paging the handset. L The cordless camera is out of range. For assistance, please visit http://www.panasonic.com/phonehelp 7 Controls A B C E Preparation G F H D A Antenna B Camera lens C MIC (Microphone) D {Call button} E Indicator F DIP switches G Speaker H PROG. (Program) Understanding the cordless camera indicator The cordless camera indicator shows the status as follows. Register the cordless camera (page 12). L The cordless camera is connected...

Optional Handset
Page 8
... AC adaptor must remain connected at all times. (It is connected, the indicator lights in red then starts flashing. L Use only the included Panasonic AC adaptor PQLV235. Preparation Setting up the cordless camera Connecting the AC adaptor and the call button cord until it to become disconnected. 8 For assistance, please visit http://www...
... AC adaptor must remain connected at all times. (It is connected, the indicator lights in red then starts flashing. L Use only the included Panasonic AC adaptor PQLV235. Preparation Setting up the cordless camera Connecting the AC adaptor and the call button cord until it to become disconnected. 8 For assistance, please visit http://www...
Optional Handset
Page 9
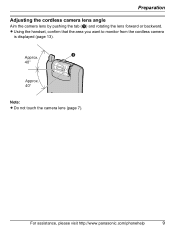
A 40° Approx. 40° Note: L Do not touch the camera lens (page 7). For assistance, please visit http://www.panasonic.com/phonehelp 9 L Using the handset, confirm that the area you want to monitor from the cordless camera is displayed (page 13). Approx. Preparation Adjusting the cordless camera lens angle Aim the camera lens by pushing the tab (A) and rotating the lens forward or backward.
A 40° Approx. 40° Note: L Do not touch the camera lens (page 7). For assistance, please visit http://www.panasonic.com/phonehelp 9 L Using the handset, confirm that the area you want to monitor from the cordless camera is displayed (page 13). Approx. Preparation Adjusting the cordless camera lens angle Aim the camera lens by pushing the tab (A) and rotating the lens forward or backward.

Optional Handset
Page 10
... OFF*1 Standard Upside down . This feature is reset to improve the image clarity, leave at ON (Standard quality mode). Selecting the cordless camera speaker volume (DIP switch 3) If you want to lower the speaker volume, set to OFF (Enhanced motion mode). Selecting image quality (...enhanced motion, set to OFF (LOW). 10 For assistance, please visit http://www.panasonic.com/phonehelp The image clarity decreases. Displaying the image upside down (DIP switch 1) To turn the camera image upside down (page 18). Preparation Setting the DIP switches DIP switches (Default position...
... OFF*1 Standard Upside down . This feature is reset to improve the image clarity, leave at ON (Standard quality mode). Selecting the cordless camera speaker volume (DIP switch 3) If you want to lower the speaker volume, set to OFF (Enhanced motion mode). Selecting image quality (...enhanced motion, set to OFF (LOW). 10 For assistance, please visit http://www.panasonic.com/phonehelp The image clarity decreases. Displaying the image upside down (DIP switch 1) To turn the camera image upside down (page 18). Preparation Setting the DIP switches DIP switches (Default position...
Optional Handset
Page 11
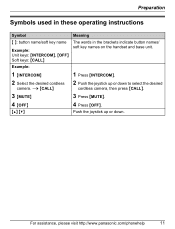
...panasonic.com/phonehelp 11 Preparation Symbols used in these operating instructions Symbol Meaning { }: button name/soft key name Example: Unit keys: {INTERCOM}, {OFF} Soft keys: {CALL} The words in the brackets indicate button names/ soft key names on the handset and base unit. Example: 1 {INTERCOM} 1 Press {INTERCOM}. 2 Select the desired cordless camera.... i {CALL} 2 Push the joystick up or down to select the desired cordless camera, then press {CALL}. 3 {MUTE} 3 Press {MUTE}. 4 {OFF}...
...panasonic.com/phonehelp 11 Preparation Symbols used in these operating instructions Symbol Meaning { }: button name/soft key name Example: Unit keys: {INTERCOM}, {OFF} Soft keys: {CALL} The words in the brackets indicate button names/ soft key names on the handset and base unit. Example: 1 {INTERCOM} 1 Press {INTERCOM}. 2 Select the desired cordless camera.... i {CALL} 2 Push the joystick up or down to select the desired cordless camera, then press {CALL}. 3 {MUTE} 3 Press {MUTE}. 4 {OFF}...

Optional Handset
Page 12
... cordless camera's extension number from the handset (color display models only: KX-TGA571). L After the IN USE indicator starts flashing, the rest of the procedure must be completed within 90 seconds. 2 Cordless camera: Press PROG. (program) on the camera remains the same. 12 For assistance, please visit http://www.panasonic.com/phonehelp Preparation Registering the cordless camera Register the cordless camera...
... cordless camera's extension number from the handset (color display models only: KX-TGA571). L After the IN USE indicator starts flashing, the rest of the procedure must be completed within 90 seconds. 2 Cordless camera: Press PROG. (program) on the camera remains the same. 12 For assistance, please visit http://www.panasonic.com/phonehelp Preparation Registering the cordless camera Register the cordless camera...
Optional Handset
Page 13
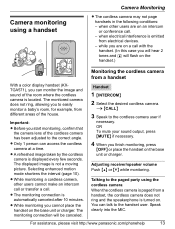
...press {OFF} or place the handset on an intercom or conference call. - Handset 1 {INTERCOM} 2 Select the desired cordless camera. You can access the cordless camera at a time. when other users cannot make an intercom call or transfer a call with the handset. (In this case ...if necessary. 4 When you cannot place the handset on . For assistance, please visit http://www.panasonic.com/phonehelp 13 Camera monitoring using the cordless camera When the cordless camera is located. The displayed image is automatically canceled after 10 minutes. Selecting enhanced motion mode shortens the...
...press {OFF} or place the handset on an intercom or conference call. - Handset 1 {INTERCOM} 2 Select the desired cordless camera. You can access the cordless camera at a time. when other users cannot make an intercom call or transfer a call with the handset. (In this case ...if necessary. 4 When you cannot place the handset on . For assistance, please visit http://www.panasonic.com/phonehelp 13 Camera monitoring using the cordless camera When the cordless camera is located. The displayed image is automatically canceled after 10 minutes. Selecting enhanced motion mode shortens the...

Optional Handset
Page 14
Important: L Only registered color display handsets (KX-TGA571) can page color display handsets (KX-TGA571) when it detects sound or by pressing its {Call button} is located. 3 Handset: To mute your sound output, press {...assistance, please visit http://www.panasonic.com/phonehelp Paging using the cordless camera audio sensor Important: L You can monitor the room where the cordless camera is pressed.) Paging the handsets from the cordless camera. Then the answering handset user can monitor live images from the cordless camera The cordless camera can be paged from the handset...
Important: L Only registered color display handsets (KX-TGA571) can page color display handsets (KX-TGA571) when it detects sound or by pressing its {Call button} is located. 3 Handset: To mute your sound output, press {...assistance, please visit http://www.panasonic.com/phonehelp Paging using the cordless camera audio sensor Important: L You can monitor the room where the cordless camera is pressed.) Paging the handsets from the cordless camera. Then the answering handset user can monitor live images from the cordless camera The cordless camera can be paged from the handset...

Optional Handset
Page 15
... 2 Press {OPTION} repeatedly until {BRIGHT} is located. 3 Cordless camera: When the handset user answers, speak clearly into the MIC. 4 Handset: When you can monitor the room where the cordless camera is displayed. 3 Press {BRIGHT} repeatedly to adjust the brightness. ...{BRIGHT}, {ZOOM}, and {SENSOR}. L You can set the camera settings while monitoring. Camera Monitoring Paging using the cordless camera call button 1 Cordless camera: Press {Call button}. For assistance, please visit http://www.panasonic.com/phonehelp 15 Adjusting the display brightness There are 6 levels....
... 2 Press {OPTION} repeatedly until {BRIGHT} is located. 3 Cordless camera: When the handset user answers, speak clearly into the MIC. 4 Handset: When you can monitor the room where the cordless camera is displayed. 3 Press {BRIGHT} repeatedly to adjust the brightness. ...{BRIGHT}, {ZOOM}, and {SENSOR}. L You can set the camera settings while monitoring. Camera Monitoring Paging using the cordless camera call button 1 Cordless camera: Press {Call button}. For assistance, please visit http://www.panasonic.com/phonehelp 15 Adjusting the display brightness There are 6 levels....

Optional Handset
Page 16
... {^}. To use the audio detection feature of the camera from the handset beforehand. 16 For assistance, please visit http://www.panasonic.com/phonehelp Once the sensor has detected sound, the cordless camera pages the handset. Camera Monitoring Setting the audio detection sensitivity The cordless camera features a sensor that the cordless camera is displayed. 3 {SENSOR} 4 To turn this feature off...
... {^}. To use the audio detection feature of the camera from the handset beforehand. 16 For assistance, please visit http://www.panasonic.com/phonehelp Once the sensor has detected sound, the cordless camera pages the handset. Camera Monitoring Setting the audio detection sensitivity The cordless camera features a sensor that the cordless camera is displayed. 3 {SENSOR} 4 To turn this feature off...

Optional Handset
Page 17
... as the weight of the wall-mounting adaptor by the standard mounting or upside down , break or cause injury. L Do not mount the cordless camera on the side of the adaptor may fall down mounting. B Tuck the call button wire to a vertically oriented or floor-mounted AC outlet.... For assistance, please visit http://www.panasonic.com/phonehelp 17 C Turning it slightly and sliding it clicks into the hole on the following places: plaster board, ALC (autoclaved lightweight cellular ...
... as the weight of the wall-mounting adaptor by the standard mounting or upside down , break or cause injury. L Do not mount the cordless camera on the side of the adaptor may fall down mounting. B Tuck the call button wire to a vertically oriented or floor-mounted AC outlet.... For assistance, please visit http://www.panasonic.com/phonehelp 17 C Turning it slightly and sliding it clicks into the hole on the following places: plaster board, ALC (autoclaved lightweight cellular ...

Optional Handset
Page 18
...of 1.8 m (5.9 feet) or below using the wall mount template as a guide (page 19). 2 Mount the cordless camera (A), then slide it down (B) and to the left (C) until it is secure. L To aim the camera lens, see page 9. 50.8 mm (2 inches) A B C Screws (120 V AC, 60 Hz) Upside ...secure. 50.8 mm (2 inches) A B C Screws (120 V AC, 60 Hz) 18 For assistance, please visit http://www.panasonic.com/phonehelp To compensate for this, change the cordless camera setting to display images upside down (page 10). 1 Drive the screws (not included) into the wall at a recommended height of ...
...of 1.8 m (5.9 feet) or below using the wall mount template as a guide (page 19). 2 Mount the cordless camera (A), then slide it down (B) and to the left (C) until it is secure. L To aim the camera lens, see page 9. 50.8 mm (2 inches) A B C Screws (120 V AC, 60 Hz) Upside ...secure. 50.8 mm (2 inches) A B C Screws (120 V AC, 60 Hz) 18 For assistance, please visit http://www.panasonic.com/phonehelp To compensate for this, change the cordless camera setting to display images upside down (page 10). 1 Drive the screws (not included) into the wall at a recommended height of ...

Optional Handset
Page 19
Max. 9.3 mm (23/64 inch) Max. 4.5 mm (11/64 inch) Space Removing the wall-mounting adaptor Press and hold the hold button (A) on the left side of the wall-mounting plate. L Drive the mounting screws leaving enough length from the wall to the right (B). A B Wall mount template for wall mounting L Use the recommended screw size below. Slide the cordless camera to hook the cordless camera. Useful Information About the screws for the cordless camera 50.8 mm (2 inches) For assistance, please visit http://www.panasonic.com/phonehelp 19
Max. 9.3 mm (23/64 inch) Max. 4.5 mm (11/64 inch) Space Removing the wall-mounting adaptor Press and hold the hold button (A) on the left side of the wall-mounting plate. L Drive the mounting screws leaving enough length from the wall to the right (B). A B Wall mount template for wall mounting L Use the recommended screw size below. Slide the cordless camera to hook the cordless camera. Useful Information About the screws for the cordless camera 50.8 mm (2 inches) For assistance, please visit http://www.panasonic.com/phonehelp 19

Optional Handset
Page 20
...). L Select standard quality mode instead of range. Move the cordless camera closer to the cordless camera, the image distorts, or the image is monitoring the cordless camera, the cordless camera stops detecting sound. 20 For assistance, please visit http://www.panasonic.com/phonehelp L A microwave appliance is in the place where the cordless camera is located. L While a handset is slow. I cannot connect...
...). L Select standard quality mode instead of range. Move the cordless camera closer to the cordless camera, the image distorts, or the image is monitoring the cordless camera, the cordless camera stops detecting sound. 20 For assistance, please visit http://www.panasonic.com/phonehelp L A microwave appliance is in the place where the cordless camera is located. L While a handset is slow. I cannot connect...

Optional Handset
Page 21
...out and you have response. The handset speaker and/or the cordless camera emit a howling noise while monitoring. L Move the handset away from the cordless camera. Cause & solution L While the image of the cordless camera is being monitored by pushing {V}. L Lower the speaker volume ...by a handset, {Call button} will not have difficulty hearing the other party. For assistance, please visit http://www.panasonic.com/phonehelp ...
...out and you have response. The handset speaker and/or the cordless camera emit a howling noise while monitoring. L Move the handset away from the cordless camera. Cause & solution L While the image of the cordless camera is being monitored by pushing {V}. L Lower the speaker volume ...by a handset, {Call button} will not have difficulty hearing the other party. For assistance, please visit http://www.panasonic.com/phonehelp ...