
Optional Handset
Page 1
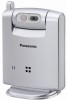
.../KX-TG5771/KXTG5776/KX-TG5777. Camera monitoring requires a color display handset (KX-TGA571). For assistance, visit our website: http://www.panasonic.com/phonehelp for future reference. KX-TGA573 Indoor Use Only This cordless camera is an accessory unit for use with your base unit before using the unit and save for customers in the U.S.A. or Puerto Rico. Operating Instructions 5.8 GHz Expandable Digital Cordless Camera...
.../KX-TG5771/KXTG5776/KX-TG5777. Camera monitoring requires a color display handset (KX-TGA571). For assistance, visit our website: http://www.panasonic.com/phonehelp for future reference. KX-TGA573 Indoor Use Only This cordless camera is an accessory unit for use with your base unit before using the unit and save for customers in the U.S.A. or Puerto Rico. Operating Instructions 5.8 GHz Expandable Digital Cordless Camera...

Optional Handset
Page 2
Table of Contents Introduction Introduction 3 Accessory information 4 Important safety instructions 5 For best performance 6 Preparation Controls 7 Setting up the cordless camera 8 Symbols used in these operating instructions 11 Registering the cordless camera . . . . . 12 Camera Monitoring Camera monitoring using a handset . . 13 Useful Information Wall mounting 17 Troubleshooting 20 FCC and other information 22 Specifications 23 Customer services 24 Warranty 25 Index Index 27 2 For assistance, please visit http://www.panasonic.com/phonehelp
Table of Contents Introduction Introduction 3 Accessory information 4 Important safety instructions 5 For best performance 6 Preparation Controls 7 Setting up the cordless camera 8 Symbols used in these operating instructions 11 Registering the cordless camera . . . . . 12 Camera Monitoring Camera monitoring using a handset . . 13 Useful Information Wall mounting 17 Troubleshooting 20 FCC and other information 22 Specifications 23 Customer services 24 Warranty 25 Index Index 27 2 For assistance, please visit http://www.panasonic.com/phonehelp

Optional Handset
Page 3
... the bottom of the unit) Name and address of dealer Date of the following information for purchasing the Panasonic 5.8 GHz expandable digital cordless camera. For further information or to the color display handset (KX-TGA571). you for future reference. the cordless camera pages the handset when it detects sound (page 14). - We recommend keeping a record of purchase Attach your...
... the bottom of the unit) Name and address of dealer Date of the following information for purchasing the Panasonic 5.8 GHz expandable digital cordless camera. For further information or to the color display handset (KX-TGA571). you for future reference. the cordless camera pages the handset when it detects sound (page 14). - We recommend keeping a record of purchase Attach your...

Optional Handset
Page 4
Accessory item 1 AC adaptor for cordless camera 2 Wall-mounting adaptor for cordless camera 3 Call button for cordless camera 1 2 Order number PQLV235Z PQLP10267Z PQLP10270Z 3 Quantity 1 1 1 Sales and support information L To order these accessories, call 1-866-605-1277. 4 For assistance, please visit http://www.panasonic.com/phonehelp L TTY users (hearing or speech impaired users) can call 1-800-332-5368. Introduction Accessory information Included accessories No.
Accessory item 1 AC adaptor for cordless camera 2 Wall-mounting adaptor for cordless camera 3 Call button for cordless camera 1 2 Order number PQLV235Z PQLP10267Z PQLP10270Z 3 Quantity 1 1 1 Sales and support information L To order these accessories, call 1-866-605-1277. 4 For assistance, please visit http://www.panasonic.com/phonehelp L TTY users (hearing or speech impaired users) can call 1-800-332-5368. Introduction Accessory information Included accessories No.
Optional Handset
Page 6
...panasonic.com/phonehelp L Operating the product near any electrical appliance that emits a strong radio signal. - near 5.8 GHz electrical appliances may damage the camera lens. any place exposed to direct sunlight. where an object such as fluorescent lamps and motors. L When using the cordless camera... should be kept free from electrical appliances. Prolonged exposure to direct sunlight or halogen light may cause interference. L Use the cordless camera in places where temperature varies greatly, such as under daylight or a well-lit room. near an air conditioner or heater....
...panasonic.com/phonehelp L Operating the product near any electrical appliance that emits a strong radio signal. - near 5.8 GHz electrical appliances may damage the camera lens. any place exposed to direct sunlight. where an object such as fluorescent lamps and motors. L When using the cordless camera... should be kept free from electrical appliances. Prolonged exposure to direct sunlight or halogen light may cause interference. L Use the cordless camera in places where temperature varies greatly, such as under daylight or a well-lit room. near an air conditioner or heater....
Optional Handset
Page 7
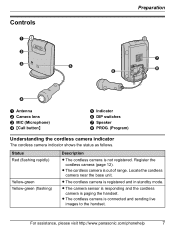
... the cordless camera indicator The cordless camera indicator shows the status as follows. Register the cordless camera (page 12). L The cordless camera is not registered. For assistance, please visit http://www.panasonic.com/phonehelp 7 Status Red (flashing rapidly) Yellow-green Yellow-green (flashing) Description L The cordless camera is registered and in standby mode. L The cordless camera is out of range. L The cordless camera is connected...
... the cordless camera indicator The cordless camera indicator shows the status as follows. Register the cordless camera (page 12). L The cordless camera is not registered. For assistance, please visit http://www.panasonic.com/phonehelp 7 Status Red (flashing rapidly) Yellow-green Yellow-green (flashing) Description L The cordless camera is registered and in standby mode. L The cordless camera is out of range. L The cordless camera is connected...

Optional Handset
Page 8
... in red then starts flashing. L Use only the included Panasonic AC adaptor PQLV235. Do not connect the AC adaptor to a ceiling-mounted AC outlet, as the weight of the adaptor may cause it clicks into the unit (B). Preparation Setting up the cordless camera Connecting the AC adaptor and the call button cord until... is normal for the adaptor to feel warm during use.) L The AC adaptor should be connected to become disconnected. 8 For assistance, please visit http://www.panasonic.com/phonehelp
... in red then starts flashing. L Use only the included Panasonic AC adaptor PQLV235. Do not connect the AC adaptor to a ceiling-mounted AC outlet, as the weight of the adaptor may cause it clicks into the unit (B). Preparation Setting up the cordless camera Connecting the AC adaptor and the call button cord until... is normal for the adaptor to feel warm during use.) L The AC adaptor should be connected to become disconnected. 8 For assistance, please visit http://www.panasonic.com/phonehelp
Optional Handset
Page 9
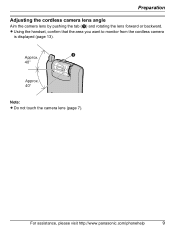
A 40° Approx. 40° Note: L Do not touch the camera lens (page 7). Preparation Adjusting the cordless camera lens angle Aim the camera lens by pushing the tab (A) and rotating the lens forward or backward. For assistance, please visit http://www.panasonic.com/phonehelp 9 L Using the handset, confirm that the area you want to monitor from the cordless camera is displayed (page 13). Approx.
A 40° Approx. 40° Note: L Do not touch the camera lens (page 7). Preparation Adjusting the cordless camera lens angle Aim the camera lens by pushing the tab (A) and rotating the lens forward or backward. For assistance, please visit http://www.panasonic.com/phonehelp 9 L Using the handset, confirm that the area you want to monitor from the cordless camera is displayed (page 13). Approx.

Optional Handset
Page 10
... lower the speaker volume, set to these settings. This feature is reset to OFF (LOW). 10 For assistance, please visit http://www.panasonic.com/phonehelp Slide each switch with a pointed object such as a pen as necessary. After repositioning the DIP switches to down Standard quality ... unplug the AC adaptor then reconnect it. Displaying the image upside down (DIP switch 1) To turn the camera image upside down (page 18). The image clarity decreases. The cordless camera is useful when you want enhanced motion, set to improve the image clarity, leave at ON (Standard quality ...
... lower the speaker volume, set to these settings. This feature is reset to OFF (LOW). 10 For assistance, please visit http://www.panasonic.com/phonehelp Slide each switch with a pointed object such as a pen as necessary. After repositioning the DIP switches to down Standard quality ... unplug the AC adaptor then reconnect it. Displaying the image upside down (DIP switch 1) To turn the camera image upside down (page 18). The image clarity decreases. The cordless camera is useful when you want enhanced motion, set to improve the image clarity, leave at ON (Standard quality ...
Optional Handset
Page 11
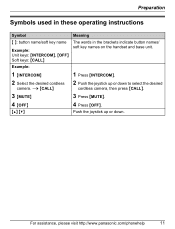
i {CALL} 2 Push the joystick up or down to select the desired cordless camera, then press {CALL}. 3 {MUTE} 3 Press {MUTE}. 4 {OFF} 4 Press {OFF}. {^} {V} Push the joystick up or down. Preparation Symbols used in these operating instructions Symbol Meaning { }: button ... keys: {CALL} The words in the brackets indicate button names/ soft key names on the handset and base unit. For assistance, please visit http://www.panasonic.com/phonehelp 11 Example: 1 {INTERCOM} 1 Press {INTERCOM}. 2 Select the desired cordless camera.
i {CALL} 2 Push the joystick up or down to select the desired cordless camera, then press {CALL}. 3 {MUTE} 3 Press {MUTE}. 4 {OFF} 4 Press {OFF}. {^} {V} Push the joystick up or down. Preparation Symbols used in these operating instructions Symbol Meaning { }: button ... keys: {CALL} The words in the brackets indicate button names/ soft key names on the handset and base unit. For assistance, please visit http://www.panasonic.com/phonehelp 11 Example: 1 {INTERCOM} 1 Press {INTERCOM}. 2 Select the desired cordless camera.

Optional Handset
Page 12
... handset to a KXTG5761/KX-TG5766/KX-TG5767/KXTG5771/KX-TG5776/KX-TG5777 base unit. 1 Base unit: Press and hold the cordless camera's extension number ({1} - {8}) until the IN USE indicator flashes. Press {INTERCOM} on the camera remains the same. 12 For assistance, please visit http://www.panasonic.com/phonehelp L When registration is completed successfully, the cordless camera beeps and the indicator...
... handset to a KXTG5761/KX-TG5766/KX-TG5767/KXTG5771/KX-TG5776/KX-TG5777 base unit. 1 Base unit: Press and hold the cordless camera's extension number ({1} - {8}) until the IN USE indicator flashes. Press {INTERCOM} on the camera remains the same. 12 For assistance, please visit http://www.panasonic.com/phonehelp L When registration is completed successfully, the cordless camera beeps and the indicator...
Optional Handset
Page 13
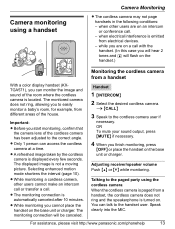
...monitoring connection will flash on the handset.) Monitoring the cordless camera from a handset With a color display handset (KXTGA571), you start monitoring, confirm that the camera lens of the cordless camera has been adjusted to the cordless camera user if necessary. OR To mute your sound ...monitoring. Speak clearly into the MIC. For assistance, please visit http://www.panasonic.com/phonehelp 13 Camera monitoring using the cordless camera When the cordless camera is paged from a handset, the cordless camera does not ring and the speakerphone is located. when other users cannot make...
...monitoring connection will flash on the handset.) Monitoring the cordless camera from a handset With a color display handset (KXTGA571), you start monitoring, confirm that the camera lens of the cordless camera has been adjusted to the cordless camera user if necessary. OR To mute your sound ...monitoring. Speak clearly into the MIC. For assistance, please visit http://www.panasonic.com/phonehelp 13 Camera monitoring using the cordless camera When the cordless camera is paged from a handset, the cordless camera does not ring and the speakerphone is located. when other users cannot make...

Optional Handset
Page 14
... cordless camera. L The cordless camera produces a camera tone and pages the handsets for camera monitoring Displayed Meaning item Example: z The handset is paged by the cordless camera during a call, 2 tones sound and z flashes on the base unit or charger. 14 For assistance, please visit http://www.panasonic.com/phonehelp L You can adjust the audio detection sensitivity (page 16). 1 Cordless camera: The cordless camera...
... cordless camera. L The cordless camera produces a camera tone and pages the handsets for camera monitoring Displayed Meaning item Example: z The handset is paged by the cordless camera during a call, 2 tones sound and z flashes on the base unit or charger. 14 For assistance, please visit http://www.panasonic.com/phonehelp L You can adjust the audio detection sensitivity (page 16). 1 Cordless camera: The cordless camera...

Optional Handset
Page 15
... on the image. Note: L When you press {OPTION}, the right soft key switches between {BRIGHT}, {ZOOM}, and {SENSOR}. For assistance, please visit http://www.panasonic.com/phonehelp 15 Camera Monitoring Paging using the cordless camera call button 1 Cordless camera: Press {Call button}. Selecting image zoom 1 Start monitoring (page 13). 2 Press {OPTION} repeatedly until {BRIGHT} is located...
... on the image. Note: L When you press {OPTION}, the right soft key switches between {BRIGHT}, {ZOOM}, and {SENSOR}. For assistance, please visit http://www.panasonic.com/phonehelp 15 Camera Monitoring Paging using the cordless camera call button 1 Cordless camera: Press {Call button}. Selecting image zoom 1 Start monitoring (page 13). 2 Press {OPTION} repeatedly until {BRIGHT} is located...

Optional Handset
Page 16
.... Push {^} or {V} to detect. L To set the appropriate level, test the sensor of the cordless camera, turn the feature on . To use the audio detection feature of the camera from the handset beforehand. 16 For assistance, please visit http://www.panasonic.com/phonehelp To use this feature off ". 1 Start monitoring (page 13). 2 Press {OPTION...
.... Push {^} or {V} to detect. L To set the appropriate level, test the sensor of the cordless camera, turn the feature on . To use the audio detection feature of the camera from the handset beforehand. 16 For assistance, please visit http://www.panasonic.com/phonehelp To use this feature off ". 1 Start monitoring (page 13). 2 Press {OPTION...

Optional Handset
Page 17
...loudly and clearly into the hole. L Do not mount the cordless camera on a soft material. Connecting the wall-mounting adaptor A Slide the cordless camera into the wall-mounting adaptor in place. For assistance, please visit http://www.panasonic.com/phonehelp 17 It may cause it clicks into the place. ...adaptor by the standard mounting or upside down , break or cause injury. D Fasten the call button wire after you mount the cordless camera on the stable location where the unit can be connected to the hook of the adaptor may fall down mounting. Useful Information ...
...loudly and clearly into the hole. L Do not mount the cordless camera on a soft material. Connecting the wall-mounting adaptor A Slide the cordless camera into the wall-mounting adaptor in place. For assistance, please visit http://www.panasonic.com/phonehelp 17 It may cause it clicks into the place. ...adaptor by the standard mounting or upside down , break or cause injury. D Fasten the call button wire after you mount the cordless camera on the stable location where the unit can be connected to the hook of the adaptor may fall down mounting. Useful Information ...

Optional Handset
Page 18
...and to the right (C) until it is secure. To compensate for this, change the cordless camera setting to display images upside down (page 10). 1 Drive the screws (not included... the wall mount template as a guide (page 19). 2 Mount the cordless camera (A), then slide it down . Useful Information Mounting the cordless camera on the wall Standard mounting 1 Drive the screws (not included) into ...1.8 m (5.9 feet) or below using the wall mount template as a guide (page 19). 2 Mount the cordless camera (A), then slide it down (B) and to the left (C) until it is secure. 50.8 mm (2 inches...
...and to the right (C) until it is secure. To compensate for this, change the cordless camera setting to display images upside down (page 10). 1 Drive the screws (not included... the wall mount template as a guide (page 19). 2 Mount the cordless camera (A), then slide it down . Useful Information Mounting the cordless camera on the wall Standard mounting 1 Drive the screws (not included) into ...1.8 m (5.9 feet) or below using the wall mount template as a guide (page 19). 2 Mount the cordless camera (A), then slide it down (B) and to the left (C) until it is secure. 50.8 mm (2 inches...

Optional Handset
Page 19
Slide the cordless camera to hook the cordless camera. L Drive the mounting screws leaving enough length from the wall to the right (B). A B Wall mount template for wall mounting L Use the recommended screw size below. Max. 9.3 mm (23/64 inch) Max. 4.5 mm (11/64 inch) Space Removing the wall-mounting adaptor Press and hold the hold button (A) on the left side of the wall-mounting plate. Useful Information About the screws for the cordless camera 50.8 mm (2 inches) For assistance, please visit http://www.panasonic.com/phonehelp 19
Slide the cordless camera to hook the cordless camera. L Drive the mounting screws leaving enough length from the wall to the right (B). A B Wall mount template for wall mounting L Use the recommended screw size below. Max. 9.3 mm (23/64 inch) Max. 4.5 mm (11/64 inch) Space Removing the wall-mounting adaptor Press and hold the hold button (A) on the left side of the wall-mounting plate. Useful Information About the screws for the cordless camera 50.8 mm (2 inches) For assistance, please visit http://www.panasonic.com/phonehelp 19

Optional Handset
Page 20
.... Register the cordless camera to the base unit, and try again. L The cordless camera has lost communications with a soft dry cloth. Move the cordless camera closer to the base unit (page 12). L A microwave appliance is in the place where the cordless camera is monitoring the cordless camera, the cordless camera stops detecting sound. 20 For assistance, please visit http://www.panasonic.com/phonehelp...
.... Register the cordless camera to the base unit, and try again. L The cordless camera has lost communications with a soft dry cloth. Move the cordless camera closer to the base unit (page 12). L A microwave appliance is in the place where the cordless camera is monitoring the cordless camera, the cordless camera stops detecting sound. 20 For assistance, please visit http://www.panasonic.com/phonehelp...

Optional Handset
Page 21
Cause & solution L While the image of the cordless camera is being monitored by pushing {V}. L Move the handset away from the cordless camera. Useful Information Problem I pressed {Call button} but the cordless camera does not page the handsets. For assistance, please visit http://www.panasonic.com/phonehelp 21 L Lower the speaker volume by a handset, {Call button} will not have...
Cause & solution L While the image of the cordless camera is being monitored by pushing {V}. L Move the handset away from the cordless camera. Useful Information Problem I pressed {Call button} but the cordless camera does not page the handsets. For assistance, please visit http://www.panasonic.com/phonehelp 21 L Lower the speaker volume by a handset, {Call button} will not have...