Bts Telephone
Page 2
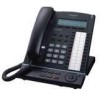
... Speakerphone, 3-Line Display (24-CO) KX-T7625 DPT with the wall mounting adaptor already attached. Table of Contents Features for this product are listed in the original carton. Attach a postage-paid letter, detailing the symptom to the Executive or Regional Sales offices. Product service Panasonic Factory Servicenters for the Digital Proprietary Telephones 2 Features List 3 Using...
... Speakerphone, 3-Line Display (24-CO) KX-T7625 DPT with the wall mounting adaptor already attached. Table of Contents Features for this product are listed in the original carton. Attach a postage-paid letter, detailing the symptom to the Executive or Regional Sales offices. Product service Panasonic Factory Servicenters for the Digital Proprietary Telephones 2 Features List 3 Using...
Bts Telephone
Page 14
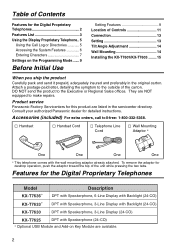
...2 Connect the telephone line cord, and then attach first and then of the wall mounting adaptor. 3 Mount the unit on the wall. 4 Pull down the handset hook until it over the top edge of the phone as shown. *Model shown is KX-T7636. 14 To temporarily place the handset down during a conversation, hook it ...locks to one of four angles. Wall Mounting 1 Set the operation board to get your fingers caught between the base...
...2 Connect the telephone line cord, and then attach first and then of the wall mounting adaptor. 3 Mount the unit on the wall. 4 Pull down the handset hook until it over the top edge of the phone as shown. *Model shown is KX-T7636. 14 To temporarily place the handset down during a conversation, hook it ...locks to one of four angles. Wall Mounting 1 Set the operation board to get your fingers caught between the base...
Operating Instructions
Page 3
... Call Log 12 Outgoing Call Log 13 Using the Directories 14 Entering Characters 15 Accessing the System Features 15 Other Operations 16 Personal Programming 19 Wall Mounting 20 Installing the KX-T7601/KX-T7603 21 KX-T7601 ...21 KX-T7603 ...21 Important Safety Instructions 22 FCC and Other Information 23 3
... Call Log 12 Outgoing Call Log 13 Using the Directories 14 Entering Characters 15 Accessing the System Features 15 Other Operations 16 Personal Programming 19 Wall Mounting 20 Installing the KX-T7601/KX-T7603 21 KX-T7601 ...21 KX-T7603 ...21 Important Safety Instructions 22 FCC and Other Information 23 3

Operating Instructions
Page 20
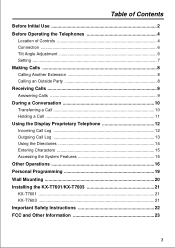
Wall Mounting 1 Pull down the handset hook until it locks, so the tab holds the handset. 4 Mount the unit on the wall. 2 Lift up the operation board until the hook knob clicks ( 1 ), then press down ( 2 ). 1 2 To temporarily place the handset down during a conversation, hook it over the top edge of the phone as shown. 3 Attach the wall mounting plate. Stand Telephone line cord * The illustrations used in this page are a KX-T7636. 20
Wall Mounting 1 Pull down the handset hook until it locks, so the tab holds the handset. 4 Mount the unit on the wall. 2 Lift up the operation board until the hook knob clicks ( 1 ), then press down ( 2 ). 1 2 To temporarily place the handset down during a conversation, hook it over the top edge of the phone as shown. 3 Attach the wall mounting plate. Stand Telephone line cord * The illustrations used in this page are a KX-T7636. 20


