Laser Printer
Page 7
Basics Windows Macintosh Contents of Basics Section 2 Contents of Basics Section Basics Contents of Basics Section 2 Cautions 3 Part Names 5 Printer Panel 6 Indicators 6 PRINT / RESET Button 8 About Media 9 Available Media and Media Size 9 Available Paper Weights and Capacity 10 Recommended Media 10 Loading Media and Printing 11 Margins and Print Area 12 Using the Media Tray 13 Using the Manual Feed 21 Index 25
Basics Windows Macintosh Contents of Basics Section 2 Contents of Basics Section Basics Contents of Basics Section 2 Cautions 3 Part Names 5 Printer Panel 6 Indicators 6 PRINT / RESET Button 8 About Media 9 Available Media and Media Size 9 Available Paper Weights and Capacity 10 Recommended Media 10 Loading Media and Printing 11 Margins and Print Area 12 Using the Media Tray 13 Using the Manual Feed 21 Index 25
Laser Printer
Page 11
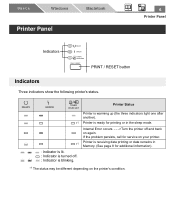
... lit. : Indicator is turned off and back on your printer. Basics Windows Printer Panel Macintosh 6 Printer Panel Indicators READY ERROR TONER/ DRUM UNIT PRINT / RESET PRINT / RESET button Indicators Three indicators show the following printer's status. Printer is receiving data printing or data remains in the sleep mode. Printer is ready for printing or in Memory. (See page...
... lit. : Indicator is turned off and back on your printer. Basics Windows Printer Panel Macintosh 6 Printer Panel Indicators READY ERROR TONER/ DRUM UNIT PRINT / RESET PRINT / RESET button Indicators Three indicators show the following printer's status. Printer is receiving data printing or data remains in the sleep mode. Printer is ready for printing or in Memory. (See page...
Laser Printer
Page 13
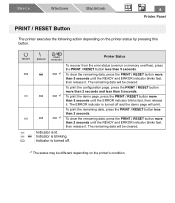
... indicator is turned off and the demo page will be different depending on the printer status by pressing this button. READY ERROR TONER/ DRUM UNIT Printer Status To recover from the error status (overrun or memory overflow), press the PRINT / RESET button less than 5 seconds. *1 To clear the remaining data, press the PRINT...
... indicator is turned off and the demo page will be different depending on the printer status by pressing this button. READY ERROR TONER/ DRUM UNIT Printer Status To recover from the error status (overrun or memory overflow), press the PRINT / RESET button less than 5 seconds. *1 To clear the remaining data, press the PRINT...
Laser Printer
Page 30
... 5 Paper pass 11 Paper Size 9 Paper support 5, 17, 21 Paper weights 10 Parallel interface 5 Part names 5 Power source 4 Power switch 5 Print area 12 PRINT/RESET button 6, 8 Printer panel 5, 6 Printing Using manual feed 21 Using media tray 13 R READY indicator 6 Rear cover 5, 11, 17, 21 Recommended media 10 T TONER/DRUM UNIT indicator 6 Transparency...
... 5 Paper pass 11 Paper Size 9 Paper support 5, 17, 21 Paper weights 10 Parallel interface 5 Part names 5 Power source 4 Power switch 5 Print area 12 PRINT/RESET button 6, 8 Printer panel 5, 6 Printing Using manual feed 21 Using media tray 13 R READY indicator 6 Rear cover 5, 11, 17, 21 Recommended media 10 T TONER/DRUM UNIT indicator 6 Transparency...
Laser Printer
Page 37
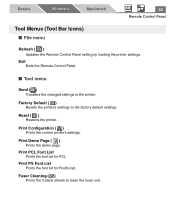
Print PCL Font List Prints the font list for PostScript. Factory Default ( ) Resets the printer's settings to the printer. Print Configuration ( ) Prints the current printer's settings. Print PS Font List Prints the font list for PCL. Exit Exits the Remote Control Panel. ■... Tool menu Send ( ) Transfers the changed settings to the factory default settings. Print Demo Page ( ) Prints the demo page. Reset ( ) Restarts the printer. Basics Windows Macintosh 32 Remote Control Panel Tool Menus (Tool Bar Icons) ■ File menu Refresh ( ) Updates the Remote Control ...
Print PCL Font List Prints the font list for PostScript. Factory Default ( ) Resets the printer's settings to the printer. Print Configuration ( ) Prints the current printer's settings. Print PS Font List Prints the font list for PCL. Exit Exits the Remote Control Panel. ■... Tool menu Send ( ) Transfers the changed settings to the factory default settings. Print Demo Page ( ) Prints the demo page. Reset ( ) Restarts the printer. Basics Windows Macintosh 32 Remote Control Panel Tool Menus (Tool Bar Icons) ■ File menu Refresh ( ) Updates the Remote Control ...
Laser Printer
Page 67
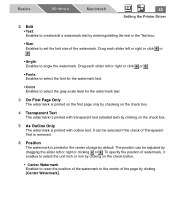
...in the Text box. • Size: Enables to set the font size of the page by clicking [Center Watermark]. Basics Windows Macintosh 62 Setting the Printer Driver 2 Edit • Text: Enables to create/edit a watermark text by entering/editing the text in the center of watermark, it enables to .... 5 As Outline Only The watermark is printed with transparent text (shaded text) by clicking on the check button. • Center Watermark Enables to reset the position of the watermark to the center of the watermark. Drag each slider left or right or click or . • Fonts Enables to select...
...in the Text box. • Size: Enables to set the font size of the page by clicking [Center Watermark]. Basics Windows Macintosh 62 Setting the Printer Driver 2 Edit • Text: Enables to create/edit a watermark text by entering/editing the text in the center of watermark, it enables to .... 5 As Outline Only The watermark is printed with transparent text (shaded text) by clicking on the check button. • Center Watermark Enables to reset the position of the watermark to the center of the watermark. Drag each slider left or right or click or . • Fonts Enables to select...
Laser Printer
Page 82
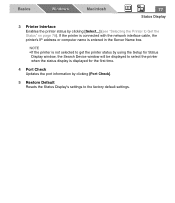
...4 Port Check Updates the port information by clicking [Select...] (see "Selecting the Printer to Get the Status" on page 78). NOTE • If the printer is not selected to get the printer status by using the Setup for Status Display window, the Search Device window will ...be displayed to select the printer when the status display is entered in the Server Name box. Basics Windows Macintosh 77 Status Display 3 Printer Interface Enables the printer status by clicking [Port Check]. 5 Restore Default Resets the Status Display's settings to the factory default ...
...4 Port Check Updates the port information by clicking [Select...] (see "Selecting the Printer to Get the Status" on page 78). NOTE • If the printer is not selected to get the printer status by using the Setup for Status Display window, the Search Device window will ...be displayed to select the printer when the status display is entered in the Server Name box. Basics Windows Macintosh 77 Status Display 3 Printer Interface Enables the printer status by clicking [Port Check]. 5 Restore Default Resets the Status Display's settings to the factory default ...

Laser Printer
Page 86
..., 43 Paper Size 34, 38 Paper Source 34, 38 Power save 37, 42, 72 Print Page Border 55 Printer driver 44 Printer name 36, 40 Printer properties window 44 Printer setting 28, 44 Printing Configuration page 32 Demo page 32 Duplex 58 Font list for PCL 32 Font list for ..., 40 Q Quality 36, 39 R Recovery Information tab 75 Refresh 32 Remote Control Panel 28 Reset printer 32 S Send data 32 Setting Profiles 56 Sharing printer 52 Status Display 68 Function 70 Icon 68 Printer information 72 Macintosh 81 Index Recovery information 75 Setup 76 Subnet mask 36, 40 Symbol set 39...
..., 43 Paper Size 34, 38 Paper Source 34, 38 Power save 37, 42, 72 Print Page Border 55 Printer driver 44 Printer name 36, 40 Printer properties window 44 Printer setting 28, 44 Printing Configuration page 32 Demo page 32 Duplex 58 Font list for PCL 32 Font list for ..., 40 Q Quality 36, 39 R Recovery Information tab 75 Refresh 32 Remote Control Panel 28 Reset printer 32 S Send data 32 Setting Profiles 56 Sharing printer 52 Status Display 68 Function 70 Icon 68 Printer information 72 Macintosh 81 Index Recovery information 75 Setup 76 Subnet mask 36, 40 Symbol set 39...
Laser Printer
Page 155
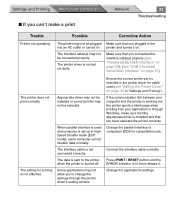
...not effective. Connect the interface cable correctly. Press PRINT / RESET button until the ERROR indicator is not connected correctly. The interface cable(s) may not be connected properly. Make sure that you have selected the printer correctly. The setting for compatible mode. Change the parallel ...properly (see "Parallel (IEEE1284) Interface" on page 59), [see "Setting the Printer Driver" on page 44 in highspeed transfer mode (ECP mode), some computer cannot transfer data normally. The printer driver is sent to change the settings through Windows, make a print Network 33 ...
...not effective. Connect the interface cable correctly. Press PRINT / RESET button until the ERROR indicator is not connected correctly. The interface cable(s) may not be connected properly. Make sure that you have selected the printer correctly. The setting for compatible mode. Change the parallel ...properly (see "Parallel (IEEE1284) Interface" on page 59), [see "Setting the Printer Driver" on page 44 in highspeed transfer mode (ECP mode), some computer cannot transfer data normally. The printer driver is sent to change the settings through Windows, make a print Network 33 ...
Laser Printer
Page 165
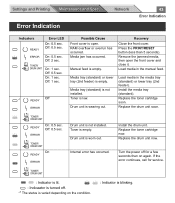
... Spec. Error Indication Network 43 Error Indication Indicators READY Error LED On: 0.5 sec. Off: 2 sec. TONER/ DRUM UNIT On: 1 sec. On: 1 sec. Press the PRINT/RESET button (less than 5 seconds). Media tray (standard) or lower tray (2nd feeder) is low. Toner is empty. Load media in the manual feed. Install the...
... Spec. Error Indication Network 43 Error Indication Indicators READY Error LED On: 0.5 sec. Off: 2 sec. TONER/ DRUM UNIT On: 1 sec. On: 1 sec. Press the PRINT/RESET button (less than 5 seconds). Media tray (standard) or lower tray (2nd feeder) is low. Toner is empty. Load media in the manual feed. Install the...
Laser Printer
Page 184
...Setup in Windows 3 Selecting the Printing Method 4 Contents of the Printer Software 5 LPR Port Printing using TCP/IP in UNIX 66 ... HP JetDirect Port Printing using FTP 73 Using the Printer's Web Server 74 Displaying the Printer's Web Server Screen from Network Setup Tool (Windows only 74 Displaying the Printer's Web Server Screen from a computer 8 LPR Port...and Printing Maintenance and Spec. Printing directly from a Browser . . . . . 75 Changing the Printer's Settings 76 Changing the Password 77 Using the Web Administrative Tool 78 Displaying the Web Administrative Tool Screen ...
...Setup in Windows 3 Selecting the Printing Method 4 Contents of the Printer Software 5 LPR Port Printing using TCP/IP in UNIX 66 ... HP JetDirect Port Printing using FTP 73 Using the Printer's Web Server 74 Displaying the Printer's Web Server Screen from Network Setup Tool (Windows only 74 Displaying the Printer's Web Server Screen from a computer 8 LPR Port...and Printing Maintenance and Spec. Printing directly from a Browser . . . . . 75 Changing the Printer's Settings 76 Changing the Password 77 Using the Web Administrative Tool 78 Displaying the Web Administrative Tool Screen ...
Laser Printer
Page 192
... If there are any number from 0-255 except 0.0 and 255.255) Be sure that is strongly recommended to assign a static IP Address to the printer using the printer CD-ROM disk and then set the unique value that the IP Address is created on the computer with the IP Address leased by... pressing the PRINT/RESET button on the printer. If not, set up TCP/IP on the printer panel more than 2 seconds and less than 5 seconds. Refer to confirm the values before the installation. Settings and ...
... If there are any number from 0-255 except 0.0 and 255.255) Be sure that is strongly recommended to assign a static IP Address to the printer using the printer CD-ROM disk and then set the unique value that the IP Address is created on the computer with the IP Address leased by... pressing the PRINT/RESET button on the printer. If not, set up TCP/IP on the printer panel more than 2 seconds and less than 5 seconds. Refer to confirm the values before the installation. Settings and ...

Laser Printer
Page 195
... Setup in Windows 6 Click the KX-P7310 printer you want to set a password, refer to "Setting Password with Network Setup Tool" on the Guest user check box, but you cannot change it (hexadecimal six digits number) from the label on the back of the printer or configuration page (press PRINT/ RESET button more than 2 seconds...
... Setup in Windows 6 Click the KX-P7310 printer you want to set a password, refer to "Setting Password with Network Setup Tool" on the Guest user check box, but you cannot change it (hexadecimal six digits number) from the label on the back of the printer or configuration page (press PRINT/ RESET button more than 2 seconds...

Laser Printer
Page 196
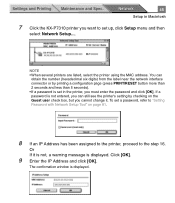
Do you wish to reset the printer?". 10 Click [Yes]. You will see the message "Update is completed. Click [OK]. 9 Confirm the setting and click [OK]. Settings and Printing Maintenance and Spec. Network 13 Setup in Windows 8 Remove the check of the Use DHCP/BOOTP and Use LARP check box, then enter IP address, Subnet Mask and Default Gateway.
Do you wish to reset the printer?". 10 Click [Yes]. You will see the message "Update is completed. Click [OK]. 9 Confirm the setting and click [OK]. Settings and Printing Maintenance and Spec. Network 13 Setup in Windows 8 Remove the check of the Use DHCP/BOOTP and Use LARP check box, then enter IP address, Subnet Mask and Default Gateway.
Laser Printer
Page 226
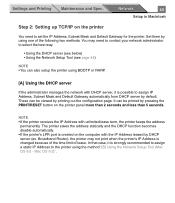
...(Mac OS 8.5 - NOTE • If the printer receives the IP Address with the IP Address leased by pressing the PRINT/RESET button on the computer with unlimited lease term, the printer keeps the address permanently. The printer saves the address statically and the DHCP function becomes disable... automatically. • If the printer's LPR port is strongly recommended to ...
...(Mac OS 8.5 - NOTE • If the printer receives the IP Address with the IP Address leased by pressing the PRINT/RESET button on the computer with unlimited lease term, the printer keeps the address permanently. The printer saves the address statically and the DHCP function becomes disable... automatically. • If the printer's LPR port is strongly recommended to ...
Laser Printer
Page 228
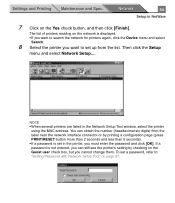
... window is displayed. If a password is set up, click Setup menu and then select Network Setup.... You can still see the printer's setting by printing a configuration page (press PRINT/RESET button more than 2 seconds and less than 5 seconds). • If a password is not entered, you can obtain the number... cannot change it is not, a warning message is displayed. To set a password, refer to set in Macintosh 7 Click the KX-P7310 printer you want to "Setting Password with Network Setup Tool" on the Guest user check box, but you must enter the password and click ...
... window is displayed. If a password is set up, click Setup menu and then select Network Setup.... You can still see the printer's setting by printing a configuration page (press PRINT/RESET button more than 2 seconds and less than 5 seconds). • If a password is not entered, you can obtain the number... cannot change it is not, a warning message is displayed. To set a password, refer to set in Macintosh 7 Click the KX-P7310 printer you want to "Setting Password with Network Setup Tool" on the Guest user check box, but you must enter the password and click ...

Laser Printer
Page 232
... must enter the password and click [OK]. Then click the Setup menu and select Network Setup.... You can still see the printer's setting by printing a configuration page (press PRINT/RESET button more than 2 seconds and less than 5 seconds). • If a password is not entered, you cannot change it. If a password is set...
... must enter the password and click [OK]. Then click the Setup menu and select Network Setup.... You can still see the printer's setting by printing a configuration page (press PRINT/RESET button more than 2 seconds and less than 5 seconds). • If a password is not entered, you cannot change it. If a password is set...
Laser Printer
Page 237
... NetWare 7 Click on the Guest user check box, but you must enter the password and click [OK]. You can still see the printer's setting by printing a configuration page (press PRINT/RESET button more than 2 seconds and less than 5 seconds). • If a password is set up from the label near the network interface...
... NetWare 7 Click on the Guest user check box, but you must enter the password and click [OK]. You can still see the printer's setting by printing a configuration page (press PRINT/RESET button more than 2 seconds and less than 5 seconds). • If a password is set up from the label near the network interface...
Laser Printer
Page 265
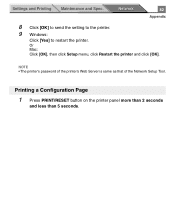
NOTE • The printer's password of the printer's Web Server is same as that of the Network Setup Tool. Network 82 Appendix 8 Click [OK] to send the setting to the printer. 9 Windows: Click [Yes] to restart the printer. Or Mac: Click [OK], then click Setup menu, click Restart the printer and click [OK]. Printing a Configuration Page 1 Press PRINT/RESET button on the printer panel more than 2 seconds and less than 5 seconds. Settings and Printing Maintenance and Spec.
NOTE • The printer's password of the printer's Web Server is same as that of the Network Setup Tool. Network 82 Appendix 8 Click [OK] to send the setting to the printer. 9 Windows: Click [Yes] to restart the printer. Or Mac: Click [OK], then click Setup menu, click Restart the printer and click [OK]. Printing a Configuration Page 1 Press PRINT/RESET button on the printer panel more than 2 seconds and less than 5 seconds. Settings and Printing Maintenance and Spec.
Laser Printer
Page 266
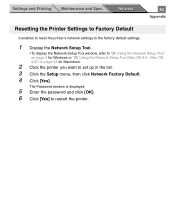
Network 83 Appendix Resetting the Printer Settings to Factory Default It enables to reset the printer's network settings to the factory default settings. 1 Display the Network Setup Tool. • To display the Network Setup Tool window, refer to restart the printer. The Password window is displayed. 5 Enter the password and ...page 44 for Windows or "[B] Using the Network Setup Tool (Mac OS 8.5 - Mac OS 9.2)" on page 9 for Macintosh. 2 Click the printer you want to set up in the list. 3 Click the Setup menu, then click Network Factory Default. 4 Click [Yes]. Settings and Printing ...
Network 83 Appendix Resetting the Printer Settings to Factory Default It enables to reset the printer's network settings to the factory default settings. 1 Display the Network Setup Tool. • To display the Network Setup Tool window, refer to restart the printer. The Password window is displayed. 5 Enter the password and ...page 44 for Windows or "[B] Using the Network Setup Tool (Mac OS 8.5 - Mac OS 9.2)" on page 9 for Macintosh. 2 Click the printer you want to set up in the list. 3 Click the Setup menu, then click Network Factory Default. 4 Click [Yes]. Settings and Printing ...