Laser Printer
Page 11
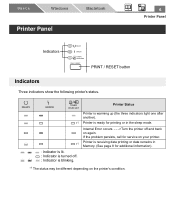
... for printing or in Memory. (See page 8 for service on your printer. Basics Windows Printer Panel Macintosh 6 Printer Panel Indicators READY ERROR TONER/ DRUM UNIT PRINT / RESET PRINT / RESET button Indicators Three indicators show the following printer's status. Printer Status Printer is blinking. If the problem persists, call for additional information). *1 The status may be different depending on...
... for printing or in Memory. (See page 8 for service on your printer. Basics Windows Printer Panel Macintosh 6 Printer Panel Indicators READY ERROR TONER/ DRUM UNIT PRINT / RESET PRINT / RESET button Indicators Three indicators show the following printer's status. Printer Status Printer is blinking. If the problem persists, call for additional information). *1 The status may be different depending on...
Laser Printer
Page 12
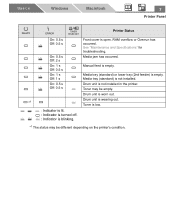
... tray (2nd feeder) is wearing out. Toner may be empty. Drum unit is empty. See "Maintenance and Specifications" for troubleshooting. Media tray (standard) is worn out. Drum unit is not installed. Printer Status Front cover is blinking. Basics Windows Macintosh 7 Printer Panel READY *1 ERROR On: 0.5 s Off: 0.5 s TONER/ DRUM UNIT On: 0.5 s Off: 2 s On: 1 s Off: 0.5 s On: 1 s Off: 1 s On: 0.5 s Off: 0.5 s : Indicator...
... tray (2nd feeder) is wearing out. Toner may be empty. Drum unit is empty. See "Maintenance and Specifications" for troubleshooting. Media tray (standard) is worn out. Drum unit is not installed. Printer Status Front cover is blinking. Basics Windows Macintosh 7 Printer Panel READY *1 ERROR On: 0.5 s Off: 0.5 s TONER/ DRUM UNIT On: 0.5 s Off: 2 s On: 1 s Off: 0.5 s On: 1 s Off: 1 s On: 0.5 s Off: 0.5 s : Indicator...
Laser Printer
Page 13
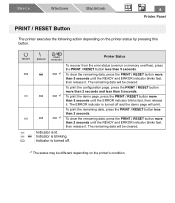
..., press the PRINT / RESET button more than 5 seconds until the READY and ERROR indicator blinks fast, then release it. READY ERROR TONER/ DRUM UNIT Printer Status To recover from the error status (overrun or memory overflow), press the PRINT / RESET button less than 5 seconds. *1 To clear the... more than 5 seconds until the READY and ERROR indicator blinks fast, then release it . The remaining data will be different depending on the printer status by pressing this button. The ERROR indicator is turned off and the demo page will be cleared. : Indicator is lit. : Indicator ...
..., press the PRINT / RESET button more than 5 seconds until the READY and ERROR indicator blinks fast, then release it. READY ERROR TONER/ DRUM UNIT Printer Status To recover from the error status (overrun or memory overflow), press the PRINT / RESET button less than 5 seconds. *1 To clear the... more than 5 seconds until the READY and ERROR indicator blinks fast, then release it . The remaining data will be different depending on the printer status by pressing this button. The ERROR indicator is turned off and the demo page will be cleared. : Indicator is lit. : Indicator ...
Laser Printer
Page 16
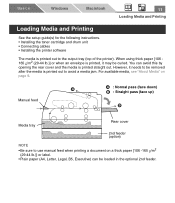
... (face down) B : Straight pass (face up) B Media tray Rear cover 2nd feeder (option) NOTE • Be sure to the output tray (top of the printer). For available media, see "About Media" on a thick paper [106 -165 g/m2 (29-44 lb.)] or label. • Plain paper (A4, Letter, Legal,...Loading Media and Printing Loading Media and Printing See the setup guide(s) for the following instructions. • Installing the toner cartridge and drum unit • Connecting cables • Installing the printer software The media is printed out to use manual feed when printing a document on page 9.
... (face down) B : Straight pass (face up) B Media tray Rear cover 2nd feeder (option) NOTE • Be sure to the output tray (top of the printer). For available media, see "About Media" on a thick paper [106 -165 g/m2 (29-44 lb.)] or label. • Plain paper (A4, Letter, Legal,...Loading Media and Printing Loading Media and Printing See the setup guide(s) for the following instructions. • Installing the toner cartridge and drum unit • Connecting cables • Installing the printer software The media is printed out to use manual feed when printing a document on page 9.
Laser Printer
Page 30
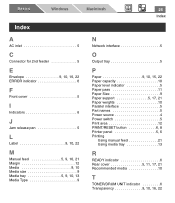
... 11 Paper Size 9 Paper support 5, 17, 21 Paper weights 10 Parallel interface 5 Part names 5 Power source 4 Power switch 5 Print area 12 PRINT/RESET button 6, 8 Printer panel 5, 6 Printing Using manual feed 21 Using media tray 13 R READY indicator 6 Rear cover 5, 11, 17, 21 Recommended media 10 T TONER/DRUM UNIT indicator 6 Transparency 9, 10, 16, 22
... 11 Paper Size 9 Paper support 5, 17, 21 Paper weights 10 Parallel interface 5 Part names 5 Power source 4 Power switch 5 Print area 12 PRINT/RESET button 6, 8 Printer panel 5, 6 Printing Using manual feed 21 Using media tray 13 R READY indicator 6 Rear cover 5, 11, 17, 21 Recommended media 10 T TONER/DRUM UNIT indicator 6 Transparency 9, 10, 16, 22
Laser Printer
Page 124
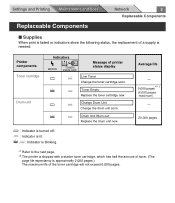
Change Drum Unit Change the drum unit soon. Toner Empty Replace the toner cartridge now. Printer components Toner cartridge Drum unit Indicators ERROR TONER/ DRUM UNIT Message of toner. (The page life expectancy is needed. Drum Unit Worn out Replace the drum unit now. Replaceable Components Network 2 ... is lit. , : Indicator is blinking. *1 Refer to the next page. *2 The printer is shipped with a starter toner cartridge, which has half the amount of printer status display Low Toner Change the toner cartridge soon. Settings and Printing Maintenance and Spec.
Change Drum Unit Change the drum unit soon. Toner Empty Replace the toner cartridge now. Printer components Toner cartridge Drum unit Indicators ERROR TONER/ DRUM UNIT Message of toner. (The page life expectancy is needed. Drum Unit Worn out Replace the drum unit now. Replaceable Components Network 2 ... is lit. , : Indicator is blinking. *1 Refer to the next page. *2 The printer is shipped with a starter toner cartridge, which has half the amount of printer status display Low Toner Change the toner cartridge soon. Settings and Printing Maintenance and Spec.
Laser Printer
Page 125
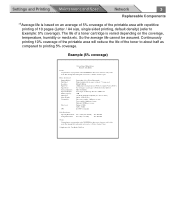
...X 15.4" X 10") Approx. 10 Kg {22 lbs.} Starter toner cartridge : 2,000 pages average Toner cartridge: 4,000 pages average Drum unit: 20,000 pages average Printing: 48 dBA Stadby: 27 dBA Intel 80C51 compatible Other Specification Operating Environment: Storing Environment: 10 to 32.5û...unit can be used as compared to about half as a : Printer, Scanner, Copier. Printer Specification Printing Method: Print Speed: Resolution: Paper Feed: Paper Outout: Software Emulation: Paper Size/Weight: Memory Capacity: Dimensions: Mass {Weight}: Consumables: Noise Level: CPU: Semiconductor Laser...
...X 15.4" X 10") Approx. 10 Kg {22 lbs.} Starter toner cartridge : 2,000 pages average Toner cartridge: 4,000 pages average Drum unit: 20,000 pages average Printing: 48 dBA Stadby: 27 dBA Intel 80C51 compatible Other Specification Operating Environment: Storing Environment: 10 to 32.5û...unit can be used as compared to about half as a : Printer, Scanner, Copier. Printer Specification Printing Method: Print Speed: Resolution: Paper Feed: Paper Outout: Software Emulation: Paper Size/Weight: Memory Capacity: Dimensions: Mass {Weight}: Consumables: Noise Level: CPU: Semiconductor Laser...
Laser Printer
Page 131
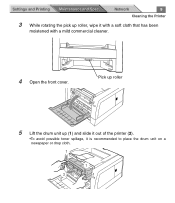
Settings and Printing Maintenance and Spec. Pick up roller 5 Lift the drum unit up roller, wipe it is recommended to place the drum unit on a newspaper or drop cloth. 1 1 2 Network 9 Cleaning the Printer 3 While rotating the pick up (1) and slide it out of the printer (2). •To avoid possible toner spillage, it with a soft cloth that has been moistened with a mild commercial cleaner. 4 Open the front cover.
Settings and Printing Maintenance and Spec. Pick up roller 5 Lift the drum unit up roller, wipe it is recommended to place the drum unit on a newspaper or drop cloth. 1 1 2 Network 9 Cleaning the Printer 3 While rotating the pick up (1) and slide it out of the printer (2). •To avoid possible toner spillage, it with a soft cloth that has been moistened with a mild commercial cleaner. 4 Open the front cover.
Laser Printer
Page 132
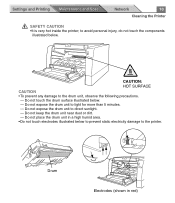
...and Spec. Do not expose the drum unit to light for more than 5 minutes. - Do not keep the drum unit near dust or dirt. - to the printer. Network 10 Cleaning the Printer ! Do not touch the drum surface illustrated below . Do not place the drum unit in red) SAFETY CAUTION •...;It is very hot inside the printer; CAUTION: HOT SURFACE CAUTION • ...
...and Spec. Do not expose the drum unit to light for more than 5 minutes. - Do not keep the drum unit near dust or dirt. - to the printer. Network 10 Cleaning the Printer ! Do not touch the drum surface illustrated below . Do not place the drum unit in red) SAFETY CAUTION •...;It is very hot inside the printer; CAUTION: HOT SURFACE CAUTION • ...
Laser Printer
Page 134
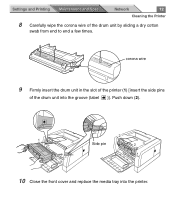
Network 12 Cleaning the Printer 8 Carefully wipe the corona wire of the drum unit into the printer. Push down (2). 2 1 Side pin 2 10 Close the front cover and replace the media tray into the groove (label )]. Settings and Printing Maintenance and Spec. corona wire 9 Firmly insert the drum unit in the slot of the printer (1) [insert the side pins of the drum unit by sliding a dry cotton swab from end to end a few times.
Network 12 Cleaning the Printer 8 Carefully wipe the corona wire of the drum unit into the printer. Push down (2). 2 1 Side pin 2 10 Close the front cover and replace the media tray into the groove (label )]. Settings and Printing Maintenance and Spec. corona wire 9 Firmly insert the drum unit in the slot of the printer (1) [insert the side pins of the drum unit by sliding a dry cotton swab from end to end a few times.
Laser Printer
Page 139
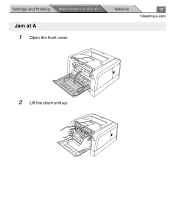
Jam at A 1 Open the front cover. Network 17 Clearing a Jam 2 Lift the drum unit up. Settings and Printing Maintenance and Spec.
Jam at A 1 Open the front cover. Network 17 Clearing a Jam 2 Lift the drum unit up. Settings and Printing Maintenance and Spec.
Laser Printer
Page 140
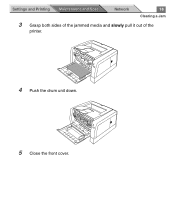
Network 18 Clearing a Jam 3 Grasp both sides of the jammed media and slowly pull it out of the printer. 4 Push the drum unit down. 5 Close the front cover. Settings and Printing Maintenance and Spec.
Network 18 Clearing a Jam 3 Grasp both sides of the jammed media and slowly pull it out of the printer. 4 Push the drum unit down. 5 Close the front cover. Settings and Printing Maintenance and Spec.
Laser Printer
Page 141
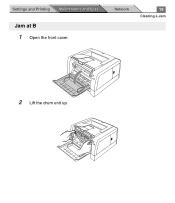
Network 19 Clearing a Jam 2 Lift the drum unit up. Jam at B 1 Open the front cover. Settings and Printing Maintenance and Spec.
Network 19 Clearing a Jam 2 Lift the drum unit up. Jam at B 1 Open the front cover. Settings and Printing Maintenance and Spec.
Laser Printer
Page 143
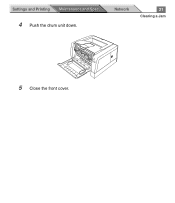
Settings and Printing Maintenance and Spec. 4 Push the drum unit down. Network 21 Clearing a Jam 5 Close the front cover.
Settings and Printing Maintenance and Spec. 4 Push the drum unit down. Network 21 Clearing a Jam 5 Close the front cover.
Laser Printer
Page 149
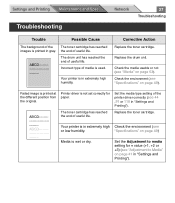
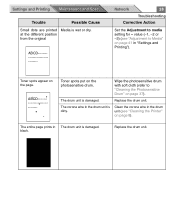
.... Replace the drum unit. The toner cartridge has reached the end of useful life. Check the environment (see "Specifications" on page 49) Set the Adjustment to Media" on page 41 in gray. The drum unit has reached the end of useful life. Incorrect type of the printer driver correctly (see... "Adjustment to media setting for paper. Your printer is printed at the different position from the original. Check the environment (see...
.... Replace the drum unit. The toner cartridge has reached the end of useful life. Check the environment (see "Specifications" on page 49) Set the Adjustment to Media" on page 41 in gray. The drum unit has reached the end of useful life. Incorrect type of the printer driver correctly (see... "Adjustment to media setting for paper. Your printer is printed at the different position from the original. Check the environment (see...
Laser Printer
Page 150
... (-1, -2 or -3) (see "Cleaning the Printer" on page 37). The corona wire in The drum unit is dirty. The drum unit is wet or dry. The entire page prints in the drum unit is damaged. Replace the drum unit. Toner spots appear on page 41 in the drum unit (see "Adjustment to media setting for - Replace the drum unit. black. Settings and Printing Maintenance...
... (-1, -2 or -3) (see "Cleaning the Printer" on page 37). The corona wire in The drum unit is dirty. The drum unit is wet or dry. The entire page prints in the drum unit is damaged. Replace the drum unit. Toner spots appear on page 41 in the drum unit (see "Adjustment to media setting for - Replace the drum unit. black. Settings and Printing Maintenance...
Laser Printer
Page 151
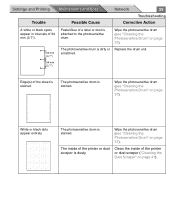
... the printer or dust scraper is attached to the photosensitive drum. Wipe the photosensitive drum (see "Cleaning the Photosensitive Drum" on page 37). Settings and Printing Maintenance and Spec. scratched. 94 mm (3.7″) Edge(s) of a label or dust is dusty. White or black dots appear entirely. The photosensitive drum is dirty or Replace the drum unit. Trouble...
... the printer or dust scraper is attached to the photosensitive drum. Wipe the photosensitive drum (see "Cleaning the Photosensitive Drum" on page 37). Settings and Printing Maintenance and Spec. scratched. 94 mm (3.7″) Edge(s) of a label or dust is dusty. White or black dots appear entirely. The photosensitive drum is dirty or Replace the drum unit. Trouble...

Laser Printer
Page 152
.... Corona wire of the photosensitive (3.7″). The drum unit is damaged. Replace the drum unit. Replace the toner cartridge. Clean the corona wire in intervals of 94 mm gear of the drum unit is bitten in the in the drum unit (see "Cleaning the Printer" on page 37). White and horizontal The drum unit is damaged. Trouble Possible Cause Horizontal lines...
.... Corona wire of the photosensitive (3.7″). The drum unit is damaged. Replace the drum unit. Replace the toner cartridge. Clean the corona wire in intervals of 94 mm gear of the drum unit is bitten in the in the drum unit (see "Cleaning the Printer" on page 37). White and horizontal The drum unit is damaged. Trouble Possible Cause Horizontal lines...

Laser Printer
Page 159
Cleaning the Photosensitive Drum Network 37 Troubleshooting If the paste or glue of a label is attached to the photosensitive drum of the drum unit, clean it following the steps below. 1 Open the front cover of the printer. 2 Lift the drum unit up (1) and slide it out of the printer (2). 1 1 2 3 While pushing the drum unit as illustrated below (1), lift the toner cartridge up (2). 2 1 Settings and Printing Maintenance and Spec.
Cleaning the Photosensitive Drum Network 37 Troubleshooting If the paste or glue of a label is attached to the photosensitive drum of the drum unit, clean it following the steps below. 1 Open the front cover of the printer. 2 Lift the drum unit up (1) and slide it out of the printer (2). 1 1 2 3 While pushing the drum unit as illustrated below (1), lift the toner cartridge up (2). 2 1 Settings and Printing Maintenance and Spec.
Laser Printer
Page 160
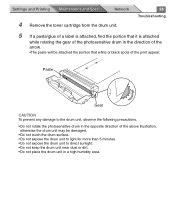
...prevent any damage to direct sunlight. • Do not keep the drum unit near dust or dirt. • Do not place the drum unit in the direction of the print appear. Network 4 Remove the toner cartridge from the drum unit. 38 Troubleshooting 5 If a paste/glue of a label is attached...be damaged. • Do not touch the drum surface. • Do not expose the drum unit to light for more than 5 minutes. • Do not expose the drum unit to the drum unit, observe the following precautions. • Do not rotate the photosensitive drum in the opposite direction of the above illustration,...
...prevent any damage to direct sunlight. • Do not keep the drum unit near dust or dirt. • Do not place the drum unit in the direction of the print appear. Network 4 Remove the toner cartridge from the drum unit. 38 Troubleshooting 5 If a paste/glue of a label is attached...be damaged. • Do not touch the drum surface. • Do not expose the drum unit to light for more than 5 minutes. • Do not expose the drum unit to the drum unit, observe the following precautions. • Do not rotate the photosensitive drum in the opposite direction of the above illustration,...