Operating Instructions
Page 3
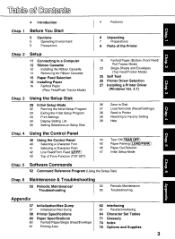
... the Initial Setup Program 33 Exiting the Initial Setup Program 34 Print Settings 34 Display Setting List 35 Setting Selections on Setup Disk 36 Save to Disk 37 Load from Disk (Recall Settings) C) 38 Send to Printer 38 Resetting to Factory Setting 39 Help Chap. 4 Using the Control Panel C) 40 Using the... Control Panel 40 Selecting a Character Font 41 Selecting a Character Pitch 42 Line Feed/Form Feed LF/FF) 43 Top of Form Function (TOF SET) Chap. 5 Software Commands 44 Tear Off (TEAR OFF) .9 45 Paper Parking LOAD/PARK) UI 46 Paper Out Detector 47 Initial Setup Mode C) ...
... the Initial Setup Program 33 Exiting the Initial Setup Program 34 Print Settings 34 Display Setting List 35 Setting Selections on Setup Disk 36 Save to Disk 37 Load from Disk (Recall Settings) C) 38 Send to Printer 38 Resetting to Factory Setting 39 Help Chap. 4 Using the Control Panel C) 40 Using the... Control Panel 40 Selecting a Character Font 41 Selecting a Character Pitch 42 Line Feed/Form Feed LF/FF) 43 Top of Form Function (TOF SET) Chap. 5 Software Commands 44 Tear Off (TEAR OFF) .9 45 Paper Parking LOAD/PARK) UI 46 Paper Out Detector 47 Initial Setup Mode C) ...
Operating Instructions
Page 4
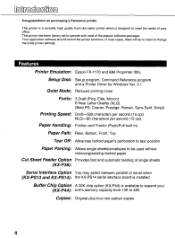
... set to operate with most cases, there will be used without removing/wasting fanfold paper Cut Sheet Feeder Option Provides fast and automatic feeding of single sheets (KX-P38): Serial Interface Option You may select between parallel or serial when (KX-PS13 and KX-PS14): the KX... option (KX-P44) is designed to meet the needs of the popular software packages. Your application software should control the printer functions. This printer is a versatile, high quality 9-pin dot matrix printer which is available to expand your office. 0 0 Congratulations on purchasing a Panasonic printer. ...
... set to operate with most cases, there will be used without removing/wasting fanfold paper Cut Sheet Feeder Option Provides fast and automatic feeding of single sheets (KX-P38): Serial Interface Option You may select between parallel or serial when (KX-PS13 and KX-PS14): the KX... option (KX-P44) is designed to meet the needs of the popular software packages. Your application software should control the printer functions. This printer is a versatile, high quality 9-pin dot matrix printer which is available to expand your office. 0 0 Congratulations on purchasing a Panasonic printer. ...
Operating Instructions
Page 9
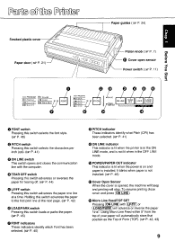
.../FF or (LOAD/PARK will advance or reverse the paper 12/ 1s". To resume printing close cover and press ON LINE 0 Micro Line Feed/TOF SET Pressing (ON LINE) with the computer. 0 TEAR OFF switch Pressing this switch advances or reverses the paper for tearing off. (ffr P. 44) LF/FF switch...
.../FF or (LOAD/PARK will advance or reverse the paper 12/ 1s". To resume printing close cover and press ON LINE 0 Micro Line Feed/TOF SET Pressing (ON LINE) with the computer. 0 TEAR OFF switch Pressing this switch advances or reverses the paper for tearing off. (ffr P. 44) LF/FF switch...
Operating Instructions
Page 15
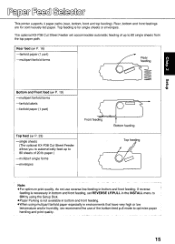
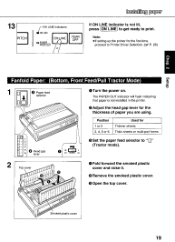
...air P. 19) -multipart fanfold forms -fanfold labels -fanfold paper (1 part) c O Front feeding Bottom feeding Top feed (a P. 23) -single sheets (The optional KX-P38 Cut Sheet Feeder allows you to automatically feed up to 80 single sheets from the top paper path. Rear, bottom and front feedings are...to ON by using the Setup Disk. •Paper Parking is for continuously fed paper. If reverse feeding is necessary in bottom and front feeding, set REVERSE LF/PULL in bottom and front feeding. a 0 0 This printer supports 4 paper paths (rear, bottom, front and top feeding). Top ...
...air P. 19) -multipart fanfold forms -fanfold labels -fanfold paper (1 part) c O Front feeding Bottom feeding Top feed (a P. 23) -single sheets (The optional KX-P38 Cut Sheet Feeder allows you to automatically feed up to 80 single sheets from the top paper path. Rear, bottom and front feedings are...to ON by using the Setup Disk. •Paper Parking is for continuously fed paper. If reverse feeding is necessary in bottom and front feeding, set REVERSE LF/PULL in bottom and front feeding. a 0 0 This printer supports 4 paper paths (rear, bottom, front and top feeding). Top ...

Operating Instructions
Page 16
... 2 V 3 4 las 5 Head gap 6 lever 0 0 OFF POWER ON OTurn the power on. S Adjust the head gap lever for Thinner sheets Thick sheets or multi-part forms 0 Set the paper feed selector to " 0" (Tractor mode). 2 Top cover 0 Fold forward the smoked plastic cover. 0 Open the top cover. /If .oc1333 Smoked plastic cover 3 Pinch...
... 2 V 3 4 las 5 Head gap 6 lever 0 0 OFF POWER ON OTurn the power on. S Adjust the head gap lever for Thinner sheets Thick sheets or multi-part forms 0 Set the paper feed selector to " 0" (Tractor mode). 2 Top cover 0 Fold forward the smoked plastic cover. 0 Open the top cover. /If .oc1333 Smoked plastic cover 3 Pinch...
Operating Instructions
Page 19
r Position Used for 1 or 2 Thinner sheets 3, 4, 5 or 6 Thick sheets or multi-part forms Head gap lever IL o MEI OFF POWER ON ()Set the paper feed selector to Printer Driver Selection. (a P. 26) Fanfold Paper: (Bottom, Front Feed/Pull Tractor Mode) -ma0 Paper feed 4 selector OTurn the power on... paper is not lit, press ON LINE to get ready to print. O Remove the smoked plastic cover. 0 Open the top cover. Note: •If setting up the printer for the thickness of paper you are using. Installing paper 13 PITCH ON LINE indicators ON LINE • ON LINE 0 POWER PAPER...
r Position Used for 1 or 2 Thinner sheets 3, 4, 5 or 6 Thick sheets or multi-part forms Head gap lever IL o MEI OFF POWER ON ()Set the paper feed selector to Printer Driver Selection. (a P. 26) Fanfold Paper: (Bottom, Front Feed/Pull Tractor Mode) -ma0 Paper feed 4 selector OTurn the power on... paper is not lit, press ON LINE to get ready to print. O Remove the smoked plastic cover. 0 Open the top cover. Note: •If setting up the printer for the thickness of paper you are using. Installing paper 13 PITCH ON LINE indicators ON LINE • ON LINE 0 POWER PAPER...
Operating Instructions
Page 22
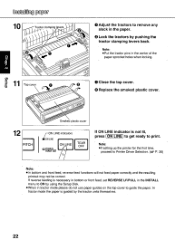
If reverse feeding is necessary in bottom or front feed, set REVERSE LF/PULL in the INSTALL menu to ON by using the Setup Disk. •When in tractor mode please do not use paper guides ... get ready to remove any slack in the center of the paper sprocket holes when locking. Top cover O Close the top cover. Note: •If setting up the printer for the first time, proceed to guide the paper. O Lock the tractors by the tractor units themselves. 22 Note: •Put the...
If reverse feeding is necessary in bottom or front feed, set REVERSE LF/PULL in the INSTALL menu to ON by using the Setup Disk. •When in tractor mode please do not use paper guides ... get ready to remove any slack in the center of the paper sprocket holes when locking. Top cover O Close the top cover. Note: •If setting up the printer for the first time, proceed to guide the paper. O Lock the tractors by the tractor units themselves. 22 Note: •Put the...
Operating Instructions
Page 23
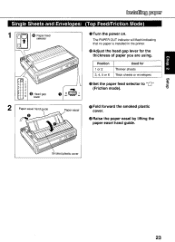
.... C) Position Used for the thickness of paper you are using. O Adjust the head gap lever for co 0 1 or 2 Thinner sheets 3, 4, 5 or 6 Thick sheets or envelopes 0 Set the paper feed selector to "El" tD - 34 (Friction mode). 0 U- Installing paper Single Sheets and Envelopes: (Top Feed/Friction Mode) Ella Paper feed selector 0 Turn...
.... C) Position Used for the thickness of paper you are using. O Adjust the head gap lever for co 0 1 or 2 Thinner sheets 3, 4, 5 or 6 Thick sheets or envelopes 0 Set the paper feed selector to "El" tD - 34 (Friction mode). 0 U- Installing paper Single Sheets and Envelopes: (Top Feed/Friction Mode) Ella Paper feed selector 0 Turn...
Operating Instructions
Page 24
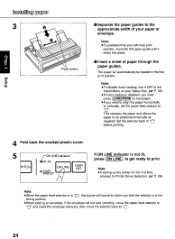
...er P. 30) • If Auto Loading is not lit, press (ON LINE,, to get ready to print. Set the selector back to before printing. 4 Fold back the smoked plastic cover. 5 PITCH FON LINE indicators 40N LINE...If you that the selector is in the Install Menu on your paper or envelope. Note: •If setting up the printer for the first time, proceed to Printer Driver Selection. (ow P. 26) Note: •... guides. The paper will sound to inform you need to align the paper horizontally or vertically, set the paper feed selector to This releases the paper and allows the "ci, paper to be ...
...er P. 30) • If Auto Loading is not lit, press (ON LINE,, to get ready to print. Set the selector back to before printing. 4 Fold back the smoked plastic cover. 5 PITCH FON LINE indicators 40N LINE...If you that the selector is in the Install Menu on your paper or envelope. Note: •If setting up the printer for the first time, proceed to Printer Driver Selection. (ow P. 26) Note: •... guides. The paper will sound to inform you need to align the paper horizontally or vertically, set the paper feed selector to This releases the paper and allows the "ci, paper to be ...

Operating Instructions
Page 27
... Add» is shown in the dialog box. 8 Click OK Add Unlisted or Updated Printer List of Printers: Panasonic KX-P3696 OK lc Cancel 0 Help 9 Click Set As Default Printer 10 Click Close 11 Exit the "Control Panel". 6 Insert the Setup Disk into drive A. XXXXXXXXXXX Printers... "Printers". If you have installed a printer driver, the dialog box expands to make a back-up copy. Go to your printer contains a Panasonic KX-P3696 Printer Driver for the proper installation procedure. If reading the printer driver disk from drive 8, type B:\ 27 To install this printer driver, you...
... Add» is shown in the dialog box. 8 Click OK Add Unlisted or Updated Printer List of Printers: Panasonic KX-P3696 OK lc Cancel 0 Help 9 Click Set As Default Printer 10 Click Close 11 Exit the "Control Panel". 6 Insert the Setup Disk into drive A. XXXXXXXXXXX Printers... "Printers". If you have installed a printer driver, the dialog box expands to make a back-up copy. Go to your printer contains a Panasonic KX-P3696 Printer Driver for the proper installation procedure. If reading the printer driver disk from drive 8, type B:\ 27 To install this printer driver, you...

Operating Instructions
Page 28
...printhead) decreases by 1. CTR PRINTHEAD 10 to 6.35 cm) The number increases or decreases by 1/72" (about 0.35 mm). EMULATION EMULATION EPSON* Sets the emulation mode to 12.70 cm) The number increases or decreases by 1/72" (about 0.35 mm). RIGHT MARGIN 2 to select 45 initial ...setup items shown in the table below. Menu Item Setting Description PRINT STYLE FONT DRAFT* ROMAN SANS SERIF COURIER PRESTIGE SCRIPT BOLD PS Selects Draft or NLQ (Near Letter Quality) font. LEFT MARGIN 0' ...
...printhead) decreases by 1. CTR PRINTHEAD 10 to 6.35 cm) The number increases or decreases by 1/72" (about 0.35 mm). EMULATION EMULATION EPSON* Sets the emulation mode to 12.70 cm) The number increases or decreases by 1/72" (about 0.35 mm). RIGHT MARGIN 2 to select 45 initial ...setup items shown in the table below. Menu Item Setting Description PRINT STYLE FONT DRAFT* ROMAN SANS SERIF COURIER PRESTIGE SCRIPT BOLD PS Selects Draft or NLQ (Near Letter Quality) font. LEFT MARGIN 0' ...

Operating Instructions
Page 29
...TURKEY BRASCII ABICOMP Selects one of 14 language or legal character sets. CHARACTER SET ITALIC* GRAPHIC 1 GRAPHIC 2 Selects the italics or graphics/character sets 1 or 2. ("ITALIC" is twice that of 8 code pages. * denotes setting when shipped from factory. 29 ZERO FONT NORMAL* POINT SLASH ... printed left -to -right only (UNI DIRECTION) or in both directions (BI DIRECTION). CHARACTER COUNTRY SET U.S.A.' Initial 0 Mode msia dnies eq Bupn Menu Item Setting Description PRINT MODE GRAPHIC DIRECTION BI DIRECTION UNI DIRECTION* Graphics are printed left -to -right only (...
...TURKEY BRASCII ABICOMP Selects one of 14 language or legal character sets. CHARACTER SET ITALIC* GRAPHIC 1 GRAPHIC 2 Selects the italics or graphics/character sets 1 or 2. ("ITALIC" is twice that of 8 code pages. * denotes setting when shipped from factory. 29 ZERO FONT NORMAL* POINT SLASH ... printed left -to -right only (UNI DIRECTION) or in both directions (BI DIRECTION). CHARACTER COUNTRY SET U.S.A.' Initial 0 Mode msia dnies eq Bupn Menu Item Setting Description PRINT MODE GRAPHIC DIRECTION BI DIRECTION UNI DIRECTION* Graphics are printed left -to -right only (...
Operating Instructions
Page 30
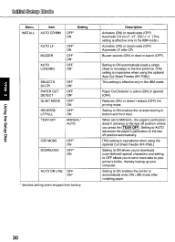
...'t advance to the tear off position automatically. [This setting is operational when using the optional Auto Cut Sheet Feeder (KX-P38).] This setting is inoperative when using the optional Cut Sheet Feeder (KX-P38).] Setting to ON allows you to download (user-defined) special characters and setting to OFF allows you press the (TEAR OFF). Paper...
...'t advance to the tear off position automatically. [This setting is operational when using the optional Auto Cut Sheet Feeder (KX-P38).] This setting is inoperative when using the optional Cut Sheet Feeder (KX-P38).] Setting to ON allows you to download (user-defined) special characters and setting to OFF allows you press the (TEAR OFF). Paper...

Operating Instructions
Page 31
...' RBC 512 Selects the desired protocol DTR or XON/XOFF. Selects Data Length 8 bits or 7 bits. Initial Setup Mode Menu Item Setting Description INTERFACE [This setting is effective only when the optional KX-PS14, RS-232C serial interface board is selected in INTERFACE. )1Sia dnieS Mil Bu!Sfl 31 ta) RDT" SDT + 128...). CUT SHEET FEEDER 0.00" to 5.00" (24/ 72-) (0.00 cm to 12.70 cm) The number increases or decreases by 1/ 72" (about 0.35 mm). [This setting is operational when using the optional Cut Sheet Feeder (KX-P38).] denotes setting when shipped from factory.
...' RBC 512 Selects the desired protocol DTR or XON/XOFF. Selects Data Length 8 bits or 7 bits. Initial Setup Mode Menu Item Setting Description INTERFACE [This setting is effective only when the optional KX-PS14, RS-232C serial interface board is selected in INTERFACE. )1Sia dnieS Mil Bu!Sfl 31 ta) RDT" SDT + 128...). CUT SHEET FEEDER 0.00" to 5.00" (24/ 72-) (0.00 cm to 12.70 cm) The number increases or decreases by 1/ 72" (about 0.35 mm). [This setting is operational when using the optional Cut Sheet Feeder (KX-P38).] denotes setting when shipped from factory.
Operating Instructions
Page 32
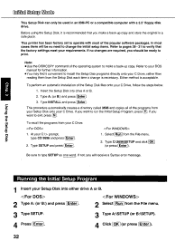
This printer has been factory set to operate with a 3.5" floppy disk drive. In most of the Setup Disk files onto your C Drive, rather than reading them from the File menu. 3 Type ... are required, you want to run the Initial Setup Program, press 0. If no need to change is necessary. Either method is recommended that the factory settings meet your requirements. Refer to your DOS manual for further information. •You may find it is acceptable. To perform an automatic installation of the...
This printer has been factory set to operate with a 3.5" floppy disk drive. In most of the Setup Disk files onto your C Drive, rather than reading them from the File menu. 3 Type ... are required, you want to run the Initial Setup Program, press 0. If no need to change is necessary. Either method is recommended that the factory settings meet your requirements. Refer to your DOS manual for further information. •You may find it is acceptable. To perform an automatic installation of the...

Operating Instructions
Page 33
... advance to and windows. • Enter to make selection in window to return to DOS ? [ EXIT ] [ CANCEL ] Ms!a dnieS mu 6u!sn 33 SETTING Seep Utility (******* r < Item > FONT PITCH In I» « COMMENT » Select VIM MYR. « KEY OPERATION » [FI*HELITI IF3+SAVE... TO DISK] IFS=PRINT SETTING) IFEmLIST] IF2.FACTORY SETTING] (F4.LOAD FROM DISK] [F1O.SEND TO PRINTER] IESC=EXITI G.) Note: •You can proceed through and press any key to window. Exiting...
... advance to and windows. • Enter to make selection in window to return to DOS ? [ EXIT ] [ CANCEL ] Ms!a dnieS mu 6u!sn 33 SETTING Seep Utility (******* r < Item > FONT PITCH In I» « COMMENT » Select VIM MYR. « KEY OPERATION » [FI*HELITI IF3+SAVE... TO DISK] IFS=PRINT SETTING) IFEmLIST] IF2.FACTORY SETTING] (F4.LOAD FROM DISK] [F1O.SEND TO PRINTER] IESC=EXITI G.) Note: •You can proceed through and press any key to window. Exiting...
Operating Instructions
Page 34
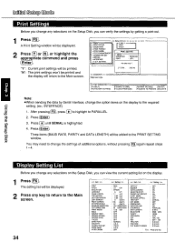
...; < Menu > * PRINT STYLE *EMULATION .PAGE FORMAT •PRINT MODE .TEXT ENHANCEMENT *CHARACTER SET *INSTALL • INTERFACE *T.O.F. SETTING Setupththly nr r < Item > FONT PITCH PRINT SETTING Op0en INTERFACE PORT PARALLEL LPTI: Are you can verify the settings by getting a print-out. 1 Press [F5 A Print Setting window will be displayed. 2 Press (VI or (11) or highlight the appropriate...
...; < Menu > * PRINT STYLE *EMULATION .PAGE FORMAT •PRINT MODE .TEXT ENHANCEMENT *CHARACTER SET *INSTALL • INTERFACE *T.O.F. SETTING Setupththly nr r < Item > FONT PITCH PRINT SETTING Op0en INTERFACE PORT PARALLEL LPTI: Are you can verify the settings by getting a print-out. 1 Press [F5 A Print Setting window will be displayed. 2 Press (VI or (11) or highlight the appropriate...

Operating Instructions
Page 35
... FONT PITCH e Draft Roman *PAGE FORMAT Sans Serif *PRINT MODE Courier *TEXT ENHANCEMENT Prestige s CHARACTER SET Script *INSTALL Bold PS O *INTERFACE r yT O F SETTING 0) 4 Press • I or Highlight the desired setting (ex; window will appear next to 6. « COMMENT » Select tont style. Style of typeface.... « KEY OPERATION » [FlyHELPI [F2=FACTORY SETTING] (F3tSAVE TO DISK) (FdyLOAD FROM DISK] [F5=PRINT SETTING] [F6=LISTI [F10=SEND TO PRINTER] IESC=EXITI >Isla dines ato 6u!sn 35 Style of typeface....
... FONT PITCH e Draft Roman *PAGE FORMAT Sans Serif *PRINT MODE Courier *TEXT ENHANCEMENT Prestige s CHARACTER SET Script *INSTALL Bold PS O *INTERFACE r yT O F SETTING 0) 4 Press • I or Highlight the desired setting (ex; window will appear next to 6. « COMMENT » Select tont style. Style of typeface.... « KEY OPERATION » [FlyHELPI [F2=FACTORY SETTING] (F3tSAVE TO DISK) (FdyLOAD FROM DISK] [F5=PRINT SETTING] [F6=LISTI [F10=SEND TO PRINTER] IESC=EXITI >Isla dines ato 6u!sn 35 Style of typeface....

Operating Instructions
Page 36
... PRINTER] lESC=EXITI 36 I EXIT I [CANCEL) E Select print style. « KEY OPERATION » [F1=HELP] (F2=FACTORY SETTING] IFUSAVE TO DISK) [F4*LOAD FROM DISK] [FS.PRINT SETTING] [Fe=LIST) IFI0.SEND TO PRINTER) (ESC=EXIT) Save to Disk 1 Press (F3 A Save to Disk window will be displayed... Files : Dive: [C: II Directory: I li CA 1 t OK c* Se ] « KEY OPERATION » [Fl*FIELPI [F2=FACTORY SETTING] EXIT (F3aSAVE TO DISK] IF4*LOAD FROM DISK) r.. SETTING Exit to DOS ? To change Directory, press TAB fifth time and select the new directory by using ( t or 4 ), then press (Enter...
... PRINTER] lESC=EXITI 36 I EXIT I [CANCEL) E Select print style. « KEY OPERATION » [F1=HELP] (F2=FACTORY SETTING] IFUSAVE TO DISK) [F4*LOAD FROM DISK] [FS.PRINT SETTING] [Fe=LIST) IFI0.SEND TO PRINTER) (ESC=EXIT) Save to Disk 1 Press (F3 A Save to Disk window will be displayed... Files : Dive: [C: II Directory: I li CA 1 t OK c* Se ] « KEY OPERATION » [Fl*FIELPI [F2=FACTORY SETTING] EXIT (F3aSAVE TO DISK] IF4*LOAD FROM DISK) r.. SETTING Exit to DOS ? To change Directory, press TAB fifth time and select the new directory by using ( t or 4 ), then press (Enter...

Operating Instructions
Page 37
...will return to the Main screen. Ms!a dnlaS eta &Han 3 Press (TABJ repeatedly to move the cursor to the previous selection. "Y": The current settings will return to a window. To change Drive, press (TABJ four times and type the letter for the drive you want to use. Delete * ... displayed. 2 To change Directory, press TAB fifth time and select the new directory by using or 4 , then press Enter If you want to save the setting(s) as a file name previously saved, after entering the same file name, press [Enter) then press (V). Menu > x -PRINT STYLE 4:EMULATION FileName it DAT ...
...will return to the Main screen. Ms!a dnlaS eta &Han 3 Press (TABJ repeatedly to move the cursor to the previous selection. "Y": The current settings will return to a window. To change Drive, press (TABJ four times and type the letter for the drive you want to use. Delete * ... displayed. 2 To change Directory, press TAB fifth time and select the new directory by using or 4 , then press Enter If you want to save the setting(s) as a file name previously saved, after entering the same file name, press [Enter) then press (V). Menu > x -PRINT STYLE 4:EMULATION FileName it DAT ...


