
Dvd Recorder - English / Spanish
Page 1
... by this unit Region numbers are allocated to DVD players and DVD-Video according to where they are sold. • The region number of this manual for purchasing this product, please read these instructions carefully. P PC Example: 1 ALL 124 RQT9046-P Operating Instructions DVD Recorder Model No.
... by this unit Region numbers are allocated to DVD players and DVD-Video according to where they are sold. • The region number of this manual for purchasing this product, please read these instructions carefully. P PC Example: 1 ALL 124 RQT9046-P Operating Instructions DVD Recorder Model No.
Dvd Recorder - English / Spanish
Page 4
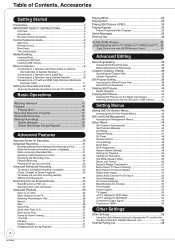
... the DVD On-Screen Menus 42 DVD and Card Management 43 Accessing the Management Menus 43 Setup Menus 46 Set Channels Automatically 46 Set Channels Manually 46 Surf Mode 47 Parental Rating 47 Off Timer 48 Remote Control 48 Clock Settings 48 Quick Start 49 DivX Registration 49 Restore Default Settings...
... the DVD On-Screen Menus 42 DVD and Card Management 43 Accessing the Management Menus 43 Setup Menus 46 Set Channels Automatically 46 Set Channels Manually 46 Surf Mode 47 Parental Rating 47 Off Timer 48 Remote Control 48 Clock Settings 48 Quick Start 49 DivX Registration 49 Restore Default Settings...
Dvd Recorder - English / Spanish
Page 12
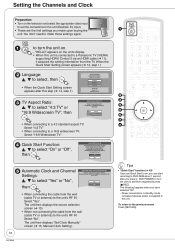
...; When connecting to on, you have selected "On". - "HELLO" appears on the unit's display. • When this unit is connected to a Panasonic TV (VIERA) supporting HDAVI Control 3 via RF IN? Setting the Channels and Clock Preparation: • Turn on the television and select the appropriate video ...; When not connecting the cable from the wall (cable TV or antenna) to turn the unit on ? The unit then displays "Set Clock Manually" screen (➔ 13, Manual Clock Setting). 8 Tips • "Quick Start" function (➔ 49) If you set Quick Start to a 16:9 widescreen TV: Select ...
...; When connecting to on, you have selected "On". - "HELLO" appears on the unit's display. • When this unit is connected to a Panasonic TV (VIERA) supporting HDAVI Control 3 via RF IN? Setting the Channels and Clock Preparation: • Turn on the television and select the appropriate video ...; When not connecting the cable from the wall (cable TV or antenna) to turn the unit on ? The unit then displays "Set Clock Manually" screen (➔ 13, Manual Clock Setting). 8 Tips • "Quick Start" function (➔ 49) If you set Quick Start to a 16:9 widescreen TV: Select ...

Dvd Recorder - English / Spanish
Page 13
... Setting (➔ 46). All scheduled recordings are cleared.) To cancel in March and ending at the same time for DST" then press [OK]. 5. Set Clock Manually Month Day Year 1 / 1 / 2000 SAT Hour Minute 12 : 00 AM DST Time Zone Off EST e, r to change dates for about 5 seconds. Notes • The ...SUN 2 : 00 AM End Month 11 Day 1st SUN Hour Minute 2 : 00 AM OK Restore Default Reinitializes the settings. 13 RQT9046 Set the DST period manually when it varies according to the RF IN terminal. Press [e, r] to set the clock with "Adjust Time Zone" (➔ 49) or "Set Clock...
... Setting (➔ 46). All scheduled recordings are cleared.) To cancel in March and ending at the same time for DST" then press [OK]. 5. Set Clock Manually Month Day Year 1 / 1 / 2000 SAT Hour Minute 12 : 00 AM DST Time Zone Off EST e, r to change dates for about 5 seconds. Notes • The ...SUN 2 : 00 AM End Month 11 Day 1st SUN Hour Minute 2 : 00 AM OK Restore Default Reinitializes the settings. 13 RQT9046 Set the DST period manually when it varies according to the RF IN terminal. Press [e, r] to set the clock with "Adjust Time Zone" (➔ 49) or "Set Clock...
Dvd Recorder - English / Spanish
Page 14
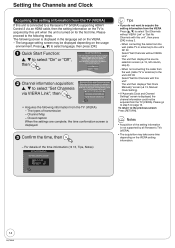
...Settings Please select how to the unit's RF IN: Select "Set No Channels with this unit". On Time Zone---- It is acquired by all Panasonic TVs (VIERA). • The acquisition may be turned on faster, in the language set channels. Confirm the time, then - The unit ... • If you do not want to step 5 on the VIERA setting information. 14 RQT9046 The unit then displays "Set Clock Manually" screen (➔ 13, Manual Clock Setting). • If "Automatic Clock and Channel Settings" screen is displayed. The language setting screen may take some time depending...
...Settings Please select how to the unit's RF IN: Select "Set No Channels with this unit". On Time Zone---- It is acquired by all Panasonic TVs (VIERA). • The acquisition may be turned on faster, in the language set channels. Confirm the time, then - The unit ... • If you do not want to step 5 on the VIERA setting information. 14 RQT9046 The unit then displays "Set Clock Manually" screen (➔ 13, Manual Clock Setting). • If "Automatic Clock and Channel Settings" screen is displayed. The language setting screen may take some time depending...

Dvd Recorder - English / Spanish
Page 34
... is on) Automatic input switching When the TV is "On".) 3. When the connection or settings are changed, repeat this unit to individual manuals for Panasonic's HDAVI Control compatible equipment. when finalizing, etc. • When this unit is connected to "On" (➔ 55). (The default .... (Picture or sound may not automatically turn off and the following conditions: - What is proceeding - Set "VIERA Link" to a Panasonic TV (VIERA) supporting HDAVI Control 3 and initially set the input channel to where playback started . See the operating instructions for connected equipment...
... is on) Automatic input switching When the TV is "On".) 3. When the connection or settings are changed, repeat this unit to individual manuals for Panasonic's HDAVI Control compatible equipment. when finalizing, etc. • When this unit is connected to "On" (➔ 55). (The default .... (Picture or sound may not automatically turn off and the following conditions: - What is proceeding - Set "VIERA Link" to a Panasonic TV (VIERA) supporting HDAVI Control 3 and initially set the input channel to where playback started . See the operating instructions for connected equipment...
Dvd Recorder - English / Spanish
Page 46
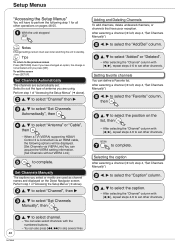
... r to perform the following step 1 for all other channels. Selecting the caption After selecting a channel (➔ left , step 4, "Set Channels Manually") w, q to select the "Favorite" column, then e, r to select the position on the list, then - With the unit stopped Notes Changed... You can acquire the VIERA setting information. [Set Channels without VIERA Link] to complete. After selecting a channel (➔ left, step 4, "Set Channels Manually") w, q to the previous screen Press [RETURN]. e, r to complete. To exit the screen Press [SETUP]. After selecting the "Channel" column with ...
... r to perform the following step 1 for all other channels. Selecting the caption After selecting a channel (➔ left , step 4, "Set Channels Manually") w, q to select the "Favorite" column, then e, r to select the position on the list, then - With the unit stopped Notes Changed... You can acquire the VIERA setting information. [Set Channels without VIERA Link] to complete. After selecting a channel (➔ left, step 4, "Set Channels Manually") w, q to the previous screen Press [RETURN]. e, r to complete. To exit the screen Press [SETUP]. After selecting the "Channel" column with ...
Dvd Recorder - English / Spanish
Page 47
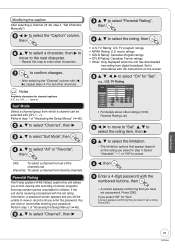
... Set TV-NR On Viewable TV-Y Viewable TV-Y7 Viewable TV-G Viewable TV-PG -- Modifying the caption After selecting a channel (➔ 46, step 4, "Set Channels Manually") w, q to select the "Caption" column, then e, r to select a character, then q to move to "Set", e, r to select the rating item, then q e, r to select the limitation. - L -- D -- S -- Select...
... Set TV-NR On Viewable TV-Y Viewable TV-Y7 Viewable TV-G Viewable TV-PG -- Modifying the caption After selecting a channel (➔ 46, step 4, "Set Channels Manually") w, q to select the "Caption" column, then e, r to select a character, then q to move to "Set", e, r to select the rating item, then q e, r to select the limitation. - L -- D -- S -- Select...
Dvd Recorder - English / Spanish
Page 48
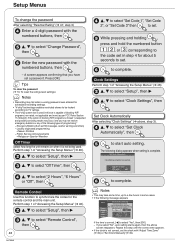
... a 4-digit password with the numbered buttons, then e, r to select "Change Password", then Enter the new password with "Adjust Time Zone" (➔ 49) or "Set Clock Manually"(➔ 49). Perform step 1 of blocking "NR" programs (non rated, not applicable and none) as EAS messages, weather warnings and others) - Set Clock Automatically Clock...
... a 4-digit password with the numbered buttons, then e, r to select "Change Password", then Enter the new password with "Adjust Time Zone" (➔ 49) or "Set Clock Manually"(➔ 49). Perform step 1 of blocking "NR" programs (non rated, not applicable and none) as EAS messages, weather warnings and others) - Set Clock Automatically Clock...
Dvd Recorder - English / Spanish
Page 49
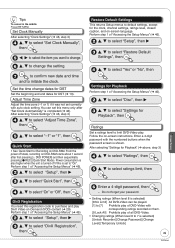
... off if this menu only after first pressing [^ DVD POWER] and then sequentially pressing [* REC] (Quick Start Mode). Set Clock Manually After selecting "Clock Settings" (➔ 48, step 3) e, r to select "Set Clock Manually", then w, q to select the item you want to select "-1" or "1", then Quick Start 1 Sec. Set the time change the...
... off if this menu only after first pressing [^ DVD POWER] and then sequentially pressing [* REC] (Quick Start Mode). Set Clock Manually After selecting "Clock Settings" (➔ 48, step 3) e, r to select "Set Clock Manually", then w, q to select the item you want to select "-1" or "1", then Quick Start 1 Sec. Set the time change the...
Dvd Recorder - English / Spanish
Page 71
...; Reset the unit as in (2) above. − Startup is connected to eject the disc: − cannot be defective. supporting 24p, you can set the clock manually. 49 Auto Clock Setting. Change to off , reset the unit (➔ 70, "To restore the unit if it . Eject the disc as follows: Press [POWER...
...; Reset the unit as in (2) above. − Startup is connected to eject the disc: − cannot be defective. supporting 24p, you can set the clock manually. 49 Auto Clock Setting. Change to off , reset the unit (➔ 70, "To restore the unit if it . Eject the disc as follows: Press [POWER...


