
Firmware Installation Instructions
Page 1
DMR-E95 Firmware Installation Instructions Table of Contents Table of Contents 1 1 Download Firmware 2 2 Burn Firmware 3 2.1 Windows® OS CD Writing Program 3 2.2 Other OS CD Writing Program 4 2.3 3rd Party CD Burning Software 4 2.4 Dragging & Dropping 5 3 Install Firmware 6 DMR-E95 DVD Recorder Firmware Installation Instructions Page 1 of 6
DMR-E95 Firmware Installation Instructions Table of Contents Table of Contents 1 1 Download Firmware 2 2 Burn Firmware 3 2.1 Windows® OS CD Writing Program 3 2.2 Other OS CD Writing Program 4 2.3 3rd Party CD Burning Software 4 2.4 Dragging & Dropping 5 3 Install Firmware 6 DMR-E95 DVD Recorder Firmware Installation Instructions Page 1 of 6
Firmware Installation Instructions
Page 2
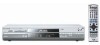
DMR-E95 DVD Recorder Firmware Installation Instructions Page 2 of 6 NOTE: The PANA_DVD.FRM file will be PANA_DVD.FRM 3) Left click on DESKTOP, and then left click on the DESKTOP. 1 Download Firmware 1) Left click on SAVE. DMR-E95 DVD Recorder Firmware Update 2) Left click on the DOWNLOAD icon for the DMR-E95 DVD Recorder Firmware. - The file name displayed should be placed on SAVE.
DMR-E95 DVD Recorder Firmware Installation Instructions Page 2 of 6 NOTE: The PANA_DVD.FRM file will be PANA_DVD.FRM 3) Left click on DESKTOP, and then left click on the DESKTOP. 1 Download Firmware 1) Left click on SAVE. DMR-E95 DVD Recorder Firmware Update 2) Left click on the DOWNLOAD icon for the DMR-E95 DVD Recorder Firmware. - The file name displayed should be placed on SAVE.
Firmware Installation Instructions
Page 3
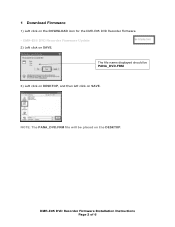
DMR-E95 DVD Recorder Firmware Installation Instructions Page 3 of the below methods to burn the firmware to a CD-R disc. 2.1 Windows® OS CD Writing Program 1) Insert a blank CD-R disc into a CD Burner Drive installed in or attached to the computer. 2) If the below (or similar) screen appears (Windows XP), left click on CANCEL. 3) Right click on the PANA_DVD.FRM file on the DESKTOP, mouse over SEND TO, and then left click on the CD BURNER DRIVE. 4) If the below screen may appear momentarily. 2 Burn Firmware Use one of 6 NOTE: The below screen appears, left click on YES.
DMR-E95 DVD Recorder Firmware Installation Instructions Page 3 of the below methods to burn the firmware to a CD-R disc. 2.1 Windows® OS CD Writing Program 1) Insert a blank CD-R disc into a CD Burner Drive installed in or attached to the computer. 2) If the below (or similar) screen appears (Windows XP), left click on CANCEL. 3) Right click on the PANA_DVD.FRM file on the DESKTOP, mouse over SEND TO, and then left click on the CD BURNER DRIVE. 4) If the below screen may appear momentarily. 2 Burn Firmware Use one of 6 NOTE: The below screen appears, left click on YES.
Firmware Installation Instructions
Page 4
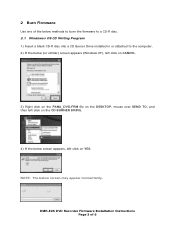
... Burner Drive. DMR-E95 DVD Recorder Firmware Installation Instructions Page 4 of 6 If it doesn't, manually eject the disc. 2.2 Other OS CD Writing Program Refer to the computer's owner's manual or HELP files for instructions on NEXT. NOTE: The below screen will appear during the burning process. 8) After the PANA_DVD.FRM file has been burned to a CD-R using the ISO-9660 format. 2.3 3rd Party CD Burning Software Refer to the software application's owner's manual or HELP files...
... Burner Drive. DMR-E95 DVD Recorder Firmware Installation Instructions Page 4 of 6 If it doesn't, manually eject the disc. 2.2 Other OS CD Writing Program Refer to the computer's owner's manual or HELP files for instructions on NEXT. NOTE: The below screen will appear during the burning process. 8) After the PANA_DVD.FRM file has been burned to a CD-R using the ISO-9660 format. 2.3 3rd Party CD Burning Software Refer to the software application's owner's manual or HELP files...
Firmware Installation Instructions
Page 5
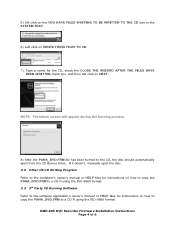
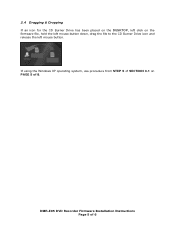
2.4 Dragging & Dropping If an icon for the CD Burner Drive has been placed on the DESKTOP, left click on PAGE 5 of 6 DMR-E95 DVD Recorder Firmware Installation Instructions Page 5 of 8. If using the Windows XP operating system, use procedure from STEP 5 of SECTION 3.1 on the firmware file, hold the left mouse button down, drag the file to the CD Burner Drive icon and release the left mouse button.
2.4 Dragging & Dropping If an icon for the CD Burner Drive has been placed on the DESKTOP, left click on PAGE 5 of 6 DMR-E95 DVD Recorder Firmware Installation Instructions Page 5 of 8. If using the Windows XP operating system, use procedure from STEP 5 of SECTION 3.1 on the firmware file, hold the left mouse button down, drag the file to the CD Burner Drive icon and release the left mouse button.
Firmware Installation Instructions
Page 6
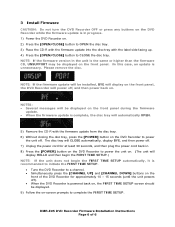
... up. 4) Press the [OPEN/CLOSE] button to CLOSE the disc tray. Please remove the disc. 3 Install Firmware CAUTION: Do not turn the DVD Recorder OFF or press any buttons on the DVD Recorder while the firmware update is in progress. 1) Power the DVD Recorder on. 2) Press the [OPEN/CLOSE] button to OPEN the disc tray. 3) Place the CD-R with the firmware update into the disc tray with the firmware update from the disc tray. 6) Without closing the disc tray, press the [POWER] button on the DVD Recorder to power the unit off , and...
... up. 4) Press the [OPEN/CLOSE] button to CLOSE the disc tray. Please remove the disc. 3 Install Firmware CAUTION: Do not turn the DVD Recorder OFF or press any buttons on the DVD Recorder while the firmware update is in progress. 1) Power the DVD Recorder on. 2) Press the [OPEN/CLOSE] button to OPEN the disc tray. 3) Place the CD-R with the firmware update into the disc tray with the firmware update from the disc tray. 6) Without closing the disc tray, press the [POWER] button on the DVD Recorder to power the unit off , and...


