
CQVD6503U User Guide
Page 2
... installation instructions. Never operate this manual. If an infant ingests a battery or insulation film, please seek immediate medical attention. ❑ Protect the Deck Mechanism. Wiring and installation with power. ❑ After installation and wiring, you to qualified service personnel. use this unit. ❑ The driver should not lie about in injury or material damage. If the unit is smoking, or smells), turn it off immediately and consult your car audio...
... installation instructions. Never operate this manual. If an infant ingests a battery or insulation film, please seek immediate medical attention. ❑ Protect the Deck Mechanism. Wiring and installation with power. ❑ After installation and wiring, you to qualified service personnel. use this unit. ❑ The driver should not lie about in injury or material damage. If the unit is smoking, or smells), turn it off immediately and consult your car audio...
CQVD6503U User Guide
Page 3
... may result in car washes or on of speaker leads. (except for a long period of the unit. strong vibrations or is unit. unit, and it for safety. Make sure that wiring is unstable. tweeter) Observe the following cautions when handling the battery for a prolonged period with ❑ Installation Angle the engine turned off the battery case and and moving parts or in...
... may result in car washes or on of speaker leads. (except for a long period of the unit. strong vibrations or is unit. unit, and it for safety. Make sure that wiring is unstable. tweeter) Observe the following cautions when handling the battery for a prolonged period with ❑ Installation Angle the engine turned off the battery case and and moving parts or in...
CQVD6503U User Guide
Page 5
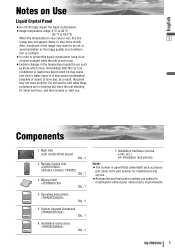
... cause condensation (droplets of water) to be out of direct sunlight while the unit is not malfunc- Main Unit SRC ALBUM FOLDER MENU VOL TUNE TRACK (LCD monitor/DVD player) MUTE NAVI P-MODE ASPECT ASP TILT Qty.: 1 PWR SRC MUTE VOL ENTER / BAND ENT RET RETURN TOP MENU DVD MENU CAR AV 2. Remote Control Unit (includes a battery: CR2025) Qty.: 1 3. CQ-VD6503U 5 Installation Instructions Qty.: 1 7. Wiping Cloth Qty.: 1 XXXXXXXXXXXXXXX XXXXXXXXXXXXXXXXX XXXXXXXXXXXXXX XXXXXXXXXXXXXXXX...
... cause condensation (droplets of water) to be out of direct sunlight while the unit is not malfunc- Main Unit SRC ALBUM FOLDER MENU VOL TUNE TRACK (LCD monitor/DVD player) MUTE NAVI P-MODE ASPECT ASP TILT Qty.: 1 PWR SRC MUTE VOL ENTER / BAND ENT RET RETURN TOP MENU DVD MENU CAR AV 2. Remote Control Unit (includes a battery: CR2025) Qty.: 1 3. CQ-VD6503U 5 Installation Instructions Qty.: 1 7. Wiping Cloth Qty.: 1 XXXXXXXXXXXXXXX XXXXXXXXXXXXXXXXX XXXXXXXXXXXXXX XXXXXXXXXXXXXXXX...
CQVD6503U User Guide
Page 7
... Company or Panasonic Sales Company (collectively referred to usage for labor. The decision to products purchased and serviced in the chart below from the servicer, and loss of media, data or other proof of having someone remove or re-install an installed unit if applicable, travel to state. During the "Parts" warranty period, there will be free from defects...
... Company or Panasonic Sales Company (collectively referred to usage for labor. The decision to products purchased and serviced in the chart below from the servicer, and loss of media, data or other proof of having someone remove or re-install an installed unit if applicable, travel to state. During the "Parts" warranty period, there will be free from defects...
CQVD6503U User Guide
Page 8
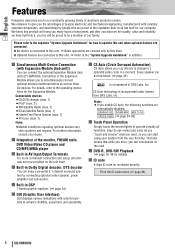
...;XM Satellite Radio (max. 1) ¡Sirius Satellite Radio (max. 1) ¡Hands-Free Phone System (max. 1) ¡TV tuner (max. 1) Note: ¡Market conditions regarding optional devices vary with carefully selected components, and assembled by people who are proud of the monitor, FM/AM radio, DVD Video/Video CD player and CD/MP3/WMA player ■ Built-in AV Input/Output Terminals For more convenient connection and setup, all functions. English Features Panasonic welcomes...
...;XM Satellite Radio (max. 1) ¡Sirius Satellite Radio (max. 1) ¡Hands-Free Phone System (max. 1) ¡TV tuner (max. 1) Note: ¡Market conditions regarding optional devices vary with carefully selected components, and assembled by people who are proud of the monitor, FM/AM radio, DVD Video/Video CD player and CD/MP3/WMA player ■ Built-in AV Input/Output Terminals For more convenient connection and setup, all functions. English Features Panasonic welcomes...
CQVD6503U User Guide
Page 9
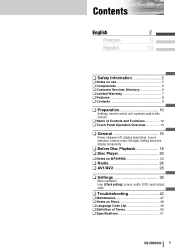
...; Preparation 10 Settings, remote control unit, symbols used in this manual ¢ Name of Controls and Functions 12 ¢ Touch Panel Operation Overview 14 ¢ General 16 Power on/power off, display open/close, source selection, volume, mute, tilt angle, folding down the display temporarily ¢ Before Disc Playback 18 ¢ Disc Player 20 ¢ Notes on MP3/WMA 24 ¢ Radio 26 ¢ AV1/AV2 28 ¢ Settings 30 Menu operation User (Clock setting), screen, audio, DVD, input/output, radio ¢ Troubleshooting 42 ¢...
...; Preparation 10 Settings, remote control unit, symbols used in this manual ¢ Name of Controls and Functions 12 ¢ Touch Panel Operation Overview 14 ¢ General 16 Power on/power off, display open/close, source selection, volume, mute, tilt angle, folding down the display temporarily ¢ Before Disc Playback 18 ¢ Disc Player 20 ¢ Notes on MP3/WMA 24 ¢ Radio 26 ¢ AV1/AV2 28 ¢ Settings 30 Menu operation User (Clock setting), screen, audio, DVD, input/output, radio ¢ Troubleshooting 42 ¢...
CQVD6503U User Guide
Page 10
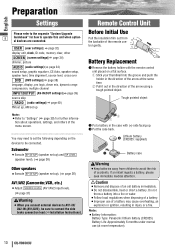
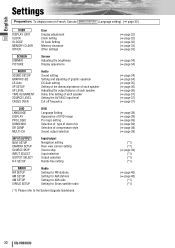
... Battery Life: Approximately 6 months under normal use of the remote control gently. al devices are connected. USER (user settings)( a page 32) display unit, clock, ID code, memory clear, other SCREEN (screen settings)(a page 34) dimmer, picture AUDIO (audio settings)(a page 34) sound setup, graphic equalizer, CS Auto, speaker setup, speaker level, time alignment, source level, cross over DVD (DVD settings)(a page 38) language, display, pro logic, down mix, dynamic range compression, multiple channel INPUT/OUTPUT (AV-IN/OUT settings)(a page 39) source skip RADIO (radio settings...
... Battery Life: Approximately 6 months under normal use of the remote control gently. al devices are connected. USER (user settings)( a page 32) display unit, clock, ID code, memory clear, other SCREEN (screen settings)(a page 34) dimmer, picture AUDIO (audio settings)(a page 34) sound setup, graphic equalizer, CS Auto, speaker setup, speaker level, time alignment, source level, cross over DVD (DVD settings)(a page 38) language, display, pro logic, down mix, dynamic range compression, multiple channel INPUT/OUTPUT (AV-IN/OUT settings)(a page 39) source skip RADIO (radio settings...

CQVD6503U User Guide
Page 13
...;Selects a band. ¡Searches for broadcast stations and memorizes them automatically. ¡Determines an operation or item. English Remote Control Aim the remote control at the remote control sensor of the display unit and operate it. u[ ] ¡Displays the DVD/title menu. (Operations (TOP MENU/ vary according to the previous display. ¡Inputs the number again. ¡Displays the VCD's menu. ¡Mutes the sound temporarily. q [SRC] (PWR) w B] [s] [d] e [RET] (RETURN) r [MUTE] ¡Switches the power on the remote control unit...
...;Selects a band. ¡Searches for broadcast stations and memorizes them automatically. ¡Determines an operation or item. English Remote Control Aim the remote control at the remote control sensor of the display unit and operate it. u[ ] ¡Displays the DVD/title menu. (Operations (TOP MENU/ vary according to the previous display. ¡Inputs the number again. ¡Displays the VCD's menu. ¡Mutes the sound temporarily. q [SRC] (PWR) w B] [s] [d] e [RET] (RETURN) r [MUTE] ¡Switches the power on the remote control unit...
CQVD6503U User Guide
Page 14
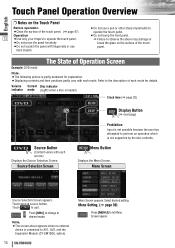
... bump the front panel. Menu Screen Source Selection Screen appears. Press [SRC] to change to let Menu Screen appear. Select desired setting. The State of Operation Screen Example: DVD mode Note: ¡The following picture is loaded) Clock time (a page 32) Source Button (Content varies with fingernails or any hard objects. ¡Do not use a pen or other sharp implements to the description of each mode for explanation. ¡Displaying contents and...
... bump the front panel. Menu Screen Source Selection Screen appears. Press [SRC] to change to let Menu Screen appear. Select desired setting. The State of Operation Screen Example: DVD mode Note: ¡The following picture is loaded) Clock time (a page 32) Source Button (Content varies with fingernails or any hard objects. ¡Do not use a pen or other sharp implements to the description of each mode for explanation. ¡Displaying contents and...
CQVD6503U User Guide
Page 30
... 33) USER DISPLAY UNIT 29 CLOCK ID-CODE MEMORY CLEAR OTHER User Display adjustment Clock setting ID Code Setting Memory clearance Other settings SCREEN DIMMER PICTURE Screen Adjusting the brightness Display appearance AUDIO SOUND SETUP GRAPHIC-EQ CS Auto SP SETUP SP LEVEL TIME ALIGNMENT SOURCE LEVEL CROSS OVER Audio Sound setting Setting and adjusting of graphic equalizer CS Auto setting Setting of the absence/presence of each speaker Adjusting the output balance of each speaker Delay time setting of each speaker Setting the AV1/AV2 input level Cut off frequency DVD LANGUAGE DISPLAY PRO...
... 33) USER DISPLAY UNIT 29 CLOCK ID-CODE MEMORY CLEAR OTHER User Display adjustment Clock setting ID Code Setting Memory clearance Other settings SCREEN DIMMER PICTURE Screen Adjusting the brightness Display appearance AUDIO SOUND SETUP GRAPHIC-EQ CS Auto SP SETUP SP LEVEL TIME ALIGNMENT SOURCE LEVEL CROSS OVER Audio Sound setting Setting and adjusting of graphic equalizer CS Auto setting Setting of the absence/presence of each speaker Adjusting the output balance of each speaker Delay time setting of each speaker Setting the AV1/AV2 input level Cut off frequency DVD LANGUAGE DISPLAY PRO...
CQVD6503U User Guide
Page 32
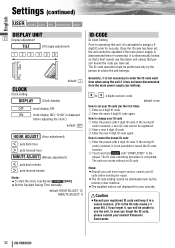
... unit belongs. played. In case you have set , the unit cannot be operated if the main power supply is disconnected then re-connected. Once the ID code has been set . w Enter the same 4 digit ID code again. How to assign a 4digit ID code for the first time) q Enter an 4 digit ID code. Settings (continued) English USER SCREEN AUDIO DVD INPUT/OUTPUT RADIO DISPLAY UNIT 31 Display adjustment TILT (Tilt angle adjustment) 123456 default: 1 CLOCK Clock setting DISPLAY (Clock display) OFF : clock display OFF ON : clock display...
... unit belongs. played. In case you have set , the unit cannot be operated if the main power supply is disconnected then re-connected. Once the ID code has been set . w Enter the same 4 digit ID code again. How to assign a 4digit ID code for the first time) q Enter an 4 digit ID code. Settings (continued) English USER SCREEN AUDIO DVD INPUT/OUTPUT RADIO DISPLAY UNIT 31 Display adjustment TILT (Tilt angle adjustment) 123456 default: 1 CLOCK Clock setting DISPLAY (Clock display) OFF : clock display OFF ON : clock display...

CQVD6503U User Guide
Page 34
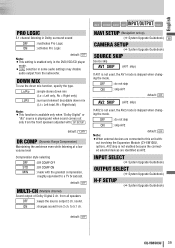
... AUDIO USER SCREEN DVD INPUT/OUTPUT RADIO SOUND SETUP Sound Set Up SOUND EFFECT (Sound effect setting) THROUGH : No GEQ or CS Auto setting GEQ : Goes to GEQ setting CS Auto : Goes to adjust. To recall a preset memory, select the corresponding preset buttons [1] to [6]. 1 : (Flat) flat frequency response 2 : (Rock) speedy and heavy sound 3 : (Pop) wide-ranged and deep sound 4 : (Vocal) clear sound 5 : (Jazz) jazz-specific deep sound 6 : (Club) club and disco-specific sound You may set your own EQ or modify factory presettings in each memory button...
... AUDIO USER SCREEN DVD INPUT/OUTPUT RADIO SOUND SETUP Sound Set Up SOUND EFFECT (Sound effect setting) THROUGH : No GEQ or CS Auto setting GEQ : Goes to GEQ setting CS Auto : Goes to adjust. To recall a preset memory, select the corresponding preset buttons [1] to [6]. 1 : (Flat) flat frequency response 2 : (Rock) speedy and heavy sound 3 : (Pop) wide-ranged and deep sound 4 : (Vocal) clear sound 5 : (Jazz) jazz-specific deep sound 6 : (Club) club and disco-specific sound You may set your own EQ or modify factory presettings in each memory button...

CQVD6503U User Guide
Page 35
... the front speakers) [ : more ] : less REAR TruBass (Applies to the rear speakers) [ : more ] : less SUB-W TruBass (Applies to the Sub-woofer) [ : more ] : less Setting range: off, + 1 to + 10 default: off , + 1 to be used, settings in which the technique of bass sound reproduction used at all and bass sound from the speakers to reproduce the sounds of playing sound vertically to be used is electrically applied, and in the menu, and...
... the front speakers) [ : more ] : less REAR TruBass (Applies to the rear speakers) [ : more ] : less SUB-W TruBass (Applies to the Sub-woofer) [ : more ] : less Setting range: off, + 1 to + 10 default: off , + 1 to be used, settings in which the technique of bass sound reproduction used at all and bass sound from the speakers to reproduce the sounds of playing sound vertically to be used is electrically applied, and in the menu, and...

CQVD6503U User Guide
Page 36
.... default: 0° SP LEVEL (Speaker level) Adjusting the output balance of each speaker FRONT L (Left front speaker output balance) ] : down, [ : up CENTER (Center speaker output balance) ] : down, [ : up FRONT R (Right front speaker output balance) ] : down, [ : up R¡SUR (Right surround speaker output balance) ] : down, [ : up L¡SUR (Left surround speaker output balance) ] : down , [ : up SUB - A power amplifier (option) is also required for connecting a subwoofer. Settings (continued) English (AUDIO continued) 35 SP SETUP (Speaker set to + 10 dB (1 dB...
.... default: 0° SP LEVEL (Speaker level) Adjusting the output balance of each speaker FRONT L (Left front speaker output balance) ] : down, [ : up CENTER (Center speaker output balance) ] : down, [ : up FRONT R (Right front speaker output balance) ] : down, [ : up R¡SUR (Right surround speaker output balance) ] : down, [ : up L¡SUR (Left surround speaker output balance) ] : down , [ : up SUB - A power amplifier (option) is also required for connecting a subwoofer. Settings (continued) English (AUDIO continued) 35 SP SETUP (Speaker set to + 10 dB (1 dB...

CQVD6503U User Guide
Page 37
... AV1/AV2 is active, only FRONT L and FRONT R can be adjusted by pressing [+] or [-] (VOL) on the remote control or turning rotary volume controller on the unit. English Note: ¡While the private mode is too high, the audio will not be output normally. ¡After setting the input level The volume can be adjusted. CQ-VD6503U 37 Adjust the output balance so that speaker cannot be selected. ¡When "PRO...
... AV1/AV2 is active, only FRONT L and FRONT R can be adjusted by pressing [+] or [-] (VOL) on the remote control or turning rotary volume controller on the unit. English Note: ¡While the private mode is too high, the audio will not be output normally. ¡After setting the input level The volume can be adjusted. CQ-VD6503U 37 Adjust the output balance so that speaker cannot be selected. ¡When "PRO...
CQVD6503U User Guide
Page 38
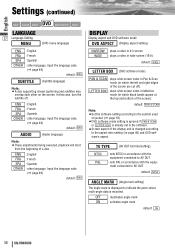
... : plays a video in 4:3 screen. default: NTSC ANGLE MARK (Angle mark setting) The angle mark is displayed to indicate the parts where multi-angle data is changed according to the symbol used on the screen. Settings (continued) English DVD USER SCREEN AUDIO INPUT/OUTPUT RADIO LANGUAGE 37 Language Setting MENU (DVD menu language) ENG : English FRA : French SPA : Spanish OTHER : other language. default: WIDE LETTER BOX (DVD software mode) PAN & SCAN : plays wide-screen video in Pan & Scan mode...
... : plays a video in 4:3 screen. default: NTSC ANGLE MARK (Angle mark setting) The angle mark is displayed to indicate the parts where multi-angle data is changed according to the symbol used on the screen. Settings (continued) English DVD USER SCREEN AUDIO INPUT/OUTPUT RADIO LANGUAGE 37 Language Setting MENU (DVD menu language) ENG : English FRA : French SPA : Spanish OTHER : other language. default: WIDE LETTER BOX (DVD software mode) PAN & SCAN : plays wide-screen video in Pan & Scan mode...
CQVD6503U User Guide
Page 39
... when changing the mode. ON : changes sound from the subwoofer. OFF : do not skip ON : skip AV1 default: OFF AV2 SKIP (AV2 skip) If AV2 is not used , the AV1 mode is playing and when sound comes out only from all speakers OFF : keeps the source output 2 ch. INPUT SELECT (a System Upgrade Guidebook) OUTPUT SELECT (a System Upgrade Guidebook) H-F SETUP (a System Upgrade Guidebook) default: OFF CQ-VD6503U 39 from the front speakers adjusted...
... when changing the mode. ON : changes sound from the subwoofer. OFF : do not skip ON : skip AV1 default: OFF AV2 SKIP (AV2 skip) If AV2 is not used , the AV1 mode is playing and when sound comes out only from all speakers OFF : keeps the source output 2 ch. INPUT SELECT (a System Upgrade Guidebook) OUTPUT SELECT (a System Upgrade Guidebook) H-F SETUP (a System Upgrade Guidebook) default: OFF CQ-VD6503U 39 from the front speakers adjusted...
CQVD6503U User Guide
Page 42
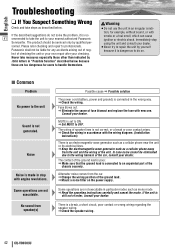
... wiring diagram. (Installation Instructions) There is connected in step with smoke or a foul smell, which can cause ignition or electric shock. Alternator noise comes from speaker(s) Possible cause a Possible solution The power cord (battery, power and ground) is an electromagnetic-wave generator such as a cellular phone away from the unit and the wiring of order, consult your dealer. Noise Noise is set to professionals. MUTE...
... wiring diagram. (Installation Instructions) There is connected in step with smoke or a foul smell, which can cause ignition or electric shock. Alternator noise comes from speaker(s) Possible cause a Possible solution The power cord (battery, power and ground) is an electromagnetic-wave generator such as a cellular phone away from the unit and the wiring of order, consult your dealer. Noise Noise is set to professionals. MUTE...

CQVD6503U User Guide
Page 45
... selected for the remote control setting. REAR is selected for the ACC selection. The speaker leads are connected in the correct direction. Left and right sounds are not correctly connected. The speaker setting is inserted. CQ-VD6503U 45 English ■ Remote control unit No response to pressing buttons The battery is inserted in the speaker setting. No sound on the power. ■ Sound settings No sound from the subwoofer Cables are reversed. aConnect the speaker wires to turn on the speaker. aSet subwoofer...
... selected for the remote control setting. REAR is selected for the ACC selection. The speaker leads are connected in the correct direction. Left and right sounds are not correctly connected. The speaker setting is inserted. CQ-VD6503U 45 English ■ Remote control unit No response to pressing buttons The battery is inserted in the speaker setting. No sound on the power. ■ Sound settings No sound from the subwoofer Cables are reversed. aConnect the speaker wires to turn on the speaker. aSet subwoofer...
CQVD6503U User Guide
Page 47
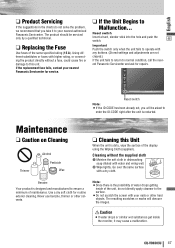
...-CODE right after the unit is designed and manufactured to Malfunction... Reset switch Insert a hard, slender stick into the hole and push the switch. 46 Important Push the switch only when the unit fails to operate with any buttons. (Stored settings and adjustments are not cleared.) If the unit fails to return to normal condition, call the nearest Panasonic Servicenter and ask for service...
...-CODE right after the unit is designed and manufactured to Malfunction... Reset switch Insert a hard, slender stick into the hole and push the switch. 46 Important Push the switch only when the unit fails to operate with any buttons. (Stored settings and adjustments are not cleared.) If the unit fails to return to normal condition, call the nearest Panasonic Servicenter and ask for service...


