
Operating Instructions
Page 2
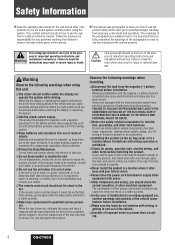
...Do not use the unit when it off immediately and consult your dealer or an authorized Panasonic Servicenter. ❑ Do not use safety-related vehicle components (fuel tank, brake, suspension...of infants. Failure to heed the instructions may result in the car. If the remote control unit lies about in injury or material damage. This product is out of ...Read the operating instructions for the unit and all exposed wires to prevent short circuiting. 2 CQ-C700U They contain instructions about how to use safety-related components for installation, grounding, and other...
...Do not use the unit when it off immediately and consult your dealer or an authorized Panasonic Servicenter. ❑ Do not use safety-related vehicle components (fuel tank, brake, suspension...of infants. Failure to heed the instructions may result in the car. If the remote control unit lies about in injury or material damage. This product is out of ...Read the operating instructions for the unit and all exposed wires to prevent short circuiting. 2 CQ-C700U They contain instructions about how to use safety-related components for installation, grounding, and other...
Operating Instructions
Page 3
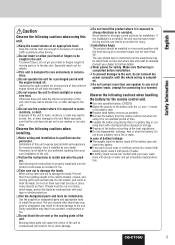
...driving. ❑ Do not insert or allow your dealer for further details. ❑ Wear gloves for the remote control unit. ● Use only specified battery (CR2025). ● Match the polarity of time. ●.... Operating the audio system for a long period of this unit must be restrictions on rainy days. Panasonic is completed. ❑ Do not connect more than 30˚. Make especially sure that in car ... in the disc slot. The user should be installed. CQ-C700U 3 To prevent injury, do not connect the power connector until the whole wiring is not liable for ...
...driving. ❑ Do not insert or allow your dealer for further details. ❑ Wear gloves for the remote control unit. ● Use only specified battery (CR2025). ● Match the polarity of time. ●.... Operating the audio system for a long period of this unit must be restrictions on rainy days. Panasonic is completed. ❑ Do not connect more than 30˚. Make especially sure that in car ... in the disc slot. The user should be installed. CQ-C700U 3 To prevent injury, do not connect the power connector until the whole wiring is not liable for ...
Operating Instructions
Page 5
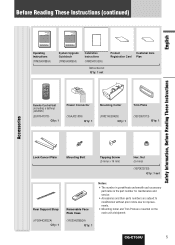
... Care Registration Card Plan POWER SOURCE MENU SRC SEL SET VOL BAND MUTE 12 RANDOM SCAN 45 3 REPEAT 6 78 TUNE #0 NUMBER 9 TUNE DISP CAR AUDIO Remote Control Unit (including a battery) (CR2025) (EUR7641010) Q'ty: 1 Power Connector (YGAJ021009) Q'ty: 1 Mounting Collar (FX0214C384ZB) Q'ty: 1 Trim Plate (YEFC051013) Q'ty: 1 Safety Information, Before Reading These Instructions... subject to modification without prior notice due to improvements. ¡ Mounting Collar and Trim Plate are mounted on the main unit at shipment. (YFC054C089CA) Q'ty: 1 CQ-C700U 5
... Care Registration Card Plan POWER SOURCE MENU SRC SEL SET VOL BAND MUTE 12 RANDOM SCAN 45 3 REPEAT 6 78 TUNE #0 NUMBER 9 TUNE DISP CAR AUDIO Remote Control Unit (including a battery) (CR2025) (EUR7641010) Q'ty: 1 Power Connector (YGAJ021009) Q'ty: 1 Mounting Collar (FX0214C384ZB) Q'ty: 1 Trim Plate (YEFC051013) Q'ty: 1 Safety Information, Before Reading These Instructions... subject to modification without prior notice due to improvements. ¡ Mounting Collar and Trim Plate are mounted on the main unit at shipment. (YFC054C089CA) Q'ty: 1 CQ-C700U 5
Operating Instructions
Page 10
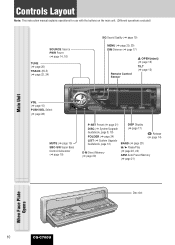
... (a page 20) TRACK (FILE) (a page 22, 24) SQ Sound Quality (a page 19) MENU (a page 29, 30) DIM Dimmer (a page 17) Remote Control Sensor u OPEN (eject) (a page 15) TILT (a page 15) CQ-C700U VOL (a page 15) PUSH SEL Select (a page 28) MUTE (a page 15) SBC-SW Super Bass Control-Subwoofer (a page 19) P-SET Preset... (a page 20) y / 5 Pause/Play D·M Direct Memory (a page 20) (a page 22, 24) APM Auto Preset Memory (a page 21) Disc slot When Face Plate Opens 10 CQ-C700U
... (a page 20) TRACK (FILE) (a page 22, 24) SQ Sound Quality (a page 19) MENU (a page 29, 30) DIM Dimmer (a page 17) Remote Control Sensor u OPEN (eject) (a page 15) TILT (a page 15) CQ-C700U VOL (a page 15) PUSH SEL Select (a page 28) MUTE (a page 15) SBC-SW Super Bass Control-Subwoofer (a page 19) P-SET Preset... (a page 20) y / 5 Pause/Play D·M Direct Memory (a page 20) (a page 22, 24) APM Auto Preset Memory (a page 21) Disc slot When Face Plate Opens 10 CQ-C700U

Operating Instructions
Page 11
...and removal actions (a page 15) ¡ Disc ejection (a page 15) ¡ Dimmer (a page 17) ¡ SQ on CDs (a page 23, 25) ¡ Random and repeat play with one-touch operation (a page 23, 25) ¡ Scan playback (a...tracks on , off, and adjustment (a page 19) ¡ Direct memory setting and calling (a page 20) Operations executable only with remote control ¡Preset station calling with one-touch operation (a page 21) ¡ Direct access to 9 # NUMBER Number RANDOM 4 RANDOM... CAR AUDIO Although most of the functions of this unit are executable with remote control CQ-C700U 11
...and removal actions (a page 15) ¡ Disc ejection (a page 15) ¡ Dimmer (a page 17) ¡ SQ on CDs (a page 23, 25) ¡ Random and repeat play with one-touch operation (a page 23, 25) ¡ Scan playback (a...tracks on , off, and adjustment (a page 19) ¡ Direct memory setting and calling (a page 20) Operations executable only with remote control ¡Preset station calling with one-touch operation (a page 21) ¡ Direct access to 9 # NUMBER Number RANDOM 4 RANDOM... CAR AUDIO Although most of the functions of this unit are executable with remote control CQ-C700U 11

Operating Instructions
Page 12
...out from the backside of an old battery immediately. ¡Do not disassemble, heat or short a battery. Note: Battery Information: Battery Type: Panasonic lithium battery (CR2025) (Included in injury or a fire. Preparation Cancellation of demonstration screen For the first use [}] or [{]. 2 Press [SOURCE...or On position. Cautions ¡Remove and dispose of remote control gently. Warning Keep batteries and insulation film out of reach of the arrow, and at room temperature) Remote Control Preparation 3 12 CQ-C700U Notice This product contains a CR Coin Cell Lithium Battery ...
...out from the backside of an old battery immediately. ¡Do not disassemble, heat or short a battery. Note: Battery Information: Battery Type: Panasonic lithium battery (CR2025) (Included in injury or a fire. Preparation Cancellation of demonstration screen For the first use [}] or [{]. 2 Press [SOURCE...or On position. Cautions ¡Remove and dispose of remote control gently. Warning Keep batteries and insulation film out of reach of the arrow, and at room temperature) Remote Control Preparation 3 12 CQ-C700U Notice This product contains a CR Coin Cell Lithium Battery ...

Operating Instructions
Page 13
..., use [}] or [{]. 4 Press [PUSH SEL], and the clock adjustment screen appears. For using the remote control, use [BAND] (SET). 7 Press [MENU] to close the menu screen. Using Subwoofer ¡ Subwoofer level adjustment (a page 28) ¡... [[] : Adjusting minutes []] : Adjusting hours q : Forward w : Backward 6 Press [PUSH SEL], and the menu screen resumes. or more . CQ-C700U 13 Clock adjustment For using the remote control, hold down [SEL] (MENU) for 2 sec. English Security Function Setting The following depending on the devices to be connected. Security Indicator Preparation ...
..., use [}] or [{]. 4 Press [PUSH SEL], and the clock adjustment screen appears. For using the remote control, use [BAND] (SET). 7 Press [MENU] to close the menu screen. Using Subwoofer ¡ Subwoofer level adjustment (a page 28) ¡... [[] : Adjusting minutes []] : Adjusting hours q : Forward w : Backward 6 Press [PUSH SEL], and the menu screen resumes. or more . CQ-C700U 13 Clock adjustment For using the remote control, hold down [SEL] (MENU) for 2 sec. English Security Function Setting The following depending on the devices to be connected. Security Indicator Preparation ...

Operating Instructions
Page 17
CQ-C700U 17 Folder hierarchy (Compressed Audio Player mode only.) Ordinary display + clock General Display Change (DISP: DISPLAY) Ordinary display + graphic pattern Only still image Only graphic ... a graphic pattern. English The display changes as follows every time you hold down [MENU] (DIM: DIMMER) for 2 sec. CQ-C700U Brighter (default) Medium Darker Note: This setting is not adjustable with the remote control. CQ-C700U Note: The graphic pattern and still image are selectable. (a page 31) At power-on: Mode Display OFF All displays...
CQ-C700U 17 Folder hierarchy (Compressed Audio Player mode only.) Ordinary display + clock General Display Change (DISP: DISPLAY) Ordinary display + graphic pattern Only still image Only graphic ... a graphic pattern. English The display changes as follows every time you hold down [MENU] (DIM: DIMMER) for 2 sec. CQ-C700U Brighter (default) Medium Darker Note: This setting is not adjustable with the remote control. CQ-C700U Note: The graphic pattern and still image are selectable. (a page 31) At power-on: Mode Display OFF All displays...

Operating Instructions
Page 18
...or more on the "SQ ADJUSTMENT" display, the preset data that is pressed. For using the remote control, use [BAND] (SET). 5 Press [DISP: DISPLAY]. Note: Setting of Step 1 appears again. CQ-C700U Lights when SQ is selectable from among preset 6 types (FLAT, ROCK, POP, VOCAL, JAZZ,... and CLUB) depending on your taste. 1 Hold down for 2 sec. For using the remote control, use [BAND] (SET). 3 Adjust each band. CQ-C700U 18 CQ-C700U The targeted SQ preset appears. SQ adjustment (USER) SQ Selection Based on Genre (SQ: SOUND QUALITY) Sound Control The ...
...or more on the "SQ ADJUSTMENT" display, the preset data that is pressed. For using the remote control, use [BAND] (SET). 5 Press [DISP: DISPLAY]. Note: Setting of Step 1 appears again. CQ-C700U Lights when SQ is selectable from among preset 6 types (FLAT, ROCK, POP, VOCAL, JAZZ,... and CLUB) depending on your taste. 1 Hold down for 2 sec. For using the remote control, use [BAND] (SET). 3 Adjust each band. CQ-C700U 18 CQ-C700U The targeted SQ preset appears. SQ adjustment (USER) SQ Selection Based on Genre (SQ: SOUND QUALITY) Sound Control The ...

Operating Instructions
Page 20
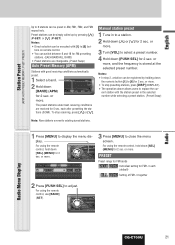
...[D.M] (DIRECT MEMORY). Operation Flow Radio This chapter explains how to listen to the radio. 1 Press [SOURCE] to select the radio mode. 2 Press [BAND] to preset. You can assign your CQ-C700U favorite broadcasting station can be received even if the unit is in the CD mode or other modes. (Default...: FM 87.9 MHz) Note: For the use of doing that, your favorite broadcasting station to [6] buttons on remote ...
...[D.M] (DIRECT MEMORY). Operation Flow Radio This chapter explains how to listen to the radio. 1 Press [SOURCE] to select the radio mode. 2 Press [BAND] to preset. You can assign your CQ-C700U favorite broadcasting station can be received even if the unit is in the CD mode or other modes. (Default...: FM 87.9 MHz) Note: For the use of doing that, your favorite broadcasting station to [6] buttons on remote ...
Operating Instructions
Page 21
...existing saved stations. 1 Press [MENU] to display the menu display. rent station with the station preset in to [6] but- For using the remote control, hold down [SEL] (MENU) for 2 sec. or more . 3 Turn [VOL] to [6] for FM1-3 each after presetting the stations (... select a preset number. 4 Hold down [PUSH SEL] for 2 sec. CQ-C700U 2 Hold down [}] or [{] for 2 sec. or more , and the frequency is stored at the selected preset number. or more . Radio Radio Menu Display CQ-C700U 21 The preset stations under best receiving conditions are changeable. (Preset Swap) Auto...
...existing saved stations. 1 Press [MENU] to display the menu display. rent station with the station preset in to [6] but- For using the remote control, hold down [SEL] (MENU) for 2 sec. or more . 3 Turn [VOL] to [6] for FM1-3 each after presetting the stations (... select a preset number. 4 Hold down [PUSH SEL] for 2 sec. CQ-C700U 2 Hold down [}] or [{] for 2 sec. or more , and the frequency is stored at the selected preset number. or more . Radio Radio Menu Display CQ-C700U 21 The preset stations under best receiving conditions are changeable. (Preset Swap) Auto...

Operating Instructions
Page 23
... [REPEAT]. SCAN play can find your favorite track by playing first 10-sec. CD Player Functions Only by use of each track. For using the remote control, hold down [SEL] (MENU) for selecting a track playing style by Remote Control Unit CQ-C700U 23 Note: To suspend direct selection, press [DISP] (DISPLAY). Example: track number 5 1 Press...
... [REPEAT]. SCAN play can find your favorite track by playing first 10-sec. CD Player Functions Only by use of each track. For using the remote control, hold down [SEL] (MENU) for selecting a track playing style by Remote Control Unit CQ-C700U 23 Note: To suspend direct selection, press [DISP] (DISPLAY). Example: track number 5 1 Press...

Operating Instructions
Page 25
...CD, problems may have little effect. ¡ The Re-master function is only effective for playback of MP3/WMA/AAC data. : Digital sound enhancer activated (default) : Digital sound enhancer inactivated Functions Only by Remote... Control Unit Play Mode Selection One-touch operation is reproduced to be adjusted. For using the remote...to more . For using the remote control, hold down [SEL] (...remote control, use [}] or [{]. 3 Press [PUSH SEL] to cancel. For using the remote...unit does not support a MIX mode CD (a CD containing both CD-DA and compressed audio files). Direct ...
...CD, problems may have little effect. ¡ The Re-master function is only effective for playback of MP3/WMA/AAC data. : Digital sound enhancer activated (default) : Digital sound enhancer inactivated Functions Only by Remote... Control Unit Play Mode Selection One-touch operation is reproduced to be adjusted. For using the remote...to more . For using the remote control, hold down [SEL] (...remote control, use [}] or [{]. 3 Press [PUSH SEL] to cancel. For using the remote...unit does not support a MIX mode CD (a CD containing both CD-DA and compressed audio files). Direct ...

Operating Instructions
Page 28
.... HPF High Pass Filter (Setting range: Filter OFF, 90 Hz, 135 Hz, 180 Hz, 225 Hz, Default: Filter OFF) q : Up w : Down 28 CQ-C700U For using the remote control, use [VOL }] or [VOL {]. BALANCE/FADER Balance adjustment (Setting range: L (left)15 to R (right) 15 and Center, Default: Center) q :...: Do not activate SQ and Bass/Treble at same time to display the AUDIO menu display. For using the remote control, use [SEL] (MENU). 3 Turn [VOL] clockwise or counterclockwise to be adjusted. For using the remote control, use [SEL] (MENU). 2 Press [PUSH SEL: SELECT] to select a mode to adjust.
.... HPF High Pass Filter (Setting range: Filter OFF, 90 Hz, 135 Hz, 180 Hz, 225 Hz, Default: Filter OFF) q : Up w : Down 28 CQ-C700U For using the remote control, use [VOL }] or [VOL {]. BALANCE/FADER Balance adjustment (Setting range: L (left)15 to R (right) 15 and Center, Default: Center) q :...: Do not activate SQ and Bass/Treble at same time to display the AUDIO menu display. For using the remote control, use [SEL] (MENU). 3 Turn [VOL] clockwise or counterclockwise to be adjusted. For using the remote control, use [SEL] (MENU). 2 Press [PUSH SEL: SELECT] to select a mode to adjust.

Operating Instructions
Page 29
... []] or [[] to adjust. or more . Audio Setting, Function Setting FUNCTION Menu Display CQ-C700U 29 SECURITY Setting the security function (a page 13) : ON (Default) : OFF 3 Turn [VOL] to select a function to display the menu display. or more . For using the remote control, hold down [SEL] (MENU) for 2 sec. BUILT-IN AMP You can...
... []] or [[] to adjust. or more . Audio Setting, Function Setting FUNCTION Menu Display CQ-C700U 29 SECURITY Setting the security function (a page 13) : ON (Default) : OFF 3 Turn [VOL] to select a function to display the menu display. or more . For using the remote control, hold down [SEL] (MENU) for 2 sec. BUILT-IN AMP You can...

Operating Instructions
Page 30
...[[] : Adjusting minutes []] : Adjusting hours q : Forward w : Backward 30 CQ-C700U Notes: ¡ The graphic pattern and still image are changeable. (a page 31) ¡ If corrupted data is selected, "DISPLAY FILE INCOM- For using the remote control, use [BAND] (SET). 5 Adjust the setting value. 6 Press [PUSH... down view angle CLOCK ADJ Note: Adjust the clock when "ADJUST" appears on the DISPLAY menu 1 Press [MENU] to C. For using the remote control, hold down [SEL] (MENU) for 2 sec. Pattern A-C S.A.: 19-band display (Spectrum analyzer) DISPLAY Menu Display 3 Turn [VOL]...
...[[] : Adjusting minutes []] : Adjusting hours q : Forward w : Backward 30 CQ-C700U Notes: ¡ The graphic pattern and still image are changeable. (a page 31) ¡ If corrupted data is selected, "DISPLAY FILE INCOM- For using the remote control, use [BAND] (SET). 5 Adjust the setting value. 6 Press [PUSH... down view angle CLOCK ADJ Note: Adjust the clock when "ADJUST" appears on the DISPLAY menu 1 Press [MENU] to C. For using the remote control, hold down [SEL] (MENU) for 2 sec. Pattern A-C S.A.: 19-band display (Spectrum analyzer) DISPLAY Menu Display 3 Turn [VOL]...

Operating Instructions
Page 36
... unit Troubleshooting (continued) Problem No response to pressing buttons Possible cause a Possible solution The battery is wrong. The sensor is exposed to direct sunlight. (The remote control unit may not be operable when the sensor is not faulty.) aBlock off sunlight to direct sunlight. aReplace the battery with new one. aInsert...
... unit Troubleshooting (continued) Problem No response to pressing buttons Possible cause a Possible solution The battery is wrong. The sensor is exposed to direct sunlight. (The remote control unit may not be operable when the sensor is not faulty.) aBlock off sunlight to direct sunlight. aReplace the battery with new one. aInsert...


