BL-MS103A Owner's Manual (English)
Page 1
BL-WV10A Please read this manual before using and save this manual for customers in the USA or Puerto Rico Panasonic Network Camera Website: http://www.panasonic.com/netcam for future reference. Operating Instructions Wireless Camera Monitoring System Model No.
BL-WV10A Please read this manual before using and save this manual for customers in the USA or Puerto Rico Panasonic Network Camera Website: http://www.panasonic.com/netcam for future reference. Operating Instructions Wireless Camera Monitoring System Model No.
BL-MS103A Owner's Manual (English)
Page 3
... 4 for connecting your cameras to the BL-WV10A and Quick Setup will handle the rest. KX-HCM280 For the latest firmware, visit http://panasonic.co.jp/pcc/products/en/netwkcam/ How to the BL-WV10A. KX-HCM250 - KX-HCM8 - Quick... Setup Configuration is a trademark of the SD Card Association. • QuickTime and the QuickTime logo are trademarks of Apple Computer, Inc. • All other trademarks identified herein are not supported by the BL- Operating Instructions (this manual...
... 4 for connecting your cameras to the BL-WV10A and Quick Setup will handle the rest. KX-HCM280 For the latest firmware, visit http://panasonic.co.jp/pcc/products/en/netwkcam/ How to the BL-WV10A. KX-HCM250 - KX-HCM8 - Quick... Setup Configuration is a trademark of the SD Card Association. • QuickTime and the QuickTime logo are trademarks of Apple Computer, Inc. • All other trademarks identified herein are not supported by the BL- Operating Instructions (this manual...
BL-MS103A Owner's Manual (English)
Page 10
... 5.4 Viewing Pictures 92 5.5 Useful Tips for Viewing Pictures 93 5.6 Erasing Recorded Pictures 93 6 Setup Menu 95 6.1 Date and Time 96 6.2 General Setup 97 6.3 Registering a Camera Manually 105 6.4 6.4.1 6.4.2 6.5 Camera Setup 108 Camera Setup for Local Cameras 109 Camera Setup for Remote Cameras 114 Erasing a Camera 118 6.6 Changing the Order of the Camera...
... 5.4 Viewing Pictures 92 5.5 Useful Tips for Viewing Pictures 93 5.6 Erasing Recorded Pictures 93 6 Setup Menu 95 6.1 Date and Time 96 6.2 General Setup 97 6.3 Registering a Camera Manually 105 6.4 6.4.1 6.4.2 6.5 Camera Setup 108 Camera Setup for Local Cameras 109 Camera Setup for Remote Cameras 114 Erasing a Camera 118 6.6 Changing the Order of the Camera...
BL-MS103A Owner's Manual (English)
Page 30
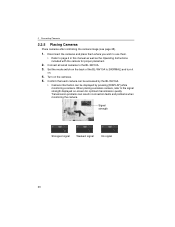
... displayed on . 4. Set the mode switch on the back of the BL-WV10A to page 6 in connection faults and problems when monitoring the camera. When placing a wireless camera, refer to the BL-WV10A. 3. Transmission problems can be accessed by pressing [DISPLAY] while monitoring a...camera. Signal strength Strongest signal Weakest signal No signal 30 Confirm that each camera can be displayed by the BL-WV10A. • Camera information can result in this manual as well as the Operating Instructions included with the camera for optimum transmission quality. Turn on the cameras. ...
... displayed on . 4. Set the mode switch on the back of the BL-WV10A to page 6 in connection faults and problems when monitoring the camera. When placing a wireless camera, refer to the BL-WV10A. 3. Transmission problems can be accessed by pressing [DISPLAY] while monitoring a...camera. Signal strength Strongest signal Weakest signal No signal 30 Confirm that each camera can be displayed by the BL-WV10A. • Camera information can result in this manual as well as the Operating Instructions included with the camera for optimum transmission quality. Turn on the cameras. ...
BL-MS103A Owner's Manual (English)
Page 41
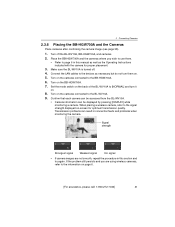
... Cameras 2.3.6 Placing the BB-HGW700A and the Cameras Place cameras after confirming the camera image (see page 38). 1. Make sure the BL-WV10A is turned off the BL-WV10A, BB-HGW700A, and cameras. 2. Turn on the cameras connected to page 6 in this section and try again. If the problem still...monitoring the camera. Set the mode switch on the back of the BL-WV10A to the information on -screen for proper placement. 3. Confirm that each camera can be accessed from the BL-WV10A. • Camera information can result in this manual as well as necessary but do not turn it on. 8. ...
... Cameras 2.3.6 Placing the BB-HGW700A and the Cameras Place cameras after confirming the camera image (see page 38). 1. Make sure the BL-WV10A is turned off the BL-WV10A, BB-HGW700A, and cameras. 2. Turn on the cameras connected to page 6 in this section and try again. If the problem still...monitoring the camera. Set the mode switch on the back of the BL-WV10A to the information on -screen for proper placement. 3. Confirm that each camera can be accessed from the BL-WV10A. • Camera information can result in this manual as well as necessary but do not turn it on. 8. ...
BL-MS103A Owner's Manual (English)
Page 42
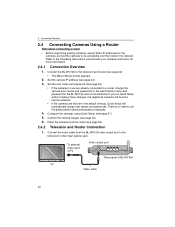
...cameras, assign Static IP addresses to the cameras, and set the administrator name and password manually. 4. Refer to the Operating Instructions included with your cameras and router for the BL-WV10A and run Quick Setup without making these changes, the registered cameras will automatically assign user...Internet if so desired. Set the camera IP address (see page 50) 6. Confirm the camera images (see page 44) 3. Connect the BL-WV10A to the television's video input (yellow) jack. Configure the cameras using Quick Setup (see page 52) 2.4.2 Television and Router Connection 1. ...
...cameras, assign Static IP addresses to the cameras, and set the administrator name and password manually. 4. Refer to the Operating Instructions included with your cameras and router for the BL-WV10A and run Quick Setup without making these changes, the registered cameras will automatically assign user...Internet if so desired. Set the camera IP address (see page 50) 6. Confirm the camera images (see page 44) 3. Connect the BL-WV10A to the television's video input (yellow) jack. Configure the cameras using Quick Setup (see page 52) 2.4.2 Television and Router Connection 1. ...
BL-MS103A Owner's Manual (English)
Page 52
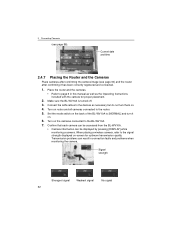
.... Connect the LAN cables to [NORMAL] and turn them on . 6. Transmission problems can be accessed from the BL-WV10A. • Camera information can result in this manual as well as necessary but do not turn it has been correctly registered and connected. 1. When placing a wireless camera..., refer to the BL-WV10A. 7. Turn on the cameras connected to the signal strength displayed on router and all cameras ...
.... Connect the LAN cables to [NORMAL] and turn them on . 6. Transmission problems can be accessed from the BL-WV10A. • Camera information can result in this manual as well as necessary but do not turn it has been correctly registered and connected. 1. When placing a wireless camera..., refer to the BL-WV10A. 7. Turn on the cameras connected to the signal strength displayed on router and all cameras ...
BL-MS103A Owner's Manual (English)
Page 61
... for text entry methods.) 4. Note • • • A preset name can overwrite registered presets. The following characters cannot be used: " ' & < >. To set the preset name manually, select [Yes] and press [ENTER]. • The character input screen is displayed in the upper left corner of the screen for the last registration will...
... for text entry methods.) 4. Note • • • A preset name can overwrite registered presets. The following characters cannot be used: " ' & < >. To set the preset name manually, select [Yes] and press [ENTER]. • The character input screen is displayed in the upper left corner of the screen for the last registration will...
BL-MS103A Owner's Manual (English)
Page 90
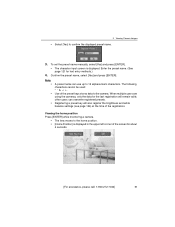
... press [ENTER] to view information on the movie. Note • Press [DISPLAY] while an image is displayed, pressing the [SNAPSHOT] will be displayed. Movies recorded manually while monitoring the camera image will save it as . 5 Viewing Movies and Pictures Viewing Movie Information Select a movie on the [Movies] screen and press [3] to...
... press [ENTER] to view information on the movie. Note • Press [DISPLAY] while an image is displayed, pressing the [SNAPSHOT] will be displayed. Movies recorded manually while monitoring the camera image will save it as . 5 Viewing Movies and Pictures Viewing Movie Information Select a movie on the [Movies] screen and press [3] to...
BL-MS103A Owner's Manual (English)
Page 95
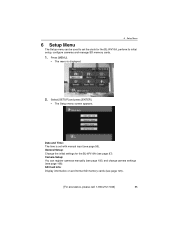
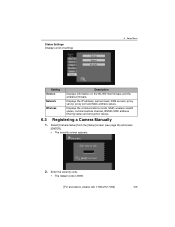
General Setup: Change the initial settings for the BL-WV10A, perform its initial setup, configure cameras and manage SD memory cards. 1. SD Card Info: Display information on and format SD memory cards (see page 97). ... Setup menu screen appears. Press [MENU]. • The menu is set the clock for the BL-WV10A (see page 120). [For assistance, please call: 1-800-272-7033] 95 Camera Setup: You can be used to set with manual input (see page 96). Date and Time: The time is displayed. 2. 6 Setup Menu 6 Setup Menu...
General Setup: Change the initial settings for the BL-WV10A, perform its initial setup, configure cameras and manage SD memory cards. 1. SD Card Info: Display information on and format SD memory cards (see page 97). ... Setup menu screen appears. Press [MENU]. • The menu is set the clock for the BL-WV10A (see page 120). [For assistance, please call: 1-800-272-7033] 95 Camera Setup: You can be used to set with manual input (see page 96). Date and Time: The time is displayed. 2. 6 Setup Menu 6 Setup Menu...
BL-MS103A Owner's Manual (English)
Page 96
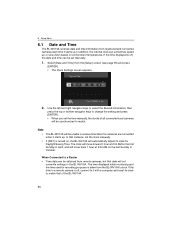
...match that instance, set the clock manually. • If [DST] is off , the date and time can sometimes speed up or slow down based on environment temperatures. If the time in a remote camera is turned on the last Sunday in the BL-WV10A. The clock will move forward 1 ... (see page 95) and press [ENTER]. • The Clock Settings screen appears. 2. Note • The BL-WV10A will be set the time manually, the clocks of the BL-WV10A. 96 6 Setup Menu 6.1 Date and Time The BL-WV10A receives date and time information from registered and connected cameras each time it starts up.
...match that instance, set the clock manually. • If [DST] is off , the date and time can sometimes speed up or slow down based on environment temperatures. If the time in a remote camera is turned on the last Sunday in the BL-WV10A. The clock will move forward 1 ... (see page 95) and press [ENTER]. • The Clock Settings screen appears. 2. Note • The BL-WV10A will be set the time manually, the clocks of the BL-WV10A. 96 6 Setup Menu 6.1 Date and Time The BL-WV10A receives date and time information from registered and connected cameras each time it starts up.
BL-MS103A Owner's Manual (English)
Page 100
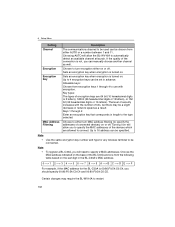
... be created and used when connecting to local cameras. Setting Starting Address Admin User Name Admin Password Description Set the IP address to restore the BL-WV10A's default settings (see page 131). If you re-register cameras using Quick Setup. Doing so, however, will need to re-perform Quick Setup to the... cameras. A maximum of your settings to their defaults, and sever the connections to register the cameras and set manually. Set the password for local cameras for Quick Setup.
... be created and used when connecting to local cameras. Setting Starting Address Admin User Name Admin Password Description Set the IP address to restore the BL-WV10A's default settings (see page 131). If you re-register cameras using Quick Setup. Doing so, however, will need to re-perform Quick Setup to the... cameras. A maximum of your settings to their defaults, and sever the connections to register the cameras and set manually. Set the password for local cameras for Quick Setup.
BL-MS103A Owner's Manual (English)
Page 102
... MAC addresses of bits, but there may require the BL-WV10A to restart. 102 Note • To register a BL-C30A, you will allow the BL-WV10A to automatically detect an available channel at launch. Certain changes... increases with encryption. Note • Use the same encryption key number and type for the BL-C30A is turned on will need to specify 2 MAC addresses. 6 Setup Menu Setting Channel Encryption...C0:C4 and 00:80:F0:54:C0:C5. Keys 1 through 4 to 4 encryption keys can manually choose another channel as a result. Up to use with the number of the devices which are 64...
... MAC addresses of bits, but there may require the BL-WV10A to restart. 102 Note • To register a BL-C30A, you will allow the BL-WV10A to automatically detect an available channel at launch. Certain changes... increases with encryption. Note • Use the same encryption key number and type for the BL-C30A is turned on will need to specify 2 MAC addresses. 6 Setup Menu Setting Channel Encryption...C0:C4 and 00:80:F0:54:C0:C5. Keys 1 through 4 to 4 encryption keys can manually choose another channel as a result. Up to use with the number of the devices which are 64...
BL-MS103A Owner's Manual (English)
Page 105
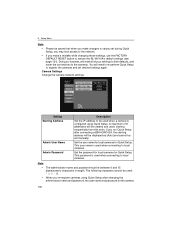
... of settings 6 Setup Menu Setting Version Network Wireless Description Displays information on the BL-WV10A firmware and the wireless firmware. Displays the communications mode, SSID, wireless stealth status, communications channel, BSSID, MAC address filtering status and encryption values. 6.3 Registering a Camera Manually 1. Displays the IP address, subnet mask, DNS servers, proxy server, proxy port...
... of settings 6 Setup Menu Setting Version Network Wireless Description Displays information on the BL-WV10A firmware and the wireless firmware. Displays the communications mode, SSID, wireless stealth status, communications channel, BSSID, MAC address filtering status and encryption values. 6.3 Registering a Camera Manually 1. Displays the IP address, subnet mask, DNS servers, proxy server, proxy port...

BL-MS103A Owner's Manual (English)
Page 107
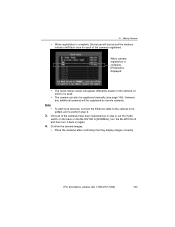
... access the camera's URL or IP address. After confirming the image, proceed to register a camera as a local camera (see page 99). Note • Registering a camera manually will make it off will require the entry of a user name and password whenever a camera is accessed. • Turning off . Use Quick Setup to step...
... access the camera's URL or IP address. After confirming the image, proceed to register a camera as a local camera (see page 99). Note • Registering a camera manually will make it off will require the entry of a user name and password whenever a camera is accessed. • Turning off . Use Quick Setup to step...

BL-MS103A Owner's Manual (English)
Page 110
.... For the camera in question, if no operation occurs during monitoring, wait until a predominantly white image appears well before selecting manual. Choose an interval to avoid an excessive invasion of time as a result. When publishing the camera externally, this setting can ... preset, the white balance and brightness settings used to refresh the monitoring image from Auto, Incandescent, Fluorescent 1, Fluorescent 2, Outdoor, or Manual *1. It can set to a value other than motion, image recording can be saved. The quality of registration will be constantly adjusted by...
.... For the camera in question, if no operation occurs during monitoring, wait until a predominantly white image appears well before selecting manual. Choose an interval to avoid an excessive invasion of time as a result. When publishing the camera externally, this setting can ... preset, the white balance and brightness settings used to refresh the monitoring image from Auto, Incandescent, Fluorescent 1, Fluorescent 2, Outdoor, or Manual *1. It can set to a value other than motion, image recording can be saved. The quality of registration will be constantly adjusted by...

BL-MS103A Owner's Manual (English)
Page 125
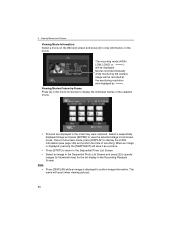
8 Other Features 8.2 Displaying Movie Information If you press [DISPLAY] while playing a movie, the following information be displayed: • Short display information • Long display information • Camera image only Short display information Camera name Status Long display information Elapsed and remaining playback time The recording mode (HIGH, LOW, LONG, or ) will be displayed. Movies recorded manually while monitoring the camera image will be recorded at the monitoring resolution and displayed as . [For assistance, please call: 1-800-272-7033] 125
8 Other Features 8.2 Displaying Movie Information If you press [DISPLAY] while playing a movie, the following information be displayed: • Short display information • Long display information • Camera image only Short display information Camera name Status Long display information Elapsed and remaining playback time The recording mode (HIGH, LOW, LONG, or ) will be displayed. Movies recorded manually while monitoring the camera image will be recorded at the monitoring resolution and displayed as . [For assistance, please call: 1-800-272-7033] 125
BL-MS103A Owner's Manual (English)
Page 133
...] is displayed. • The Quick Setup screen will be registered as in step 2, set the mode switch on the back on the BL-WV10A to be registered manually (see page 105). However, any additional cameras will appear differently based on the network on again. 4. Once all of the cameras registered.... Note • To add more cameras, connect the Ethernet cable to the camera to [NORMAL], turn the BL-WV10A off and then ...
...] is displayed. • The Quick Setup screen will be registered as in step 2, set the mode switch on the back on the BL-WV10A to be registered manually (see page 105). However, any additional cameras will appear differently based on the network on again. 4. Once all of the cameras registered.... Note • To add more cameras, connect the Ethernet cable to the camera to [NORMAL], turn the BL-WV10A off and then ...

BL-MS103A Owner's Manual (English)
Page 140
... RESET button on the camera, and re-perform Quick Setup. This error appears when the firmware for the router is set each camera's starting address manually. • For the camera IP address in the Advanced Settings Screen, enter a network segment address identical to either 255.255.255.248 or 255.255...
... RESET button on the camera, and re-perform Quick Setup. This error appears when the firmware for the router is set each camera's starting address manually. • For the camera IP address in the Advanced Settings Screen, enter a network segment address identical to either 255.255.255.248 or 255.255...
BL-MS103A Owner's Manual (English)
Page 152
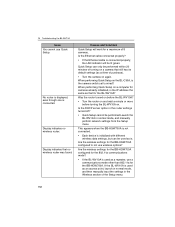
... performed within 20 minutes of turning on . If the BL-WV10A is . Are the wireless settings for the BL-WV10A? Causes and Solutions Quick Setup will be used as an access point, launch in normal mode, and then manually input the settings in normal mode, and manually perform network settings from the Setup menu. Quick Setup...
... performed within 20 minutes of turning on . If the BL-WV10A is . Are the wireless settings for the BL-WV10A? Causes and Solutions Quick Setup will be used as an access point, launch in normal mode, and then manually input the settings in normal mode, and manually perform network settings from the Setup menu. Quick Setup...