Installation Guide
Page 1
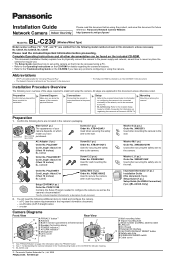
Panasonic Network Camera Website: http://panasonic.net/pcc/ipcam/ BL-C230 Model No. (Wireless/Wired Type) Model number suffixes ("A", "CE", and "E") are omitted from a PC. • BL-C230A only: Refer to the included Setup Guide for VIERA Connection for future reference. Mounting Mounting or placing the camera. Preparation 1. BL-C230A Main Unit (1 pc.) The appearance of the camera's physical features. Screw C (2 pcs...
Panasonic Network Camera Website: http://panasonic.net/pcc/ipcam/ BL-C230 Model No. (Wireless/Wired Type) Model number suffixes ("A", "CE", and "E") are omitted from a PC. • BL-C230A only: Refer to the included Setup Guide for VIERA Connection for future reference. Mounting Mounting or placing the camera. Preparation 1. BL-C230A Main Unit (1 pc.) The appearance of the camera's physical features. Screw C (2 pcs...
Installation Guide
Page 2
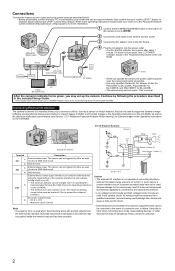
...(BL-C230 Only) in the Operating Instructions on the CD-ROM). • This terminal is an open collector circuit. Also confirm that require large amounts of the camera is used . The camera can be near the camera and easily accessible. • Use only specified Panasonic AC...Panasonic Network Camera website (http://panasonic.net/pcc/ipcam/) for BL-C230E). • The camera may set to WIRED. 2 Connect the LAN cable to the camera and the router. 3 Connect the AC adaptor cord to the DC IN jack. Router Internet WAN LAN 4321 LAN cable (Cat-5 straight cable) Modem PC VIERA (BL-C230A...
...(BL-C230 Only) in the Operating Instructions on the CD-ROM). • This terminal is an open collector circuit. Also confirm that require large amounts of the camera is used . The camera can be near the camera and easily accessible. • Use only specified Panasonic AC...Panasonic Network Camera website (http://panasonic.net/pcc/ipcam/) for BL-C230E). • The camera may set to WIRED. 2 Connect the LAN cable to the camera and the router. 3 Connect the AC adaptor cord to the DC IN jack. Router Internet WAN LAN 4321 LAN cable (Cat-5 straight cable) Modem PC VIERA (BL-C230A...
Installation Guide
Page 4
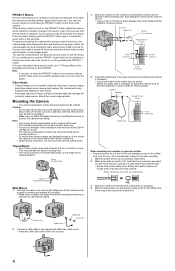
... • Attach the safety wire in relatively dark areas, however, image quality decreases when viewing dark images. Mount the camera appropriately. Mount the camera so that camera images are going to make a hole for indoor use a tripod screw with the wall. • Mortar walls break easily...light may become detached, it clicks into a secure area of the wall, such as the camera's indicator) changes from falling. 3. Mount the camera on the screws by following the instructions on this document depict the BL-C230A. Screw A Washer L At least 25 mm (1 inch) Safety wire 4 mm (3/16...
... • Attach the safety wire in relatively dark areas, however, image quality decreases when viewing dark images. Mount the camera appropriately. Mount the camera so that camera images are going to make a hole for indoor use a tripod screw with the wall. • Mortar walls break easily...light may become detached, it clicks into a secure area of the wall, such as the camera's indicator) changes from falling. 3. Mount the camera on the screws by following the instructions on this document depict the BL-C230A. Screw A Washer L At least 25 mm (1 inch) Safety wire 4 mm (3/16...


