
Care and Maintenance
Page 8
To secure the battery access cover, slide the cover back on the word PUSH, then slide the cover up and away from the laptop 4. Place your finger on to the battery bay and press down until your hear an audible "snap" 8 Located the area of the door marked PUSH (A) 3. Product Overview Securing Battery Access Cover 1. Flip the computer so that the LCD cabinet is facing towards the floor. 2.
To secure the battery access cover, slide the cover back on the word PUSH, then slide the cover up and away from the laptop 4. Place your finger on to the battery bay and press down until your hear an audible "snap" 8 Located the area of the door marked PUSH (A) 3. Product Overview Securing Battery Access Cover 1. Flip the computer so that the LCD cabinet is facing towards the floor. 2.
Care and Maintenance
Page 9
Overview • LCD/Touch Screen • Keyboard and Touch Pad • Outer Case • Battery • AC Adapter Maintenance 1-800-LAPTOP5 1-800-527-8675 24 Hours, 7 days Toughbook_Tech_Support@us.panasonic.com 9
Overview • LCD/Touch Screen • Keyboard and Touch Pad • Outer Case • Battery • AC Adapter Maintenance 1-800-LAPTOP5 1-800-527-8675 24 Hours, 7 days Toughbook_Tech_Support@us.panasonic.com 9
Care and Maintenance
Page 11
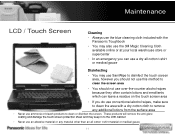
... the screen. Maintenance LCD / Touch Screen Panasonic Cleaning • Always use the blue cleaning cloth included with the Panasonic Toughbook • You may also use the 3M Magic Cleaning Cloth available online or at your local warehouse store or supercenter • In an emergency you do use conventional alcohol wipes, make sure to clean the area with a dry cotton cloth to remove any...
... the screen. Maintenance LCD / Touch Screen Panasonic Cleaning • Always use the blue cleaning cloth included with the Panasonic Toughbook • You may also use the 3M Magic Cleaning Cloth available online or at your local warehouse store or supercenter • In an emergency you do use conventional alcohol wipes, make sure to clean the area with a dry cotton cloth to remove any...

Care and Maintenance
Page 12
... access doors and port covers are closed and secured/locked before you proceed • Make sure to invert the unit to drain any additional debris from the touch pad Disinfecting • You may use a business or credit card to remove any additional liquids that may remain in to the keyboard area. Maintenance Keyboard / Touch Pad Cleaning • Always use the blue cleaning cloth included with the Panasonic Toughbook...
... access doors and port covers are closed and secured/locked before you proceed • Make sure to invert the unit to drain any additional debris from the touch pad Disinfecting • You may use a business or credit card to remove any additional liquids that may remain in to the keyboard area. Maintenance Keyboard / Touch Pad Cleaning • Always use the blue cleaning cloth included with the Panasonic Toughbook...
Care and Maintenance
Page 13
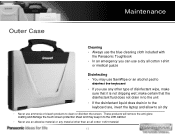
... products will remove the anti-glare coating and damage the touch screen protection sheet and may use SaniWipe or an alcohol pad to disinfect the keyboard • If you use any material other type of disinfectant wipe, make certain that it is not dripping wet; Maintenance Outer Case Cleaning • Always use the blue cleaning cloth included with the Panasonic Toughbook • In...
... products will remove the anti-glare coating and damage the touch screen protection sheet and may use SaniWipe or an alcohol pad to disinfect the keyboard • If you use any material other type of disinfectant wipe, make certain that it is not dripping wet; Maintenance Outer Case Cleaning • Always use the blue cleaning cloth included with the Panasonic Toughbook • In...

Care and Maintenance
Page 14
... useful life of the battery 14 Maintenance Battery Normal Use • Run the battery calibration utility once every 3 months or so • The calibration utility will damage the battery cells and degrade the useful life of the main battery • Leaving the laptop connected to AC Power at all times equal to storing it is strongly recommended that you enable Economy mode • If you enable Economy Mode...
... useful life of the battery 14 Maintenance Battery Normal Use • Run the battery calibration utility once every 3 months or so • The calibration utility will damage the battery cells and degrade the useful life of the main battery • Leaving the laptop connected to AC Power at all times equal to storing it is strongly recommended that you enable Economy mode • If you enable Economy Mode...

Care and Maintenance
Page 15
... • Make sure to store the battery in a cool dry place • Never store a battery more than a few months. • Prolonged storage will deteriorate the battery cells and reduce the overall effectiveness of the battery • Leaving the laptop connected to high levels of heat will become less and less useful over time. • Exposure to AC Power at...
... • Make sure to store the battery in a cool dry place • Never store a battery more than a few months. • Prolonged storage will deteriorate the battery cells and reduce the overall effectiveness of the battery • Leaving the laptop connected to high levels of heat will become less and less useful over time. • Exposure to AC Power at...
Care and Maintenance
Page 16
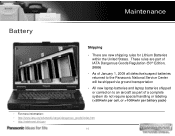
These rules are new shipping rules for Lithium Batteries within the United States. Maintenance Battery Shipping • There are part of IATA Dangerous Goods Regulation (50th Edition, 2009) • As of January 1, 2009 all defective/suspect batteries returned to the Panasonic National Service Center will be shipped via ground transportation • All new laptop batteries and laptop batteries shipped or carried on to an...
These rules are new shipping rules for Lithium Batteries within the United States. Maintenance Battery Shipping • There are part of IATA Dangerous Goods Regulation (50th Edition, 2009) • As of January 1, 2009 all defective/suspect batteries returned to the Panasonic National Service Center will be shipped via ground transportation • All new laptop batteries and laptop batteries shipped or carried on to an...

Care and Maintenance
Page 17
... AC Adapter housing. This may stretch and eventually break the internal connections/wiring • Do not allow the AC Adapter to hang from a hook or other area, use a tie down to cut into the cable, causing an electrical hazard 17 Never use a tie wrap around the AC Adapter. The...If you must fix the AC Adapter to a desk or other device. This can cause the AC Adapter to overheat and may lead to a fire hazard • Tying the AC Adapter cables may cause the tie to secure the cables • Covering the AC Adapter is never a good idea. Maintenance AC Adapter Storage • ...
... AC Adapter housing. This may stretch and eventually break the internal connections/wiring • Do not allow the AC Adapter to hang from a hook or other area, use a tie down to cut into the cable, causing an electrical hazard 17 Never use a tie wrap around the AC Adapter. The...If you must fix the AC Adapter to a desk or other device. This can cause the AC Adapter to overheat and may lead to a fire hazard • Tying the AC Adapter cables may cause the tie to secure the cables • Covering the AC Adapter is never a good idea. Maintenance AC Adapter Storage • ...

Care and Maintenance
Page 19
Diagnostic Utility Troubleshooting • Part of the System BIOS • Independent of Operating System • Tests All Major Components • Test All Components or Single Component • Tests component system to ensure proper operating status • Does not test physical data transfer on USB, Modem, WLAN, Bluetooth, LAN • Good starting point when troubleshooting hardware issues 19
Diagnostic Utility Troubleshooting • Part of the System BIOS • Independent of Operating System • Tests All Major Components • Test All Components or Single Component • Tests component system to ensure proper operating status • Does not test physical data transfer on USB, Modem, WLAN, Bluetooth, LAN • Good starting point when troubleshooting hardware issues 19
Care and Maintenance
Page 20
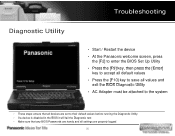
... Utility Troubleshooting • Start / Restart the device • At the Panasonic welcome screen, press the [F2] to enter the BIOS Set Up Utility • Press the [F9] key, then press the [Enter] key to accept all default values • Press the [F10] key to save all values and exit the BIOS Diagnostic Utility • AC Adapter must be attached to the system • These steps ensure that all devices...
... Utility Troubleshooting • Start / Restart the device • At the Panasonic welcome screen, press the [F2] to enter the BIOS Set Up Utility • Press the [F9] key, then press the [Enter] key to accept all default values • Press the [F10] key to save all values and exit the BIOS Diagnostic Utility • AC Adapter must be attached to the system • These steps ensure that all devices...
Care and Maintenance
Page 21
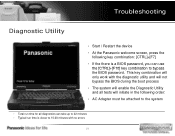
... only work with no errors 21 Troubleshooting Diagnostic Utility • Start / Restart the device • At the Panasonic welcome screen, press the following order: • AC Adapter must be attached to the system • Total run time for all diagnostics can use the [CTRL]+[F10] key combination to 15-20 minutes with the diagnostic utility and will not bypass the BIOS during the boot process...
... only work with no errors 21 Troubleshooting Diagnostic Utility • Start / Restart the device • At the Panasonic welcome screen, press the following order: • AC Adapter must be attached to the system • Total run time for all diagnostics can use the [CTRL]+[F10] key combination to 15-20 minutes with the diagnostic utility and will not bypass the BIOS during the boot process...

Care and Maintenance
Page 22
Troubleshooting Diagnostic Utility • Total run time for all diagnostics can take up to 22 minutes • Typical run time is closer to 15-20 minutes with no errors • Flashes yell and blue when testing 22 • CPU/System • RAM (installed RAM size will display) • HDD (installed HDD size will display) • Video • Sound • Modem • LAN • Wireless LAN • Bluetooth • USB • PC Card • Modem • Keyboard • Touch Pad • Touch Screen
Troubleshooting Diagnostic Utility • Total run time for all diagnostics can take up to 22 minutes • Typical run time is closer to 15-20 minutes with no errors • Flashes yell and blue when testing 22 • CPU/System • RAM (installed RAM size will display) • HDD (installed HDD size will display) • Video • Sound • Modem • LAN • Wireless LAN • Bluetooth • USB • PC Card • Modem • Keyboard • Touch Pad • Touch Screen

Care and Maintenance
Page 23
Diagnostic Utility Troubleshooting • Each section will flash during the test and then display the pass/fail color • Blue = Standby/Waiting for instruction • Yellow = Running Diagnostic • Green = Pass all tests • Red = Failed test • Total run time for all diagnostics can take up to 22 minutes • Typical run time is closer to 15-20 minutes with no errors • Flashes yell and blue when testing 23
Diagnostic Utility Troubleshooting • Each section will flash during the test and then display the pass/fail color • Blue = Standby/Waiting for instruction • Yellow = Running Diagnostic • Green = Pass all tests • Red = Failed test • Total run time for all diagnostics can take up to 22 minutes • Typical run time is closer to 15-20 minutes with no errors • Flashes yell and blue when testing 23
Care and Maintenance
Page 24
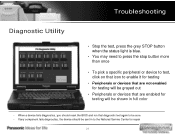
Troubleshooting Diagnostic Utility • Stop the test, press the grey STOP button when the status light is blue. • You may need to press the stop button more than once • To pick a specific peripheral or device to test, click on that icon to enable it for testing • Peripherals or devices that are not enabled for testing will be grayed out...
Troubleshooting Diagnostic Utility • Stop the test, press the grey STOP button when the status light is blue. • You may need to press the stop button more than once • To pick a specific peripheral or device to test, click on that icon to enable it for testing • Peripherals or devices that are not enabled for testing will be grayed out...
Care and Maintenance
Page 25
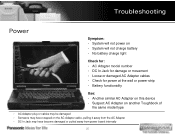
... power on • System will not charge battery • No battery charge light Check for: • AC Adapter model number • DC In Jack for damage or movement • Loose or damaged AC Adapter cables • Check for power at the wall or power strip • Battery functionality Use: • Another similar AC Adapter on this device • Suspect AC Adapter on another Toughbook of the same model type • AC Adapter plug or cables...
... power on • System will not charge battery • No battery charge light Check for: • AC Adapter model number • DC In Jack for damage or movement • Loose or damaged AC Adapter cables • Check for power at the wall or power strip • Battery functionality Use: • Another similar AC Adapter on this device • Suspect AC Adapter on another Toughbook of the same model type • AC Adapter plug or cables...
Care and Maintenance
Page 26
... power on • System will not charge battery • No battery charge light Check for: • AC Adapter model number • DC In Jack for damage or movement • Loose or damaged AC Adapter cables • Check for power at the wall or power strip • Battery functionality Use: • Another similar AC Adapter on this device • Suspect AC Adapter on another Toughbook of the same model type • AC Adapter plug or cables...
... power on • System will not charge battery • No battery charge light Check for: • AC Adapter model number • DC In Jack for damage or movement • Loose or damaged AC Adapter cables • Check for power at the wall or power strip • Battery functionality Use: • Another similar AC Adapter on this device • Suspect AC Adapter on another Toughbook of the same model type • AC Adapter plug or cables...

Care and Maintenance
Page 27
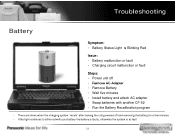
Troubleshooting Battery Symptom: • Battery Status Light is Blinking Orange Issue: • System temperature is too hot • System will not charge battery • Economy mode is Enabled and battery level is above 80% Steps: • Power unit off • Take unit inside or to a cool environment • Place unit in front of an air conditioning vent • Remove the main battery... and allow it to cool down • If Economy mode is enabled, system will resume charging when battery reaches 80% • Make sure that the laptop is powering off and ...
Troubleshooting Battery Symptom: • Battery Status Light is Blinking Orange Issue: • System temperature is too hot • System will not charge battery • Economy mode is Enabled and battery level is above 80% Steps: • Power unit off • Take unit inside or to a cool environment • Place unit in front of an air conditioning vent • Remove the main battery... and allow it to cool down • If Economy mode is enabled, system will resume charging when battery reaches 80% • Make sure that the laptop is powering off and ...
Care and Maintenance
Page 28
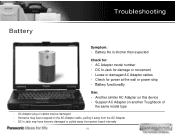
Troubleshooting Battery Symptom: • Battery Status Light is Blinking Red Issue: • Battery malfunction or fault • Charging circuit malfunction or fault Steps: • Power unit off • Remove AC Adapter • Remove Battery • Wait five minutes • Install battery and attach AC adapter • Swap batteries with another CF-52 • Run the Battery Recalibration program • There are times when the charging system "resets" after leaving the unit...
Troubleshooting Battery Symptom: • Battery Status Light is Blinking Red Issue: • Battery malfunction or fault • Charging circuit malfunction or fault Steps: • Power unit off • Remove AC Adapter • Remove Battery • Wait five minutes • Install battery and attach AC adapter • Swap batteries with another CF-52 • Run the Battery Recalibration program • There are times when the charging system "resets" after leaving the unit...
Care and Maintenance
Page 29
... or power strip • Battery functionality Use: • Another similar AC Adapter on this device • Suspect AC Adapter on another Toughbook of the same model type • AC Adapter plug or cables may be damaged • Someone may have stepped on the AC Adapter cable, pulling it away from the AC Adapter • DC In Jack may have become damaged or pulled away from power board internally 29
... or power strip • Battery functionality Use: • Another similar AC Adapter on this device • Suspect AC Adapter on another Toughbook of the same model type • AC Adapter plug or cables may be damaged • Someone may have stepped on the AC Adapter cable, pulling it away from the AC Adapter • DC In Jack may have become damaged or pulled away from power board internally 29


