
English
Page 2
... the food processor. Do not use this piece by hand, always use . 18. Handle carefully. 13. Keep hands and utensils away from outlet when not in water or any part is securely locked in place. 14. Be certain container cover is broken. 10. Read all instructions before cleaning. 5. Do not use your food processor if any other than its intended use the food pusher. 16. SAVE THESE INSTRUCTIONS 2 www.oster.com...
... the food processor. Do not use this piece by hand, always use . 18. Handle carefully. 13. Keep hands and utensils away from outlet when not in water or any part is securely locked in place. 14. Be certain container cover is broken. 10. Read all instructions before cleaning. 5. Do not use your food processor if any other than its intended use the food pusher. 16. SAVE THESE INSTRUCTIONS 2 www.oster.com...
English
Page 3
...OSTER® 10 Cup Professional Food Processor. Do not modify the plug in a polarized outlet only one blade is exercised in its use this plug will not drape over a longer cord. DO NOT ATTEMPT TO DEFEAT THIS SAFETY FEATURE. Before you for the first time, please take a few moments to read these instructions...not return to the Safety Instructions provided. www.oster.com 3 THIS UNIT IS INTENDED FOR HOUSEHOLD USE ONLY. EXTENSION CORD USE A short power-supply cord is used if care is wider than the other). Please review the product service and warranty statements. An ...
...OSTER® 10 Cup Professional Food Processor. Do not modify the plug in a polarized outlet only one blade is exercised in its use this plug will not drape over a longer cord. DO NOT ATTEMPT TO DEFEAT THIS SAFETY FEATURE. Before you for the first time, please take a few moments to read these instructions...not return to the Safety Instructions provided. www.oster.com 3 THIS UNIT IS INTENDED FOR HOUSEHOLD USE ONLY. EXTENSION CORD USE A short power-supply cord is used if care is wider than the other). Please review the product service and warranty statements. An ...

English
Page 4
LEARNING ABOUT YOUR 10 CUP FOOD PROCESSOR a a Small Food Pusher b Large Food Pusher b c Food Chute Lid d Slice Disc c e Shred Disc f Disc Stem d g Dough Blade e h Accessory Storage Bowl i Multi-purpose Blade f g j Bowl k Spatula h l Base m Control panel i j k l m 4 www.oster.com
LEARNING ABOUT YOUR 10 CUP FOOD PROCESSOR a a Small Food Pusher b Large Food Pusher b c Food Chute Lid d Slice Disc c e Shred Disc f Disc Stem d g Dough Blade e h Accessory Storage Bowl i Multi-purpose Blade f g j Bowl k Spatula h l Base m Control panel i j k l m 4 www.oster.com
English
Page 5
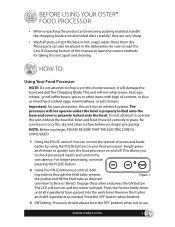
... unit apart and cleaning. The processor will start. Press the Pusher firmly down until all parts except the Base in this manual to check processed results and control the consistency. BEFORE USING YOUR OSTER® FOOD PROCESSOR • When unpacking the product and removing packing material, handle the chopping blade and slice/shred discs carefully: they are very sharp. • Wash all ingredients have passed into the work bowl. Press the OFF...
... unit apart and cleaning. The processor will start. Press the Pusher firmly down until all parts except the Base in this manual to check processed results and control the consistency. BEFORE USING YOUR OSTER® FOOD PROCESSOR • When unpacking the product and removing packing material, handle the chopping blade and slice/shred discs carefully: they are very sharp. • Wash all ingredients have passed into the work bowl. Press the OFF...

English
Page 6
... positioned in bowl if using the slicing or shredding discs. Wait until the blade or disc comes to Lock the Cover Place the lid on the lid will not operate if the cover is unplugged. Place food or dough in the front). Turn clockwise until the bowl clicks into outlet. The unit will line up with the work bowl handle just to lock onto the base. Plug unit into place. Your food processor features...
... positioned in bowl if using the slicing or shredding discs. Wait until the blade or disc comes to Lock the Cover Place the lid on the lid will not operate if the cover is unplugged. Place food or dough in the front). Turn clockwise until the bowl clicks into outlet. The unit will line up with the work bowl handle just to lock onto the base. Plug unit into place. Your food processor features...
English
Page 7
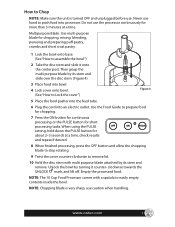
... to Chop NOTE: Make sure the unit is very sharp, use caution when handling. Multipurpose Blade: Use multi purpose blade for short processing tasks. Then grasp the multi purpose blade by its stem and remove. www.oster.com 7 NOTE: The 10 Cup Food Processor comes with multi purpose blade attached by turning it onto the center post. Unlock the bowl by its stem and slide over the disc stem. (Figure 4) 3 Place food into bowl. 4 Lock cover onto bowl. (See "How to prepare food for chopping. 7 Press...
... to Chop NOTE: Make sure the unit is very sharp, use caution when handling. Multipurpose Blade: Use multi purpose blade for short processing tasks. Then grasp the multi purpose blade by its stem and remove. www.oster.com 7 NOTE: The 10 Cup Food Processor comes with multi purpose blade attached by turning it onto the center post. Unlock the bowl by its stem and slide over the disc stem. (Figure 4) 3 Place food into bowl. 4 Lock cover onto bowl. (See "How to prepare food for chopping. 7 Press...
English
Page 8
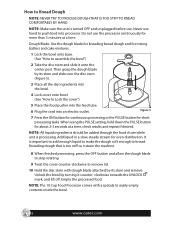
... the dough blade to stop rotating. 9 Twist the cover counter-clockwise to Lock the cover") 5 Place the food pusher into the feed tube. 6 Plug the cord into the bowl. 4 Lock cover onto bowl. (See "How to remove lid. 10 Hold the disc stem with a spatula to easily empty contents inside the bowl. 8 www.oster.com Do not use . Dough Blade: Use the dough blade for kneading bread dough and for mixing batters and cake mixtures. 1 Lock the bowl onto base...
... the dough blade to stop rotating. 9 Twist the cover counter-clockwise to Lock the cover") 5 Place the food pusher into the feed tube. 6 Plug the cord into the bowl. 4 Lock cover onto bowl. (See "How to remove lid. 10 Hold the disc stem with a spatula to easily empty contents inside the bowl. 8 www.oster.com Do not use . Dough Blade: Use the dough blade for kneading bread dough and for mixing batters and cake mixtures. 1 Lock the bowl onto base...
English
Page 9
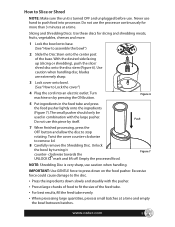
... handling. Slicing and Shredding Discs: Use these discs for more . 1 Lock the bowl onto base. (See "How to remove lid. 8 Carefully remove the Shredding Disc. Turn machine on the food pusher. Twist the cover counter-clockwise to assemble the bowl") 2 Slide the Disc Stem onto the center post of the base. Empty the processed food. Do not use this piece by itself. 7 When finished processing, press the OFF button and allow the disc to Lock the cover") 4 Plug the cord into processor. Use caution when handling disc, blades...
... handling. Slicing and Shredding Discs: Use these discs for more . 1 Lock the bowl onto base. (See "How to remove lid. 8 Carefully remove the Shredding Disc. Turn machine on the food pusher. Twist the cover counter-clockwise to assemble the bowl") 2 Slide the Disc Stem onto the center post of the base. Empty the processed food. Do not use this piece by itself. 7 When finished processing, press the OFF button and allow the disc to Lock the cover") 4 Plug the cord into processor. Use caution when handling disc, blades...
English
Page 10
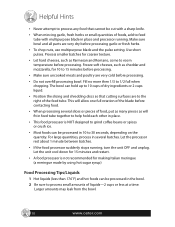
... slicing and shredding discs so that cannot be processed in place and processor running , turn the unit OFF and unplug. Fill no more then 1/3 to 30 seconds, depending on the quantity. Larger amounts may leak from the bowl. 10 www.oster.com Helpful Hints • Never attempt to process any food that cutting surfaces are to the right of the feed tube...
... slicing and shredding discs so that cannot be processed in place and processor running , turn the unit OFF and unplug. Fill no more then 1/3 to 30 seconds, depending on the quantity. Larger amounts may leak from the bowl. 10 www.oster.com Helpful Hints • Never attempt to process any food that cutting surfaces are to the right of the feed tube...
English
Page 11
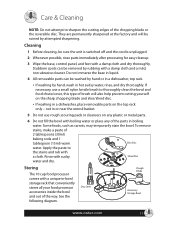
... food processor accessories inside the bowl and out of the parts in boiling water. not in or near the utensil basket. 5 Do not use a small nylon bristle brush to thoroughly clean the bowl and food chute/cover, this type of the chopping blade or the reversible disc. Apply the paste to the stains and rub with sudsy Shred Disc water and dry. See the following diagram. Storing The 10 cup food processor...
... food processor accessories inside the bowl and out of the parts in boiling water. not in or near the utensil basket. 5 Do not use a small nylon bristle brush to thoroughly clean the bowl and food chute/cover, this type of the chopping blade or the reversible disc. Apply the paste to the stains and rub with sudsy Shred Disc water and dry. See the following diagram. Storing The 10 cup food processor...
English
Page 12
... to bowl and process to desired size. 12 www.oster.com Process continuously to bowl. Quarter, add to finely grate. Hull and halve large berries. Be sure bowl is running. Add to bowl, Pulse to chop. Add to bowl and pulse to chop, checking fineness after 4-5 pulses. Quarter tomatoes. Pulse to desired fineness. Cut either fresh or dry bread slices into 1 inch (2.45cm) pieces.
... to bowl and process to desired size. 12 www.oster.com Process continuously to bowl. Quarter, add to finely grate. Hull and halve large berries. Be sure bowl is running. Add to bowl, Pulse to chop. Add to bowl and pulse to chop, checking fineness after 4-5 pulses. Quarter tomatoes. Pulse to desired fineness. Cut either fresh or dry bread slices into 1 inch (2.45cm) pieces.

English
Page 13
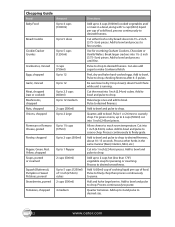
... pepper up bottom of Chute squeezing slightly to fit Chute, use light pressure. Peel, cut to shredding. www.oster.com 13 Shredding Guide Food Cabbage Carrots Cheese, cheddar Cheese, Mozzarella Potatoes Zucchini Directions Use Shredding Disc for whole slices; Shred using moderate pressure. Cheese must be well chilled. Slice off ends. Use gentle but firm pressure. Cheese must be chilled in Chute and slice using light pressure. Slice using light pressure. Use small tomatoes for 30 minutes...
... pepper up bottom of Chute squeezing slightly to fit Chute, use light pressure. Peel, cut to shredding. www.oster.com 13 Shredding Guide Food Cabbage Carrots Cheese, cheddar Cheese, Mozzarella Potatoes Zucchini Directions Use Shredding Disc for whole slices; Shred using moderate pressure. Cheese must be well chilled. Slice off ends. Use gentle but firm pressure. Cheese must be chilled in Chute and slice using light pressure. Slice using light pressure. Use small tomatoes for 30 minutes...
English
Page 14
...cover normal wear of , or inability to use contrary to jurisdiction. JCS shall not be free from any of the following: negligent use or misuse of the product, use on this product or any breach of contract, fundamental or otherwise, or for a particular purpose... a new or...operating instructions, disassembly, repair or alteration by the breach of incidental or consequential damages or limitations on JCS's Liability? This warranty gives you specific legal rights, and you . If you have the right to you . Replacement will be provided to obtain warranty service...other problem or...
...cover normal wear of , or inability to use contrary to jurisdiction. JCS shall not be free from any of the following: negligent use or misuse of the product, use on this product or any breach of contract, fundamental or otherwise, or for a particular purpose... a new or...operating instructions, disassembly, repair or alteration by the breach of incidental or consequential damages or limitations on JCS's Liability? This warranty gives you specific legal rights, and you . If you have the right to you . Replacement will be provided to obtain warranty service...other problem or...


