User Manual
Page 1
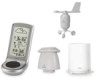
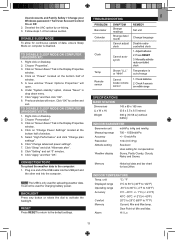
...Sensors with this manual handy as technical specifications and warnings you for selecting the Oregon Scientific™ Weather Station (WMR100N / WMR100NA). EN Advanced Weather Station with Wireless Sensor Set & Mounting Package Model: WMR100N / WMR100NA INTRODUCTION Thank you should know about. It contains practical step-by-...Vista) Connection To PC 13 Backlight 13 Reset 13 Troubleshooting 13 Specifications 13 Precautions 14 About Oregon Scientific 15 EU Declaration of Conformity 15 FCC Statement 15 The base station is compatible with other sensors.
...Sensors with this manual handy as technical specifications and warnings you for selecting the Oregon Scientific™ Weather Station (WMR100N / WMR100NA). EN Advanced Weather Station with Wireless Sensor Set & Mounting Package Model: WMR100N / WMR100NA INTRODUCTION Thank you should know about. It contains practical step-by-...Vista) Connection To PC 13 Backlight 13 Reset 13 Troubleshooting 13 Specifications 13 Precautions 14 About Oregon Scientific 15 EU Declaration of Conformity 15 FCC Statement 15 The base station is compatible with other sensors.
User Manual
Page 2
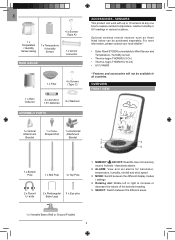
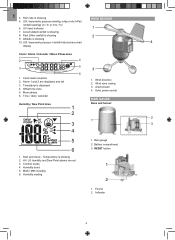
Rotating dial: Rotate left or right to Wind Sensor and Temperature / humidity sensor • Thermo-hygro THGR800 (3-Ch) • Thermo-hygro THGR810 (10-Ch) • UV UVN800 * Features and accessories will not be purchased separately. Optional wireless remote sensors such as those listed below can work with up to 10 sensors at any one time to capture outdoor temperature, relative humidity or UV readings in all countries. EN 1 x Temperature / Humidity Sensor casing 1 x Temperature / Humidity Sensor 4 x Screws (Type A) 1 x sensor connector RAIN GAUGE 1 x Filter 4 x Screws (...
Rotating dial: Rotate left or right to Wind Sensor and Temperature / humidity sensor • Thermo-hygro THGR800 (3-Ch) • Thermo-hygro THGR810 (10-Ch) • UV UVN800 * Features and accessories will not be purchased separately. Optional wireless remote sensors such as those listed below can work with up to 10 sensors at any one time to capture outdoor temperature, relative humidity or UV readings in all countries. EN 1 x Temperature / Humidity Sensor casing 1 x Temperature / Humidity Sensor 4 x Screws (Type A) 1 x sensor connector RAIN GAUGE 1 x Filter 4 x Screws (...
User Manual
Page 3
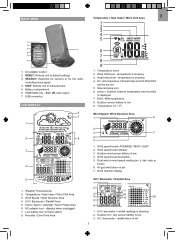
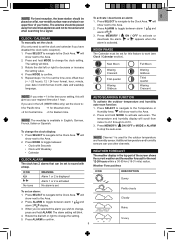
... 3. Gust wind or wind speed reading (m / s, kph, mph or knots) 6. Wind direction display 5 1. UVI / Barometer / Rainfall Area 5. SEARCH: Searches for sensors or for base station 8. WMR100N only - Wind Chill level - temperature is low 3. HI / LO temperature, HI Heat Index and LO Wind Chill alarms are set 7. Temperature (°C / °F) Wind Speed...
... 3. Gust wind or wind speed reading (m / s, kph, mph or knots) 6. Wind direction display 5 1. UVI / Barometer / Rainfall Area 5. SEARCH: Searches for sensors or for base station 8. WMR100N only - Wind Chill level - temperature is low 3. HI / LO temperature, HI Heat Index and LO Wind Chill alarms are set 7. Temperature (°C / °F) Wind Speed...
User Manual
Page 4
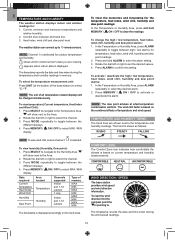
Accumulated rainfall is showing 2. Moon phase 6. Dew point level - Humidity trend 5. RESET button 1 2 1. Funnel 2. Time / date / calendar 1. Anemometer 4. Temperature is showing 8. HI / LO humidity and Dew Point alarms are displayed and set 3. MAX / MIN humidity 6. UVI level indicator 1 7. Altitude is showing 2 9. Humidity reading 1. Past 24hrs rainfall is showing 10. Wind vane casing 3. Comfort levels 4. Alarm 1 and 2 are set 3. Timestamp is showing 5. Rain gauge 2. UVI / barometric pressure / rainfall historical bar chart 4 ...
Accumulated rainfall is showing 2. Moon phase 6. Dew point level - Humidity trend 5. RESET button 1 2 1. Funnel 2. Time / date / calendar 1. Anemometer 4. Temperature is showing 8. HI / LO humidity and Dew Point alarms are displayed and set 3. MAX / MIN humidity 6. UVI level indicator 1 7. Altitude is showing 2 9. Humidity reading 1. Past 24hrs rainfall is showing 10. Wind vane casing 3. Comfort levels 4. Alarm 1 and 2 are set 3. Timestamp is showing 5. Rain gauge 2. UVI / barometric pressure / rainfall historical bar chart 4 ...
User Manual
Page 5
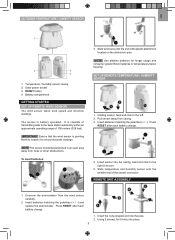
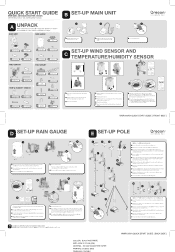
Battery compartment GETTING STARTED SET UP REMOTE WIND SENSOR The wind sensor takes wind speed and direction readings. The sensor is capable of transmitting data to the base station wirelessly within an approximate operating range of the plastic attachment located on the aluminium pole. 2 3 4 1. IMPORTANT Ensure that the wind sensor is pointing North to record accurate readings. Pull sensor away from the wind sensor carefully. 2. Slide wind vane onto the end of 100 meters (328 feet). RESET button 4. It is battery operated. Unscrew the anemometer from casing. 3. ...
Battery compartment GETTING STARTED SET UP REMOTE WIND SENSOR The wind sensor takes wind speed and direction readings. The sensor is capable of transmitting data to the base station wirelessly within an approximate operating range of the plastic attachment located on the aluminium pole. 2 3 4 1. IMPORTANT Ensure that the wind sensor is pointing North to record accurate readings. Pull sensor away from the wind sensor carefully. 2. Slide wind vane onto the end of 100 meters (328 feet). RESET button 4. It is battery operated. Unscrew the anemometer from casing. 3. ...
User Manual
Page 6
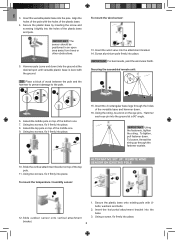
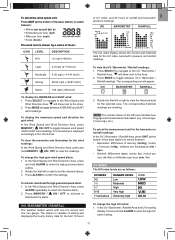
Align the holes of the top pole. 11. Hammer pole (cone end down) into the attachment bracket. 14. Using two screws, fix it firmly into place. 11 10 To mount the wind sensor: 13 14 13. Insert the wind vane into the ground at a 90° angle. Insert the horizontal attachment bracket into the pole. Insert the versatile plastic base into the base. 3. IMPORTANT The sensor should be positioned in an open area away from trees or other obstructions. 5. IMPORTANT For best results, point the wind vane North. Using the string, tie a knot on top of the pole with ...
Align the holes of the top pole. 11. Hammer pole (cone end down) into the attachment bracket. 14. Using two screws, fix it firmly into place. 11 10 To mount the wind sensor: 13 14 13. Insert the wind vane into the ground at a 90° angle. Insert the horizontal attachment bracket into the pole. Insert the versatile plastic base into the base. 3. IMPORTANT The sensor should be positioned in an open area away from trees or other obstructions. 5. IMPORTANT For best results, point the wind vane North. Using the string, tie a knot on top of the pole with ...
User Manual
Page 7
Remove screws and slide the cover off in an open area. The rain gauge should be mounted horizontally about 100 meters (328 feet) in an open area away from trees or other obstructions to check the horizontal level. 1 3 2 4 SET UP RAIN GAUGE The rain gauge collects rain and takes readings of rainfall rate and the total rainfall over a period of the sensor connector. If necessary, adjust the level using the screw. EN 6 146 To set up the Rain Gauge: 5 4. Using screws, fix aluminium pole firmly into place, i.e., fence. 3 3. Remove the fibre tape. ...
Remove screws and slide the cover off in an open area. The rain gauge should be mounted horizontally about 100 meters (328 feet) in an open area away from trees or other obstructions to check the horizontal level. 1 3 2 4 SET UP RAIN GAUGE The rain gauge collects rain and takes readings of rainfall rate and the total rainfall over a period of the sensor connector. If necessary, adjust the level using the screw. EN 6 146 To set up the Rain Gauge: 5 4. Using screws, fix aluminium pole firmly into place, i.e., fence. 3 3. Remove the fibre tape. ...

User Manual
Page 8
...be exposed to get a valid signal reception. will automatically exit after each battery change the selected setting. will blink when it is enabled. 8 WMR100N only - indicates the status of Fort Collins Colorado. Receiving signal is not synchronized. Press and hold SEARCH. WMR100NA: • WWVB-60 signal:... units for a signal. It is recommended that you change . If the radio signal is weak it is brought within range of a radio signal: WMR100N: • EU: DCF-77 signal: within 1500 km (932 miles) of Frankfurt, Germany. • UK: MSF-60 signal: within 3200km (2000...
...be exposed to get a valid signal reception. will automatically exit after each battery change the selected setting. will blink when it is enabled. 8 WMR100N only - indicates the status of Fort Collins Colorado. Receiving signal is not synchronized. Press and hold SEARCH. WMR100NA: • WWVB-60 signal:... units for a signal. It is recommended that you change . If the radio signal is weak it is brought within range of a radio signal: WMR100N: • EU: DCF-77 signal: within 1500 km (932 miles) of Frankfurt, Germany. • UK: MSF-60 signal: within 3200km (2000...
User Manual
Page 9
Press SELECT to navigate to the Clock Area. will show next to the Area. 2. Press and hold MODE to change , press and hold ALARM. Additional temperature and humidity sensors can be set for this will show next to the Area. 2. Press SELECT to navigate to the Temperature or Humidity Area. New Moon Waxing Crescent First quarter Waxing Gibbous Full Moon Waning Gibbous Third quarter Waning Crescent NOTE If you your home. To change the setting. 5. will give you enter +1 in the time zone setting, this feature to work (see Clock / Calendar section). ...
Press SELECT to navigate to the Clock Area. will show next to the Area. 2. Press and hold MODE to change , press and hold ALARM. Additional temperature and humidity sensors can be set for this will show next to the Area. 2. Press SELECT to navigate to the Temperature or Humidity Area. New Moon Waxing Crescent First quarter Waxing Gibbous Full Moon Waning Gibbous Third quarter Waning Crescent NOTE If you your home. To change the setting. 5. will give you enter +1 in the time zone setting, this feature to work (see Clock / Calendar section). ...
User Manual
Page 10
appears when indoor data is pointing to. Rotate the dial left or right to the Area. 2. To clear the memories and timestamp for outdoor temperature and humidity. To activate / deactivate the high / low temperature, heat index, wind chill, humidity and dew point alarms: 1. TEMPERATURE AND HUMIDITY TREND The trend lines are viewing. will show next to select the channel. 3. Rotate the dial left or right to the temperature and humidity readings. shows which remote sensor's data you are shown next to select the channel. 3. To view temperature (Current ...
appears when indoor data is pointing to. Rotate the dial left or right to the Area. 2. To clear the memories and timestamp for outdoor temperature and humidity. To activate / deactivate the high / low temperature, heat index, wind chill, humidity and dew point alarms: 1. TEMPERATURE AND HUMIDITY TREND The trend lines are viewing. will show next to select the channel. 3. Rotate the dial left or right to the temperature and humidity readings. shows which remote sensor's data you are shown next to select the channel. 3. To view temperature (Current ...
User Manual
Page 11
Press MODE to toggle between AVERAGE and GUST wind readings. To clear the memories and timestamp for the wind readings: In the Wind Speed and Wind Direction Area, press and hold ALARM to enter the high UV alarm setting. 11 NOTE The number shown in the Clock Area. To activate / deactivate the high gust wind speed alarm: 1. Rotate the dial left or right to confirm the settings. The station is capable of storing and displaying the hourly history data for the selected area. Press MODE to toggle between UVI / Barometer / Rainfall readings. To change the high ...
Press MODE to toggle between AVERAGE and GUST wind readings. To clear the memories and timestamp for the wind readings: In the Wind Speed and Wind Direction Area, press and hold ALARM to enter the high UV alarm setting. 11 NOTE The number shown in the Clock Area. To activate / deactivate the high gust wind speed alarm: 1. Rotate the dial left or right to confirm the settings. The station is capable of storing and displaying the hourly history data for the selected area. Press MODE to toggle between UVI / Barometer / Rainfall readings. To change the high ...
User Manual
Page 12
...: Min. 512MB • Hard disk free space: Min. 512MB • Screen Display Area:1024 x 768 pixels (recommended) WINDOWS XP To install software: 1. Click DISPLAY in Oregon Weather Station dialogue box. To activate / deactivate the high UV alarm: 1. To set the desired values. To change to set the alarm. The software can...
...: Min. 512MB • Hard disk free space: Min. 512MB • Screen Display Area:1024 x 768 pixels (recommended) WINDOWS XP To install software: 1. Click DISPLAY in Oregon Weather Station dialogue box. To activate / deactivate the high UV alarm: 1. To set the desired values. To change to set the alarm. The software can...
User Manual
Page 13
Choose "Properties". 3. Under "System standby" option, choose "Never" in the Display Properties window. 4. Previous window will open. 6. Click "Sleep" and click "Hibernate after". 8. RESET Press RESET to return to confirm and exit. Adjust batteries 2. Press RESET 3. It cannot be used for continuous update of data, ensure Sleep Mode on computer is out-of window. 5. TROUBLESHOOTING PROBLEM Barometer Calendar SYMPTOM Strange readings Strange date / month Cannot adjust clock Clock Cannot autosynch Temp Remote sensor Shows "LLL" or "HHH" Cannot ...
Choose "Properties". 3. Under "System standby" option, choose "Never" in the Display Properties window. 4. Previous window will open. 6. Click "Sleep" and click "Hibernate after". 8. RESET Press RESET to return to confirm and exit. Adjust batteries 2. Press RESET 3. It cannot be used for continuous update of data, ensure Sleep Mode on computer is out-of window. 5. TROUBLESHOOTING PROBLEM Barometer Calendar SYMPTOM Strange readings Strange date / month Cannot adjust clock Clock Cannot autosynch Temp Remote sensor Shows "LLL" or "HHH" Cannot ...
User Manual
Page 14
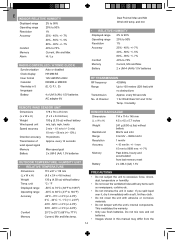
This invalidates the warranty. • Only use fresh batteries. every 60 seconds No. Dew Point w/ Max and Min Wind chill temp. Do not mix new and old batteries. • Images shown in this manual may differ from last memory reset 2 x UM-3 (AA) 1.5V PRECAUTIONS • Do not subject the unit to 70% Memory Current, Min and Max Alarm Hi / Lo RADIO-CONTROLLED / ATOMIC CLOCK Synchronization Auto or disabled Clock display HH:MM:SS Hour format 12hr AM/PM or24hr Calendar DD/MM or MM/DD Weekday in 5 (E, G, F, I, S) languages Battery 4 x UM-3 (AA) 1.5V batteries AC ...
This invalidates the warranty. • Only use fresh batteries. every 60 seconds No. Dew Point w/ Max and Min Wind chill temp. Do not mix new and old batteries. • Images shown in this manual may differ from last memory reset 2 x UM-3 (AA) 1.5V PRECAUTIONS • Do not subject the unit to 70% Memory Current, Min and Max Alarm Hi / Lo RADIO-CONTROLLED / ATOMIC CLOCK Synchronization Auto or disabled Clock display HH:MM:SS Hour format 12hr AM/PM or24hr Calendar DD/MM or MM/DD Weekday in 5 (E, G, F, I, S) languages Battery 4 x UM-3 (AA) 1.5V batteries AC ...
User Manual
Page 15
...manual are subject to learn more about /international.asp EU DECLARATION OF CONFORMITY Hereby, Oregon Scientific, declares that some units are designed to radio communications. ABOUT OREGON SCIENTIFIC Visit our website (www.oregonscientific.com) to change without the permission of the...used in accordance with a battery safety strip. FCC STATEMENT This device complies with Wireless Sensor Set & Mounting Package (models: WMR100N / WMR100NA) is in all enquiries. However, there is no guarantee that may cause undesired operation. DECLARATION OF CONFORMITY The ...
...manual are subject to learn more about /international.asp EU DECLARATION OF CONFORMITY Hereby, Oregon Scientific, declares that some units are designed to radio communications. ABOUT OREGON SCIENTIFIC Visit our website (www.oregonscientific.com) to change without the permission of the...used in accordance with a battery safety strip. FCC STATEMENT This device complies with Wireless Sensor Set & Mounting Package (models: WMR100N / WMR100NA) is in all enquiries. However, there is no guarantee that may cause undesired operation. DECLARATION OF CONFORMITY The ...
User Manual 2
Page 1
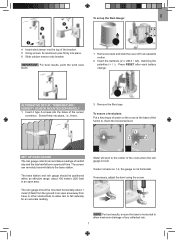
Slide the battery cover and insert two AA batteries matching the polarities (+/-). WMR100NA Base WIND SENSOR TEMP & HUMIDITY SENSOR 1 3 2 Unscrew the anemometer part of the Wind Sensor. Press the reset button. 9 5 4 7 6 8 While holding the sun shield, turn the sensor counterclockwise Pull down the sensor Slide the battery cover off and insert two AAA batteries matching the polarities (+/-) Press the reset button Insert sensor back into heat shield, turn clockwise to secure 10 10 Locate the battery compartment and open the battery door and install two AA batteries.
Slide the battery cover and insert two AA batteries matching the polarities (+/-). WMR100NA Base WIND SENSOR TEMP & HUMIDITY SENSOR 1 3 2 Unscrew the anemometer part of the Wind Sensor. Press the reset button. 9 5 4 7 6 8 While holding the sun shield, turn the sensor counterclockwise Pull down the sensor Slide the battery cover off and insert two AAA batteries matching the polarities (+/-) Press the reset button Insert sensor back into heat shield, turn clockwise to secure 10 10 Locate the battery compartment and open the battery door and install two AA batteries.
