User Manual
Page 1
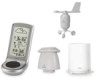
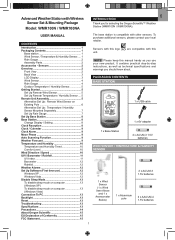
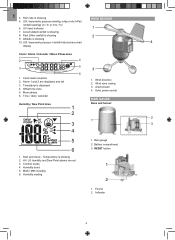
... please contact your new product. are compatible with Wireless Sensor Set & Mounting Package Model: WMR100N / WMR100NA INTRODUCTION Thank you should know about. Sensors with other sensors. PACKAGING CONTENTS BASE... Sensor..... 1 Rain Gauge 2 Assembly Parts 2 Accessories - Sensors 2 Overview 2 Front View 2 Back View 3 LCD Display 3 Wind Sensor 4 Rain Gauge 4 Outdoor Temperature / Humidity Sensor 5 Getting Started 5 Set Up Remote Wind Sensor 5...13 Troubleshooting 13 Specifications 13 Precautions 14 About Oregon Scientific 15 EU Declaration of Conformity 15 FCC ...
... please contact your new product. are compatible with Wireless Sensor Set & Mounting Package Model: WMR100N / WMR100NA INTRODUCTION Thank you should know about. Sensors with other sensors. PACKAGING CONTENTS BASE... Sensor..... 1 Rain Gauge 2 Assembly Parts 2 Accessories - Sensors 2 Overview 2 Front View 2 Back View 3 LCD Display 3 Wind Sensor 4 Rain Gauge 4 Outdoor Temperature / Humidity Sensor 5 Getting Started 5 Set Up Remote Wind Sensor 5...13 Troubleshooting 13 Specifications 13 Precautions 14 About Oregon Scientific 15 EU Declaration of Conformity 15 FCC ...
User Manual
Page 2
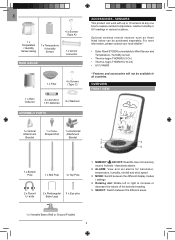
... product can be available in various locations. ALARM: View and set alarms for barometer, temperature, humidity, rainfall and wind speed 3. SELECT: Switch between the different display modes / settings 4. EN 1 x Temperature / Humidity Sensor casing 1 x Temperature / Humidity Sensor 4 x Screws (Type A) 1 x sensor connector RAIN GAUGE 1 x Filter 4 x Screws (Type C) 1 x Rain Collector 2 x AA UM-3 1.5V batteries...
... product can be available in various locations. ALARM: View and set alarms for barometer, temperature, humidity, rainfall and wind speed 3. SELECT: Switch between the different display modes / settings 4. EN 1 x Temperature / Humidity Sensor casing 1 x Temperature / Humidity Sensor 4 x Screws (Type A) 1 x sensor connector RAIN GAUGE 1 x Filter 4 x Screws (Type C) 1 x Rain Collector 2 x AA UM-3 1.5V batteries...
User Manual
Page 3
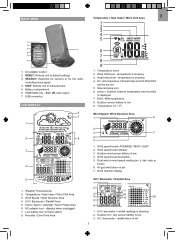
...3 7 4 5 6 1. SEARCH: Searches for sensors or for base station 8. temperature is showing 2. Selected area icon 6. Wind direction display 5 1. displays when unplugged 7. UVI / barometer / rainfall readings is showing 3. UV / barometer / rainfall alarm is set 7. controlled clock signal 4. Heat...AC adapter icon - Gust wind or wind speed reading (m / s, kph, mph or knots) 6. Temperature / Heat Index / Wind Chill Area 3. WMR100N only - Temperature trend 2. HI / LO temperature, HI Heat Index and LO Wind Chill alarms are set 5. Weather Forecast Area 2. UVI / Barometer /...
...3 7 4 5 6 1. SEARCH: Searches for sensors or for base station 8. temperature is showing 2. Selected area icon 6. Wind direction display 5 1. displays when unplugged 7. UVI / barometer / rainfall readings is showing 3. UV / barometer / rainfall alarm is set 7. controlled clock signal 4. Heat...AC adapter icon - Gust wind or wind speed reading (m / s, kph, mph or knots) 6. Temperature / Heat Index / Wind Chill Area 3. WMR100N only - Temperature trend 2. HI / LO temperature, HI Heat Index and LO Wind Chill alarms are set 5. Weather Forecast Area 2. UVI / Barometer /...
User Manual
Page 4
...button 1 2 1. Funnel 2. Past 24hrs rainfall is showing 2. Dew point level - Temperature is showing 2 9. Rain rate is displayed 4. Timestamp is showing 5. Solar power socket RAIN GAUGE Humidity / Dew Point Area Base and funnel: 1 2 2 1 3 3 4 5 ...6 1. HI / LO humidity and Dew Point alarms are displayed and set 3. Humidity reading 1. Wind vane casing 3. EN 4. UVI / barometric pressure / rainfall historical bar chart 4 display Clock / Alarm / Calendar / Moon Phase Area 1 2 4 5 3 3 6 1. Offset time zone...
...button 1 2 1. Funnel 2. Past 24hrs rainfall is showing 2. Dew point level - Temperature is showing 2 9. Rain rate is displayed 4. Timestamp is showing 5. Solar power socket RAIN GAUGE Humidity / Dew Point Area Base and funnel: 1 2 2 1 3 3 4 5 ...6 1. HI / LO humidity and Dew Point alarms are displayed and set 3. Humidity reading 1. Wind vane casing 3. EN 4. UVI / barometric pressure / rainfall historical bar chart 4 display Clock / Alarm / Calendar / Moon Phase Area 1 2 4 5 3 3 6 1. Offset time zone...

User Manual
Page 8
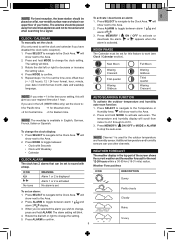
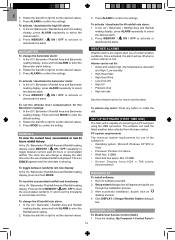
... radio reception (clock synchronization): 1. Press and hold SEARCH. Install the base station batteries (4 x UM-3 / AA) matching the polarity + and -. WMR100N only - indicates the status of the remote sensor channels and the measurement units for a signal. EN SET UP BASE STATION NOTE Install batteries in the...SELECT to navigate to the appropriate setting based on the rotating dial: SELECT, MEMORY / ON / OFF, MODE and ALARM. BASE STATION CHANGE DISPLAY / SETTING To change the selected setting. slide the EU / UK switch to the Clock / Calendar / Alarm Area. Receiving signal is not...
... radio reception (clock synchronization): 1. Press and hold SEARCH. Install the base station batteries (4 x UM-3 / AA) matching the polarity + and -. WMR100N only - indicates the status of the remote sensor channels and the measurement units for a signal. EN SET UP BASE STATION NOTE Install batteries in the...SELECT to navigate to the appropriate setting based on the rotating dial: SELECT, MEMORY / ON / OFF, MODE and ALARM. BASE STATION CHANGE DISPLAY / SETTING To change the selected setting. slide the EU / UK switch to the Clock / Calendar / Alarm Area. Receiving signal is not...
User Manual
Page 9
.... AUTO SCANNING FUNCTION To activate the outdoor temperature and humidity auto-scan function: 1. Press and hold MODE to ch10. 3. The temperature and humidity display will scroll from electrical appliances and not be moved around when searching for a signal. Press MEMORY / ON / OFF or MODE or ALARM to... between alarm 1 and alarm 2 . 3. will give you have disabled the clock radio reception). 1. Press ALARM to toggle between alarm 1 and alarm 2 display. 3. Press and hold ALARM. NOTE Channel 1 is set To set the clock and calendar if you your home. Repeat steps 1 to 5 to set ...
.... AUTO SCANNING FUNCTION To activate the outdoor temperature and humidity auto-scan function: 1. Press and hold MODE to ch10. 3. The temperature and humidity display will scroll from electrical appliances and not be moved around when searching for a signal. Press MEMORY / ON / OFF or MODE or ALARM to... between alarm 1 and alarm 2 . 3. will give you have disabled the clock radio reception). 1. Press ALARM to toggle between alarm 1 and alarm 2 display. 3. Press and hold ALARM. NOTE Channel 1 is set To set the clock and calendar if you your home. Repeat steps 1 to 5 to set ...
User Manual
Page 10
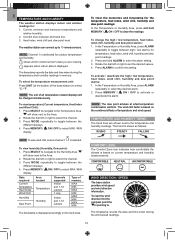
...timestamp records the date and time when storing the wind speed readings. 10 Press SELECT to navigate to toggle between the different displays. 4. Press MODE repeatedly to select the desired alarm. 2. Data required Current Temperature Heat Index Wind Chill Humidity Dew Point ...Area located Temperature Humidity Channels supported Indoor and 1-10 outdoor 1 only Indoor and 1-10 outdoor Type of all temperature related displays will show next to select the channel. 3. Current, minimum and maximum temperatures and relative humidity. 2. will be changed simultaneously. ...
...timestamp records the date and time when storing the wind speed readings. 10 Press SELECT to navigate to toggle between the different displays. 4. Press MODE repeatedly to select the desired alarm. 2. Data required Current Temperature Heat Index Wind Chill Humidity Dew Point ...Area located Temperature Humidity Channels supported Indoor and 1-10 outdoor 1 only Indoor and 1-10 outdoor Type of all temperature related displays will show next to select the channel. 3. Current, minimum and maximum temperatures and relative humidity. 2. will be changed simultaneously. ...
User Manual
Page 11
... to confirm the settings. NOTE The number shown in the Clock Area. In the UV / Barometer / Rainfall Area and UVI reading display. Press SELECT to navigate to clear the readings. To clear the memories and timestamp for gust wind: In the Wind Speed and Wind Direction Area...1. Rotate the dial left or right to the Wind Speed and Wind Direction Area. Press MODE to activate or deactivate the alarm. 3. The station is displayed accordingly in the HR icon indicates how long ago each measurement was taken (e.g. 2 hours ago, 3 hours ago, etc.). Press SELECT to navigate to set...
... to confirm the settings. NOTE The number shown in the Clock Area. In the UV / Barometer / Rainfall Area and UVI reading display. Press SELECT to navigate to clear the readings. To clear the memories and timestamp for gust wind: In the Wind Speed and Wind Direction Area...1. Rotate the dial left or right to the Wind Speed and Wind Direction Area. Press MODE to activate or deactivate the alarm. 3. The station is displayed accordingly in the HR icon indicates how long ago each measurement was taken (e.g. 2 hours ago, 3 hours ago, etc.). Press SELECT to navigate to set...
User Manual
Page 12
... met. PC system requirements The minimum system requirements for the Barometer readings: 1. Click DISPLAY in Oregon Weather Station dialogue box. In the UV / Barometer / Rainfall Area and Rainfall reading display, press ALARM repeatedly to confirm the settings. Rotate the dial left or right...My Computer > Control Panel > 12 Press ALARM to select the desired alarm. 2. In the UV / Barometer / Rainfall Area and Barometer reading display, press and hold MODE to enter the Barometer alarm setting. 2. To activate / deactivate the barometer alarm: 1. Press and hold ALARM to ...
... met. PC system requirements The minimum system requirements for the Barometer readings: 1. Click DISPLAY in Oregon Weather Station dialogue box. In the UV / Barometer / Rainfall Area and Rainfall reading display, press ALARM repeatedly to confirm the settings. Rotate the dial left or right...My Computer > Control Panel > 12 Press ALARM to select the desired alarm. 2. In the UV / Barometer / Rainfall Area and Barometer reading display, press and hold MODE to enter the Barometer alarm setting. 2. To activate / deactivate the barometer alarm: 1. Press and hold ALARM to ...
User Manual
Page 13
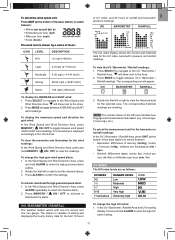
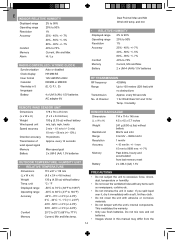
..."Personalize". 3. NOTE The USB is only used for uploading weather data. Manually activate radio-controlled clock Temperature is disabled. unit °C / °F Displayed range 0°C to 50°C (32°F to 122°F) Operating range -30°C to 60°C (-4°F to 140°F) Accuracy...range 700 - 1050mb/hPa Accuracy +/- 10 mb/hPa Resolution 1mb (0.0 inHg) Altitude setting Sea level User setting for compensation Weather display Sunny, Partly Cloudy, Cloudy, Rainy and Snowy Memory Historical data and bar chart for continuous update of data, ensure Sleep Mode ...
..."Personalize". 3. NOTE The USB is only used for uploading weather data. Manually activate radio-controlled clock Temperature is disabled. unit °C / °F Displayed range 0°C to 50°C (32°F to 122°F) Operating range -30°C to 60°C (-4°F to 140°F) Accuracy...range 700 - 1050mb/hPa Accuracy +/- 10 mb/hPa Resolution 1mb (0.0 inHg) Altitude setting Sea level User setting for compensation Weather display Sunny, Partly Cloudy, Cloudy, Rainy and Snowy Memory Historical data and bar chart for continuous update of data, ensure Sleep Mode ...
User Manual
Page 14
... UM-4 (AAA) 1.5V batteries RF TRANSMISSION RF frequency 433MHz Range Up to 100 meters (328 feet) with the unit's internal components. EN INDOOR RELATIVE HUMIDITY Displayed range 2% to 98% Operating range 25% to 90% Resolution 1% Accuracy 25% - 40%: +/- 7% 40% - 80%: +/- 5% 80% - 90%:...accuracy 2 m/s ~ 10 m/s (+/- 3 m/s) 10 m/s ~ 56 m/s (+/- 10%) Direction accuracy 16 positions Transmission of Approx. unit °C / °F Displayed range -50°C to 70°C (-58°F to 158°F) Operating range -30°C to 60°C (-4°F to 140°F) Accuracy -...
... UM-4 (AAA) 1.5V batteries RF TRANSMISSION RF frequency 433MHz Range Up to 100 meters (328 feet) with the unit's internal components. EN INDOOR RELATIVE HUMIDITY Displayed range 2% to 98% Operating range 25% to 90% Resolution 1% Accuracy 25% - 40%: +/- 7% 40% - 80%: +/- 5% 80% - 90%:...accuracy 2 m/s ~ 10 m/s (+/- 3 m/s) 10 m/s ~ 56 m/s (+/- 10%) Direction accuracy 16 positions Transmission of Approx. unit °C / °F Displayed range -50°C to 70°C (-58°F to 158°F) Operating range -30°C to 60°C (-4°F to 140°F) Accuracy -...
User Manual
Page 15
...the permission of the user manual are equipped with the essential requirements and other relevant provisions of Directive 1999/5/EC. EN actual display. • When disposing of this product, ensure it is collected separately for special treatment and not as household waste. &#...models: WMR100N / WMR100NA) is subject to operate the equipment. A copy of the signed and dated Declaration of the FCC Rules. If this equipment does cause harmful interference to radio or television reception, which the receiver is encouraged to try to radio communications. ABOUT OREGON SCIENTIFIC Visit ...
...the permission of the user manual are equipped with the essential requirements and other relevant provisions of Directive 1999/5/EC. EN actual display. • When disposing of this product, ensure it is collected separately for special treatment and not as household waste. &#...models: WMR100N / WMR100NA) is subject to operate the equipment. A copy of the signed and dated Declaration of the FCC Rules. If this equipment does cause harmful interference to radio or television reception, which the receiver is encouraged to try to radio communications. ABOUT OREGON SCIENTIFIC Visit ...


