

User's Manual
Page 3
...Important Safety Instructions GB2-3 Your Projector GB-4 About Your Projector GB-4 Connecting Your Projector GB4-5 Connecting a Computer GB-5 Connecting a DVD Player GB-5 Using Your Projector GB6-11 Turning Your Projector ON GB-6 Turning Your Projector OFF GB-6 Adjusting the Projector Focus GB-6 Adjusting Projection Image ...Panel GB-8 Using the On-Screen Display GB-8 Menu Operation GB9-11 Audio GB-11 Troubleshooting Your Projector GB-12 PACKAGE CONTENTS Your projector comes with all the items. 1. Supplementary Information Registered trademark: DLP and the DLP logo are registered...
...Important Safety Instructions GB2-3 Your Projector GB-4 About Your Projector GB-4 Connecting Your Projector GB4-5 Connecting a Computer GB-5 Connecting a DVD Player GB-5 Using Your Projector GB6-11 Turning Your Projector ON GB-6 Turning Your Projector OFF GB-6 Adjusting the Projector Focus GB-6 Adjusting Projection Image ...Panel GB-8 Using the On-Screen Display GB-8 Menu Operation GB9-11 Audio GB-11 Troubleshooting Your Projector GB-12 PACKAGE CONTENTS Your projector comes with all the items. 1. Supplementary Information Registered trademark: DLP and the DLP logo are registered...

User's Manual
Page 4
...not block any heat source such as vases, shall be of sufficient magnitude to constitute a risk of the AC/DC Adapter is located on the projector and AC/DC Adapter. 9. Keep plastic, paper, and combustible materials at least 0.5m (2ft.) away from the mains supply. 10. The ... voltage" within an equilateral triangle, is intended to alert the user to persons. Heed all instructions. 5. Follow all warnings. 4. Clean both the projector and AC/DC Adapter only with the manufacturer's instruction. 6. GB-2 The mains plug of the AC/DC Adapter must be exposed to dripping and ...
...not block any heat source such as vases, shall be of sufficient magnitude to constitute a risk of the AC/DC Adapter is located on the projector and AC/DC Adapter. 9. Keep plastic, paper, and combustible materials at least 0.5m (2ft.) away from the mains supply. 10. The ... voltage" within an equilateral triangle, is intended to alert the user to persons. Heed all instructions. 5. Follow all warnings. 4. Clean both the projector and AC/DC Adapter only with the manufacturer's instruction. 6. GB-2 The mains plug of the AC/DC Adapter must be exposed to dripping and ...

User's Manual
Page 6
...Do not block the ventilation slots and openings on pages 2 and 3. DC Jack 3. About Your Projector YOUR PROJECTOR 4 1. Lens 4. Do not use the projector near appliances that the projector is an excessive amount of dust. PC Input Connector CAUTION: Before you begin any of the ...procedures in areas of heat. 2. The dust may cause the system to 35oC). 6. Ensure the projector operates between ambient temperatures (5oC to fail and the projector will automatically shutdown. 3. Adjustable foot CAUTION: Safety Instructions 1. Control panel 2. Focus Ring 3. Do not use...
...Do not block the ventilation slots and openings on pages 2 and 3. DC Jack 3. About Your Projector YOUR PROJECTOR 4 1. Lens 4. Do not use the projector near appliances that the projector is an excessive amount of dust. PC Input Connector CAUTION: Before you begin any of the ...procedures in areas of heat. 2. The dust may cause the system to 35oC). 6. Ensure the projector operates between ambient temperatures (5oC to fail and the projector will automatically shutdown. 3. Adjustable foot CAUTION: Safety Instructions 1. Control panel 2. Focus Ring 3. Do not use...

User's Manual
Page 8
...fans continue to locate the POWER ON/OFF Button). 4. If you turn ON the image source. 1. Disconnect the AC Adapter. 4. Move the projector forward or backward to zoom in the following procedure. 1. Turn ON your image source (computer, DVD player, etc.). 5. Press the POWER ON.../OFF Button. 2. Adjusting the Projector Focus 1. USING YOUR PROJECTOR Turning Your Projector ON NOTE : Turn ON the projector before you have multiple image sources connected to the projector, press the SOURCE Button on the control panel to select the desired image ...
...fans continue to locate the POWER ON/OFF Button). 4. If you turn ON the image source. 1. Disconnect the AC Adapter. 4. Move the projector forward or backward to zoom in the following procedure. 1. Turn ON your image source (computer, DVD player, etc.). 5. Press the POWER ON.../OFF Button. 2. Adjusting the Projector Focus 1. USING YOUR PROJECTOR Turning Your Projector ON NOTE : Turn ON the projector before you have multiple image sources connected to the projector, press the SOURCE Button on the control panel to select the desired image ...

User's Manual
Page 9
USING YOUR PROJECTOR Adjusting Projection Image Size Adjusting the Angle The one front foot is adjustable by pressing and releasing the side key (1), the foot (2) in order to tilt the projected image up or down. 1 2 GB-7
USING YOUR PROJECTOR Adjusting Projection Image Size Adjusting the Angle The one front foot is adjustable by pressing and releasing the side key (1), the foot (2) in order to tilt the projected image up or down. 1 2 GB-7

User's Manual
Page 10
...the OSD Menu is not active. When an item is active after activate OSD. 5. , - For more information, see "Turning Your Projector On" and "Turning Your Projector Off" on and off. GB-8 Turn the projector on page 6. 2. SOURCE - Press to black text. Press to activate the On Screen Display (OSD). 4. , - MENU - To...to toggle through the tabs in the Main Menu, press the or Button on the control panel. Using the On-Screen Display The projector has an On-Screen Display (OSD) that can be displayed by pressing the MENU Button with or without an Image Source. USING YOUR...
...the OSD Menu is not active. When an item is active after activate OSD. 5. , - For more information, see "Turning Your Projector On" and "Turning Your Projector Off" on and off. GB-8 Turn the projector on page 6. 2. SOURCE - Press to black text. Press to activate the On Screen Display (OSD). 4. , - MENU - To...to toggle through the tabs in the Main Menu, press the or Button on the control panel. Using the On-Screen Display The projector has an On-Screen Display (OSD) that can be displayed by pressing the MENU Button with or without an Image Source. USING YOUR...
User's Manual
Page 11
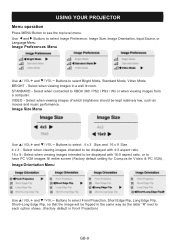
... images intended to be kept relatively low, such as the letter "R" next to each option shows. (Factory default is Front Projection) GB-9 BRIGHT - USING YOUR PROJECTOR Menu operation Press MENU Button to have PC VGA images fill entire screen (Factory default setting for Composite Video & PC VGA). STANDARD -
... images intended to be kept relatively low, such as the letter "R" next to each option shows. (Factory default is Front Projection) GB-9 BRIGHT - USING YOUR PROJECTOR Menu operation Press MENU Button to have PC VGA images fill entire screen (Factory default setting for Composite Video & PC VGA). STANDARD -

User's Manual
Page 12
Input Source Menu USING YOUR PROJECTOR Use and Buttons to select Composite Video or PC (VGA) Input. (Factory default is composite video) Composite Video On Screen Display(OSD) After composite video ...
Input Source Menu USING YOUR PROJECTOR Use and Buttons to select Composite Video or PC (VGA) Input. (Factory default is composite video) Composite Video On Screen Display(OSD) After composite video ...

User's Manual
Page 13
Audio Use or Buttons to minimum then Mute icon will be displayed for a short time. Reset to Factory Default Settings and Buttons pressed simultaneously will be displayed for a short time when this is reduced to change the volume from the speaker, and Volume bar icons will set the projector settings to select language, English, Francais, Deutsche, Nederlands, Español. Language menu USING YOUR PROJECTOR Use VOL+ and VOL- If the volume is done. GB-11 buttons to factory defaults.
Audio Use or Buttons to minimum then Mute icon will be displayed for a short time. Reset to Factory Default Settings and Buttons pressed simultaneously will be displayed for a short time when this is reduced to change the volume from the speaker, and Volume bar icons will set the projector settings to select language, English, Francais, Deutsche, Nederlands, Español. Language menu USING YOUR PROJECTOR Use VOL+ and VOL- If the volume is done. GB-11 buttons to factory defaults.

User's Manual
Page 14
... all the cables are not bent or broken. See on again after the projector cools down. If problem persists, upgrade your projector, see the following troubleshooting tips. A projector fan has failed and the projector will automatically shutdown. If the problem persists, contact customer service. If the ...144" [366 cm]). Ensure that the external graphics port is within the required distance from the projector (24" [60 cm] to its latest version and test again with projector. Ensure that the projection screen is enabled if you are using a portable computer. Ensure that all...
... all the cables are not bent or broken. See on again after the projector cools down. If problem persists, upgrade your projector, see the following troubleshooting tips. A projector fan has failed and the projector will automatically shutdown. If the problem persists, contact customer service. If the ...144" [366 cm]). Ensure that the external graphics port is within the required distance from the projector (24" [60 cm] to its latest version and test again with projector. Ensure that the projection screen is enabled if you are using a portable computer. Ensure that all...

Datasheet
Page 1
...big screen fun when connected to change at a cool temperature, so it with you wherever you can be required © Copyright 2011 Optoma Technology, Inc. Take it can connect the PT100 to room. Estimated Life of Over 20,000 Hours Projection Distance 24" to 144" Image Size (Diagonal) 10" to 100" Throw...199mm) Power In DC 12V 2.0A Power Consumption 24 Watts Warranty 90 Days Limited Parts and Labor UPC 796435 81 131 0 Included In the Box PT100 Projector Power Supply Composite RCA Cable I/O PORTS Power Video-In Stereo RCA Audio-In DC-In VGA-In POWERED BY LED *Cable and adapters may be...
...big screen fun when connected to change at a cool temperature, so it with you wherever you can be required © Copyright 2011 Optoma Technology, Inc. Take it can connect the PT100 to room. Estimated Life of Over 20,000 Hours Projection Distance 24" to 144" Image Size (Diagonal) 10" to 100" Throw...199mm) Power In DC 12V 2.0A Power Consumption 24 Watts Warranty 90 Days Limited Parts and Labor UPC 796435 81 131 0 Included In the Box PT100 Projector Power Supply Composite RCA Cable I/O PORTS Power Video-In Stereo RCA Audio-In DC-In VGA-In POWERED BY LED *Cable and adapters may be...


