User Manual
Page 1
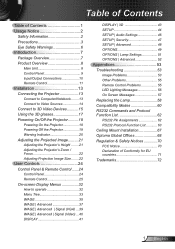
... 39 IMAGE | Advanced | Signal (Video).... 40 DISPLAY 41 DISPLAY | 3D 43 SETUP 44 SETUP | Audio Settings 46 SETUP | Security 47 SETUP | Advanced 48 OPTIONS 49 OPTIONS | Lamp Settings 51 OPTIONS | Advanced 52 Appendices 53 Troubleshooting 53 Image Problems 53 Other Problems 55 Remote Control Problems 55 LED Lighting... and Protocol Function List 62 RS232 Pin Assignments 62 RS232 Protocol Function List 63 Ceiling Mount Installation 67 Optoma Global Offices 68 Regulation & Safety Notices 70 FCC Notice 70 Declaration of Conformity for EU countries 71 Trademarks 72 1 English
... 39 IMAGE | Advanced | Signal (Video).... 40 DISPLAY 41 DISPLAY | 3D 43 SETUP 44 SETUP | Audio Settings 46 SETUP | Security 47 SETUP | Advanced 48 OPTIONS 49 OPTIONS | Lamp Settings 51 OPTIONS | Advanced 52 Appendices 53 Troubleshooting 53 Image Problems 53 Other Problems 55 Remote Control Problems 55 LED Lighting... and Protocol Function List 62 RS232 Pin Assignments 62 RS232 Protocol Function List 63 Ceiling Mount Installation 67 Optoma Global Offices 68 Regulation & Safety Notices 70 FCC Notice 70 Declaration of Conformity for EU countries 71 Trademarks 72 1 English
User Manual
Page 3
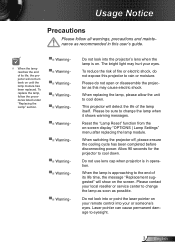
... its life time, the message "Replacement suggested" will detect the life of its life, the projector will not turn back on -screen display "OPTIONS | Lamp Settings" menu after replacing the lamp module. When the lamp is in this projector to change the lamp when it shows warning messages. Usage Notice Precautions...
... its life time, the message "Replacement suggested" will detect the life of its life, the projector will not turn back on -screen display "OPTIONS | Lamp Settings" menu after replacing the lamp module. When the lamp is in this projector to change the lamp when it shows warning messages. Usage Notice Precautions...
User Manual
Page 14
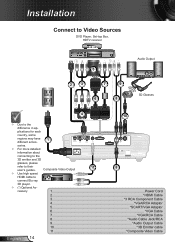
... Cable 8 Audio Cable Jack/RCA 9 Audio Output Cable 10 3D Emitter cable 11 Composite Video Cable English 14 Installation Connect to Video Sources DVD Player, Set-top Box, HDTV receiver 5 2 3 7 9 6 8 Audio Output 3D Glasses 4 10 ™™ Due to connect Blu-ray 3D player. ™™ (*) Optional Ac- Composite Video Output...
... Cable 8 Audio Cable Jack/RCA 9 Audio Output Cable 10 3D Emitter cable 11 Composite Video Cable English 14 Installation Connect to Video Sources DVD Player, Set-top Box, HDTV receiver 5 2 3 7 9 6 8 Audio Output 3D Glasses 4 10 ™™ Due to connect Blu-ray 3D player. ™™ (*) Optional Ac- Composite Video Output...
User Manual
Page 15
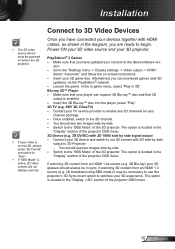
... have connected your 3D device and switch to out 3D content with HDMI cables, as shown in 3D". yy Once enabled, switch to the "Settings menu -> Display settings -> Video output -> HDMI". yy Switch to "Auto". ™™ If "SBS Mode" is enabled. NOTE ™™ If input video is normal 2D, please...
... have connected your 3D device and switch to out 3D content with HDMI cables, as shown in 3D". yy Once enabled, switch to the "Settings menu -> Display settings -> Video output -> HDMI". yy Switch to "Auto". ™™ If "SBS Mode" is enabled. NOTE ™™ If input video is normal 2D, please...
User Manual
Page 17
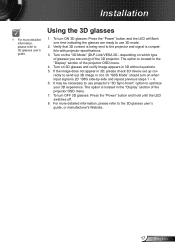
... does not appear in 3D without eyestrain. 5. Or "SBS Mode" should turn on 3D glasses and verify image appears in 3D, please check 3D device set up cor- The option is compatible with projector specifications. 3. The option is 2D 1080i side-by-side and repeat previous steps 1 ~ 4. 6. Installation NOTE ™™...
... does not appear in 3D without eyestrain. 5. Or "SBS Mode" should turn on 3D glasses and verify image appears in 3D, please check 3D device set up cor- The option is compatible with projector specifications. 3. The option is 2D 1080i side-by-side and repeat previous steps 1 ~ 4. 6. Installation NOTE ™™...
User Manual
Page 18
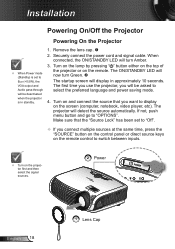
Installation Powering On/Off the Projector Powering On the Projector ™™ When Power mode (Standby) is set to Eco (
Installation Powering On/Off the Projector Powering On the Projector ™™ When Power mode (Standby) is set to Eco (
User Manual
Page 25
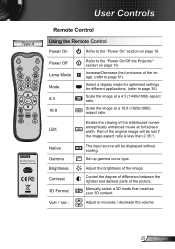
... be displayed without scaling. Manually select a 3D mode that matches your 3D content. Scale the image at a 4:3 (1440x1080) aspect ratio. Set up gamma curve type. LBX Enable the viewing of the picture. Control the degree of difference between the lightest and darkest parts of the letterboxed...is less than 2.35:1. Vol+ / Vol - Increase/Decrease the luminance of the image. (refer to page 51) Select a display mode for optimised settings for different applications. (refer to the "Power On/Off the Projector" section on page 18. Power Off Lamp Mode Mode 4:3 16:9 Refer to ...
... be displayed without scaling. Manually select a 3D mode that matches your 3D content. Scale the image at a 4:3 (1440x1080) aspect ratio. Set up gamma curve type. LBX Enable the viewing of the picture. Control the degree of difference between the lightest and darkest parts of the letterboxed...is less than 2.35:1. Vol+ / Vol - Increase/Decrease the luminance of the image. (refer to page 51) Select a display mode for optimised settings for different applications. (refer to the "Power On/Off the Projector" section on page 18. Power Off Lamp Mode Mode 4:3 16:9 Refer to ...
User Manual
Page 32
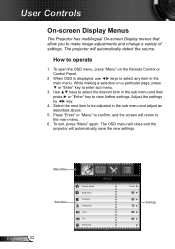
...to operate 1. To open the OSD menu, press "Menu" on a particular page, press ▼ or "Enter" key to the main menu. 6. Adjust the settings by ◄► key. 4. To exit, press "Menu" again. English 32 Main Menu Sub Menu Display Mode Brightness Contrast Sharpness Color Tint Advanced IMAGE Photo... "Menu" to select any item in the sub menu and then press ► or "Enter" key to make image adjustments and change a variety of settings. While making a selection on the Remote Control or Control Panel. 2 When OSD is displayed, use ◄► keys to confirm, and the screen ...
...to operate 1. To open the OSD menu, press "Menu" on a particular page, press ▼ or "Enter" key to the main menu. 6. Adjust the settings by ◄► key. 4. To exit, press "Menu" again. English 32 Main Menu Sub Menu Display Mode Brightness Contrast Sharpness Color Tint Advanced IMAGE Photo... "Menu" to select any item in the sub menu and then press ► or "Enter" key to make image adjustments and change a variety of settings. While making a selection on the Remote Control or Control Panel. 2 When OSD is displayed, use ◄► keys to confirm, and the screen ...
User Manual
Page 33
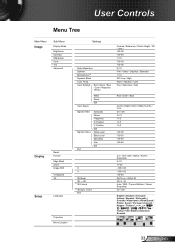
... / Polski / Suomi Magyar / ýeština 0 Türkçe / ViӋt / Bahasa Indonesia / Română HD25e OSD Menu Tree.xls 33 English User Controls Menu Tree Main Menu Image Sub Menu Display Mode Brightness Contrast Sharpness #1 Color #1 Tint Advanced Display... Reset Format Edge Mask Zoom Image Shift V Keystone 3D Setup Language Projection Menu Location Settings Noise Reduction Gamma BrilliantColor™ Dynamic Black Color Temp. Color Settings Red / Green / Blue / Cyan / Magenta / Yellow / Color Space White Reset Exit Signal...
... / Polski / Suomi Magyar / ýeština 0 Türkçe / ViӋt / Bahasa Indonesia / Română HD25e OSD Menu Tree.xls 33 English User Controls Menu Tree Main Menu Image Sub Menu Display Mode Brightness Contrast Sharpness #1 Color #1 Tint Advanced Display... Reset Format Edge Mask Zoom Image Shift V Keystone 3D Setup Language Projection Menu Location Settings Noise Reduction Gamma BrilliantColor™ Dynamic Black Color Temp. Color Settings Red / Green / Blue / Cyan / Magenta / Yellow / Color Space White Reset Exit Signal...
User Manual
Page 34
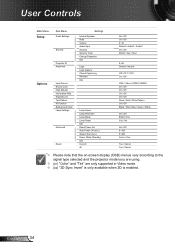
English 34 HD25e OSD Menu Tree.xls User Controls Main Menu Setup Options Sub Menu Audio Settings Security Projector ID Advanced Input Source Source Lock High Altitude Information Hide Keypad Lock Test Pattern IR Function Background Color Lamp Settings Advanced Reset Settings Internal Speaker Mute Volume Audio Input Security Security Timer Change Password Exit Logo...
English 34 HD25e OSD Menu Tree.xls User Controls Main Menu Setup Options Sub Menu Audio Settings Security Projector ID Advanced Input Source Source Lock High Altitude Information Hide Keypad Lock Test Pattern IR Function Background Color Lamp Settings Advanced Reset Settings Internal Speaker Mute Volume Audio Input Security Security Timer Change Password Exit Logo...
User Manual
Page 35
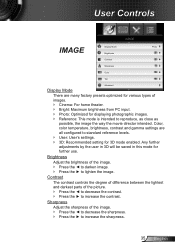
... ◄ to decrease the contrast. `` Press the ► to increase the contrast. Color, color temperature, brightness, contrast and gamma settings are many factory presets optimized for various types of the image. `` Press the ◄ to decrease the sharpness. `` Press the ...Mode Brightness Photo Contrast Sharpness Color Tint Advanced Display Mode There are all configured to standard reference levels. `` User: User's settings. `` 3D: Recommended setting for further use. Sharpness Adjust the sharpness of images. `` Cinema: For home theater. `` Bright: Maximum brightness from PC...
... ◄ to decrease the contrast. `` Press the ► to increase the contrast. Color, color temperature, brightness, contrast and gamma settings are many factory presets optimized for various types of the image. `` Press the ◄ to decrease the sharpness. `` Press the ...Mode Brightness Photo Contrast Sharpness Color Tint Advanced Display Mode There are all configured to standard reference levels. `` User: User's settings. `` 3D: Recommended setting for further use. Sharpness Adjust the sharpness of images. `` Cinema: For home theater. `` Bright: Maximum brightness from PC...

User Manual
Page 37
...for home theater. `` Video: for video or TV source. `` Standard: for standardized setting. `` Graphics: for white. 37 English Color Temp If set to cold temperature, the image looks more blue. (cold image) If set to "10". (0: Off) Gamma This allows you prefer a stronger enhanced image, adjust... source. Dynamic Black Dynamic Black enables the projector to automatically optimize the the brightness of visible noise interlaced signals. Medium Color Settings Noise Reduction The Noise Reduction reduces the amount of the display during dark/light movie scenes to "10". The range is ...
...for home theater. `` Video: for video or TV source. `` Standard: for standardized setting. `` Graphics: for white. 37 English Color Temp If set to cold temperature, the image looks more blue. (cold image) If set to "10". (0: Off) Gamma This allows you prefer a stronger enhanced image, adjust... source. Dynamic Black Dynamic Black enables the projector to automatically optimize the the brightness of visible noise interlaced signals. Medium Color Settings Noise Reduction The Noise Reduction reduces the amount of the display during dark/light movie scenes to "10". The range is ...
User Manual
Page 38
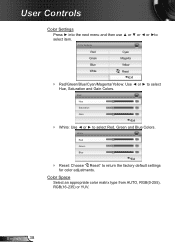
Red Hue Saturation Gain Exit `` White: Use ◄ or ► to select Hue, Saturation and Gain Colors. Color Settings Red Cyan Green Magenta Blue Yellow White Reset Exit `` Red/Green/Blue/Cyan/Magenta/Yellow: Use ◄ or ► to select Red, Green and Blue ...: Choose " Reset" to select item. Color Space Select an appropriate color matrix type from AUTO, RGB(0-255), RGB(16-235) or YUV. User Controls Color Settings Press ► into the next menu and then use ▲ or ▼ or ◄ or ►to return the factory default...
Red Hue Saturation Gain Exit `` White: Use ◄ or ► to select Hue, Saturation and Gain Colors. Color Settings Red Cyan Green Magenta Blue Yellow White Reset Exit `` Red/Green/Blue/Cyan/Magenta/Yellow: Use ◄ or ► to select Red, Green and Blue ...: Choose " Reset" to select item. Color Space Select an appropriate color matrix type from AUTO, RGB(0-255), RGB(16-235) or YUV. User Controls Color Settings Press ► into the next menu and then use ▲ or ▼ or ◄ or ►to return the factory default...

User Manual
Page 39
Frequency Change the display data frequency to manually tune and save the settings. Position ™™ "Signal" is disabled, the Frequency and Phase items will appear for user to match the frequency of the display with the graphic ...
Frequency Change the display data frequency to manually tune and save the settings. Position ™™ "Signal" is disabled, the Frequency and Phase items will appear for user to match the frequency of the display with the graphic ...

User Manual
Page 42
... ▲ ▼ to remove video encoding noise on the projection screen. This format shows original image without scaling. User Controls ™™ Each I/O has different setting of video source.
... ▲ ▼ to remove video encoding noise on the projection screen. This format shows original image without scaling. User Controls ™™ Each I/O has different setting of video source.
User Manual
Page 43
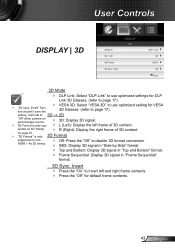
..." function wouldn't save the `` VESA 3D: Select "VESA 3D" to use optimized settings for DLP Link 3D Glasses. (refer to 3D -> 2D "Off" when powers on and changes source. ™...: Display 3D signal in "Frame Sequential" format. 3D Sync. Invert `` Press the "On" to invert left frame of 3D content. It will set to page 17). ™™ "3D sync. on 3D Timing `` R (Right): Display the right frame of 3D content. User Controls DISPLAY ... 3D Sync. Link 3D AUTO Off Exit 3D Mode `` DLP-Link: Select "DLP-Link" to use optimized setting for default frame contents. 43 English
..." function wouldn't save the `` VESA 3D: Select "VESA 3D" to use optimized settings for DLP Link 3D Glasses. (refer to 3D -> 2D "Off" when powers on and changes source. ™...: Display 3D signal in "Frame Sequential" format. 3D Sync. Invert `` Press the "On" to invert left frame of 3D content. It will set to page 17). ™™ "3D sync. on 3D Timing `` R (Right): Display the right frame of 3D content. User Controls DISPLAY ... 3D Sync. Link 3D AUTO Off Exit 3D Mode `` DLP-Link: Select "DLP-Link" to use optimized setting for default frame contents. 43 English
User Manual
Page 44
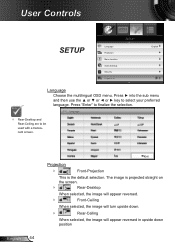
... then use the ▲ or ▼ or ◄ or ► key to be used with a translucent screen. User Controls SETUP Language Projection Menu Location Audio Settings Security Projector ID SETUP English Language Choose the multilingual OSD menu. The image is the default selection. Press "Enter" to finalize the selection.
... then use the ▲ or ▼ or ◄ or ► key to be used with a translucent screen. User Controls SETUP Language Projection Menu Location Audio Settings Security Projector ID SETUP English Language Choose the multilingual OSD menu. The image is the default selection. Press "Enter" to finalize the selection.
User Manual
Page 45
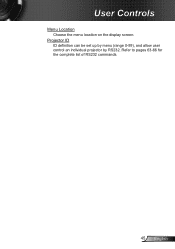
User Controls Menu Location Choose the menu location on the display screen. Refer to pages 63-66 for the complete list of RS232 commands. 45 English Projector ID ID definition can be set up by menu (range 0-99), and allow user control an individual projector by RS232.
User Controls Menu Location Choose the menu location on the display screen. Refer to pages 63-66 for the complete list of RS232 commands. 45 English Projector ID ID definition can be set up by menu (range 0-99), and allow user control an individual projector by RS232.
User Manual
Page 46
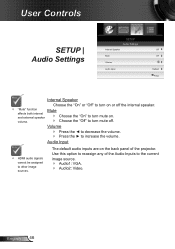
User Controls SETUP | Audio Settings SETUP Audio Settings Internal Speaker Mute Volume Audio Input Off Off Default Exit Internal Speaker Choose the "On" or "Off" to turn mute on the back panel of ...
User Controls SETUP | Audio Settings SETUP Audio Settings Internal Speaker Mute Volume Audio Input Off Off Default Exit Internal Speaker Choose the "On" or "Off" to turn mute on the back panel of ...
User Manual
Page 47
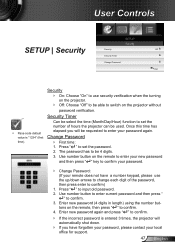
... `` Change Password: (If your remote does not have forgotten your password, please contact your local office for support. 47 English Press " " to set the number of the password, then press enter to be select the time (Month/Day/Hour) function to confirm. 3. Press " " to input... old password. 2. Incorrect security code. Use number button to enter current password and then press " " to set the password. 2. Change Password `` First time: 1. Use number button on the remote, then press " " to confirm. 4. Once this time has elapsed ...
... `` Change Password: (If your remote does not have forgotten your password, please contact your local office for support. 47 English Press " " to set the number of the password, then press enter to be select the time (Month/Day/Hour) function to confirm. 3. Press " " to input... old password. 2. Incorrect security code. Use number button to enter current password and then press " " to set the password. 2. Change Password `` First time: 1. Use number button on the remote, then press " " to confirm. 4. Once this time has elapsed ...


