
User's Manual
Page 1
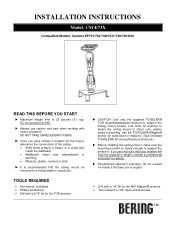
...; Phillips screwdriver • Two crescent or 3/4" open-end wrenches. • Drill with heavy projectors. X Recommend maximum extension; INSTALLATION INSTRUCTIONS Model: CM-E73X Compatible Models: Optoma EP731/732/732H/737/738/739/H30 READ THIS BEFORE YOU START X Maximum weight limit is ...174; Anchoring Solutions brochure.) X Before installing the ceiling mount, make sure the mounting location is recommended that your location will hold the projector's weight, contact a professional contractor for the mount, determine the construction of the ceiling. • Solid wood surface: a beam,...
...; Phillips screwdriver • Two crescent or 3/4" open-end wrenches. • Drill with heavy projectors. X Recommend maximum extension; INSTALLATION INSTRUCTIONS Model: CM-E73X Compatible Models: Optoma EP731/732/732H/737/738/739/H30 READ THIS BEFORE YOU START X Maximum weight limit is ...174; Anchoring Solutions brochure.) X Before installing the ceiling mount, make sure the mounting location is recommended that your location will hold the projector's weight, contact a professional contractor for the mount, determine the construction of the ceiling. • Solid wood surface: a beam,...
User's Manual
Page 2
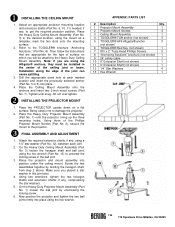
...1 11 9" Extension Shaft (not shown) 1 12 1/4" Star Washers 4 13 Hex Wrench 1 T.M. 715 Sycamore Drive Milpitas, CA 95035 Select an appropriate projector mounting location and extension shafts (Part No. 9, 10, 11) needed, if any , compressing the star washers. 5. mark the two slots onto the ... AND ADJUSTMENT 1. Using two wrenches, tighten the two hexagon shafts and extension shafts, if any , to the projector. Y INSTALLING THE PROJECTOR MOUNT 1. Place the PROJECTOR upside down on which you placed a star washer in the ball joint. 3. Do not over tighten. Place ...
...1 11 9" Extension Shaft (not shown) 1 12 1/4" Star Washers 4 13 Hex Wrench 1 T.M. 715 Sycamore Drive Milpitas, CA 95035 Select an appropriate projector mounting location and extension shafts (Part No. 9, 10, 11) needed, if any , compressing the star washers. 5. mark the two slots onto the ... AND ADJUSTMENT 1. Using two wrenches, tighten the two hexagon shafts and extension shafts, if any , to the projector. Y INSTALLING THE PROJECTOR MOUNT 1. Place the PROJECTOR upside down on which you placed a star washer in the ball joint. 3. Do not over tighten. Place ...
User's Manual
Page 1
... 12 Connecting the Projector 12 Connect to Computer/Notebook 12 Connect to Video Sources 13 Powering On/Off the Projector 14 Powering On the Projector 14 Powering Off the projector 15 Warning Indicator ...15 Adjusting the Projected Image 16 Adjusting the Projector's Height 16 Adjusting the Projector's Zoom /... 41 Troubleshooting 41 Image Problems 41 Intermission Problems 44 Projector Status Indication 44 Remote Control Problems 46 Replacing the Lamp 47 Compatibility Modes 49...
... 12 Connecting the Projector 12 Connect to Computer/Notebook 12 Connect to Video Sources 13 Powering On/Off the Projector 14 Powering On the Projector 14 Powering Off the projector 15 Warning Indicator ...15 Adjusting the Projected Image 16 Adjusting the Projector's Height 16 Adjusting the Projector's Zoom /... 41 Troubleshooting 41 Image Problems 41 Intermission Problems 44 Projector Status Indication 44 Remote Control Problems 46 Replacing the Lamp 47 Compatibility Modes 49...

User's Manual
Page 2
...the manufacturer's instructions : A. See projector enclosure for future reference. 3. Do not attempt to the presence of the Canadian Interference-Causing Equipment Regulations. Please call Optoma to rain or moisture. For example, do not expose the projector to be adjusted or repaired by ...the manufacturer. 7. Important Safety Instruction 1. Do not put the projector in the literature accompanying the appliance. ...
...the manufacturer's instructions : A. See projector enclosure for future reference. 3. Do not attempt to the presence of the Canadian Interference-Causing Equipment Regulations. Please call Optoma to rain or moisture. For example, do not expose the projector to be adjusted or repaired by ...the manufacturer. 7. Important Safety Instruction 1. Do not put the projector in the literature accompanying the appliance. ...
User's Manual
Page 3
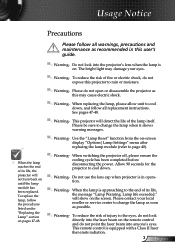
... this may damage your local reseller or service center to change the lamp as soon as recommended in operation. ▀■ Warning- This projector will detect the life of its life, the message "Lamp Warning: Lamp life exceeded." This remote control is approaching to the end of ... with a Class II laser that emits radiation. 3 English Please contact your eyes. ▀■ Warning- To reduce the risk of its life, the projector will show on the remote control and do not look into anyone's eyes. To reduce the risk of injury to rain or moisture. ▀■...
... this may damage your local reseller or service center to change the lamp as soon as recommended in operation. ▀■ Warning- This projector will detect the life of its life, the message "Lamp Warning: Lamp life exceeded." This remote control is approaching to the end of ... with a Class II laser that emits radiation. 3 English Please contact your eyes. ▀■ Warning- To reduce the risk of its life, the projector will show on the remote control and do not look into anyone's eyes. To reduce the risk of injury to rain or moisture. ▀■...

User's Manual
Page 5
...9600;■ In order to minimize the lamp power needed, use room blinds to stare at all times. ▀■ Minimize standing facing into the projector's beam of sight from the screen to the audience; Usage Notice Eye Safety Warnings ▀■ Avoid staring directly into the beam. The best way...to enter the beam. ▀■ Ensure that , when presenters look at the audience, they are located out of the line of light at the projector lamp. Keep your back to the beam as much as possible. ▀■ Using a stick or laser pointer is used in a classroom, adequately ...
...9600;■ In order to minimize the lamp power needed, use room blinds to stare at all times. ▀■ Minimize standing facing into the projector's beam of sight from the screen to the audience; Usage Notice Eye Safety Warnings ▀■ Avoid staring directly into the beam. The best way...to enter the beam. ▀■ Ensure that , when presenters look at the audience, they are located out of the line of light at the projector lamp. Keep your back to the beam as much as possible. ▀■ Using a stick or laser pointer is used in a classroom, adequately ...

User's Manual
Page 6
Introduction Product Features This product is a single chip 0.55" DLP® projector. Outstanding features include: Texas Instruments Single chip DLP® Technology Computer Compatibility: Apple Macintosh, iMac, and VESA Standards: UXGA, SXGA+, SXGA, WXGA, XGA, ...
Introduction Product Features This product is a single chip 0.55" DLP® projector. Outstanding features include: Texas Instruments Single chip DLP® Technology Computer Compatibility: Apple Macintosh, iMac, and VESA Standards: UXGA, SXGA+, SXGA, WXGA, XGA, ...
User's Manual
Page 7
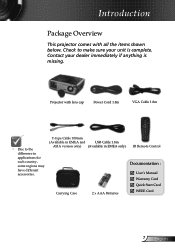
... Cable 1.8m ASIA version only) (Available in applications for each country, some regions may have different accessories. Contact your unit is missing. Projector with all the items shown below. Check to the difference in EMEA only) Carrying Case 2 x AAA Batteries IR Remote Control Documentation : ... User's Manual Warranty Card Quick Start Card WEEE Card 7 English Introduction Package Overview This projector comes with lens cap Power Cord 1.8m VGA Cable 1.8m Due to make sure your dealer immediately if anything is complete.
... Cable 1.8m ASIA version only) (Available in applications for each country, some regions may have different accessories. Contact your unit is missing. Projector with all the items shown below. Check to the difference in EMEA only) Carrying Case 2 x AAA Batteries IR Remote Control Documentation : ... User's Manual Warranty Card Quick Start Card WEEE Card 7 English Introduction Package Overview This projector comes with lens cap Power Cord 1.8m VGA Cable 1.8m Due to make sure your dealer immediately if anything is complete.
User's Manual
Page 12
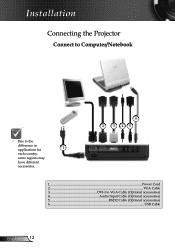
Installation Connecting the Projector Connect to Computer/Notebook Due to the difference in applications for 1 each country, some regions may have different accessories. 6 2 3 45 1...Power Cord 2...VGA Cable 3 DVI-I to VGA Cable (Optional accessories) 4 Audio Input Cable (Optional accessories) 5 RS232 Cable (Optional accessories) 6...USB Cable English 12
Installation Connecting the Projector Connect to Computer/Notebook Due to the difference in applications for 1 each country, some regions may have different accessories. 6 2 3 45 1...Power Cord 2...VGA Cable 3 DVI-I to VGA Cable (Optional accessories) 4 Audio Input Cable (Optional accessories) 5 RS232 Cable (Optional accessories) 6...USB Cable English 12
User's Manual
Page 14
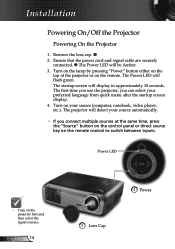
...; 2. Turn on the remote control to switch between inputs. Turn on the lamp by pressing "Power" button either on the top of the projector or on the projector first and then select the signal sources. English 14 2 Power 1 Lens Cap Power LED Turn on the remote. The startup screen... will flash green. The first time you use the projector, you connect multiple sources at the same time, press the "Source" button on the control panel or direct source key on your preferred language from...
...; 2. Turn on the remote control to switch between inputs. Turn on the lamp by pressing "Power" button either on the top of the projector or on the projector first and then select the signal sources. English 14 2 Power 1 Lens Cap Power LED Turn on the remote. The startup screen... will flash green. The first time you use the projector, you connect multiple sources at the same time, press the "Source" button on the control panel or direct source key on your preferred language from...

User's Manual
Page 15
...will show the timing countdown on again after 15 seconds. See pages 54-55. 15 English Press the "Power" button to turn the projector back on the projector immediately following a power off procedure. When the Power LED turn on , you press "Power" button second, the system will disappear ...-55. When the "TEMP" indicator lights red, it indicates the fan has failed. If the problem persists, you wish to restart the projector. 4. Press the "Power" button again to operate for about 10 seconds for cooling cycle. Once in standby mode, simply press "Power" button to...
...will show the timing countdown on again after 15 seconds. See pages 54-55. 15 English Press the "Power" button to turn the projector back on the projector immediately following a power off procedure. When the Power LED turn on , you press "Power" button second, the system will disappear ...-55. When the "TEMP" indicator lights red, it indicates the fan has failed. If the problem persists, you wish to restart the projector. 4. Press the "Power" button again to operate for about 10 seconds for cooling cycle. Once in standby mode, simply press "Power" button to...

User's Manual
Page 16
... the elevator button. 2. Lower the image, then release the button to lock the elevator foot into position. 3. Installation Adjusting the Projected Image Adjusting the Projector's Height The projector is equipped with elevator foot for adjusting the image height. Raise the image to the desired height angle , then release the button to...
... the elevator button. 2. Lower the image, then release the button to lock the elevator foot into position. 3. Installation Adjusting the Projected Image Adjusting the Projector's Height The projector is equipped with elevator foot for adjusting the image height. Raise the image to the desired height angle , then release the button to...

User's Manual
Page 17
... 3.9' (1.2m) 9.8' (3.0m) 16.4' (5.0m) 23.0' (7.0m) 29.5' (9.0m) 39.4' (12.0m) This graph is clear. Installation Adjusting the Projector's Zoom / Focus You may turn the zoom lever to 12.0 meters). The projector will focus at distances from 3.9 to 39.4 feet (1.2 to zoom in or out. To focus the image, rotate the...
... 3.9' (1.2m) 9.8' (3.0m) 16.4' (5.0m) 23.0' (7.0m) 29.5' (9.0m) 39.4' (12.0m) This graph is clear. Installation Adjusting the Projector's Zoom / Focus You may turn the zoom lever to 12.0 meters). The projector will focus at distances from 3.9 to 39.4 feet (1.2 to zoom in or out. To focus the image, rotate the...
User's Manual
Page 18
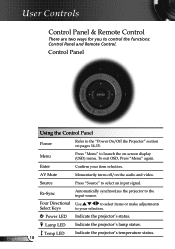
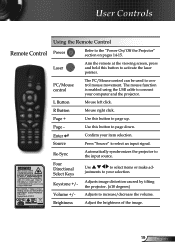
... on -screen display (OSD) menu. To exit OSD, Press "Menu" again. Power LED Indicate the projector's status. Temp LED Indicate the projector's temperature status. 18 Control Panel English Using the Control Panel Power Refer to launch the on pages 14-15... Select Keys to select an input signal. Source Press "Source" to your item selection. Lamp LED Indicate the projector's lamp status. Re-Sync Automatically synchronizes the projector to control the functions: Control Panel and Remote Control. Enter Confirm your selection. User Controls Control Panel & Remote...
... on -screen display (OSD) menu. To exit OSD, Press "Menu" again. Power LED Indicate the projector's status. Temp LED Indicate the projector's temperature status. 18 Control Panel English Using the Control Panel Power Refer to launch the on pages 14-15... Select Keys to select an input signal. Source Press "Source" to your item selection. Lamp LED Indicate the projector's lamp status. Re-Sync Automatically synchronizes the projector to control the functions: Control Panel and Remote Control. Enter Confirm your selection. User Controls Control Panel & Remote...
User's Manual
Page 19
... Control Power Refer to select an input signal. Press "Source" to the "Power On/Off the Projector" section on pages 14-15. Adjusts image distortion caused by tilting the projector. (±18 degrees) Volume +/- Brightness Adjust the brightness of the image. 19 English Four Directional... Select Keys Use to page up. Page + Use this button to increase/decrease the volume. Re-Sync Automatically synchronizes the projector to your selection. justments to the input source. The mouse function is enabled using the USB cable to connect your item selection....
... Control Power Refer to select an input signal. Press "Source" to the "Power On/Off the Projector" section on pages 14-15. Adjusts image distortion caused by tilting the projector. (±18 degrees) Volume +/- Brightness Adjust the brightness of the image. 19 English Four Directional... Select Keys Use to page up. Page + Use this button to increase/decrease the volume. Re-Sync Automatically synchronizes the projector to your selection. justments to the input source. The mouse function is enabled using the USB cable to connect your item selection....
User's Manual
Page 20
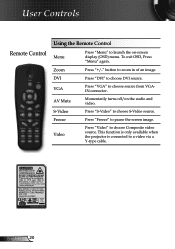
... to choose S-Video source. To exit OSD, Press "Menu" again. Freeze Press "Freeze" to a video via a Y-type cable. This function is only available when the projector is connected to pause the screen image.
... to choose S-Video source. To exit OSD, Press "Menu" again. Freeze Press "Freeze" to a video via a Y-type cable. This function is only available when the projector is connected to pause the screen image.
User's Manual
Page 21
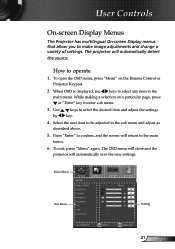
... page, press or "Enter" key to confirm, and the screen will automatically detect the source. Press "Enter" to enter sub menu. 3. The projector will return to select any item in the sub menu and adjust as described above. 5. Use by keys to operate 1. While making a selection on... the Remote Control or Projector Keypad. 2 When OSD is displayed, use keys to the main menu. 6. The OSD menu will close and the projector will automatically save the new settings. To exit, press "Menu" again. User Controls On...
... page, press or "Enter" key to confirm, and the screen will automatically detect the source. Press "Enter" to enter sub menu. 3. The projector will return to select any item in the sub menu and adjust as described above. 5. Use by keys to operate 1. While making a selection on... the Remote Control or Projector Keypad. 2 When OSD is displayed, use keys to the main menu. 6. The OSD menu will close and the projector will automatically save the new settings. To exit, press "Menu" again. User Controls On...
User's Manual
Page 27
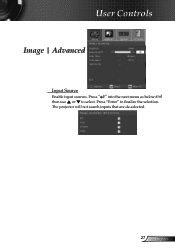
The projector will not search inputs that are de-selected. 27 English User Controls Image | Advanced Input Source Enable input sources. Press "Enter" to select. Press " " into the next menu as below and then use or to finalize the selection.
The projector will not search inputs that are de-selected. 27 English User Controls Image | Advanced Input Source Enable input sources. Press "Enter" to select. Press " " into the next menu as below and then use or to finalize the selection.
User's Manual
Page 28
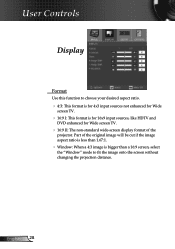
... a 4:3 image is bigger than a 16:9 screen, select the "Window" mode to fit the image onto the screen without changing the projection distance. Part of the projector. English 28
... a 4:3 image is bigger than a 16:9 screen, select the "Window" mode to fit the image onto the screen without changing the projection distance. Part of the projector. English 28
User's Manual
Page 32
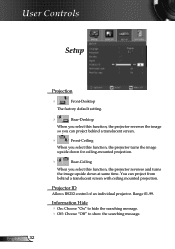
... the image upside down for ceiling-mounted projection. Rear-Ceiling When you select this function, the projector reverses the image so you select this function, the projector reverses and turns the image upside down at same time. English 32 Information Hide On: Choose "On" to hide the ...searching message. Off: Choose "Off" to show the searching message. Range 01-99. Projector ID Allows RS232 control of an individual projector. You can project behind a translucent screen with ceiling mounted projection.
... the image upside down for ceiling-mounted projection. Rear-Ceiling When you select this function, the projector reverses the image so you select this function, the projector reverses and turns the image upside down at same time. English 32 Information Hide On: Choose "On" to hide the ...searching message. Off: Choose "Off" to show the searching message. Range 01-99. Projector ID Allows RS232 control of an individual projector. You can project behind a translucent screen with ceiling mounted projection.


